
Popular categories
Looking for a yarn?


|
|||||||||||||||||||
Bardu Jacket |
|||||||||||||||||||
 |
 |
||||||||||||||||||
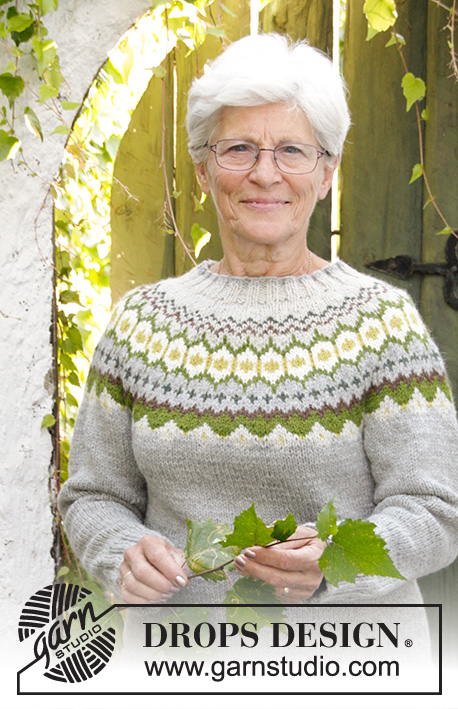
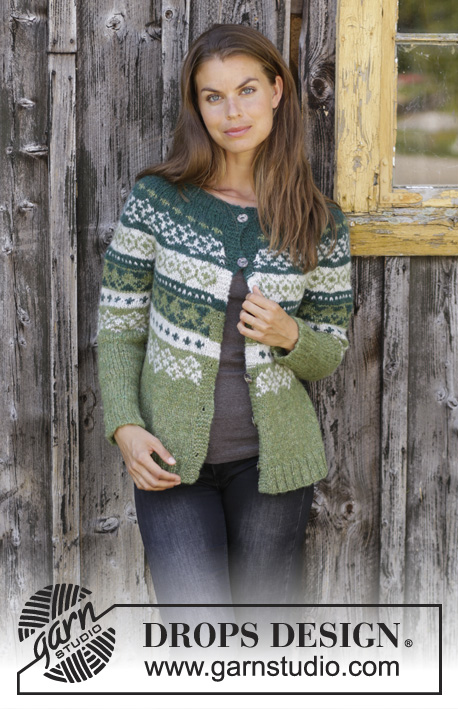
Knitted jacket with round yoke in DROPS Air. The piece is worked top down with Nordic pattern. Sizes S - XXXL.
DROPS 196-10 |
|||||||||||||||||||
|
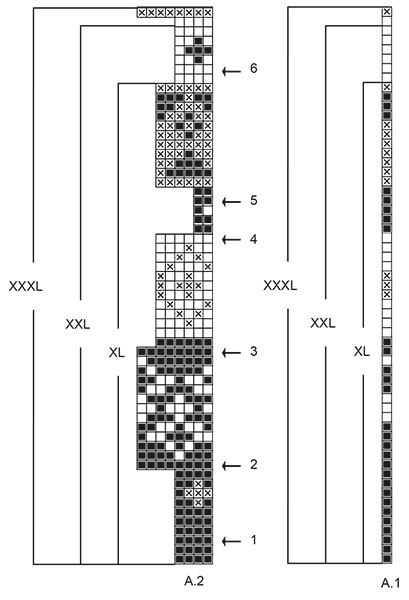
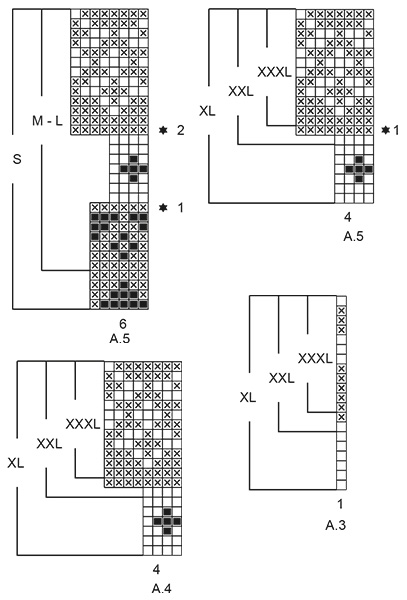
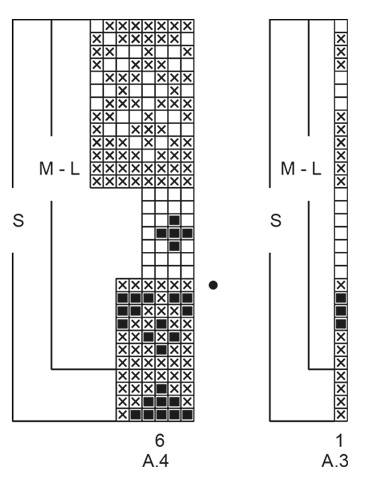
EXPLANATIONS FOR THE PATTERN: ------------------------------------------------------- RIDGE/GARTER STITCH (worked back and forth): 1 ridge = Knit 2 rows. PATTERN: See diagrams A.1 to A.5. Find your size in the diagrams. The whole pattern is worked in stocking stitch. KNITTING TIP-1: To avoid the knitting tension becoming tighter when working pattern it is important that the strands at the back of the piece are not tight. You can use a larger needle size when working pattern if this is a problem. The band stitches are worked in the background colour on rows worked with pattern. KNITTING TIP-2: It is important that the knitting tension is maintained also in height, or the yoke will be too short and the armholes too small! Check the tension as you go and if it is right in width but not in length, you can work extra rows with forest green after the 2nd and/or the 3rd rows with increases (row with arrow) to get the right length for your size. The number of extra rows must be made in even numbers (2, 4, 6 etc.) so that the increases on the remaining rows with arrow comes on a row from the right side. INCREASE TIP-1 (evenly spaced): All increases are made from the right side! To work out how to increase evenly, count the total number of stitches on the needle (e.g. 92 stitches) minus the bands (e.g.10 stitches) and divide the remaining stitches by the number of increases to be made (e.g. 23) = 3.5. In this example, increase by making 1 yarn over after alternately each 3rd and 4th stitch. On the next round (wrong side) purl the yarn overs twisted to avoid holes. INCREASE TIP-2 (for sides of body): Work until there are 2 stitches left before the marker thread, 1 yarn over, knit 4 (marker thread sits in the middle of these 4 stitches), 1 yarn over (= 2 stitches increased). On the next row purl the yarn overs twisted to avoid holes. DECREASE TIP-1 (evenly spaced): All decreases are made from the right side! To work out how to decrease evenly, count the total number of stitches on the needle (e.g. 54 stitches) and divide by the number of decreases to be made (e.g. 2) = 27. In this example, decrease by knitting each 26th and 27th stitch together. DECREASE TIP-2 (for sleeves): Decrease 1 stitch on each side of the marker thread as follows: Work until there are 3 stitches left before the marker thread, knit 2 together, knit 2 (marker thread sits in the middle of these 2 stitches), slip 1 stitch as if to knit, knit 1 and pass the slipped stitch over the knitted stitch (= 2 stitches decreased). BUTTONHOLE: Work buttonholes on right band (when the garment is worn). 1 buttonhole = Work from the right side until there are 3 stitches left on the row, make 1 yarn over, knit 2 together and knit 1. On the next row (wrong side) knit the yarn over to leave a hole. The first buttonhole is worked when the rib in the neck measures approx. 2½-3 cm. Then work the next 5-5-5-5-6-6 buttonholes with approx. 9-9-9½-9½-9-9 cm between each one. ------------------------------------------------------- START THE PIECE HERE: ------------------------------------------------------- JACKET - SHORT OVERVIEW OF THE PIECE: The piece is worked back and forth with circular needle from mid front and top down. The sleeves are worked in the round with double pointed needles/short circular needle, top down. JACKET: NECK: Cast on 92-96-100-108-112-116 stitches (including 5 band stitches in each side towards mid front) with circular needle size 4.5 mm and forest green. Purl 1 row (= wrong side). Now work rib as follows: 5 band stitches in GARTER STITCH – read description above (knit 2, purl 2) until there are 7 stitches left on the row, knit 2 and then 5 band stitches in garter stitch. Continue back and forth like this until the rib measures 4 cm – remember BUTTONHOLES – read description above, and adjust so that the last row of rib is worked from the wrong side. YOKE: Change to circular needle size 5.5 mm. Now work from the right side as follows: 5 band stitches in garter stitch, knit until there are 5 stitches left on the row at the same time as you increase 23-23-27-27-31-31 stitches evenly over these knitted stitches – read INCREASE TIP-1, 5 band stitches in garter stitch = 115-119-127-135-143-147 stitches. Purl 1 row, but the 5 band stitches in each side are worked in garter stitch. Now work pattern and increase stitches evenly on the rows marked with an arrow in the diagram: Work 5 band stitches in garter stitch, A.1 (find your size in the diagram) over the next stitch, work A.2 (find your size in the diagram) until there are 5 stitches left on the row and 5 band stitches in garter stitch. REMEMBER THE KNITTING TENSION! Read KNITTING TIP-1 and KNITTING TIP-2! ARROW-1: Increase 24-28-32-32-32-32 stitches evenly on row = 139-147-159-167-175-179 stitches. ARROW-2: Increase 32-32-36-36-36-40 stitches evenly on row = 171-179-195-203-211-219 stitches. ARROW-3: Increase 32-36-38-36-40-44 stitches evenly on row = 203-215-233-239-251-263 stitches. ARROW-4: Increase 24-30-30-30-30-36 stitches evenly on row = 227-245-263-269-281-299 stitches. ARROW-5: Increase 6-12-24-30-30-36 stitches evenly on row = 233-257-287-299-311-335 stitches. When the increases on the row marked with arrow-5 are finished, continue in the different sizes as follows: Sizes S, M, L and XL: Continue working until there is 1 row left in the diagrams. The piece should now measure 25-27-27-30 cm from the cast-on edge down. Sizes XXL and XXXL: Continue with pattern as before and increase as follows: ARROW-6: Increase 28-28 stitches evenly on row = 339-363 stitches. When the increases on the row marked with arrow-6 are finished continue working until there is 1 row left in the diagrams. The piece should now measure 33-34 cm from the cast-on edge down. Continue with the next section. ALL SIZES: Work the last row in the diagrams as follows from the right side: Work the first 37-40-44-47-53-57 stitches (= front piece), place the next 48-54-60-60-68-72 stitches on a thread for sleeve and cast on 6-6-6-8-8-8 new stitches on the needle (= in side under sleeve), work the next 63-69-79-85-97-105 stitches (= back piece), place the next 48-54-60-60-68-72 stitches on a thread for sleeve and cast on 6-6-6-8-8-8 new stitches on the needle (= in side under sleeve) and work the remaining 37-40-44-47-53-57 stitches (= front piece). THE PIECE IS NOW MEASURED FROM HERE! BODY: = 149-161-179-195-219-235 stitches. Now work pattern as follows (first row = wrong side): Work 5 band stitches in garter stitch, work A.4 (find your size in diagram) until there are 6 stitches left on the row, A.3 (find your size in diagram) over the next stitch and 5 band stitches in garter stitch. The pattern on the body should match the pattern on the yoke so that each repeat of A.4 is over each repeat of A.2! In sizes S and M increase 6-2 stitches evenly on the row marked with a black dot in A.4 (do not increase in sizes L, XL, XXL and XXXL) = 155-163-179-195-219-235 stitches. When A.3 and A.4 have been completed in height continue with moss green, stocking stitch and 5 band stitches in garter stitch in each side towards mid front. On the next row from the right side adjust the number of stitches to 152-164-180-196-218-238 stitches. Now insert 1 marker 42-45-48-52-57-63 stitches in from each side (= 68-74-84-92-104-112 stitches for the back piece between the 2 markers). On the next row from the right side increase 2 stitches in each side (= 4 stitches increased on the row) - read INCREASE TIP-2. Increase like this every 4-2-2-5-7-0 cm a total of 2-3-3-3-2-1 times = 160-176-192-208-226-242 stitches. When the piece measures 24-24-26-25-24-25 cm increase 24-28-28-32-36-36 stitches evenly inside the 5 band stitches in garter stitch in each side = 184-204-220-240-262-278 stitches. Change to circular needle size 4.5 mm. Work rib as follows: 5 band stitches in garter stitch, (knit 2, purl 2) until there are 7 stitches left on the row, knit 2 and 5 band stitches in garter stitch. When the rib measures 6 cm cast off with garter stitch over garter stitch, knit over knit and purl over purl; but to avoid the cast off edge being tight you can make 1 yarn over after each 4th stitch (yarn overs cast off as normal stitches). The piece measures approx. 58-60-62-64-66-68 cm from the shoulder down. SLEEVE: Place the 48-54-60-60-68-72 stitches from the thread on the one side of the piece on double pointed needles/short circular needle size 5.5 mm and knit up 1 stitch in each of the 6-6-6-8-8-8 new stitches cast on under the sleeve = 54-60-66-68-76-80 stitches. Insert a marker thread mid under sleeve, i.e. in the middle of the 6-6-6-8-8-8 stitches cast on under sleeve. Let marker thread follow in piece, it is used for the decrease under the sleeve. Continue in the round with A.5 (find your size in the diagram). NOTE (applies to sizes S, M and L): Because the yoke was finished in the middle of a pattern repeat, it is important that the pattern on the sleeve matches the pattern on the yoke so that each repeat of A.5 is over each repeat of A.2! Make sure that you start on the right stitch in the diagram so that the pattern fits around the whole sleeve. Now work as follows in the different sizes: Sizes S, M and L: On the first round with a star in A.5 decrease 2-4-2 stitches evenly – read DECREASE TIP-1 and on the second round with a star decrease 4-8-8 stitches evenly = 48-48-56 stitches. Sizes XL, XXL and XXXL: On the round with a star in A.5 decrease 4-4-0 stitches evenly – read DECREASE TIP-1 = 64-72-80 stitches. When A.5 has been completed, continue with stocking stitch and moss green. On the next round start to decrease under the sleeve - read DECREASE TIP-2. Decrease like this approx. every 2-2-1-1-1-1 cm a total of 7-7-10-13-16-19 times = 34-34-36-38-40-42 stitches. When the sleeve measures 34-32-33-30-27-27 cm from the division, knit 1 round where you increase 6-6-8-6-8-10 stitches evenly = 40-40-44-44-48-52 stitches. Change to double pointed needles size 4.5 mm. Work rib (knit 2 /purl 2) for 6 cm. Cast off with knit over knit and purl over purl. The sleeve measures approx. 40-38-39-36-33-33 cm. Work the other sleeve in the same way. ASSEMBLY: Sew buttons onto left band. |
|||||||||||||||||||
Diagram explanations |
|||||||||||||||||||
|
|||||||||||||||||||

|
|||||||||||||||||||
|
|||||||||||||||||||
|
|||||||||||||||||||
|
|||||||||||||||||||

|
|||||||||||||||||||
|
Have you made this or any other of our designs? Tag your pictures in social media with #dropsdesign so we can see them! Do you need help with this pattern?You'll find tutorial videos, a Comments/Questions area and more by visiting the pattern on garnstudio.com. © 1982-2024 DROPS Design A/S. We reserve all rights. This document, including all its sub-sections, has copyrights. Read more about what you can do with our patterns at the bottom of each pattern on our site. |
|||||||||||||||||||


With over 40 years in knitting and crochet design, DROPS Design offers one of the most extensive collections of free patterns on the internet - translated to 17 languages. As of today we count 304 catalogues and 11422 patterns - 11422 of which are translated into English (UK/cm).
We work hard to bring you the best knitting and crochet have to offer, inspiration and advice as well as great quality yarns at incredible prices! Would you like to use our patterns for other than personal use? You can read what you are allowed to do in the Copyright text at the bottom of all our patterns. Happy crafting!
Comments / Questions (22)
Bonjour, Bonjour, je ne comprends pas comment on commence l'empiècement : comment se lient le diagramme A1 et A2, je ne comprends pas A1 "au dessus de la maille suivante, répéter A2". Je ne vois pas à quoi correspond le A1. Merci pour votre réponse et pour votre site Marie Thouvenin
24.09.2018 - 14:23DROPS Design answered:
Bonjour Mme Thouvenin, les diagrammes se lisent en commençant en bas à droite, de droite à gauche sur l'endroit et de gauche à droite sur l'envers. Tricotez ainsi sur l'endroit: 5 m point mousse, A.1 (= 1 maille), répétez A.2 tout le rang et terminez par 5 m point mousse. Sur l'envers, tricotez 5 m end, répétez A.2 (en lisant de gauche à droite) et terminez par A.1 et 5 m end. Bon tricot!
24.09.2018 - 14:44Goedemiddag, Ik ben inmiddels aangekomen bij t lijf. Steken voor de mouw staan op de hulpnaald. Ik brei dit vest in een S. Volgens patroon, 1e naald averechts A4 breien, dit zou betekenen dat de meerdering bij de stip in een averechtse naald valt. Moet ik eerst een hele naald averechts zonder patroon breien en t patroon in de volgende naald op recht starten, of moet de meerdering een naald eerder of later, aangezien dit altijd in een rechte naald moet? Graag verneem ik van u?
23.09.2018 - 16:13DROPS Design answered:
Dag Marieke, Je hebt inderdaad gelijk, het komt er dan op neer dat je op een naald averecht verdeeld moet meerderen. Ik zal dit even navragen, want ik denk dat er een foutje in zit. In ieder geval niet een extra naald averecht zonder patroon, anders loopt het patroon niet mooi door.
26.09.2018 - 14:40Goedemiddag, Mijn vorige vraag heeft zichzelf opgelost😊. Heb nu een vraag over tips voor t breien 2; Als t werk te strak is in de breedte, kun je extra naalden breien. Dit levert toch allleen maar lengte op en geen breedte? Graag verneem ik van u. Vriendelijke groet Marieke
18.09.2018 - 15:21DROPS Design answered:
Dag Marieke, Fijn dat het gelukt is w.b.t. je vorige vraag. Wat de breitip aangaat: het stond verkeerd in het patroon en ik heb het zonet aangepast. Het gaat inderdaad allen over de stekenverhouding in de hoogte.
19.09.2018 - 16:12Ik ben net begonnen met dit vest. Ik ben aangekomen bij t patroon. Moet ik A1 1 keer breien en dan A2 blijven herhalen, of moet A1 en A2 beide herhaald worden?
13.09.2018 - 13:51Ireland Forever or Irish Tosay
08.08.2018 - 00:03Green forest
11.07.2018 - 12:26Den vil jeg glæde mig til at strikke. Super flotte efterårsfarver Tilslutter mig navnet Green Fall
03.07.2018 - 18:19Ein Klassiker schöne Farbzusammenstellung, wunderschön!
02.07.2018 - 23:08Fair Winter (contente que vous proposiez un pull aussi beau)
01.07.2018 - 16:30J'adore les nuances de vert.
29.06.2018 - 13:03