DROPS Sky
DROPS Sky
74% Alpaca, 18% Polyamide, 8% Wool
from 5.10 £ /50g
Get the yarn to make this pattern from 15.30£.

The yarn cost is calculated from the pattern’s smallest size and the yarn’s cheapest product type. Looking for an even better price? You might find it on the DROPS Deals!

DROPS SS24

Mint Tulip

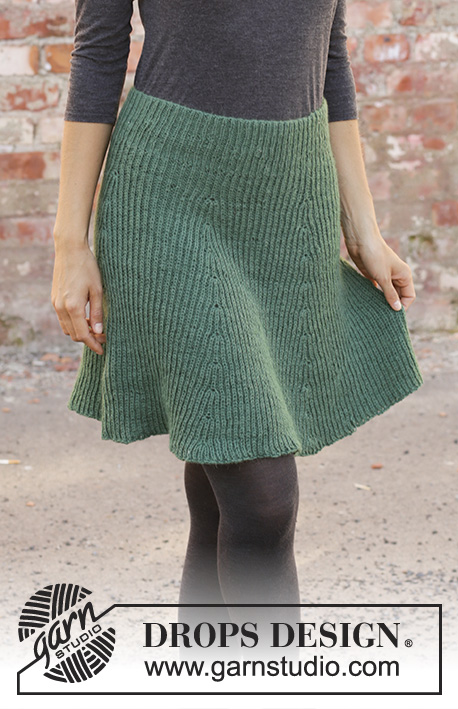
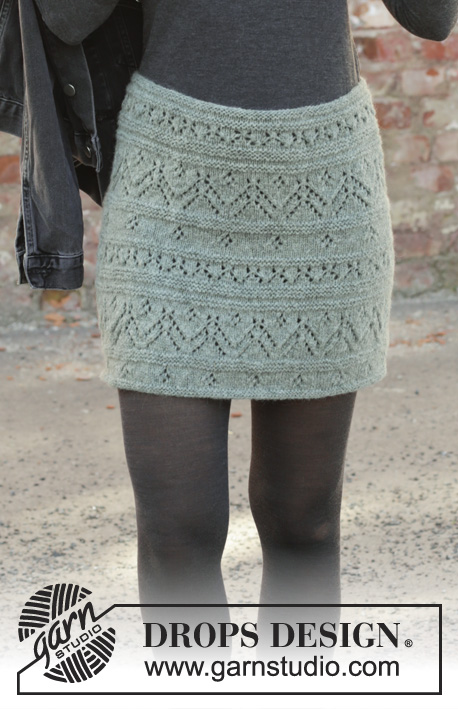
Knitted skirt in DROPS Sky. The piece is worked top down with lace pattern and garter stitch. Sizes S - XXXL.

DROPS 196-38
DROPS Design: Pattern no sk-009
Yarn group B
-------------------------------------------------------

Sizes: S - M - L - XL - XXL - XXXL
Materials:
DROPS SKY from Garnstudio (belongs to yarn group B)
150-150-200-200-200-250 g colour 07, light sea green

-------------------------------------------------------
ACCESSORIES FOR THE PIECE:

KNITTING TENSION:
21 stitches in width and 28 rows in height in stocking stitch = 10 x 10 cm.

NEEDLES:
DROPS CIRCULAR NEEDLE SIZE 4 MM: length 40 cm and 80 cm.
DROPS CIRCULAR NEEDLE SIZE 3.5 MM: length 60 cm for lining and edge.
The needle size is only a guide. If you get too many stitches on 10 cm, change to a larger needle size. If you get too few stitches on 10 cm, change to a smaller needle size.

ACCESSORIES: Approx. 70-120 cm trouser elastic. 

-------------------------------------------------------

-------------------------------------------------------

Alternative Yarn – See how to change yarns here
Yarn Groups A to F – Use the same pattern and change the yarn here
Yarn usage using an alternative yarn – Use our yarn converter here

-------------------------------------------------------

DROPS Sky
DROPS Sky
74% Alpaca, 18% Polyamide, 8% Wool
from 5.10 £ /50g
Get the yarn to make this pattern from 15.30£.

The yarn cost is calculated from the pattern’s smallest size and the yarn’s cheapest product type. Looking for an even better price? You might find it on the DROPS Deals!

Pattern instructions

NOTE: This pattern is written in British English. All measurements in charts are in cm. For conversion from cm to inches - click here. There are different terms for crocheting in British and American English. If this pattern includes crochet, click for "crochet terms" here. For this pattern in American English, please click here.
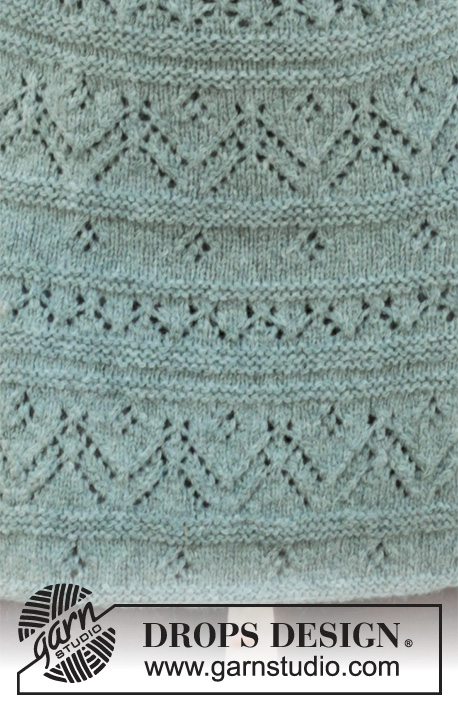
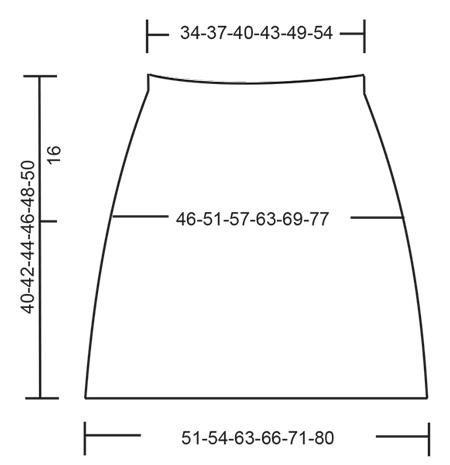
EXPLANATIONS FOR THE PATTERN:

-------------------------------------------------------

RIDGE/GARTER STITCH (worked in the round):
1 ridge = 2 rounds. Knit 1 round and purl 1 round.

PATTERN: 
See diagram A.1.

INCREASE TIP (evenly spaced):
To work out how to increase evenly, count the total number of stitches on the needle (e.g. 144 stitches) and divide by the number of increases to be made (e.g. 12) = 12. 
In this example, increase by making 1 yarn over after each 12th stitch. On the next round work the yarn overs twisted to avoid holes.

-------------------------------------------------------

START THE PIECE HERE:

-------------------------------------------------------

SKIRT - SHORT OVERVIEW OF THE PIECE:
The piece is worked in the round with circular needle, top down. First a lining is worked, which is later used to thread the elastic through. You then continue with lace pattern and garter stitch.

LINING:
Cast on 144-156-168-180-204-228 stitches with circular needle size 3.5 mm and Sky. Work 1 RIDGE – read description above. Then work 4 rounds stocking stitch. Purl 1 round (= folding edge). Insert 1 marker in the piece. THE PIECE IS MEASURED FROM HERE!

SKIRT:
Work 2 ridges. Change to circular needle size 4 mm. Then work A.1 (= 12 stitches) a total of 12-13-14-15-17-19 times in the round. On rounds 11 and 41, the round is displaced by 1 stitch so that the lace pattern fits.
On the round marked with an arrow, increase as follows:
INCREASE 1: Increase 12-12-12-24-24-24 stitches evenly on round – read INCREASE TIP = 156-168-180-204-228-252 stitches. A.1 is then repeated 13-14-15-17-19-21 times in width.
REMEMBER THE KNITTING TENSION!
INCREASE 2: Increase 12-24-24-24-24-24 stitches evenly on round = 168-192-204-228-252-276 stitches. A.1 is then repeated 14-16-17-19-21-23 times in width.
INCREASE 3: Increase 12-12-24-24-24-24 stitches evenly on round = 180-204-228-252-276-300 stitches. A.1 is then repeated 15-17-19-21-23-25 times in width
INCREASE 4: Increase 12-12-12-12-12-24 stitches evenly on round = 192-216-240-264-288-324 stitches. A.1 is then repeated 16-18-20-22-24-27 times in width.
Repeat A.1 in height and increase evenly 12 stitches on each round with an arrow 2-1-2-1-1-1 times more = 216-228-264-276-300-336 stitches. A.1 is then repeated 18-19-22-23-25-28 times in width. Continue with pattern until the piece measures 39-41-43-45-47-49 cm from the marker; adjust so that you finish neatly in relation to the pattern. Work 2 ridges. Then cast off with knit. The skirt measures approx. 40-42-44-46-48-50 cm from the marker.

ASSEMBLY:
Fold the lining towards the wrong side and sew down neatly, but leave a small opening to thread the elastic through. 

Diagram

symbols = knit
symbols = purl
symbols = knit 2 together
symbols = slip 1 stitch as if to knit, knit 1, pass the slipped stitch over the knitted stitch
= between 2 stitches make 1 yarn over
symbols = between 2 stitches make 1 yarn over
symbols = slip 2 stitches as if to knit together, knit 1, pass the 2 slipped stitches over the knitted stitch
symbols = increase round - read description in the text
symbols = this square is not a stitch, go directly to the next symbol in the diagram
symbols = on this round the last stitch from previous round is worked as the first stitch on this round (= the round is displaced with 1 stitch), displace the round back again by knitting first stitch on the round 1 more time at the end of round
diagram
diagram

Each of our patterns has specific tutorial videos to help you.

Do you have a question? See a list of frequently asked questions (FAQ)

Knitting tension is what determines the final measurements of your work, and is usually measured per 10 x 10 cm. It is provided like so: number of stitches in width x number of rows in height - eg: 19 stitches x 26 rows = 10 x 10 cm.

The knitting tension is very individual; some people knit/crochet loosely while others work tightly. You adjust the knitting tension with the needle size, which is why the suggested needle size is only meant as a guide! You need to adjust this (up or down) to ensure that YOUR knitting tension matches the knitting tension provided in the pattern. If you work with a different knitting tension than provided you will have a different yarn consumption, and your work will have different measurements than what the pattern suggests.

The knitting tension also determines which yarns can replace each other. As long as you achieve the same knitting tension you can replace one yarn with another.

See DROPS lesson: How to measure your tension/gauge

See DROPS video: How to make a gauge tension swatch

The required amount of yarn is provided in grams, eg: 450 g. To calculate how many balls you’ll need you first need to know how many grams are in 1 ball (25g, 50g or 100g). This information is available if you click on the individual yarn quality on our pages. Divide the amount required with the amount of each ball. For example, if each ball is 50g (the most common amount), the calculation will be as follows: 450 / 50 = 9 balls.

The important thing when changing from one yarn to another is that the knitting/crochet tension remains the same. This is so that the measurements of the finished piece will be the same as on the sketch provided. It is easier to achieve the same knitting tension using yarns from the same yarn group. It is also possible to work with multiple strands of a thinner yarn to achieve the knitting tension of a thicker one. Please try our yarn converter. We recommend you to always work a test swatch.

Please NOTE: when changing yarn the garment might have a different look and feel to the garment in the photo, due to individual properties and qualities of each yarn.

See DROPS lesson: Can I use a different yarn than the one mentioned in the pattern?

All our yarns are categorised into yarn groups (from A to F) according to thickness and knitting tension – group A contains the thinnest yarns and group F the thickest. This makes it easier for you to find alternative yarns to our patterns, should you wish to switch yarn. All yarns within the same group have a similar knitting tension and can easily replace each other. However, different yarn qualities have different structures and properties which will give the finished work a unique look and feel.

Click here for an overview of the yarns in each yarn group

At the top of all our patterns you’ll find a link to our yarn calculator, which is a helpful tool should you wish to use a different yarn than suggested. By filling in the yarn quality you wish to replace, the amount (in your size) and number of strands, the calculator will present good alternative yarns with the same knitting tension. Additionally it will tell you how much you’ll require in the new qualities and whether you’ll need to work with multiple strands. Most skeins are 50g (some are 25g or 100g).

If the pattern is worked with multiple colours, every colour will have to be calculated separately. Similarly, if the pattern is worked with several strands of different yarns (for example 1 strand Alpaca and 1 strand Kid-Silk) you will have to find alternatives for each, individually.

Click here to see our yarn calculator

Since different yarns have different qualities and textures we have chosen to keep the original yarn in our patterns. However, you can easily find options among our available qualities by using our yarn calculator, or simply pick a yarn from the same yarn group.

It is possible that some retailers still have discontinued yarns in stock, or that someone has a few skeins at home that they would like to find patterns for.

The yarn calculator will provide both alternative yarn as well as required amount in the new quality.

If you think it's hard to decide what size to make, it can be a good idea to measure a garment you own already and like the size of. Then you can pick the size by comparing those measures with the ones available in the pattern's size chart.

You'll find the size chart at the bottom of the pattern.

See DROPS lesson: How to read size chart

The needle size provided in the pattern serves only as a guide, the important thing is to follow the knitting tension. And since knitting tension is very individual, you will have to adjust the needle size to ensure that YOUR tension is the same as in the pattern – maybe you’ll have to adjust 1, or even 2 needle sizes, up or down to achieve the correct tension. For this, we recommend that you work test swatches.

Should you work with a different knitting tension than the one provided, the measurements of the finished garment might deviate from the measurement sketch.

See DROPS lesson: How to measure your tension/gauge

See DROPS video: How to make a tension/gauge swatch

Working a garment top-down provides more flexibility and room for personal adjustment. For example it is easier to try the garment on while working, as well as making adjustments to length of yoke and shoulder caps.

The instructions are carefully explaining every step, in the correct order. Diagrams are adjusted to the knitting direction and are worked as usual.

The diagram depicts all rows/rounds, and every stitch seen from the right side. It is read from bottom to top, from right to left. 1 square = 1 stitch.

When working back and forth, every other row is worked from the right side and every other row is worked from the wrong side. When working from the wrong side, the diagram will have to be worked reversed: from left to right, knit stitches are purled, purl stitches are knit etc.

When working in the round every round is worked from the right side and the diagram are worked from right to left on all rounds.

See DROPS lesson: How to read knitting diagrams

The diagram depicts all rows/rounds, and every stitch seen from the right side. It is worked from bottom to top, from right to left.

When working back and forth every other row is worked from the right side: from right to left and every other row is worked from the wrong side: from left to right.

When working in the round, every row in the diagram are worked from the right side, from right to left.

When working a circular diagram you start in the middle and work your way outwards, counter clockwise, row by row.

The rows usually start with a given number of chain stitches (equivalent to the height of the following stitch), this will either be depicted in the diagram or explained in the pattern.

See DROPS lesson: How to read crochet diagrams

Instructions for working several diagrams after each other on the same row/round, will often be written like so: “work A.1, A.2, A.3 a total of 0-0-2-3-4 times". This means you work A.1 once, then A.2 is worked once, and A.3 is repeated (in width) the number of times provided for your size – in this case like so: S = 0 times, M = 0 times, L=2 times, XL= 3 times and XXL = 4 times.

The diagrams are worked as usual: begin with the first row in A.1, then work the first row in A.2 etc.

See DROPS lesson: How to read knitting diagrams

See DROPS lesson: How to read crochet diagrams

The total width of the garment (from wrist-to-wrist) will be larger in the larger sizes, despite the actual sleeves being shorter. The larger sizes have longer sleeve caps and wider shoulders, so there will be a good fit in all sizes.

The measurement sketch/schematic drawing provides information regarding the full length of the garment. If it’s a jumper or a jacket the length is measured from the highest point on the shoulder closest to the neckline, and straight down to the bottom of the garment. It is NOT measured from the tip of shoulder. Similarly, the length of yoke is measured from the highest point on the shoulder and down to where yoke is split into body and sleeves.

On a jacket measures are never taken along bands, unless specifically stated. Always measure inside band stitches when measuring the length.

See DROPS lesson: How to read a schematic drawing

Diagrams are often repeated on the round or in height. 1 repeat is the diagram the way it appears in the pattern. If it says to work 5 repeats of A.1 in the round, then you work A.1 a total of 5 times after/next to each other in the round. If it says to work 2 repeats of A.1 vertically/in height you work the entire diagram once, then begin again at the start and work the entire diagram one more time.

Chain stitches are slightly narrower than other stitches and to avoid working the cast-on edge too tight, we simply chain more stitches to begin with. The stitch count will be adjusted on the following row to fit the pattern and measurement sketch.

The rib edge is more elastic and will contract slightly compared to, for example, stocking stitch. By increasing before the rib edge, you avoid a visible difference in width between the rib edge and the rest of the body.

It’s very easy to cast off too tightly, and by making yarn overs while casting off (and simultaneously casting these off) you avoid a too tight cast off edge.

See DROPS video: How to bind off with yarn overs (yo)

To achieve an even increase (or decrease) you can increase on, for example: every 3rd and 4th row alternately, like so: work 2 rows and increase on the 3rd row, work 3 rows and increase on the 4th. Repeat this until the increase is complete.

See DROPS lesson: Increase or decrease 1 st on every 3rd and 4th row alternately

Should you prefer to work in the round instead of back and forth, you may of course adjust the pattern. You’ll need to add steeks mid-front (usually 5 stitches), and follow the instructions. When you would normally turn and work from the wrong side, simply work across the steek and continue in the round. At the end you’ll cut the piece open, pick up stitches to work bands, and cover the cut edges.

See DROPS video: How to knit steeks and cut open

Should you prefer to work back and forth instead of in the round, you may of course adjust the pattern so you work the pieces separately and then assemble them at the end. Divide the stitches for the body in 2, add 1 edge stitch in each side (for sewing) and work the front and back pieces separately.

See DROPS lesson: Can I adapt a pattern for circular needles into straight needles?

Pattern repeats can vary slightly in the different sizes, in order to get the correct proportions. If you’re not working the exact same size as the garment in the photo, yours might deviate slightly. This has been carefully developed and adjusted so that the complete impression of the garment is the same in all sizes.

Make sure to follow instructions and diagrams for your size!

If you have found a pattern you like which is available in women’s size it’s not very difficult to convert it to men’s size. The biggest difference will be the length of sleeves and body. Start working on the women size that you think would fit across the chest. The additional length will be worked right before you cast off for the armhole/sleeve cap. If the pattern is worked top-down you can add the length right after the armhole or before the first decrease on sleeve.

Regarding additional yarn amount, this will depend on how much length you add, but it is better with a skein too many than too few.

All yarns will have excess fibres (from production) that might come off as lint or shedding. Brushed yarns (ie hairier yarns) have more of these loose, excess fibres, causing more shedding.

Shedding also depends on what is worn under or over the garment, and whether this pulls at the yarn fibres. It’s therefore not possible to guarantee that there will be no shedding

Below are some tips on how to get the best result when working with hairier yarns:

1. When the garment is finished (before you wash it) shake it vigorously so the looser hairs come off. NOTE: do NOT use a lint roller, brush or any method that pulls at the yarn.

2. Place the garment in a plastic bag and put it in your freezer - the temperature will cause the fibres to become less attached to each other, and excess fibres will come off easier.

3. Leave in the freezer for a few hours before taking it out and shaking it again.

4. Wash the garment according to the instructions on the yarn label.

Pilling is a natural process that happens to even the most exclusive of fibers. It's a natural sign of wear and tear that is hard to avoid, and that is most visible in high friction areas of your garment like a sweater's arms and cuffs.

You can make your garment look as new by removing the pilling, using a fabric comb or a pill/lint remover.

Still can't find the answer you need? Then scroll down and leave your question so one of our experts can try to help you. This will be done normally within 5 to 10 working days.
In the meantime, you can read the questions and answers that others have left to this pattern or join the DROPS Workshop on Facebook to get help from fellow knitters/crocheters!

You might also like...

Post a comment to pattern DROPS 196-38

We would love to hear what you have to say about this pattern!

If you want to leave a question, please make sure you select the correct category in the form below, to speed up the answering process. Required fields are marked *.

Comments / Questions (55)

country flag Anaïs wrote:

Bonjour, À la fin des explications, il est indiqué "continuer ainsi jusqu'à ce que l'ouvrage mesure 39 cm". Faut-il quand même continuer à faire des augmentations aux tours indiqués par des flèches ? Merci

04.03.2021 - 10:47

DROPS Design answered:

Bonjour Anaïs, si vous avez bien augmenté comme il faut, vous avez 216 mailles soit 18 fois A.1 tout le tour, continuez A.1 sans plus augmenter jusqu'à ce que la jupe mesure 39 cm, ajustez pour arrêter après une section point mousse ou point ajouré (pour éviter de stopper en plein milieu d'un motif).. Bon tricot!

04.03.2021 - 11:44

country flag Κατερίνα Χαιρετάκη wrote:

Hello, I would like to ask you if am I continue the the pattern of skirt to the same body of the lining.

11.01.2021 - 10:22

country flag Amelie wrote:

Hallo, ich bin etwas kürzer geraten und würde daher den Rock gerne um einige cm kürzer stricken. Wie kann ich das am besten machen - auch in Hinblick auf die Zunahmen?? Einfach früher aufhören und am Ende etwas weglassen? Vielen Dank =)

04.01.2021 - 17:37

DROPS Design answered:

Liebe Amelie, leider können wir nicht jede Anleitung nach jeder Anfrage umrechnen - sicher können Sie den Rock einfach früher aufhören, solange die Zunahmen fertig sind. Ihr DROPS Laden kann Ihnen damit gerne weiterhelfen - auch telefonisch oder per E-Mail. Viel Spaß beim stricken!

05.01.2021 - 11:08

country flag Cathy Chadwick wrote:

Hi, can you give me the finished measurements for hip and waist of this skirt? Thank you so much, Cathy

21.11.2020 - 19:52

DROPS Design answered:

Dear Cathy, the finished measurements of the piece can be seen on the schematics drawing at the bottom of the pattern! Happy Crafting!

22.11.2020 - 21:16

country flag Cathy Chadwick wrote:

Hi, I would like to knit this skirt pattern. I have been studying the A-1 graph, and it seems different from the finished skirt pictured. I can see how it works down to about row 37, and. then in the A-1 graph it looks like there are too many knit purls. As. I look at it more closely, I am now wondering if I should be reading the A-1 pattern from the bottom up. can you clarify this for me? Thank you so much, Cathy

21.11.2020 - 17:27

DROPS Design answered:

Dear Mrs Chadwick, diagram should be read from bottom up, from the corner on the right side towards the left on every round - read more about diagrams here - as you work diagram in the round, the purl rounds will create ridges (= 1 ridge in garter stitch = knit 1 round, purl 1 round). Happy knitting!

23.11.2020 - 08:44

country flag Michaelle ALAMELE wrote:

Bonjour, Je ne comprends pas les explications données à Mme Deray en date du 24.01.2019. A la fin du rang 10, j'ai un jeté (du rang 9). Est-ce que je dois le tricoter puis faire un jeté pour débuter le rang 11? Et avec ce nouveau jeté, tricoter ensemble avec la 1ere maille (endroit) du rang 11 c'est-a-dire tricoter cette maille à l'endroit et passer le "nouveau jeté" par dessus cette maille tricotée? Est-ce bien cela qu'il faut faire? Merci d'avance

24.10.2020 - 00:11

DROPS Design answered:

Bonjour Mme Alamele, tricotez le tour 10 jusqu'à ce qu'il reste 1 maille, faites 1 jeté (= ce jeté est maintenant la dernière maille du tour), tricotez ensemble à l'endroit la dernière m du tour et la 1ère m du 1er A.1 = 1ère m du tour et terminez A.1 = il reste 1 m du 1er motif, commencez le A.1 suivant ici, et répétez ainsi tout le tour, à la fin du tour 11, tricotez à l'endroit le jeté fait au début du tour et tricotez le tour 12 sur toutes les mailles. En espérant que ces explications vous aident. Bon tricot!

26.10.2020 - 07:43

country flag Andrea wrote:

Sorry, das unten sollte als Frage gepostet werden, nicht als Kommentar....

07.10.2020 - 21:10

DROPS Design answered:

Liebe Andrea, nach der 4. Zunahmen stricken Sie immer noch A.1 aber jetzt nehmen Sie in Ihre Grôße nur einaml 12 Maschen bzw bei der nächsten Reihen mit dem Pfeil = jetzt haben Sie 288+12= 300 Maschen und 25 x A.1 in der Breite und so weiterstricken bis die ARbeit 47 cm mist. Viel Spaß beim stricken!

08.10.2020 - 10:26

country flag Andrea wrote:

Hallo! Ich hänge bei der Anleitung ab dem zweiten Musterdurchgang fest, also bei folgendem Abschnitt: "A.1 in der Höhe wiederholen und in jeder Runde mit Zunahmepfeil..." Dann steht aber (ich habe die vorletzte Größe) 300 M, also insgesamt 12 mehr. Wenn man in jeder entsprechenden Runde zunimmt, also 4x, müssten es doch 336 M sein, oder? Wo nimmt man zu und wo nicht? Und was bedeutet das "noch weitere ... 1 x zunehmen" genau? Worauf bezieht sich das? Dankeschön!

07.10.2020 - 21:08

country flag Noemi wrote:

Ciao! Nelle indicazioni dei ferri, c’è scritto FERRI DROPS CIRCOLARI n° 4 mm, lunghezza 40 e 80 cm. Ma nella spiegazione non c’è scritto quando mettere il 40 o 80 cm. Come li devo usare? Posso usare direttamente quello da 80 cm? Grazie!

13.09.2020 - 02:18

DROPS Design answered:

Buongiorno Noemi. Sì può usare direttamente i ferri da 80 cm. Buon lavoro!

14.09.2020 - 15:44

country flag Nathalie wrote:

Ce nest pas claire. Je ny comprends rien 😒😒😒

28.05.2020 - 23:47

DROPS Design answered:

Bonjour Nathalie, pouvez-vous préciser votre pensée? Nous pourrons volontiers vous aider si nous savons ce que vous ne comprenez pas. Bon tricot!

29.05.2020 - 08:51