DROPS Sky
DROPS Sky
74% Alpaca, 18% Polyamide, 8% Wool
from 5.10 £ /50g
Get the yarn to make this pattern from 15.30£.

The yarn cost is calculated from the pattern’s smallest size and the yarn’s cheapest product type. Looking for an even better price? You might find it on the DROPS Deals!

DROPS SS24

Mint Tulip

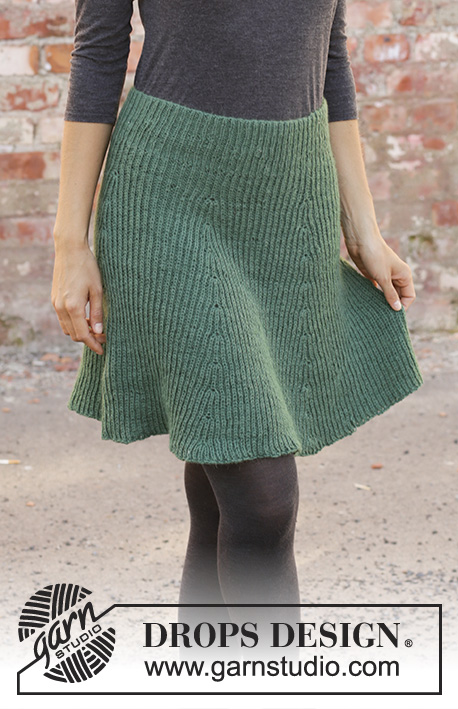
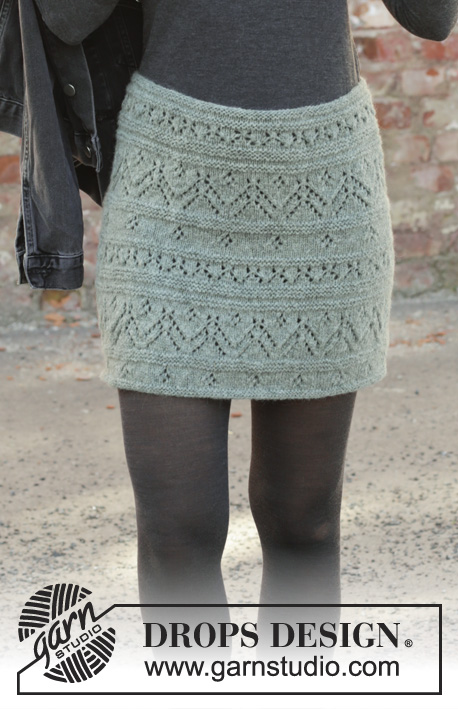
Knitted skirt in DROPS Sky. The piece is worked top down with lace pattern and garter stitch. Sizes S - XXXL.

DROPS 196-38
DROPS Design: Pattern no sk-009
Yarn group B
-------------------------------------------------------

Sizes: S - M - L - XL - XXL - XXXL
Materials:
DROPS SKY from Garnstudio (belongs to yarn group B)
150-150-200-200-200-250 g colour 07, light sea green

-------------------------------------------------------
ACCESSORIES FOR THE PIECE:

KNITTING TENSION:
21 stitches in width and 28 rows in height in stocking stitch = 10 x 10 cm.

NEEDLES:
DROPS CIRCULAR NEEDLE SIZE 4 MM: length 40 cm and 80 cm.
DROPS CIRCULAR NEEDLE SIZE 3.5 MM: length 60 cm for lining and edge.
The needle size is only a guide. If you get too many stitches on 10 cm, change to a larger needle size. If you get too few stitches on 10 cm, change to a smaller needle size.

ACCESSORIES: Approx. 70-120 cm trouser elastic. 

-------------------------------------------------------

-------------------------------------------------------

Alternative Yarn – See how to change yarns here
Yarn Groups A to F – Use the same pattern and change the yarn here
Yarn usage using an alternative yarn – Use our yarn converter here

-------------------------------------------------------

DROPS Sky
DROPS Sky
74% Alpaca, 18% Polyamide, 8% Wool
from 5.10 £ /50g
Get the yarn to make this pattern from 15.30£.

The yarn cost is calculated from the pattern’s smallest size and the yarn’s cheapest product type. Looking for an even better price? You might find it on the DROPS Deals!

Pattern instructions

NOTE: This pattern is written in British English. All measurements in charts are in cm. For conversion from cm to inches - click here. There are different terms for crocheting in British and American English. If this pattern includes crochet, click for "crochet terms" here. For this pattern in American English, please click here.
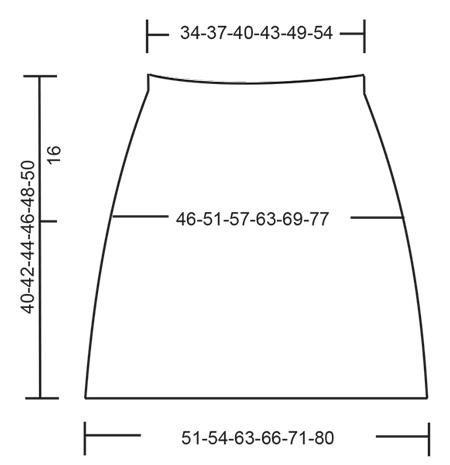
EXPLANATIONS FOR THE PATTERN:

-------------------------------------------------------

RIDGE/GARTER STITCH (worked in the round):
1 ridge = 2 rounds. Knit 1 round and purl 1 round.

PATTERN: 
See diagram A.1.

INCREASE TIP (evenly spaced):
To work out how to increase evenly, count the total number of stitches on the needle (e.g. 144 stitches) and divide by the number of increases to be made (e.g. 12) = 12. 
In this example, increase by making 1 yarn over after each 12th stitch. On the next round work the yarn overs twisted to avoid holes.

-------------------------------------------------------

START THE PIECE HERE:

-------------------------------------------------------

SKIRT - SHORT OVERVIEW OF THE PIECE:
The piece is worked in the round with circular needle, top down. First a lining is worked, which is later used to thread the elastic through. You then continue with lace pattern and garter stitch.

LINING:
Cast on 144-156-168-180-204-228 stitches with circular needle size 3.5 mm and Sky. Work 1 RIDGE – read description above. Then work 4 rounds stocking stitch. Purl 1 round (= folding edge). Insert 1 marker in the piece. THE PIECE IS MEASURED FROM HERE!

SKIRT:
Work 2 ridges. Change to circular needle size 4 mm. Then work A.1 (= 12 stitches) a total of 12-13-14-15-17-19 times in the round. On rounds 11 and 41, the round is displaced by 1 stitch so that the lace pattern fits.
On the round marked with an arrow, increase as follows:
INCREASE 1: Increase 12-12-12-24-24-24 stitches evenly on round – read INCREASE TIP = 156-168-180-204-228-252 stitches. A.1 is then repeated 13-14-15-17-19-21 times in width.
REMEMBER THE KNITTING TENSION!
INCREASE 2: Increase 12-24-24-24-24-24 stitches evenly on round = 168-192-204-228-252-276 stitches. A.1 is then repeated 14-16-17-19-21-23 times in width.
INCREASE 3: Increase 12-12-24-24-24-24 stitches evenly on round = 180-204-228-252-276-300 stitches. A.1 is then repeated 15-17-19-21-23-25 times in width
INCREASE 4: Increase 12-12-12-12-12-24 stitches evenly on round = 192-216-240-264-288-324 stitches. A.1 is then repeated 16-18-20-22-24-27 times in width.
Repeat A.1 in height and increase evenly 12 stitches on each round with an arrow 2-1-2-1-1-1 times more = 216-228-264-276-300-336 stitches. A.1 is then repeated 18-19-22-23-25-28 times in width. Continue with pattern until the piece measures 39-41-43-45-47-49 cm from the marker; adjust so that you finish neatly in relation to the pattern. Work 2 ridges. Then cast off with knit. The skirt measures approx. 40-42-44-46-48-50 cm from the marker.

ASSEMBLY:
Fold the lining towards the wrong side and sew down neatly, but leave a small opening to thread the elastic through. 

Diagram

symbols = knit
symbols = purl
symbols = knit 2 together
symbols = slip 1 stitch as if to knit, knit 1, pass the slipped stitch over the knitted stitch
= between 2 stitches make 1 yarn over
symbols = between 2 stitches make 1 yarn over
symbols = slip 2 stitches as if to knit together, knit 1, pass the 2 slipped stitches over the knitted stitch
symbols = increase round - read description in the text
symbols = this square is not a stitch, go directly to the next symbol in the diagram
symbols = on this round the last stitch from previous round is worked as the first stitch on this round (= the round is displaced with 1 stitch), displace the round back again by knitting first stitch on the round 1 more time at the end of round
diagram
diagram

Each of our patterns has specific tutorial videos to help you.

Do you have a question? See a list of frequently asked questions (FAQ)

Knitting tension is what determines the final measurements of your work, and is usually measured per 10 x 10 cm. It is provided like so: number of stitches in width x number of rows in height - eg: 19 stitches x 26 rows = 10 x 10 cm.

The knitting tension is very individual; some people knit/crochet loosely while others work tightly. You adjust the knitting tension with the needle size, which is why the suggested needle size is only meant as a guide! You need to adjust this (up or down) to ensure that YOUR knitting tension matches the knitting tension provided in the pattern. If you work with a different knitting tension than provided you will have a different yarn consumption, and your work will have different measurements than what the pattern suggests.

The knitting tension also determines which yarns can replace each other. As long as you achieve the same knitting tension you can replace one yarn with another.

See DROPS lesson: How to measure your tension/gauge

See DROPS video: How to make a gauge tension swatch

The required amount of yarn is provided in grams, eg: 450 g. To calculate how many balls you’ll need you first need to know how many grams are in 1 ball (25g, 50g or 100g). This information is available if you click on the individual yarn quality on our pages. Divide the amount required with the amount of each ball. For example, if each ball is 50g (the most common amount), the calculation will be as follows: 450 / 50 = 9 balls.

The important thing when changing from one yarn to another is that the knitting/crochet tension remains the same. This is so that the measurements of the finished piece will be the same as on the sketch provided. It is easier to achieve the same knitting tension using yarns from the same yarn group. It is also possible to work with multiple strands of a thinner yarn to achieve the knitting tension of a thicker one. Please try our yarn converter. We recommend you to always work a test swatch.

Please NOTE: when changing yarn the garment might have a different look and feel to the garment in the photo, due to individual properties and qualities of each yarn.

See DROPS lesson: Can I use a different yarn than the one mentioned in the pattern?

All our yarns are categorised into yarn groups (from A to F) according to thickness and knitting tension – group A contains the thinnest yarns and group F the thickest. This makes it easier for you to find alternative yarns to our patterns, should you wish to switch yarn. All yarns within the same group have a similar knitting tension and can easily replace each other. However, different yarn qualities have different structures and properties which will give the finished work a unique look and feel.

Click here for an overview of the yarns in each yarn group

At the top of all our patterns you’ll find a link to our yarn calculator, which is a helpful tool should you wish to use a different yarn than suggested. By filling in the yarn quality you wish to replace, the amount (in your size) and number of strands, the calculator will present good alternative yarns with the same knitting tension. Additionally it will tell you how much you’ll require in the new qualities and whether you’ll need to work with multiple strands. Most skeins are 50g (some are 25g or 100g).

If the pattern is worked with multiple colours, every colour will have to be calculated separately. Similarly, if the pattern is worked with several strands of different yarns (for example 1 strand Alpaca and 1 strand Kid-Silk) you will have to find alternatives for each, individually.

Click here to see our yarn calculator

Since different yarns have different qualities and textures we have chosen to keep the original yarn in our patterns. However, you can easily find options among our available qualities by using our yarn calculator, or simply pick a yarn from the same yarn group.

It is possible that some retailers still have discontinued yarns in stock, or that someone has a few skeins at home that they would like to find patterns for.

The yarn calculator will provide both alternative yarn as well as required amount in the new quality.

If you think it's hard to decide what size to make, it can be a good idea to measure a garment you own already and like the size of. Then you can pick the size by comparing those measures with the ones available in the pattern's size chart.

You'll find the size chart at the bottom of the pattern.

See DROPS lesson: How to read size chart

The needle size provided in the pattern serves only as a guide, the important thing is to follow the knitting tension. And since knitting tension is very individual, you will have to adjust the needle size to ensure that YOUR tension is the same as in the pattern – maybe you’ll have to adjust 1, or even 2 needle sizes, up or down to achieve the correct tension. For this, we recommend that you work test swatches.

Should you work with a different knitting tension than the one provided, the measurements of the finished garment might deviate from the measurement sketch.

See DROPS lesson: How to measure your tension/gauge

See DROPS video: How to make a tension/gauge swatch

Working a garment top-down provides more flexibility and room for personal adjustment. For example it is easier to try the garment on while working, as well as making adjustments to length of yoke and shoulder caps.

The instructions are carefully explaining every step, in the correct order. Diagrams are adjusted to the knitting direction and are worked as usual.

The diagram depicts all rows/rounds, and every stitch seen from the right side. It is read from bottom to top, from right to left. 1 square = 1 stitch.

When working back and forth, every other row is worked from the right side and every other row is worked from the wrong side. When working from the wrong side, the diagram will have to be worked reversed: from left to right, knit stitches are purled, purl stitches are knit etc.

When working in the round every round is worked from the right side and the diagram are worked from right to left on all rounds.

See DROPS lesson: How to read knitting diagrams

The diagram depicts all rows/rounds, and every stitch seen from the right side. It is worked from bottom to top, from right to left.

When working back and forth every other row is worked from the right side: from right to left and every other row is worked from the wrong side: from left to right.

When working in the round, every row in the diagram are worked from the right side, from right to left.

When working a circular diagram you start in the middle and work your way outwards, counter clockwise, row by row.

The rows usually start with a given number of chain stitches (equivalent to the height of the following stitch), this will either be depicted in the diagram or explained in the pattern.

See DROPS lesson: How to read crochet diagrams

Instructions for working several diagrams after each other on the same row/round, will often be written like so: “work A.1, A.2, A.3 a total of 0-0-2-3-4 times". This means you work A.1 once, then A.2 is worked once, and A.3 is repeated (in width) the number of times provided for your size – in this case like so: S = 0 times, M = 0 times, L=2 times, XL= 3 times and XXL = 4 times.

The diagrams are worked as usual: begin with the first row in A.1, then work the first row in A.2 etc.

See DROPS lesson: How to read knitting diagrams

See DROPS lesson: How to read crochet diagrams

The total width of the garment (from wrist-to-wrist) will be larger in the larger sizes, despite the actual sleeves being shorter. The larger sizes have longer sleeve caps and wider shoulders, so there will be a good fit in all sizes.

The measurement sketch/schematic drawing provides information regarding the full length of the garment. If it’s a jumper or a jacket the length is measured from the highest point on the shoulder closest to the neckline, and straight down to the bottom of the garment. It is NOT measured from the tip of shoulder. Similarly, the length of yoke is measured from the highest point on the shoulder and down to where yoke is split into body and sleeves.

On a jacket measures are never taken along bands, unless specifically stated. Always measure inside band stitches when measuring the length.

See DROPS lesson: How to read a schematic drawing

Diagrams are often repeated on the round or in height. 1 repeat is the diagram the way it appears in the pattern. If it says to work 5 repeats of A.1 in the round, then you work A.1 a total of 5 times after/next to each other in the round. If it says to work 2 repeats of A.1 vertically/in height you work the entire diagram once, then begin again at the start and work the entire diagram one more time.

Chain stitches are slightly narrower than other stitches and to avoid working the cast-on edge too tight, we simply chain more stitches to begin with. The stitch count will be adjusted on the following row to fit the pattern and measurement sketch.

The rib edge is more elastic and will contract slightly compared to, for example, stocking stitch. By increasing before the rib edge, you avoid a visible difference in width between the rib edge and the rest of the body.

It’s very easy to cast off too tightly, and by making yarn overs while casting off (and simultaneously casting these off) you avoid a too tight cast off edge.

See DROPS video: How to bind off with yarn overs (yo)

To achieve an even increase (or decrease) you can increase on, for example: every 3rd and 4th row alternately, like so: work 2 rows and increase on the 3rd row, work 3 rows and increase on the 4th. Repeat this until the increase is complete.

See DROPS lesson: Increase or decrease 1 st on every 3rd and 4th row alternately

Should you prefer to work in the round instead of back and forth, you may of course adjust the pattern. You’ll need to add steeks mid-front (usually 5 stitches), and follow the instructions. When you would normally turn and work from the wrong side, simply work across the steek and continue in the round. At the end you’ll cut the piece open, pick up stitches to work bands, and cover the cut edges.

See DROPS video: How to knit steeks and cut open

Should you prefer to work back and forth instead of in the round, you may of course adjust the pattern so you work the pieces separately and then assemble them at the end. Divide the stitches for the body in 2, add 1 edge stitch in each side (for sewing) and work the front and back pieces separately.

See DROPS lesson: Can I adapt a pattern for circular needles into straight needles?

Pattern repeats can vary slightly in the different sizes, in order to get the correct proportions. If you’re not working the exact same size as the garment in the photo, yours might deviate slightly. This has been carefully developed and adjusted so that the complete impression of the garment is the same in all sizes.

Make sure to follow instructions and diagrams for your size!

If you have found a pattern you like which is available in women’s size it’s not very difficult to convert it to men’s size. The biggest difference will be the length of sleeves and body. Start working on the women size that you think would fit across the chest. The additional length will be worked right before you cast off for the armhole/sleeve cap. If the pattern is worked top-down you can add the length right after the armhole or before the first decrease on sleeve.

Regarding additional yarn amount, this will depend on how much length you add, but it is better with a skein too many than too few.

All yarns will have excess fibres (from production) that might come off as lint or shedding. Brushed yarns (ie hairier yarns) have more of these loose, excess fibres, causing more shedding.

Shedding also depends on what is worn under or over the garment, and whether this pulls at the yarn fibres. It’s therefore not possible to guarantee that there will be no shedding

Below are some tips on how to get the best result when working with hairier yarns:

1. When the garment is finished (before you wash it) shake it vigorously so the looser hairs come off. NOTE: do NOT use a lint roller, brush or any method that pulls at the yarn.

2. Place the garment in a plastic bag and put it in your freezer - the temperature will cause the fibres to become less attached to each other, and excess fibres will come off easier.

3. Leave in the freezer for a few hours before taking it out and shaking it again.

4. Wash the garment according to the instructions on the yarn label.

Pilling is a natural process that happens to even the most exclusive of fibers. It's a natural sign of wear and tear that is hard to avoid, and that is most visible in high friction areas of your garment like a sweater's arms and cuffs.

You can make your garment look as new by removing the pilling, using a fabric comb or a pill/lint remover.

Still can't find the answer you need? Then scroll down and leave your question so one of our experts can try to help you. This will be done normally within 5 to 10 working days.
In the meantime, you can read the questions and answers that others have left to this pattern or join the DROPS Workshop on Facebook to get help from fellow knitters/crocheters!

You might also like...

Post a comment to pattern DROPS 196-38

We would love to hear what you have to say about this pattern!

If you want to leave a question, please make sure you select the correct category in the form below, to speed up the answering process. Required fields are marked *.

Comments / Questions (55)

country flag Pia Therese Lynghaug wrote:

Har 180 m,skal strikke linge 9 i a1..men jeg får jo forr mange masker nårr jeg følger oppskriften🤔

22.10.2019 - 13:03

DROPS Design answered:

Hej Pia. Maskantalet blir detsamma för du gör 4 kast och så minskar du 4 masker per rapport på pinne 9 i diagrammet (se förklaringar till symbolerna i diagrammet). Lycka till!

23.10.2019 - 07:31

country flag KAREN HUGHES wrote:

Hi, I'm still having trouble with the black star! Do I stop row 10 and row 40 with 1 stitch to go and use this stitch as the first stitch of rows 11 and 41? It's very confusing.

01.10.2019 - 09:16

DROPS Design answered:

Dear Mrs Hughes, work the last stitch of previous round (before the one with the star) together with the decrase (= the yarn over is now the last stitch of the round), work to the end of repeat, then work the last stitch in A.1 together with the first stitch in next A.1 and repeat this to the end of the round. Happy knitting!

01.10.2019 - 10:25

country flag KAREN HUGHES wrote:

I have no idea how to do row 11!! Is there a video tutorial? I'm not sure what it means when it says the round is displaced by one stitch.

30.09.2019 - 06:36

DROPS Design answered:

Hi Karen, Displacing is starting the round one stitch early. Begin round 11 with 1 yarn over, slip 1 stitch, k1 and pass slipped stitch over, k1, k2 together, 1 YO, k1, 1 YO, slip 1, k1 and pass slipped stitch over, k1, k2 together, 1 yarn over, k1. Happy knitting!

30.09.2019 - 07:31

country flag Constanza wrote:

Hola! Una pregunta: al repetir A1, ¿se aumentan 12 puntos en cada vuelta con flecha (o sea, al finalizar la repetición de A1 se habrían aumentado 48 puntos) o se aumentan sólo 12 puntos durante toda la repetición de A1? Gracias por la ayuda!

07.09.2019 - 23:31

DROPS Design answered:

Hola Constanza. En cada vuelta con una flecha hay que trabajar los aumentos (aumentar un cierto número de puntos según la talla). En total hay 4 aumentos.

28.10.2019 - 20:07

country flag Ann Kristin Olaisen wrote:

Hvordan er str i skjørtet ? (Har strikket klompelompe tidligere og da måtte jeg ned i str.)

28.08.2019 - 07:03

DROPS Design answered:

Hei Ann Kristin, Målene på forskjellige størrelsene finner du i en skisse på bunnen av oppskriften. God fornøyelse!

28.08.2019 - 09:11

country flag Bjørg Hildre Pedersen wrote:

Hei. Jeg vet ikke hvilken butikk det er bestilt fra, dette må da dere finne ut av. Vennligst send med to nøster til snarest!

20.08.2019 - 15:53

DROPS Design answered:

Hei Bjørg. Vi har ingen oversikt over hvilken nettbutikk du har handlet hos. Se på din leveringsbekreftelse/faktura el. Vi sender ikke ut garn til privatpersoner. mvh Drops design

09.09.2019 - 09:55

country flag Bjørg Hildre Pedersen wrote:

Er det nok med 1 nøste i str M? Fikk bare 1 nøste tilsendt.

17.08.2019 - 11:18

DROPS Design answered:

Hei Bjørg. Det skal brukes 150 gram / 3 nøster til dette skjørtet. Ta kontakt med nettbutikken du har bestilt fra.

20.08.2019 - 15:10

country flag Bjørg Hildre Pedersen wrote:

Hei. Jeg lurer på om det er nok med 1 nøste i str M? Fikk bare 1 nøste tilsendt...

17.08.2019 - 11:17

country flag Spørgsmåltilstrikm wrote:

Hej jeg forstår ikke i hvilken ende man starter? Nede hvor der står 12 og A1 eller i toppen?

26.07.2019 - 22:13

DROPS Design answered:

Hej, du starter nederst i diagrammet til højre, og strikker hver omgang i diagrammet fra retsiden. God fornøjelse!

01.08.2019 - 15:55

country flag Joan wrote:

Hej! Jeg forstår simpelthen ikke hvad jeg skal gøre ved den sorte stjerne. Kan jeg få det uddybet?

30.04.2019 - 17:09

DROPS Design answered:

Hej Joan, du starter bare med symbolet i diagrammet en masken før der hvor du normalt starter omgangen. God fornøjelse!

03.05.2019 - 10:21