
Looking for a yarn?


Comments / Questions (10)
![]() Mina Sousa wrote:
Mina Sousa wrote:
No me queda clara la vuelta 5. No entienco cómo hay que repartir los puntos con aumentos, porque me queda un desastre de puntos amontonados.
16.06.2021 - 20:09DROPS Design answered:
Hola Mina, se trabaja 1 punto bajo en cada punto y al mismo tiempo se aumentan 4 - 6 - 10 puntos bajos (según la talla; 4 para 35-37...) a lo largo de la vuelta.
27.06.2021 - 19:20
![]() Michaela Šiftová wrote:
Michaela Šiftová wrote:
Vaše papuče se mi moc líbí, zkoušela jsem je uháčkovat, ale podle návodu se mi to nedaří, bez obrázku jej nechápu. Uháčkuju skoro celou papuči, ale s patou si neporadím. Musela jsem udělat rovný šev, který sice moc dobře nevypadá, ale chodit se v tom dá. Mohli byste prosím natočit video s návodem, jak háčkovat patu nebo alespoň k návodům doplnit i fotografie paty nebo nakreslit střih? Děkuji
30.03.2021 - 21:04DROPS Design answered:
Hi Michaela, take a look at this video: How to crochet a basic slipper from toe and up
20.04.2021 - 09:59
![]() Valborg Hillberg wrote:
Valborg Hillberg wrote:
Om jag vill virka i en färg hur mycket garn går det då?
16.06.2020 - 10:54DROPS Design answered:
Hej Valborg. Det har vi dessvärre ingen uppgift på, men om jag ser på liknande mönster som är gjorda i bara en färg så ser det ut att gå åt ca 100-150 g. Mvh DROPS Design
17.06.2020 - 13:32
![]() Priyanka wrote:
Priyanka wrote:
Beautiful slippers and easy to make pattern. Tried the largest size and it fits perfect. Thank you
01.06.2020 - 12:29
![]() Susan wrote:
Susan wrote:
Hi I'm a size 3, how could I make these smaller. Many thanks x
17.11.2019 - 12:50DROPS Design answered:
Dear Susan, we are unfortunately not able to adjust every pattern to every single request, please contact your DROPS store - even per mail or telephone - for any individual assistance. Happy crocheting!
18.11.2019 - 10:16
![]() Astrid Hediger wrote:
Astrid Hediger wrote:
Bitte in deutscher Sprache Emails an mich. Auch nicht innerhalb 1 Min. mehrere gleiche Mails in div. Sprachen an mich. Besten Dank.
07.05.2019 - 15:22
![]() Dominique L. wrote:
Dominique L. wrote:
Je viens tout juste de terminer ces pantoufles, le patron est facile à suivre, bien expliqué et le résultat final est superbe. J’ai utilisé des balances de laines que j’avais et des couleurs très similaires. Les chaussons tiennent vraiment bien au pied , j’adore! Merci beaucoup!
03.02.2019 - 23:43
![]() Karen wrote:
Karen wrote:
Not sure what you mean regarding yarn group C or A + A. And the 700. Sorry, I am new to crocheting and from the US. Please advise and thank you
15.01.2019 - 13:50DROPS Design answered:
Dear Karen, W-700 is the pattern name of this design as it was shown for the vote to the collection. Our yarns are dvidided into groups depending on their thickness and tension (read more here about the groups . The slippers are here worked with 1 strand yarn group C (= DROPS Paris), but you can use alternately 2 strands yarn group A - try our yarn converter to see alternatives. Happy crocheting!
15.01.2019 - 16:46
![]() Susanne Van Schaik wrote:
Susanne Van Schaik wrote:
Hallo, Ik ben nu deze aan het haken en ik heb een vraag. Nadat je de markering hebt aangebracht, waar moet je precies beginnen met haken? Is dat vanaf 4 steken tot de markering? Als er 6 vasten overblijven, is dat toch meer dan maar 3 steken aan beide kanten?
22.08.2018 - 22:07DROPS Design answered:
Hoi Susanne, Je telt 4 steken en begint dan met haken, je begint dus in die vierde steek met haken zodat er op het eind 3 steken aan elke kant van de markeerdraad zijn.
23.08.2018 - 17:47
![]() Ana wrote:
Ana wrote:
Hi. How much yarn do I need if I want to make these in a single colour? Thanks.
04.05.2018 - 18:14DROPS Design answered:
Dear Ana, if I would want to make this from one color, I would get about 200-300 gramms of yarn (depending on the size). Happy Crafting!
06.05.2018 - 09:05
|
|
On Point#onpointslippers |
|
 |
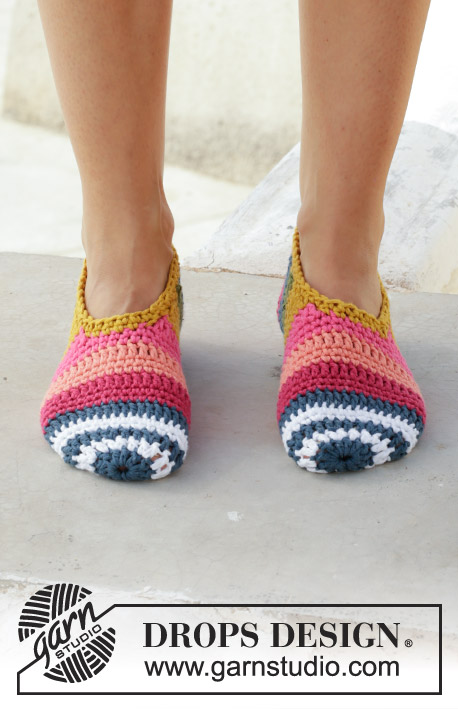 |
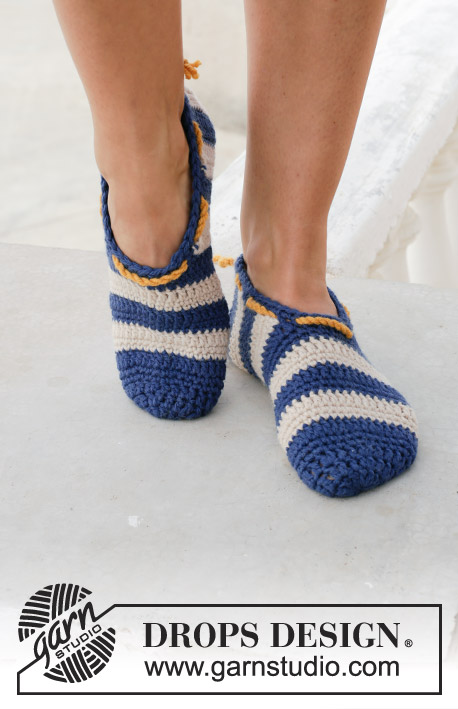
Crocheted slipper with stripes. Piece is crocheted in DROPS Paris.
DROPS 189-29 |
|
|
INFORMATION FOR PATTERN: DECREASE TIP: Decrease 1 double crochet by working the next 2 double crochet together as follows: Work 1 double crochet in next single crochet but wait with last pull through, work 1 double crochet in next single crochet the same way, make 1 yarn over and pull yarn through all 3 loops on hook. CROCHET INFO: Replace first double crochet on every round/row with double crochets with 3 chain stitches and finish round with 1 slip stitch in third chain stitch. Replace first single crochet on every round/row with single crochets with 1 chain stitches and finish round with 1 slip stitch in first chain stitch. PATTERN: 2 round/rows with single crochets, 1 round/row with double crochets. Repeat these 3 rounds/rows. STRIPES: Work 3 rounds/rows (= 2 rounds/rows with single crochets and 1 round/row with double crochets) of each color. Work stripes as follows: * heather, apricot, shocking pink, mustard, green, petrol *, repeat from *-* until finished measurements. ------------------------------------------------------ SLIPPER: Work from toe towards heel. Work 5 chain stitches with petrol on hook size 4 mm / G/6 and form a ring with 1 slip stitch in first chain stitch. READ CROCHET INFO! ROUND 1: Work 12 double crochets around chain stitch ring – beginning of round = mid under foot. ROUND 2: Switch to white. Work * 1 double crochet in first double crochet, 2 double crochets in next double crochet *, repeat from *-* the entire round = 18 double crochets. ROUND 3: Switch to petrol. Work * 1 double crochet in the first 2 double crochets, 2 double crochets in next double crochet *, repeat from *-* the entire round = 24 double crochets. ROUND 4: Switch to white. Work * 1 single crochet in each of the first 3 double crochets, 2 single crochets in next double crochet *, repeat from *-* the entire round = 30 single crochets. ROUND 5: Work 1 single crochet in every single crochet but increase 4-6-10 single crochets evenly = 34-36-40 single crochets. ROUND 6: Switch to petrol. Work 1 double crochet in every single crochet. Continue with PATTERN and STRIPES - see explanation above. REMEMBER THE CROCHET GAUGE! When piece measures approx. 10-11-13 cm, finish after 2 rounds with single crochet, cut the yarn. Insert 1 marker between the 2 middle stitches on round, i.e. after 17-18-20 single crochets. Work piece with toe towards you and count 4 stitches to the left of marker, begin working here from right side with double crochets. Work until 6 single crochets remain in total on round (i.e. 3 stitches on each side of marker mid on top of foot), turn = 28-30-34 double crochets. Continue pattern as before – work 1 slip stitch in first double crochet, then single crochets until 1 double crochet remains on row, turn. Then work back and forth over the remaining 26-28-32 stitches until piece measures approx. 21-23-26 cm in total – adjust so that next row is a row worked with double crochets. Work next row as follows: 1 double crochet in each of the first 11-12-14 single crochets, then work the next 4 double crochets together 2 by 2 – READ DECREASE TIP, then work 1 double crochet in each of the last 11-12-14 single crochets. Fasten off. Fold the slipper double and sew tog edge to edge mid back. EDGE: Work an edge around the opening on slipper with mustard as follows: ROUND 1: 1 single crochet in every single crochet mid on top of foot, 1 single crochet in transition between 2 color stripes, * 2 chain stitches, skip a color stripes, 1 single crochet in transition between the 2 next color stripes *, repeat from *-*, finish with 1 slip stitch in first single crochet. ROUND 2: Work 1 single crochet in every single crochet and 2 single crochet around every chain space. Finish round with 1 slip stitch in first single crochet. Fasten off. Work another slipper the same way. |
|
Have you finished this pattern?Tag your pictures with #dropspattern #onpointslippers or submit them to the #dropsfan gallery. Do you need help with this pattern?You'll find 11 tutorial videos, a Comments/Questions area and more by visiting the pattern on garnstudio.com. © 1982-2025 DROPS Design A/S. We reserve all rights. This document, including all its sub-sections, has copyrights. Read more about what you can do with our patterns at the bottom of each pattern on our site. |
|


With over 40 years in knitting and crochet design, DROPS Design offers one of the most extensive collections of free patterns on the internet - translated to 17 languages. As of today we count 314 catalogs and 11821 patterns - 11811 of which are translated into English (US/in).
We work hard to bring you the best knitting and crochet have to offer, inspiration and advice as well as great quality yarns at incredible prices! Would you like to use our patterns for other than personal use? You can read what you are allowed to do in the Copyright text at the bottom of all our patterns. Happy crafting!
Post a comment to pattern DROPS 189-29
We would love to hear what you have to say about this pattern!
If you want to leave a question, please make sure you select the correct category in the form below, to speed up the answering process. Required fields are marked *.