


Komentáře / Otázky (36)
![]() Sharon Schwartz napsala:
Sharon Schwartz napsala:
Thank you for your speedy answer! Im still lost and probably making more of this than is necessary. My final stitch is mid back over my marker. It's nowhere near the double crochets. 34 stitches from mid-back is still in the single crochets. 68 stitches from there into the new stitches is still single crochets. Do I continue beginning mid-back singles until I hit the double crochets again and then start increasing? I'm looking forward to getting unstuck so I can continue! Thanks again!
19.05.2025 - 13:50Odpověď DROPS Design :
Dear Mrs Schwartz, the short rows for elevation on mid back are now done, you now work with double crochets (US-English terminology), so just start from mid back as before and count 36 sts, insert a marker = first side, now count 68 sts after the first marker, add another marker = there are 36 sts after this 2nd marker towards mid back (68 sts for both front and back piece between markers and 136 sts in total). So just work with 1 dc in each stitch around increasing every round then every other round. Happy crocheting!
19.05.2025 - 15:56
![]() Sharon Schwartz napsala:
Sharon Schwartz napsala:
Hi! I was doing well until I reached the increase instructions. I stopped the single crochets mid back post turn after 96 stitches. My back measures 4 1/2 inches as expected. The next set of instructions discuss increasing around double crochets. My side markers are around single crochets and double crochets are several stitches past the markers. What have I missed? Im wondering if this is just too much for me. Thanks!
19.05.2025 - 05:47Odpověď DROPS Design :
Dear Mrs Schwartz, the markers should be inserted between stitches on each side of piece so that you will increase 2 sts on each side of shorts as follows: work until 2 sts remain before the marker thread, then work 2 dc in next dc, 2 dc (the marker thread is between these 2 sts), 2 dc in next dc - repeat at the other marker thread. Happy crocheting!
19.05.2025 - 09:43
![]() Violante napsala:
Violante napsala:
Per realizzare il modello qui sopra pantaloni e top quanto cotone deve ? grazie
01.03.2025 - 18:31Odpověď DROPS Design :
Buonasera Violante, può trovare la quantità di filato necessaria per realizzare il modello di fianco alla foto. Buon lavoro!
01.03.2025 - 18:56
![]() Ayana Smith napsala:
Ayana Smith napsala:
Hi! Loving the pattern so far, i just have a quick question. For the side increases on the shorts in the 5th size is it a total 4 side increases including the one in the first row, or is it the side increase in the first row plus four more increase rows for a total of 5 side increase rows? Thank you!
06.08.2023 - 09:47Odpověď DROPS Design :
Dear Ayana, if it's a total of 4 times then it's 4 side increases, including the one in the first row. Happy crochetting!
06.08.2023 - 22:04
![]() Odile napsala:
Odile napsala:
Hola!! No entiendo muy bien el tip para los aumentos. Dice: Trabajar hasta que queden 2 puntos altos antes del marcapuntos, trabajar 2 puntos altos en el primer punto alto, 1 punto alto en cada uno de los siguientes 2 puntos altos (el marcapuntos queda en el centro de estos puntos altos) y 2 puntos altos en el siguiente punto alto (= 2 puntos altos aumentados). Entonces, ¿el punto alto del marcapuntos lo dejo sin tejer?
22.05.2023 - 23:06Odpověď DROPS Design :
Hola Odile, no hay puntos con marcapuntos; el marcapuntos se inserta entre los puntos. Por lo tanto, trabajas hasta 2 puntos antes del marcapuntos, aumentas en el 1º punto y trabajas 1 punto alto en el siguiente punto alto, deslizar el marcapuntos, trabajar 1 punto alto en el siguiente punto alto. Por lo tanto, el marcapuntos está entre esos 2 puntos.
28.05.2023 - 17:32
![]() Sugarpiggy napsala:
Sugarpiggy napsala:
Is there a video tutorial for this? I have adhd/autism and it’s really hard for me to process written word. Also are there any patterns you’re aware of for children with severe sensory sensitivity, mostly looking for high waisted underwear.
24.12.2022 - 16:21Odpověď DROPS Design :
Dear Sugarpiggy, all videos that may help you make the pattern can be found after the pattern instructions; we don't have a specific video to make this piece. All our videos are made without sound so that they can be used for all languages. Here you can find all of our trousers and shorts for babies: https://www.garnstudio.com/search.php?action=browse&c=baby-trousers&lang=en and children: https://www.garnstudio.com/search.php?action=browse&c=children-trousers-overalls&lang=en and see if there are any that fit what you are looking for. Happy knitting!
25.12.2022 - 20:23
![]() Sabrin napsala:
Sabrin napsala:
I'm having trouble with instructions
21.06.2022 - 21:56Odpověď DROPS Design :
Dear Sabrin, please feel free to ask your question here so that we can try to help. Happy crocheting!
22.06.2022 - 08:25
![]() Xela napsala:
Xela napsala:
Liebes Team, die Maschenprobe stimmt, dennoch wird die Hose viel zu weit an der Hüfte. wie ist das möglich? lieben gruß
02.02.2022 - 21:14Odpověď DROPS Design :
Liebe Xela, sollte die Maschenprobe stimmen, dann bekommen Sie die selben Maßen wie in der Skizze, dh 180 Maschen (nach allen Zunahmen) sind 100 cm Umfang bzw 50 cm flach (siehe Maßskizze). Sollte das zu breit für Sie sein, dann sollen Sie die Zunahmen so anpassen, wie Sie es möchten. Viel Spaß beim häkeln!
03.02.2022 - 08:46
![]() Xela napsala:
Xela napsala:
Hey, danke für die tolle Anleitung! Ich habe nur ein Problem: Ich häkele die Shorts in Größe S mit Muskat und einer Häkelnadel Gr. 4. Jedoch ist mir die Shorts viel zu groß, und ich bin keinesfalls schlanker als die Person auf dem bild. Ich verstehe das nicht und bin für jeden tipp dankbar. lieben gruß!
01.02.2022 - 22:41Odpověď DROPS Design :
Liebe Xela, stimmt Ihre Maschenprobe? Sie sollten 18 Stäbchen x 9 Reihen = 10 x 10 cm haben. Damit bekommen Sie die Maßen wie in der Maßskizze für die gewählte Größe. Viel Spaß beim häkeln!
02.02.2022 - 07:57
![]() Toni S napsala:
Toni S napsala:
Takk så mye for svaret! But if the dc and the sc are worked in separate ch-spaces, then shouldn't it be an ODD number of ch-spaces created in Row 1? Because if you need to work the initial sc in the first ch-sp, then the following repeats are worked over an even number, it should work out to be an odd number overall if you need to end with a sc: (n x 2) + 1 (1 for the first sc before the repeat). That is why I was so confused about the total number having to be even; it seems backwards to me.
31.01.2022 - 15:40Odpověď DROPS Design :
Dear Toni S, for the picot, you work 3 chain stitches and in the first one of these you work a dc. The sc is then worked in the next chain space (these are the chain spaces formed in row 1). So you only need to have chain spaces for the sc; the dc are worked in stitches from row 2, not row 1. Happy crocheting!
05.02.2022 - 19:45
|
|||||||||||||||||||||||||
Micaela#micaelaset |
|||||||||||||||||||||||||
 |
 |
||||||||||||||||||||||||
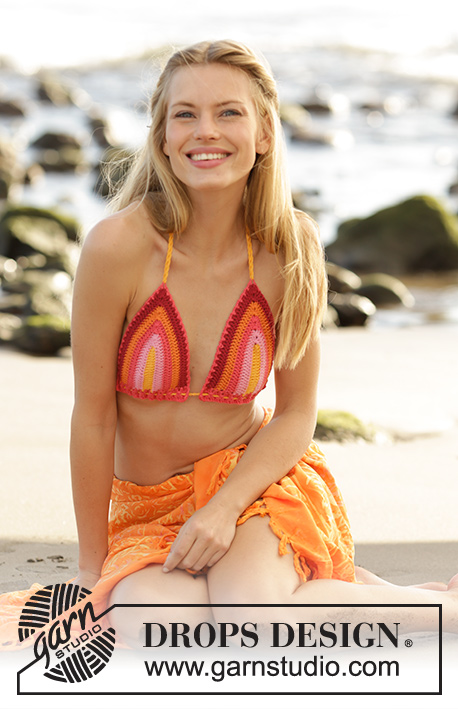
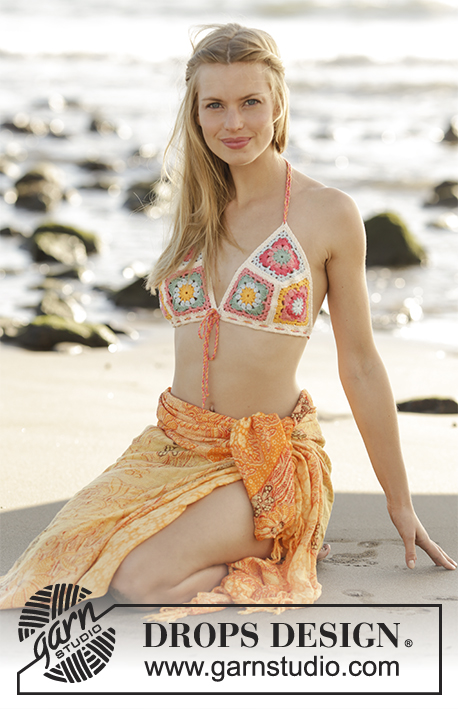
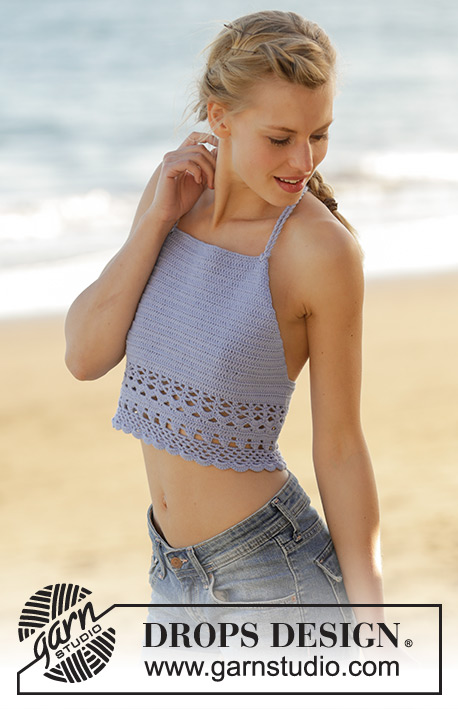
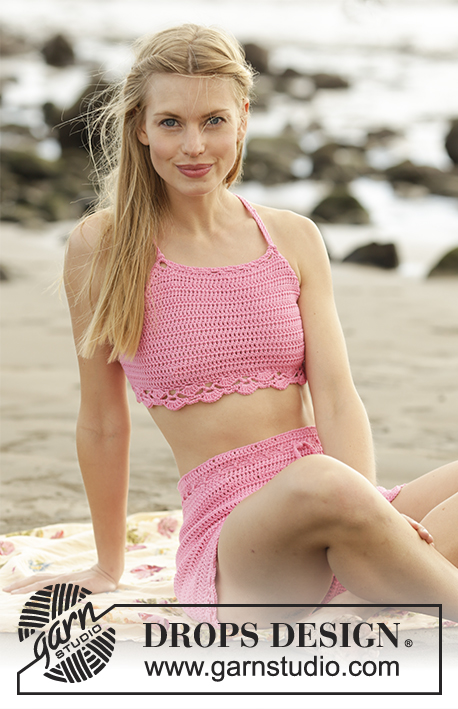
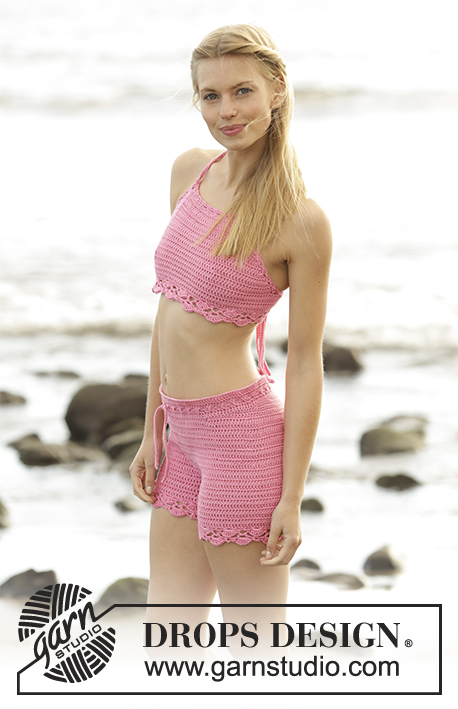
Bikiny – podprsenka - top a kalhotky - šortky háčkované z příze DROPS Muskat. Velikost S - XXXL.
DROPS 178-74 |
|||||||||||||||||||||||||
|
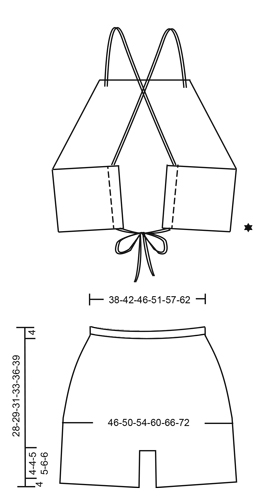
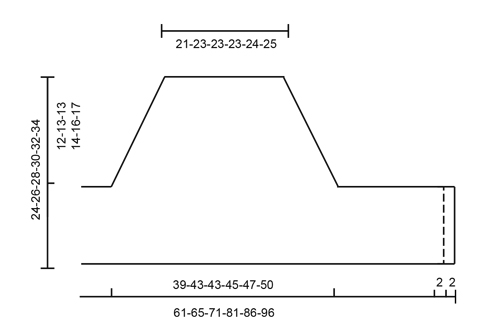
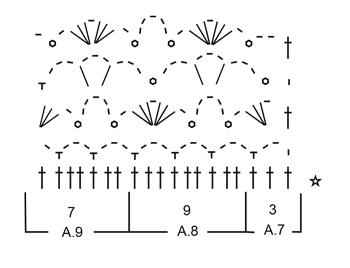
INFO (top): Na začátku každé řady dlouhých sloupků háčkujeme 5 řetízkových ok na otočení. Těchto 5 řetízkových ok nenahrazuje první dlouhý sloupek. VZOR: Viz schémata A.1 až A.9. INFO (šortky): První dlouhý sloupek na začátku každé kruhové řady dlouhých sloupků nahrazujeme 3 řetízkovými oky. Kruhovou řadu končíme 1 pevným okem do 3. řetízkového oka ze začátku kruhové řady. První krátký sloupek na začátku každé kruhové řady krátkých sloupků nahrazujeme 1 řetízkovým okem. Kruhovou řadu končíme 1 pevným okem do 1. řetízkového oka ze začátku kruhové řady. TIP - PŘIDÁVÁNÍ (šortky): Háčkujeme až po poslední 2 dlouhé sloupky před značkou, do 1. dlouhého sloupku uháčkujeme 2 dlouhé sloupky, pak po 1 dlouhém sloupku do každého z následujících 2 dlouhých sloupků (značka leží uprostřed těchto sloupků) a 2 dlouhé sloupky do dalšího dlouhého sloupku (= přidali jsme 2 dlouhé sloupky). Postup zopakujeme i na protější straně (= v kruhové řadě přidáme celkem 4 dlouhé sloupky). ---------------------------------------------------------- TOP: Háčkujeme v řadách, shora dolů. Háčkem č.4 uháčkujeme přízí Muskat 48-52-52-53-54-57 řetízkových ok (včetně 1 řetízkového oka na otočení). Práci otočíme a pokračujeme takto: 1 krátký sloupek do 2. řetízkového oka od háčku (= 1 řetízkové oko na otočení + 1 krátký sloupek), po 1 krátkém sloupku do každého z následujících 1-0-0-1-2-0 řetízkových ok, *1 řetízkové oko vynecháme, pak po 1 krátkém sloupku do každého z dalších 4 řetízkových ok*, *-* opakujeme ještě 8-9-9-9-9-10x = 38-41-41-42-43-45 krátkých sloupků. Práci otočíme a háčkujeme vzor: vzor A.1 nad prvními 5 řetízkovými oky, vzor A.2 nad dalšími 29-32-32-33-34-36 krátkými sloupky, vzor A.3 nad zbylými 4 krátkými sloupky – viz INFO! Po dokončení 1 celé sekvence vzoru A.1 až A.3 (na výšku) pokračujeme dlouhými sloupky, přitom přidáváme jako dosud, a to až do chvíle, kdy máme uháčkovaných celkem 11-12-12-13-14-15 řad dlouhých sloupků (v každé řadě přidáme 3 dlouhé sloupky). V řadě teď máme 71-77-77-81-85-90 dlouhých sloupků. Přízi odstřihneme. Uháčkujeme 22-26-33-39-44-52 volných řetízkových ok. Dál háčkujeme dlouhými sloupky jako dosud nad 71-77-77-81-85-90 dlouhými sloupky, na konci řady pak uháčkujeme 27-31-38-44-49-57 řetízkových ok (včetně 5 řetízkových ok na otočení). Práci otočíme a pokračujeme takto: 1 dlouhý sloupek do 6. řetízkového oka od háčku, pak po 1 dlouhém sloupku do každého z následujících 3-1-2-2-1-3 řetízkových ok, *1 řetízkové oko vynecháme, po 1 dlouhém sloupku do každého z dalších 5 dlouhých sloupků*, *-* opakujeme ještě 2-3-4-5-6-7x, 71-77-77-81-85-90 dlouhých sloupků jako dosud, nad řetízkovými oky na konci řady háčkujeme takto: po 1 dlouhém sloupku do každého z následujících 4-2-3-3-2-4 řetízkových ok, *1 řetízkové oko vynecháme, po 1 dlouhém sloupku do každého z dalších 5 dlouhých sloupků*, *-* opakujeme ještě 2-3-4-5-6-7x = 109-121-133-147-159-178 dlouhých sloupků. Uháčkujeme 6-7-9-10-10-11 řad dlouhých sloupků a SOUČASNĚ v poslední řadě dlouhých sloupků ujmeme rovnoměrně 0-3-6-2-5-6 ok = 109-118-127-145-154-172 dlouhých sloupků. Pokračujeme takto: vzor A.4 nad prvními 7 dlouhými sloupky, vzor A.5 nad dalšími 90-99-108-126-135-153 dlouhými sloupky (= 10-11-12-14-15-17 sekvencí vzoru po 9 okách), končíme vzorem A.6 nad posledními 12 dlouhými sloupky. Uháčkujeme 1 celou sekvenci vzoru A.4, A.5 a A.6 (na výšku). Poslední řada je lícová. Přízi odstřihneme a zapošijeme. LEM: Celý top obháčkujeme – začínáme z rubové strany na jedné krátké straně na zádech, postupujeme vzhůru podél šikmého okraje, přes řadu řetízkových ok na horní straně předního dílu, podél druhého šikmého okraje a nakonec i druhé krátké strany na zádech (podél vějířkového vzoru na dolním okraji topu háčkovat nebudeme): 1. ŘADA: 1 krátký sloupek,*3 řetízková oka, asi 1-1,5 cm vynecháme, 1 krátký sloupek*, *-* opakujeme, dbáme na to, aby byl celkový počet obloučků z řetízkových ok dělitelný 2 (tj. sudý). 2. ŘADA: 1 krátký sloupek kolem prvního obloučku z řetízkových ok, *3 řetízková oka, 1 dlouhý sloupek do 1. řetízkového oka, 1 krátký sloupek kolem následujícího obloučku z řetízkových ok*, *-* opakujeme. Přízi odstřihneme a zapošijeme. DOKONČENÍ: Okraj krátkých stran na zádech zahneme v šířce asi 2 cm do rubu a přišijeme – vznikne tunýlek na protažení vázačky. VÁZAČKA: Vyrobíme si volnou vázačku: háčkem č.4 uháčkujeme přízí Muskat řetízek z řetízkových ok dlouhý 140-150-160-170-180-190 cm. Práci otočíme a háčkujeme po 1 pevném oku do každého řetízkového oka, ale dbáme na to, aby oka nebyla moc stažená – měla by být stejně volná, jako řetízková oka! Přízi odstřihneme a zapošijeme. Stejným způsobem uháčkujeme ještě jednu vázačku. Z lícové strany protáhneme konec jedné vázačky krajní dírkou v horním okraji předního dílu, kolem dlouhého sloupku a do další dírky (= oba konce vázačky máme na lícové straně). Konce vázačky srovnáme na stejnou délku a pak je oba protáhneme pod smyčkou na rubové straně (= vytvoříme tzv. liščí smyčku), stáhneme. Stejně postupujeme i na protilehlém okraji předního dílu. Vázačky pak na zádech překřížíme a poté je protáhneme tunýlky na okrajích bočních dílů – viz nákres! Top zavazujeme na zádech. ŠORTKY: Háčkujeme v kruhových řadách, shora dolů. Háčkem č.4 uháčkujeme přízí Muskat 163-182-196-220-244-268 řetízkových ok a spojíme je pevným okem do kroužku. Označíme si začátek kruhové řady = střed zadní strany. První kruhovou řadu háčkujeme takto: 3 řetízková oka (= 1 dlouhý sloupek) – viz INFO, do každého z následujících 0-1-3-3-3-3 řetízkových ok uháčkujeme 0-1-1-1-1-1 dlouhý sloupek, *1 řetízkové oko vynecháme, po 1 dlouhém sloupku do každého z dalších 5 řetízkových ok*, *-* opakujeme ještě 26-29-31-35-39-43x = 136-152-164-184-204-224 dlouhých sloupků. Uháčkujeme další kruhovou řadu dlouhých sloupků. Teď následuje dírková řada – postupujeme takto: 4 řetízková oka (= 1 dlouhý sloupek + 1 řetízkové oko), 1 dlouhý sloupek vynecháme, *1 dlouhý sloupek do následujícího dlouhého sloupku, 1 řetízkové oko, 1 dlouhý sloupek*, *-* opakujeme v průběhu celé kruhové řady, končíme 1 pevným okem do 3. řetízkového oka ze začátku kruhové řady. V následujícíc kruhové řadě háčkujeme po 1 dlouhém sloupku do každého dlouhého sloupku/kolem každého řetízkového oka. Nyní vypracujeme zvýšení zadní strany, takto – háčkujeme KRÁTKÝMI SLOUPKY: uháčkujeme 8 krátkých sloupků za značkou uprostřed zadní strany, práci otočíme, do 1. oka uháčkujeme 1 pevné oko, pak po 1 krátkém sloupku do každého z následujících 15 krátkých sloupků, práci otočíme, 1 pevné oko do 1. oka, pak po 1 krátkém sloupku do každého z dalších 23 ok (háčkujeme i do pevných ok). Takto pokračujeme – po každém otočení uháčkujeme o 8 ok více, a to až do chvíle, kdy háčkujeme celkem 96-96-96-112-112-128 ok. Práci opět otočíme a háčkujeme zpět ke značce uprostřed zadní strany. Díl měří asi 11-11-11-12-12-13 cm (měřeno uprostřed zadní strany). Označíme si boky - vložíme 2 nové značky (první značku uprostřed zadní strany ponecháme beze změny): druhou značku dáme za prvních 34-38-41-46-51-56 ok (= bok), třetí značku vložíme za dalších 68-76-82-92-102-112 ok (= bok). Háčkujeme dlouhými sloupky (tj. po 1 dlouhém sloupku do každého dlouhého sloupku), SOUČASNĚ v 1. kruhové řadě přidáme 1 dlouhý sloupek na obou stranách každé značky na bocích – viz TIP - PŘIDÁVÁNÍ. Takto přidáváme v každé 2.-3.-4.-4.-5.-6. kruhové řadě, celkem 5-4-4-4-4-4x. SOUČASNĚ jakmile máme uháčkované 4-3-2-2-2-2 kruhové řady, přidáme 1 dlouhý sloupek na každé straně značky uprostřed zadní strany. Toto přidávání opakujeme v každé 2. kruhové řadě, celkem 5-6-7-8-9-10x. Po dokončení veškerého přidávání máme v kruhové řadě 166-180-194-216-238-260 dlouhých sloupků. Pokračujeme 1 dlouhým sloupkem do každého dlouhého sloupku až do chvíle, kdy díl měří 20-21-22-24-26-28 cm uprostřed přední strany a 27-28-29-32-34-37 cm uprostřed zadní strany. Teď díl rozdělíme na nohavičky, takto: po 1 krátkém sloupku do každého z prvních 3-3-4-4-4-5 dlouhých sloupků v kruhové řadě, práci otočíme a háčkujeme 6-6-8-8-8-10 dlouhých sloupků (tj. 3-3-4-4-4-5 dlouhých sloupků na každé straně značky uprostřed zadní strany). Těchto 6-6-8-8-8-10 dlouhých sloupků = klín. Nad těmito dlouhými sloupky (klínem) uháčkujeme v řadách 10-11-12-13-14-15 cm výšky, pak přízi odstřihneme. Klín pak přišijeme k 6-6-8-8-8-10 středovým okům uprostřed přední strany. Poté uháčkujeme nohavičky. NOHAVIČKA: Po 1 dlouhém sloupku do každého z 77-84-89-100-111-120 dlouhých sloupků po obvodu jedné nohavičky, navíc uháčkujeme 14-16-20-18-25-25 dlouhých sloupků podél klínu = 91-100-109-118-136-145 dlouhých sloupků. Pokračujeme dál dlouhými sloupky až do výše 4-4-5-5-6-6 cm. Pak dolní okraj nohavičky obháčkujeme lemem, takto: vzor A.7 (= 3 dlouhé sloupky), vzor A.8 (= 9 dlouhých sloupků) nad následujícími 81-90-99-108-126-135 dlouhými sloupky, končíme vzorem A.9 (= 7 dlouhých sloupků). Uháčkujeme + celou sekvenci vzorů A.7., A.8 a A.9 (na výšku). Přízi odstřihneme a zapošijeme. VÁZAČKA: Uháčkujeme řetízek z VOLNÝCH řetízkových ok, dlouhý 120-140-150-160-170-180 cm. Práci otočíme a háčkujeme po 1 pevném oku do každého řetízkového oka. Vázačku provlečeme dírkovou řadou v horním okraji kalhotek – začínáme uprostřed přední strany. |
|||||||||||||||||||||||||
Vysvětlivky ke schématu |
|||||||||||||||||||||||||
|
|||||||||||||||||||||||||
|
|||||||||||||||||||||||||
|
|||||||||||||||||||||||||

|
|||||||||||||||||||||||||
|
|||||||||||||||||||||||||
Dokončili jste tento model?Pak označte své fotky tagem #dropspattern #micaelaset nebo je pošlete do galerie #dropsfan. Potřebujete s tímto návodem poradit?Otevřete-li si návod na stránce garnstudio.com, najdete tam 11 výukových video-ukázek, Komentáře/Dotazy a další užitečné informace. © 1982-2025 DROPS Design A/S. Vyhrazujeme si veškerá práva. Tento dokument, včetně všech jeho dílčích částí, podléhá autorským právům. Podrobnější komentář k možnostem užití našich návodů najdete dole pod každým návodem na našich stránkách. |
|||||||||||||||||||||||||


V oblasti pletené a háčkované módy působí DROPS Design více než 40 let. Díky tomu vám můžeme nabídnout jednu z nejrozsáhlejších kolekcí modelů s bezplatnými návody dostupnými na internetu - navíc v 17 jazycích. K dnešnímu dni máme na 314 katalogů a 11822 návodů celkem - z nich je už 7048 dostupných v [češtině].
Přidejte komentář k návodu DROPS 178-74
Rádi bychom věděli, co si o tomto modelu myslíte!
Pokud se chcete na něco zeptat, dbejte prosím na to, abyste ve formuláři níže vybrali správnou kategorii - díky tomu se dříve dozvíte, co potřebujete vědět. Povinná pole jsou označena *.