
Popular categories
Looking for a yarn?


Comments / Questions (4)
![]() Loes wrote:
Loes wrote:
Ik mis de symbolen voor de kleuren
20.07.2019 - 10:36DROPS Design answered:
Dag Loes,
De symbolen staan er wel bij. Mogelijk dat de afbeeldingen tijdelijk niet goed geladen werden door je browser. Hopelijk is het inmiddels gelukt.
22.07.2019 - 11:06
![]() Anita Stassen wrote:
Anita Stassen wrote:
Volgens mij klopt het telpatroon A1 van DROPS 172-9 niet ik mis hier hokjes buj het begin van het patroon voor de murs
03.12.2016 - 20:13DROPS Design answered:
Hoi Anita. Het klopt wel. Je herhaalt het telpatroon over de st op de toer. In toer 1 heb je 14, 15 of 16 stk om de ring = 14, 15 of 16 herhalingen van het patroon. Toer 2 heb je 28-30-32 stk = 14, 15 of 16 herhalingen van het patroon in de rondte. Enzovoort.
06.12.2016 - 15:25
![]() Rebecca Gibbs wrote:
Rebecca Gibbs wrote:
So beautiful and cheery what a wonderful way to brighten some ones winter. what is even better is what a perfect idea for a Christmas gift for one that is loved! a perfect way to give them a warm hug each time they put it on.
15.06.2016 - 05:56
![]() Lauren McRoberts wrote:
Lauren McRoberts wrote:
One of my favorites! Love the colors and that it is a complete set. Please include!
12.06.2016 - 01:27
|
||||||||||||||||||||||
Pink Maze#pinkmazeset |
||||||||||||||||||||||
 |
 |
|||||||||||||||||||||
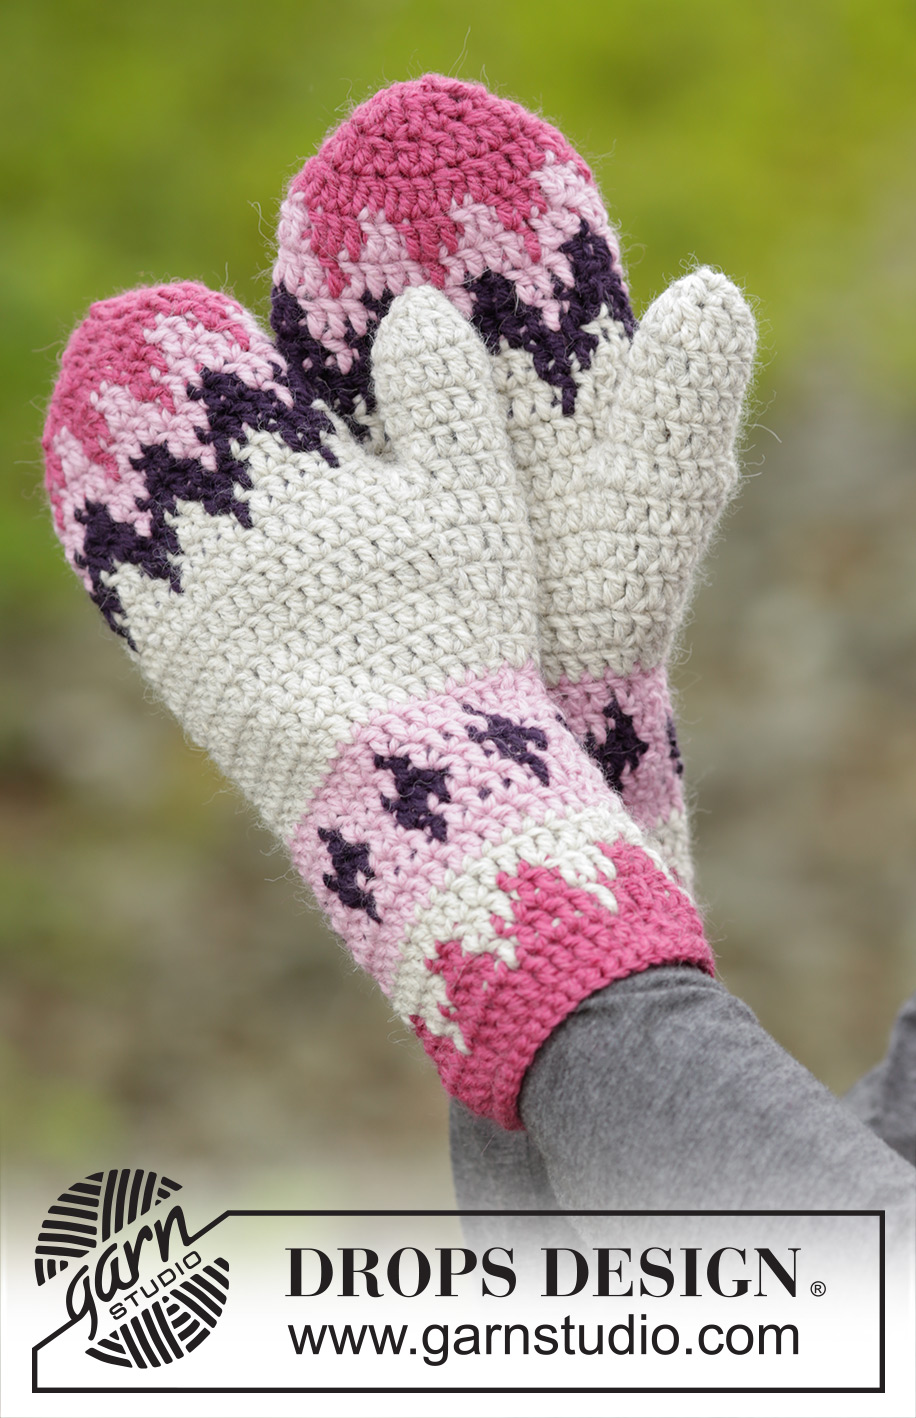
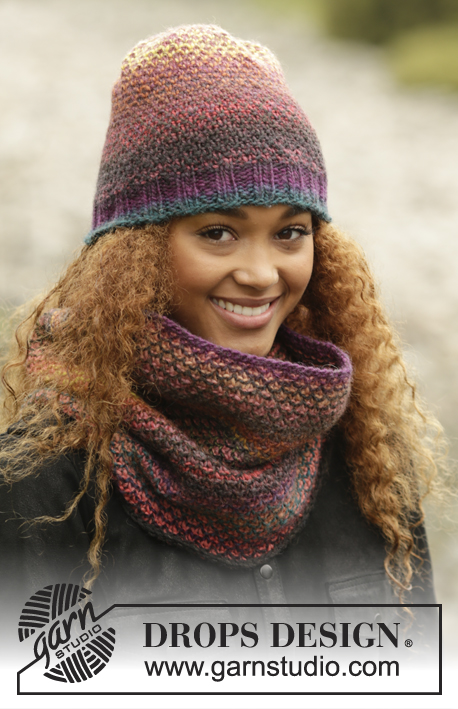
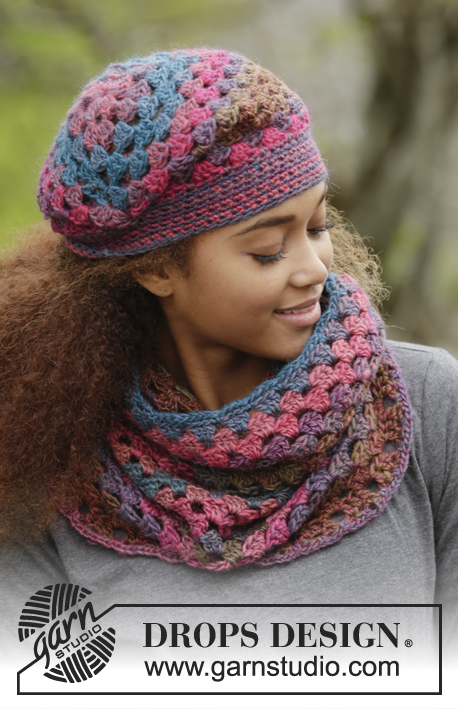
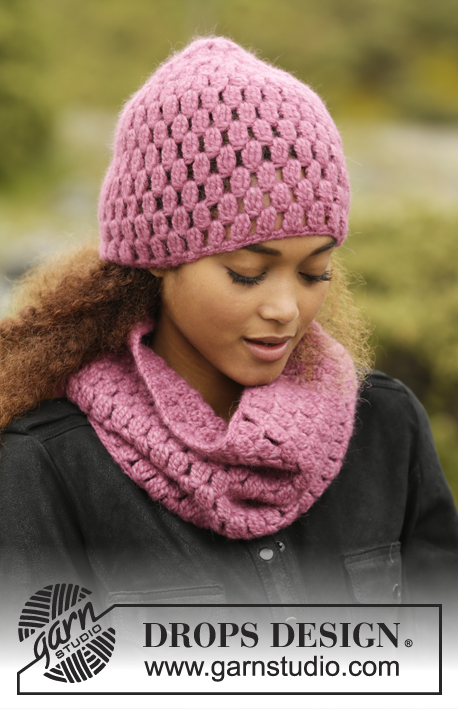
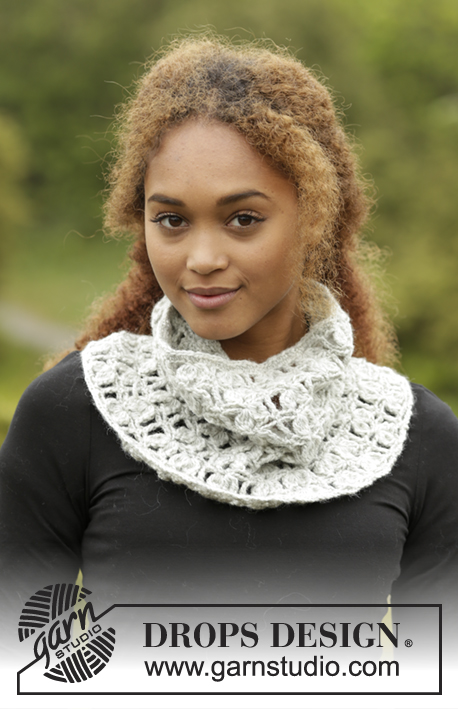
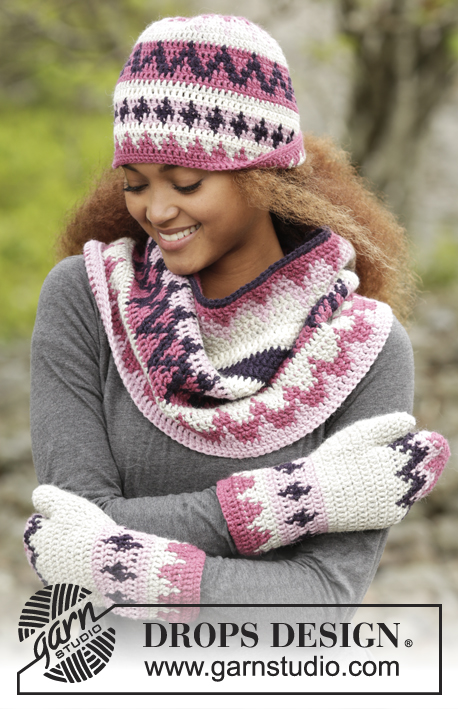
Crochet DROPS hat, neck warmer and mittens with multi-coloured pattern in “Nepal”.
DROPS 172-9 |
||||||||||||||||||||||
|
CROCHET INFO: Replace first tr at beg of every tr round with 3 ch. Finish round with 1 sl st in 3rd ch at beg of round. Replace first dc at beg of every dc round with 1 ch. Finish round with 1 sl st in 1st ch at beg of round. COLOUR PATTERN (worked in the round): When changing colour work as follows: Work last tr with first colour but wait with last pull through, switch to next colour and work last pull through, then work next tr. When working with two colour place strand for the colour not worked over sts from previous round, work around the strand so that it is hidden and follows in the round. Make sure not to tighten the yarns. Replace first tr with 3 ch, if last tr on previous round and first tr on next round are different colour work last tr as follows: Work last tr with first colour but wait with last pull through, switch to next colour and work last pull through, 1 sl st in 3rd ch at beg of round, then work 3 ch (= beg of round). PATTERN: See diagrams A.1 to A.5. Diagrams show colours on hat, neck warmer and mittens. 1 square in diagram = 1 tr. DECREASE TIP (APPLIES TO MITTEN): Dec 1 tr by working the next 2 tr tog as follows: Work 1 tr but wait with last pull through (= 2 sts on hook), then work next tr but on last pull through, pull yarn through all 3 sts on hook. 3 TR TOG (applies to mitten): Work 3 tr tog as follows: Work 1 tr in ch but wait with last pull through, work 2 tr in same ch the same way, make 1 YO and pull yarn through all sts on hook. 2 DC WORKED TOG (applies to mitten): Dec 1 dc by working 2 dc tog as follows: * Insert hook in next st, get yarn *, repeat from *-* one more time, make a YO and pull yarn through all 3 sts on hook. ---------------------------------------------------------- HAT: The piece is worked top down. Crochet 5 ch with raspberry rose on hook size 4.5 mm and form a ring with a sl st in first ch. Then work in the round and according to diagram A.1 - READ COLOUR PATTERN, as follows: ROUND 1: Work 14-15-16 tr in ring – read CROCHET INFO. ROUND 2: Work 2 tr in every tr = 28-30-32 tr. REMEMBER THE CROCHET TENSION! ROUND 3: Work * 1 tr in first tr, 2 tr in the next tr *, repeat from *-* the entire round = 42-45-48 tr. ROUND 4: Work * 1 tr in each of the first 2 tr, 2 tr in next tr *, repeat from *-* the entire round = 56-60-64 tr. REMEMBER THE CROCHET TENSION! ROUND 5: Work * 1 tr in each of the first 3 tr, 2 tr in next tr *, repeat from *-* the entire round = 70-75-80 tr. ROUND 6: Work * 1 tr in each of the first 4 tr, 2 tr in next tr *, repeat from *-* the entire round = 84-90-96 tr. Piece measures approx. 7 cm. Then work 1 tr in every tr and pattern A.1 as before (= 14-15-16 times in width). On last round in A.1 inc 0-2-0 tr evenly = 84-92-96 tr. When A.1 has been worked 1 time vertically, piece measures approx. 17 cm. Then work A.2 (= 4 tr) in total 21-23-24 times in width. When A.2 has been worked 1 time vertically, (piece measures approx. 25 cm) work 0-0-2 rounds with raspberry rose. Turn piece (i.e. work from WS), work 1 dc in every tr with raspberry rose. Fasten off. Piece measures approx. 25-25-27 cm. ---------------------------------------------------------- NECK WARMER: Worked in the round. The piece is worked top down. Work 96-103 ch on hook size 5.5 mm with raspberry rose and form a ring with 1 sl st in first ch. Work 3 ch (= 1 tr) - READ CROCHET INFO, work 1 tr in each of the first 5 ch, * skip 1 ch, 1 tr in each of the next 6 ch *, repeat from *-* the entire round, finish with 1 sl st in 3rd ch at beg of round = 84-90 tr. Work A.3 14-15 times in total on round - READ COLOUR PATTERN. REMEMBER THE CROCHET TENSION! On 5th, 8th and 10th round inc 12 tr evenly = 120-126 tr. Every time you inc, repeat A.3 2 more times in total in width. On 12th and 19th round inc 6-12 tr evenly = 132-150 tr. Every time you inc, repeat A.3 1-2 more times in total in width. When A.3 has been worked 1 time vertically, turn piece (i.e. work from WS), work 1 dc in every tr with medium pink. Fasten off. Piece measures approx. 32 cm. EDGE: Work 1 edge in ch-row at the top of neck warmer with dark purple. Work 1 round with 1 dc in every ch tr was worked in on first round. Fasten off. ---------------------------------------------------------- MITTEN: Work 33-39 ch on hook size 4.5 mm with raspberry rose and form 1 ring with 1 sl st in first ch. Work 3 ch (= 1 tr) – READ CROCHET INFO, work 1 tr in each of the first 5-4 ch, * work 1 tr in each of the next 6 ch, skip 1 ch*, repeat from *-* the entire round, finish with 1 sl st in 3rd ch = 30-35 tr. Work A.4 6-7 times in total on round - READ COLOUR PATTERN. When A.4 has been worked 1 time vertically, piece measures approx. 10 cm. REMEMBER THE CROCHET TENSION! Continue with light grey. On next round inc 1 tr for thumb on each side of the first tr on round (= 2 tr inc) - inc 1 tr by working 2 tr in same tr. Repeat inc on each side of this st every round 5 times in total = 40-45 tr on round (thumb sts = 11 tr). Piece measures approx. 17 cm in total. Work 1 sl st in each of the first 11 tr (= thumb sts) at beg of round, 3 ch (= 1 tr), then work 1 tr in every tr, finish with 1 ch and 1 sl st in 3rd ch at beg of round = 29-34 tr and 1 ch on round. On next round, work 1 tr in every tr and in ch at the end of round work 3 TR TOG - see explanation above = 30-35 tr. Work A.5 6-7 times on round. After 6 round of A.5 work and dec as follows - see diagram: ROUND 7: * Work the first/next 2 tr tog (= 1 tr dec) – READ DECREASE TIP, work 1 tr in next tr, work the next 2 tr tog (= 1 tr dec) *, repeat from *-* 6-7 times in total = 18-21 tr. ROUND 8: * Work 1 tr in first/next tr, work the next 2 tr tog *, repeat from *-* 6-7 times in total = 12-14 tr. ROUND 9: Work all tr tog 2 by 2 = 6-7 tr. Cut the yarn, baste it up and down through sts at the top of mitten, pull yarn to tighten and fasten tightly. THUMB: Continue with light grey. ROUND 1: Work 1 sl st in the first of the 11 thumb sts, 3 ch (= 1 tr), then work 1 tr in each of the 10 tr, * work 2 tr tog around ch behind thumb *, repeat from *-* 3 times in total = 14 tr. ROUNDS 2-3: Work 1 tr in every tr = 14 tr. Try the mitten on, approx. 1 cm remains until finished thumb measurements. Work 1 more round with 1 tr in every tr if needed. ROUND 4: Work tr tog 2 by 2 = 7 tr. ROUND 5: Work 2 and 2 dc tog - READ 2 DC WORKED TOG. Cut the yarn, baste it up and down through sts at the top of thumb, pull yarn to tighten and fasten tightly. EDGE: Around ch-row at the beg of mitten work 1 edge with raspberry rose as follows from WS: Work 1 dc in every ch there was worked tr in on first round, i.e. Do not work in the ch skipped on first round. Fasten off. Work another mitten but inc on each side of last st on round, then do not work sl sts over the first 11 sts. |
||||||||||||||||||||||
Diagram explanations |
||||||||||||||||||||||
|
||||||||||||||||||||||

|
||||||||||||||||||||||
Have you finished this pattern?Tag your pictures with #dropspattern #pinkmazeset or submit them to the #dropsfan gallery. Do you need help with this pattern?You'll find 12 tutorial videos, a Comments/Questions area and more by visiting the pattern on garnstudio.com. © 1982-2025 DROPS Design A/S. We reserve all rights. This document, including all its sub-sections, has copyrights. Read more about what you can do with our patterns at the bottom of each pattern on our site. |
||||||||||||||||||||||


With over 40 years in knitting and crochet design, DROPS Design offers one of the most extensive collections of free patterns on the internet - translated to 17 languages. As of today we count 314 catalogues and 11822 patterns translated into English (UK/cm).
We work hard to bring you the best knitting and crochet have to offer, inspiration and advice as well as great quality yarns at incredible prices! Would you like to use our patterns for other than personal use? You can read what you are allowed to do in the Copyright text at the bottom of all our patterns. Happy crafting!
Post a comment to pattern DROPS 172-9
We would love to hear what you have to say about this pattern!
If you want to leave a question, please make sure you select the correct category in the form below, to speed up the answering process. Required fields are marked *.