
Looking for a yarn?


Comments / Questions (60)
![]() Monica wrote:
Monica wrote:
Hva er målene på bikinitrusen?
14.05.2025 - 08:42DROPS Design answered:
Hei Monica. Den har ingen målskisse. Bikinitrunsen har knyting i siden, slik at man kan juserer størrelsen. Men om du ønsker å vite cm størrelsen der det hekles staver, kan du kan regne utifra hvor mange staver det hekles i den str. du hekler etter og se på den oppgitte heklefastheten (hvor mange staver man skal ha pr 10 cm). mvh DROPS Design
19.05.2025 - 14:04
![]() Hege wrote:
Hege wrote:
Hej, når man skal hekle sammen cupene skal det gjöres fra retten og det skal settes et merke i den förste luftmasken. Når man senere skal hekle kanten skal dette også gjöres fra retten. For meg blir det på vrangen og jeg må starte i motsatt ende av "ryggbandet" for å kunne hekle kanten fra retten. Er det jeg som har gjort noe feil, er det feil beskrevet i mönstret eller er det noe jeg ikke forstår?
13.09.2024 - 06:44DROPS Design answered:
Hei Hege. Når du har heklet 3. og 4. rad 2-2-2-3-3-3 ganger til, skal det nå hekles en picot kant (fra retten) og når den er ferdig klippes og festes tråden. Så når du skal hekle KANT, starter du fra retten. mvh DROPS Design
16.09.2024 - 13:25
![]() Esther wrote:
Esther wrote:
Buenos días, hay un error en la parte de unir las dos copas, verdad? Se repiten un par de párrafos, creo
23.05.2023 - 10:39DROPS Design answered:
Hola Esther, el patrón es correcto. Qué fila de la unión es la que te causa dudas? Ten en cuenta que a la vez que trabajas la unión de las copas también tienes p.de cad a cada lado de la unión (47-56-65-75-84-98 p.de cad flojos), para la parte posterior del bikini.
28.05.2023 - 17:19
![]() Esther wrote:
Esther wrote:
Hola! estoy tejiendo la talla L, y al llegar a la fila 13 tengo 42 puntos a cada lado...¿que significa eso de ajustar a 48 a cada lado de la cadeneta? ¿Tenía que haber ido creciendo previamente?¡Gracias!
19.03.2023 - 00:20DROPS Design answered:
Hola Esther, no, dependiendo del número de puntos que tengas en esta fila tienes que aumentar o disminuir en esta misma fila hasta obtener 48 puntos altos a cada lado.
19.03.2023 - 20:14
![]() Martin wrote:
Martin wrote:
Hei, ganske ny til hekling, og lurte på denne: hekle (2 st, 1 lm, 2 st) i den siste lm på raden, ( i starten av overdelen). Hvordan skal man hekle det som står inne i parentesen?
15.01.2023 - 01:43DROPS Design answered:
Hei Martin. Jo, da skal du hekle 2 staver i siste maske, så 1 luftmaske og så 2 staver i samme maske som du heklet de 2 første stavene i. Altså i samme maske hekles det: 2 staver + 1 luftmaske+ 2 staver. mvh DROPS Design
16.01.2023 - 12:55
![]() Terri wrote:
Terri wrote:
Where are the size measurements for the bikini panties? I do not see a schematic drawing for them, only the top is shown with measurements.
31.10.2022 - 19:19DROPS Design answered:
Dear Terri, Sorry but we don't have a schematic drawing for the bikini panties. Remember that the pants can be adjusted with the ties in both sides. Happy crocheting!
01.11.2022 - 15:30
![]() Frøydis wrote:
Frøydis wrote:
Til andre som vil hekle denne: selv i S, og med en rad mindre enn det oppskriften sier, er cup'en litt i største laget for en som bare fyller en liten A... Ville forsøkt med litt kortere start-rad, altså færre masker. Jeg er ikke så erfaren, men det går helt sikkert an å regne om til noe som "går opp".
29.08.2022 - 21:12
![]() Christina wrote:
Christina wrote:
Hej. I starten af opskriften for Tahiti bikini-toppen er det beskrevet, at man i slutningen af rækken skal “vride” arbejdet. Hvad menes det med “vride”? Betyder det at fortsætte med de luftmasker, som blev slået op? Mvh Christina
13.07.2021 - 10:18DROPS Design answered:
Hej Christina, ja du hækler ligesom rundt om/på begge sider af samme luftmaskerække :)
13.07.2021 - 15:09
![]() Susanne wrote:
Susanne wrote:
Hab es hingekriegt :) :) :) tausend Dank. Toll, dass es diese Seite gibt, die wunderschönen Anleitungen und die schnelle Hilfe hier auf der Seite. Liebe Grüße, Susanne
22.06.2021 - 21:36
![]() Susanne wrote:
Susanne wrote:
Noch eine Frage: Die Lm zwischen jeweils den beiden Stb wird nur aus dem Faden geholt oder muss ich dabei auch in die Lm einstechen? Dann würde es eigentlich eine feste Mache ergeben? Danke ;) Auch wenn ich so viele Fragen stelle, die Videos sind toll...
22.06.2021 - 16:39DROPS Design answered:
Liebe Susanne, leider verstehe nicht ganz was Sie hier meinen, am Ende der 1. Hälfte (in die erste Luftmasche der Luftmaschenkette) häkeln Sie 2 Stb + 1 Lm + 2 Stb, dann bei jeder den nächsten Reihen häkeln Sie wieder (2 Stb, 1 Lm, 2 Stb) um diese mittlere Lm (= in der Mitte der Reihe = oben am Cup. Kann es Ihnen helfen?
23.06.2021 - 07:44
|
|
Tahiti#tahitibikini |
|
 |
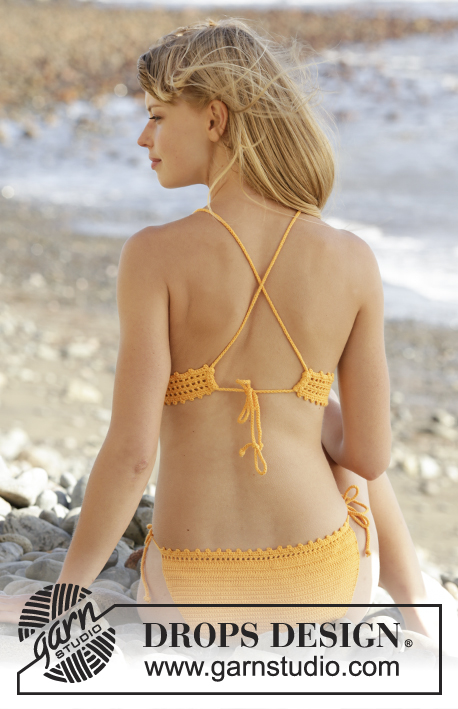 |
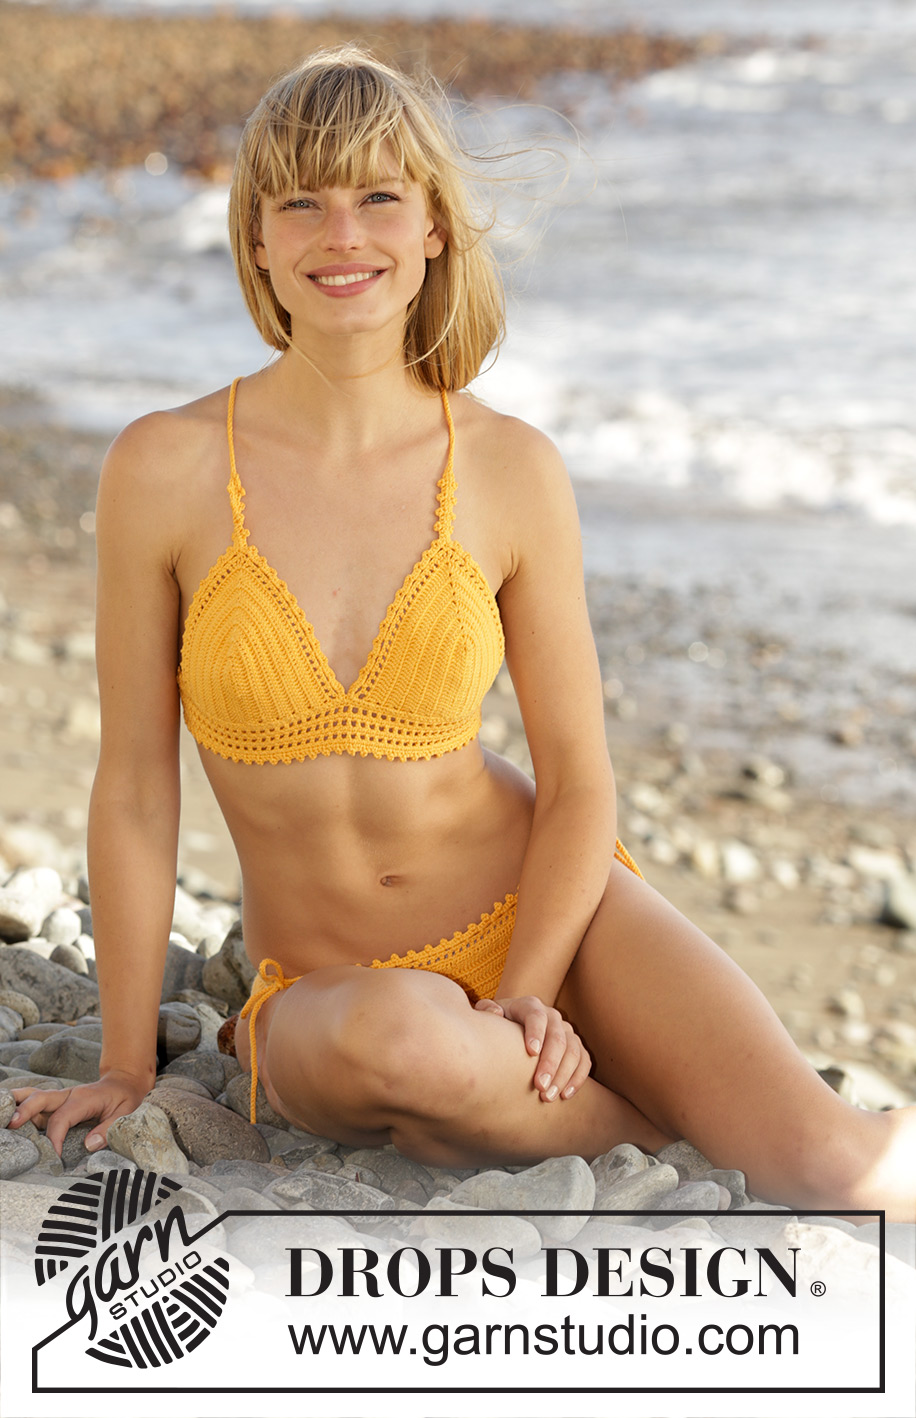
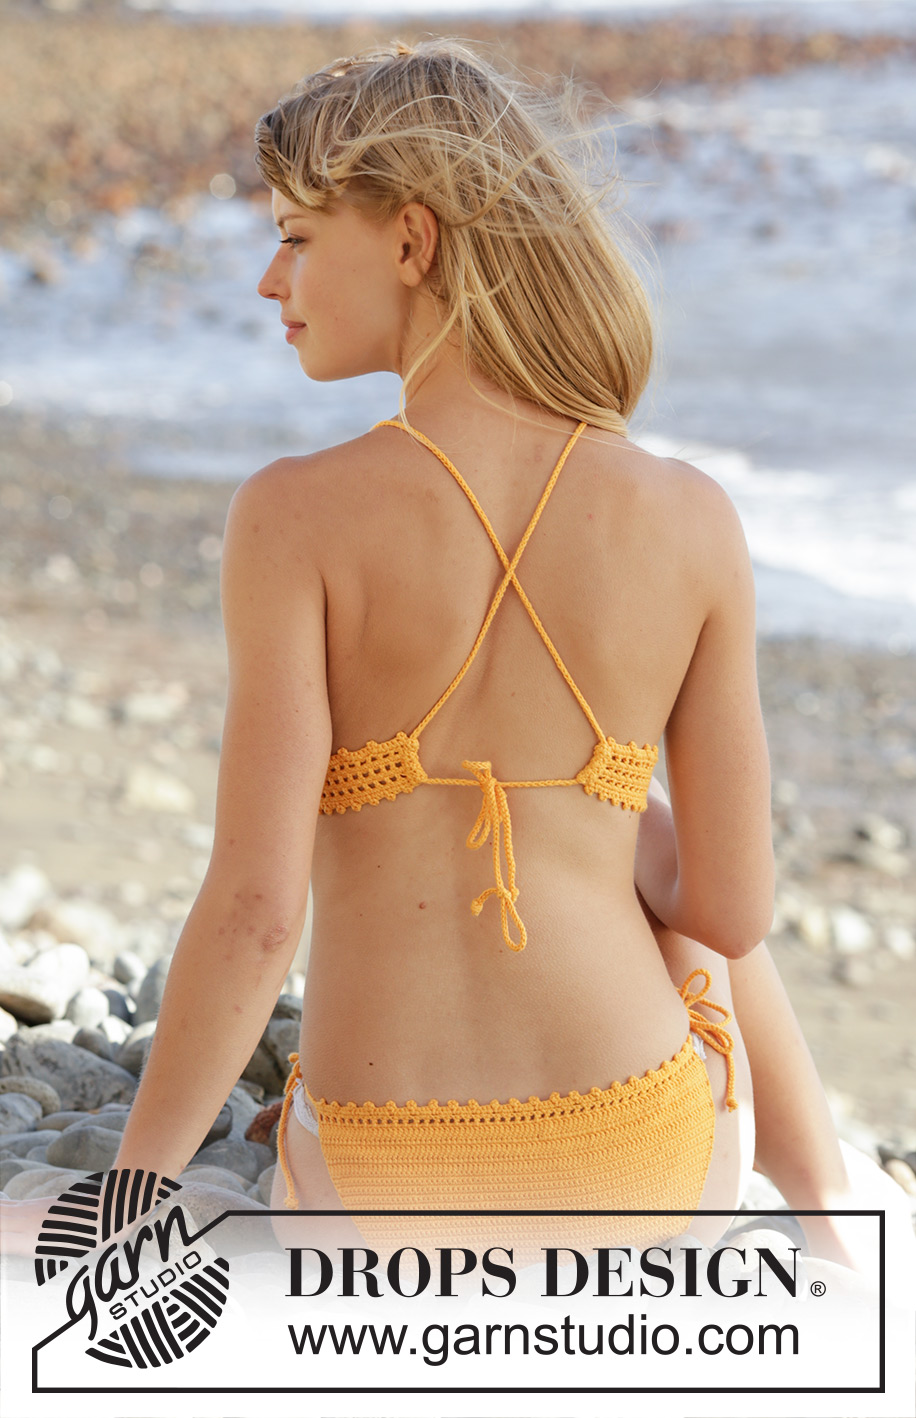
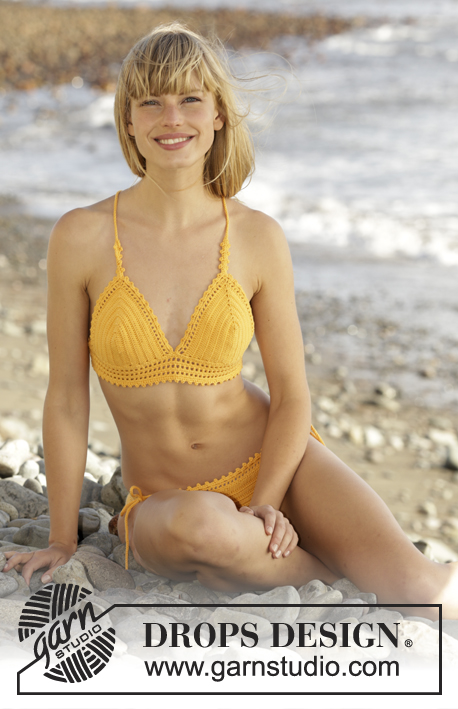
Crochet DROPS bikini with lace pattern and ties in ”Safran”. Size S-XXXL.
DROPS 170-15 |
|
|
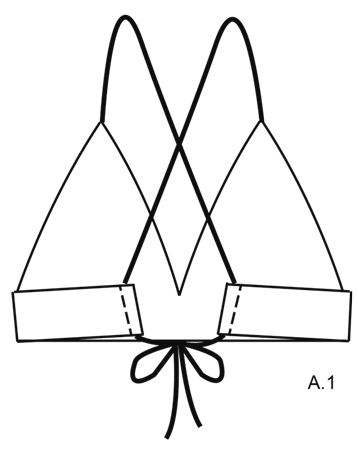
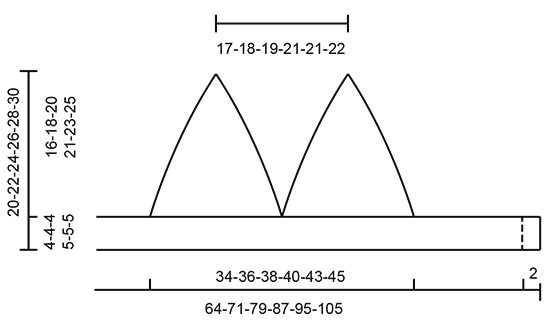
CROCHET INFO: On first row in piece work first dc in 5th ch from hook (= 2 dc). Replace first dc at beg of every dc row with 3 ch. Replace first sc at beg of every sc row with 1 ch. ---------------------------------------------------------- BIKINI TOP: First work 2 loose bra cups. The work the 2 bra cups tog. BRA CUP: Work 21-24-27-27-32-38 ch with Safran on hook size 2.5 mm/C. Work back and forth as follows (1st row = from RS): Work 1 dc in 5th ch from hook (= 2 dc) - READ CROCHET INFO, then work 1 dc in each of the next 15-18-21-21-26-32 ch, work (2 dc, ch 1, 2 dc) in the last ch on row, rotate piece, skip last ch (i.e. ch just worked in) and continue with 1 dc in each of the remaining 17-20-23-23-28-34 ch on the other side of ch-row = 38-44-50-50-60-72 dc + 1 ch. Turn piece and continue back and forth with 1 dc in every dc on each side of ch-row and work (2 dc, ch 1, 2 dc) around ch at the top of each row. REMEMBER THE CROCHET GAUGE! Continue like this until 11-12-13-14-14-15 rows in total with dc have been worked, but on last row adjust no of sts so that there are 40-44-48-52-56-64 dc on each side of ch at the top (= 80-88-96-104-112-128 dc in total). Piece measures approx. 7-7½-8-9-9-9½ cm / 2 3/4"-2 7/8"-3 1/8"-3½"-3½"-3 3/4" from ch-row and outwards. NOTE: Next row worked is from RS. I.e. the yarn must be cut in size S, L and XXXL before continuing. Now work an edge as follows: ROW 1 (= RS): Work * 1 dc, ch 1, skip next dc *, repeat from *-* until 2 dc remain before ch at the top of bra cup, work 1 dc in next dc, ch 1, 1 dc in next dc (= last dc before ch at the top), work (1 ch, 1 dc, ch 1, 1 dc, 1 ch) around ch, then work the same way but reversed down on opposite side of bra cup as follows: Work 1 dc in first dc after ch at the top, ch 1, 1 dc in next dc, continue with * ch 1, skip next dc, 1 dc *, repeat from *-* the rest of the row. ROW 2: Turn and work 1 sc in first dc, * work ch 3, skip (1 ch, 1 dc, 1 ch), 1 sc in next dc *, repeat from *-* up to ch at the top of bra cup but work last sc around the middle ch at the top of bra cup. Then work ch for tie by working ch for 85-90-90-95-100-100 cm / 33½"-35½"-35½"-37½"-39½"-39½" (measured from the top of bra cup). Turn and work 1 sl st in every ch. NOTE: Make sure that sl sts does not tighten ch row. Then work reversed of the other side of bra cup as follows: 1 sc around ch-space at the top of bra cup (i.e. there are 2 sc around same ch-space), * work ch 3, skip (1 ch, 1 dc, 1 ch), 1 sc in next dc *, repeat from *-* down along the entire edge. Cut the yarn. Work another bra cup the same way. Now work the 2 bra cups tog into a top. NOTE: Make sure to work over both bra cups seen from RS. ROW 1 (= RS): Work 47-56-65-75-84-98 loose ch and insert a marker in the first ch worked (work an edge beg from this marker later in piece). Then work 48-50-53-56-59-62 sc evenly around the outermost dc/sc (i.e. along edge at the bottom on one bra cup), work 1 ch (= between the 2 bra cups), work 48-50-53-56-59-62 sc evenly around the outermost dc/sc (i.e. along edge at the bottom on the other bra cup), them work 47-56-65-75-84-98 loose ch (includes 1 ch to turn with) at the end of row = 191-213-237-263-287-321 sts. ROW 2: Work 1 sc in 2nd ch from hook (= 2 sc), work 1 sc in each of the next 3-5-7-3-5-5 ch, * skip ch 1, work 1 sc in each of the next 6 ch *, repeat from *-* 5-6-7-9-10-12 more times (= 41-49-57-65-73-85 sc), now work 1 sc in each of the next 97-101-107-113-119-125 sc/ch, * work 1 sc in each of the next ch 6, skip 1 ch *, repeat from *-* 5-6-7-9-10-12 more times, work 1 sc in each of the last 5-7-9-5-7-7 ch (= 41-49-57-65-73-85 sc) = 179-199-221-243-265-295 sc on row. ROW 3: Work 1 dc in each of the first 5 sc, * work ch 1, skip 1 sc, 1 dc in next sc *, repeat from *-* until 4 sc remain, work 1 dc in each of the last 4 sc. ROW 4: Work 1 sc in every dc and around every ch. Repeat 3rd and 4th row 2-2-2-3-3-3 more times. Then work as follows: Work 1 sc in each of the first 5-8-5-6-6-6 sc, * work 1 sc in each of the next 2 sc, work ch 3, work 1 sl st in last sc worked (= picot), 1 sc in next sc *, repeat from *-* until 6-8-6-6-7-7 sc remain, work 1 sc in each of the last 6-8-6-6-7-7 sc. Fasten off. EDGE: Now work an edge, beg from marker. NOTE: Skip the ch sts not worked. Work as follows from RS: Work 1 sc in each of the first ch 5, * work 1 sc in next ch, ch 3, 1 sl st in last sc worked (= picot), work 1 sc in each of the next 4 ch *, repeat from *-* until 1-4-2-0-3-0 ch remain before bra cup, work 1 sc in each of the next 1-4-2-0-3-0 ch and 1 sc in corner in transition for bra cup. Then work * 1 sc around first ch-space on bra cup, ch 3, 1 sc around same ch-space, work 1 sc in next sc *, repeat from *-* up to strap on bra cup. Now work in sl st row:* 1 sc in each of the first 3 sl sts, ch 3, 1 sl st in last sc worked *, repeat from *-* 3-3-4-4-5-5 more times, work 1 sc in each of the next 2 sc, 1 sl st in next sl st. Now do not work up along the strap but turn and work down towards bra cup again: Work 1 sl st through 1 ch on the back of strap and continue with edge the same way but reversed in ch-row on strap, then along opposite side of bra cup, work 1 sc in ch between the 2 bra cups. Continue with edge the same way as on first bra cup and strap and then along the remaining ch cast on. Fasten off. ASSEMBLY: Sew a tunnel for the ties in each side of top as follows: Fold the 1st dc/sc inwards on WS so that it meets the 5th dc/sc and sew neatly tog through both layers. Place ties in a cross on the back and thread ends of tie through tunnel - see A.1. ---------------------------------------------------------- BIKINI PANTIES: CROCHET INFO: Replace first dc at beg of every dc row with 3 ch. Replace first sc at beg of every sc row with 1 ch. DEC ON SC-ROW: Dec 1 sc in each side on a row as follows: Work 1 sc, * insert hook in next st, get thread *, repeat from *-*, make a YO and pull yarn through all 3 loops on hook. Then work 1 sc in every st until 3 sts remain on row, repeat dec in the next 2 sts, 1 sc in last st. INCREASE TIP: Inc 1 sc in each side on a row as follows: Work 2 sc in first sc, work 1 st in every sc until 1 sc remains, work 2 sc in last sc. ---------------------------------------------------------- BIKINI PANTIES: Work bikini panties in sc with an edge on front and back piece and ties in the sides. Start at top of front piece and work in one until back piece. Work 80-90-95-105-110-120 ch on hook size 2.5 mm/C/2 with Safran. Turn and work 1 sc in 2nd ch from hook (= 2 sc) - READ CROCHET INFO, then work 1 sc in each of the next ch 3, * skip ch 1, 1 sc in each of the next 4 ch *, repeat from *-* 14-17-18-20-21-23 more times = 65-73-77-85-89-97 sc. Then work 1 sc in every sc, and on next row dec 1 sc in each side as follows - READ DECREASE TIP: Dec every 3rd row 13-13-14-14-16-16 times, every other row 6-9-9-10-10-13 times, every row 2-2-2-4-3-3 times and on every other row 2 times in all sizes = 19-21-23-25-27-29 sc. Piece measures 16-18-19-20-21-23 cm / 6 1/4"-7"-7½"-8"-8 1/4"-8 3/4". REMEMBER THE CROCHET GAUGE! Continue with 1 sc in every sc until piece measures 21-23-25-26-28-30 cm / 8 1/4"-9"-9 3/4"-10 1/4"-11"-11 3/4". On next row inc 1 st in each side as follows: Inc every other row 2 times in all sizes, every row 0-2-3-5-8-13 times and every other row 31-32-32-31-31-29 times = 85-93-97-101-109-117 sc. Continue with 1 sc in every sc until piece measures 44-46-48-50-52-55 cm / 17 1/4"-18"-19"-19 3/4"-20½"-21½". Cut the yarn. Now work an edge and ties as follows: EDGE AND TIES: Work an edge on back piece as follows: ROW 1 (= RS): Work 1 dc in first sc, * work ch 1, skip 1 sc, 1 dc in next sc *, repeat from *-* the rest of row. Cut the yarn. ROW 2: Work loose ch for approx. 29-30-31-32-33-34 cm / 11 3/8''-11¾''-12¼''-12½''-13''-13 3/8'', then continue over edge at the back as follows: * 1 sc in first/next dc, ch 3, skip 1 dc, work 1 sc in next dc *, repeat from *-* the rest of row, then work ch for 29-30-31-32-33-34 cm / 11 3/8''-11¾''-12¼''-12½''-13''-13 3/8''. ROW 3: Turn piece and work 1 sl st in every ch on tie (make sure to avoid tight sl sts), then continue over edge at the back as follows: Work 1 sc in first sc, * 2 sc around ch-space, ch 3, 1 sl st in last sc worked, 1 sc around same ch-space, 1 sc in next sc *, repeat from *-* the entire row, and continue with 1 sl st in every ch worked for tie in the side. Fasten off. Work an edge on front piece as follows: Work 1 sc in every sc. NOTE: Skip the ch sts not worked = 65-73-77-85-89-97 sc. Then work an edge and ties as on back piece. |
|
|
|
|
|
Have you finished this pattern?Tag your pictures with #dropspattern #tahitibikini or submit them to the #dropsfan gallery. Do you need help with this pattern?You'll find 10 tutorial videos, a Comments/Questions area and more by visiting the pattern on garnstudio.com. © 1982-2025 DROPS Design A/S. We reserve all rights. This document, including all its sub-sections, has copyrights. Read more about what you can do with our patterns at the bottom of each pattern on our site. |
|


With over 40 years in knitting and crochet design, DROPS Design offers one of the most extensive collections of free patterns on the internet - translated to 17 languages. As of today we count 314 catalogs and 11822 patterns - 11812 of which are translated into English (US/in).
We work hard to bring you the best knitting and crochet have to offer, inspiration and advice as well as great quality yarns at incredible prices! Would you like to use our patterns for other than personal use? You can read what you are allowed to do in the Copyright text at the bottom of all our patterns. Happy crafting!
Post a comment to pattern DROPS 170-15
We would love to hear what you have to say about this pattern!
If you want to leave a question, please make sure you select the correct category in the form below, to speed up the answering process. Required fields are marked *.