DROPS Cotton Merino
DROPS Cotton Merino
50% Wool, 50% Cotton
from 4.45 $ /50g
Get the yarn to make this pattern from 22.25$.

The yarn cost is calculated from the pattern’s smallest size and the yarn’s cheapest product type. Looking for an even better price? You might find it on the DROPS Deals!

DROPS SS24

Wendy Darling

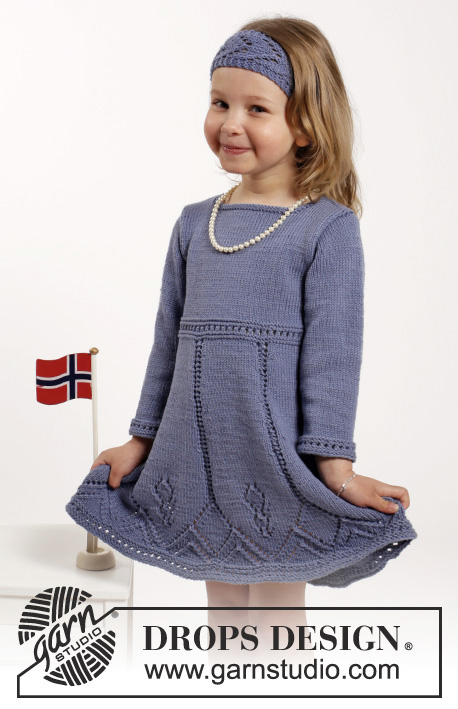
Knitted dress and hair band with lace pattern in DROPS Cotton Merino. Size children 2 - 10 years

DROPS Children 26-6
DROPS design: Pattern no cm-003-bn
Yarn group B
----------------------------------------------------------
DRESS:
Size: 2 - 3/4 - 5/6 - 7/8 - 9/10 years
All measurements in chart in cm.

Materials:
DROPS COTTON MERINO from Garnstudio
250-300-350-400-450 g color no 16, denim blue

HAIR BAND:
Size: 2/4 - 5/6 - 7/8 - 9/10 years
Head circumference: 48/50 - 50/52 - 52/53 - 54/55 cm / 19¼"-20"-20¾"-21½"
Materials:
DROPS COTTON MERINO from Garnstudio
50 g for all sizes in color no 16, denim blue

DROPS DOUBLE POINTED NEEDLES and CIRCULAR NEEDLE (60 cm / 24") SIZE 3.5 mm/US 4 - or size needed to get 22 sts x 30 rows in stockinette st = 4" x 4" (10 x 10 cm).
DROPS BUTTON: ARCHED (white), NO 521: 2 pieces for all sizes for dress.

-------------------------------------------------------

Alternative Yarn – See how to change yarns here
Yarn Groups A to F – Use the same pattern and change the yarn here
Yarn usage using an alternative yarn – Use our yarn converter here

-------------------------------------------------------

DROPS Cotton Merino
DROPS Cotton Merino
50% Wool, 50% Cotton
from 4.45 $ /50g
Get the yarn to make this pattern from 22.25$.

The yarn cost is calculated from the pattern’s smallest size and the yarn’s cheapest product type. Looking for an even better price? You might find it on the DROPS Deals!

Pattern instructions

NOTE: This pattern is written in American English. All measurements in charts are in cm. For conversion from inches to cm - click here. There are different terms for crocheting in American and British English. If this pattern includes crochet, click for "crochet terms" here. For this pattern in British English, please click here.
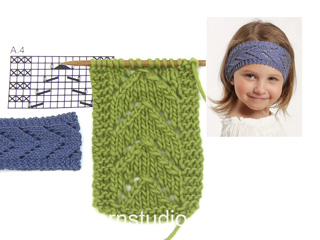
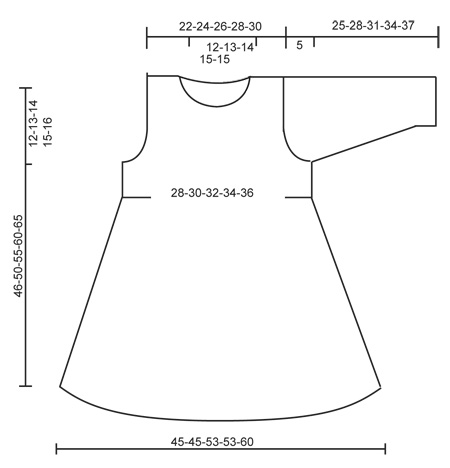
PATTERN: See diagrams A.1 to A.4.

DECREASE TIP:
Dec as follows before A.3: K 2 tog.
Dec as follows after A.3: Slip 1 st as if to K, K 1, psso

BUTTONHOLES:
Dec for buttonholes on left back piece. Dec by working second and third st tog from mid back, then make a YO.
Dec for buttonholes when band measures 2 and 4 cm / ¾" and 1½".

GARTER ST (back and forth):
K all rows. 1 ridge = K2 rows.
----------------------------------------------------------

DRESS:
Worked in the round on circular needle from bottom up.
Cast on 192-192-224-224-256 sts on circular needle size 3.5 mm / US 4 with Cotton Merino. Work A.1. Then work A.2 (= 6-6-7-7-8 repetitions in width). When A.2 has been worked 1 time vertically, work as follows - beg 1 st before first st on round: * A.3 (= 3 sts), 29 sts in stockinette st *, repeat from *-* 6-6-7-7-8 times. AT THE SAME TIME when piece measures 15 cm / 6", dec 1 st before every A.3 – READ DECREASE TIP (= 6-6-7-7-8 sts dec). Repeat dec alternately before and after A.3 every every 1-1½-1½-2-2 cm / ⅜"-½"-½"-¾"-¾" a total of 12-10-12-10-12 times = 120-132-140-154-160 sts. Continue in stockinette st and A.3 until piece measures 27-29-32-35-37 cm / 10½"-11½"-12½"-13¾"-14½". Now work A.1 over all sts, on first row in A.1 adjust no of sts to 124-132-140-148-160. Insert 2 markers in the piece; one at the beg of round and 1 after 62-66-70-74-80 sts = sides.
Continue in stockinette st over all sts. When piece measures 34-37-41-45-49 cm / 13½"-14½"-16"-17¾"-19¼", bind off 6 sts in each side for armholes (i.e. 3 sts on both sides of every marker) and finish each piece separately.

BACK PIECE:
= 56-60-64-68-74 sts. Continue bind off for armholes in each side at beg of every row as follows: 2 sts 1 time and 1 st 2-2-1-1-2 times = 48-52-58-62-66 sts. When piece measures 38-42-47-52-57 cm / 15"-16½"-18½"-20½"-22½", slip the first 22-24-27-29-31 sts (from RS) on 1 stitch holder for right shoulder (work them first) and finish each shoulder separately.

LEFT SHOULDER:
= 26-28-31-33-35 sts. Continue in stockinette st but work the first 4 sts on needle (towards middle) in garter st (= button band). Dec for BUTTONHOLES - see explanation above. When piece measures 44-48-53-58-63 cm / 17¼"-19"-21"-22¾"-24¾", slip the first 4 sts on a stitch holder (work them first), then bind off the next 10-11-12-13-13 sts for neck. Then bind off 1 st on next row towards the neck = 11-12-14-15-17 sts remain on the shoulder. Bind off when piece measures 46-50-55-60-65 cm / 18"-19¾"-21½"-23½"-25½".

RIGHT SHOULDER:
Slip the 22-24-27-29-31 sts from stitch holder back on needle and cast on 4 new sts at the end of first row from RS (= button band) = 26-28-31-33-35 sts. Work as left shoulder but reversed, do not dec for buttonholes.

FRONT PIECE:
= 56-60-64-68-74 sts. Bind off for armhole in the sides as on back piece = 48-52-58-62-66 sts. When piece measures 41-45-50-55-60 cm / 16"-17¾"-19¾"-21½"-23½", slip the middle 18-20-22-24-24 sts on a stitch holder for neck and finish each shoulder separately. Then bind off on every row towards neck: 2 sts 1 time and 1 st 2 times = 11-12-14-15-17 sts remain on shoulder. Bind off when piece measures 46-50-55-60-65 cm / 18"-19¾"-21½"-23½"-25½".

SLEEVE:
Worked in the round on double pointed needles. Cast on 40-42-44-46-48 sts on double pointed needles size 3.5 mm / US 4 with Cotton Merino. Work A.1 over all sts, then work in stockinette st. Insert 1 marker at beg of round = mid under sleeve. When piece measures 6 cm / 2⅜", inc 1 st on each side of marker. Inc every 6-3½-3-3-3 cm / 2½"-1¼"-1"-1"-1" 2-4-6-7-8 more times = 46-52-58-62-66 sts. When piece measures 20-23-26-29-32 cm / 8"-9"-10¼"-11½"-12½", bind off 6 sts mid under sleeve for sleeve cap. Then work sleeve back and forth while AT THE SAME TIME dec for sleeve cap in each side as follows: Dec 2 sts in each side until piece measures 24-27-30-33-36 cm / 9½"-10½"-11¾"-13"-14¼". Bind off 3 sts in each side, then bind off the remaining sts. Piece measures approx. 25-28-31-34-37 cm / 9¾"-11"-12¼"-13½"-14½".

ASSEMBLY:
Sew the shoulder seams. Sew in sleeves. Sew the buttons on to right band. Then place the 4 sts from right back piece behind the 4 sts on the left back piece and fasten with small sts.


NECK EDGE: Pick up approx. 72 to 88 sts (includes sts on stitch holders) around the neck on circular needle size 3.5 mm / US 4. Work 2 ridges. Bind off.
----------------------------------------------------------

HAIR BAND:
Cast on 15 sts on needle size 3.5 mm / US 4 with Cotton Merino. Work 1 ridge in GARTER ST - see explanation above, then work A.4 over all sts. Continue with A.4 until piece measures 41-42-43-44 cm / 16"-16½"-17"-17¼" (lightly pull piece when measuring), work a ridge, bind off. Sew cast-on and bind-off edge tog with grafting/kitchener stitches.

Diagram

All measurements in charts are in cm.

symbols = K from RS, P from WS
symbols = P from RS, K from WS
symbols = 1 YO between 2 sts
symbols = slip 1 st as if to K, K 1, psso
symbols = K 2 tog
symbols = slip 1 st as if to K, K 2 tog, psso
diagram
diagram

Each of our patterns has specific tutorial videos to help you.

Do you have a question? See a list of frequently asked questions (FAQ)

Knitting tension is what determines the final measurements of your work, and is usually measured per 10 x 10 cm. It is provided like so: number of stitches in width x number of rows in height - eg: 19 stitches x 26 rows = 10 x 10 cm.

The knitting tension is very individual; some people knit/crochet loosely while others work tightly. You adjust the knitting tension with the needle size, which is why the suggested needle size only serve as a guide! You need to adjust this (up or down) to ensure that YOUR knitting tension matches the knitting tension provided in the pattern. If you work with a different knitting tension than provided you will have a different yarn consumption, and your work will have different measurements than what the pattern suggests.

The knitting tension also determines which yarns can replace each other. As long as you achieve the same knitting tension you can replace one yarn with another.

See DROPS lesson: How to measure your tension/gauge

See DROPS video: How to make a gauge tension swatch

The required amount of yarn is provided in grams, eg: 450 g. To calculate how many balls you’ll need you first need to know how many grams are in 1 ball (25g, 50g or 100g). This information is available if you click on the individual yarn quality on our pages. Divide the amount required with the amount of each ball. For example, if each ball is 50g (the most common amount), the calculation will be as follows: 450 / 50 = 9 balls.

The important thing when changing from one yarn to another is that the knitting/crochet tension remains the same. This is so that the measurements of the finished piece will be the same as on the sketch provided. It is easier to achieve the same knitting tension using yarns from the same yarn group. It is also possible to work with multiple strands of a thinner yarn to achieve the knitting tension of a thicker one. Please try our yarn converter. We recommend you to always work a test swatch.

Please NOTE: when changing yarn the garment might have a different look and feel to the garment in the photo, due to individual properties and qualities of each yarn.

See DROPS lesson: Can I use a different yarn than the one mentioned in the pattern?

All our yarns are categorised into yarn groups (from A to F) according to thickness and knitting tension – group A contains the thinnest yarns and group F the thickest. This makes it easier for you to find alternative yarns to our patterns, should you wish to switch yarn. All yarns within the same group have a similar knitting tension and can easily replace each other. However, different yarn qualities have different structures and properties which will give the finished work a unique look and feel.

Click here for an overview of the yarns in each yarn group

At the top of all our patterns you’ll find a link to our yarn converter, which is a helpful tool should you wish to use a different yarn than suggested. By filling in the yarn quality you wish to replace, the amount (in your size) and number of strands, the converter will present good alternative yarns with the same knitting tension. Additionally it will tell you how much you’ll require in the new qualities and whether you’ll need to work with multiple strands. Most skeins are 50g (some are 25g or 100g).

If the pattern is worked with multiple colours, every colour will have to be converted separately. Similarly, if the pattern is worked with several strands of different yarns (for example 1 strand Alpaca and 1 strand Kid-Silk) you will have to find alternatives for each, individually.

Click here to see our yarn converter

Since different yarns have different qualities and textures we have chosen to keep the original yarn in our patterns. However, you can easily find options among our available qualities by using our yarn converter, or simply pick a yarn from the same yarn group.

It is possible that some retailers still have discontinued yarns in stock, or that someone has a few skeins at home that they would like to find patterns for.

The yarn converter will provide both alternative yarn as well as required amount in the new quality.

If you think it's hard to decide what size to make, it can be a good idea to measure a garment you own already and like the size of. Then you can pick the size by comparing those measures with the ones available in the pattern's size chart.

You'll find the size chart at the bottom of the pattern.

See DROPS lesson: How to read size chart

The needle size provided in the pattern serves only as a guide, the important thing is to follow the knitting tension. And since knitting tension is very individual, you will have to adjust the needle size to ensure that YOUR tension is the same as in the pattern – maybe you’ll have to adjust 1, or even 2 needle sizes, up or down to achieve the correct tension. For this, we recommend that you work test swatches.

Should you work with a different knitting tension than the one provided, the measurements of the finished garment might deviate from the measurement sketch.

See DROPS lesson: How to measure your tension/gauge

See DROPS video: How to make a gauge tension swatch

Working a garment top-down provides more flexibility and room for personal adjustment. For example it is easier to try the garment on while working, as well as making adjustments to length of yoke and shoulder caps.

The instructions are carefully explaining every step, in the correct order. Diagrams are adjusted to the knitting direction and are worked as usual.

The diagram depicts all rows/rounds, and every stitch seen from the right side. It is read from bottom to top, from right to left. 1 square = 1 stitch.

When working back and forth, every other row is worked from the right side and every other row is worked from the wrong side. When working from the wrong side, the diagram will have to be worked reversed: from left to right, knit stitches are purled, purl stitches are knit etc.

When working in the round every round is worked from the right side and the diagram are worked from right to left on all rounds.

See DROPS lesson: How to read knitting diagrams

The diagram depicts all rows/rounds, and every stitch seen from the right side. It is worked from bottom to top, from right to left.

When working back and forth every other row is worked from the right side: from right to left and every other row is worked from the wrong side: from left to right.

When working in the round, every row in the diagram are worked from the right side, from right to left.

When working a circular diagram you start in the middle and work your way outwards, counter clockwise, row by row.

The rows usually start with a given number of chain stitches (equivalent to the height of the following stitch), this will either be depicted in the diagram or explained in the pattern.

See DROPS lesson: How to read crochet diagrams

Instructions for working several diagrams after each other on the same row/round, will often be written like so: “work A.1, A.2, A.3 a total of 0-0-2-3-4 times". This means you work A.1 once, then A.2 is worked once, and A.3 is repeated (in width) the number of times provided for your size – in this case like so: S = 0 times, M = 0 times, L=2 times, XL= 3 times and XXL = 4 times.

The diagrams are worked as usual: begin with the first row in A.1, then work the first row in A.2 etc.

See DROPS lesson: How to read knitting diagrams

See DROPS lesson: How to read crochet diagrams

The total width of the garment (from wrist-to-wrist) will be larger in the larger sizes, despite the actual sleeves being shorter. The larger sizes have longer sleeve caps and wider shoulders, so there will be a good fit in all sizes.

The measurement sketch/schematic drawing provides information regarding the full length of the garment. If it’s a jumper or a jacket the length is measured from the highest point on the shoulder (usually closest to the neckline), and straight down to the bottom of the garment. It is NOT measured from the tip of shoulder. Similarly, the length of yoke is measured from the highest point on the shoulder and down to where yoke is split into body and sleeves.

See DROPS lesson: How to read a schematic drawing

Diagrams are often repeated on the round or in height. 1 repeat is the diagram the way it appears in the pattern. If it says to work 5 repeats of A.1 in the round, then you work A.1 a total of 5 times after/next to each other in the round. If it says to work 2 repeats of A.1 vertically/in height you work the entire diagram once, then begin again at the start and work the entire diagram one more time.

Chain stitches are slightly narrower than other stitches and to avoid working the cast-on edge too tight, we simply chain more stitches to begin with. The stitch count will be adjusted on the following row to fit the pattern and measurement sketch.

The rib edge is more elastic and will contract slightly compared to, for example, stocking stitch. By increasing before the rib edge, you avoid a visible difference in width between the rib edge and the rest of the body.

It’s very easy to cast off too tightly, and by making yarn overs while casting off (and simultaneously casting these off) you avoid a too tight cast off edge.

See DROPS video: How to bind off with yarn overs (yo)

To achieve an even increase (or decrease) you can increase on, for example: every 3rd and 4th row alternately, like so: work 2 rows and increase on the 3rd row, work 3 rows and increase on the 4th. Repeat this until the increase is complete.

See DROPS lesson: Increase or decrease 1 st on every 3rd and 4th row alternately

Should you prefer to work in the round instead of back and forth, you may of course adjust the pattern. You’ll need to add steeks mid-front (usually 5 stitches), and follow the instructions. When you would normally turn and work from the wrong side, simply work across the steek and continue in the round. At the end you’ll cut the piece open, pick up stitches to work bands, and cover the cut edges.

See DROPS video: How to knit steeks and cut open

Should you prefer to work back and forth instead of in the round, you may of course adjust the pattern so you work the pieces separately and then assemble them at the end. Divide the stitches for the body in 2, add 1 edge stitch in each side (for sewing) and work the front and back pieces separately.

See DROPS lesson: Can I adapt a pattern for circular needles into straight needles?

Pattern repeats can vary slightly in the different sizes, in order to get the correct proportions. If you’re not working the exact same size as the garment in the photo, yours might deviate slightly. This has been carefully developed and adjusted so that the complete impression of the garment is the same in all sizes.

Make sure to follow instructions and diagrams for your size!

If you have found a pattern you like which is available in women’s size it’s not very difficult to convert it to men’s size. The biggest difference will be the length of sleeves and body. Start working on the women size that you think would fit across the chest. The additional length will be worked right before you cast off for the armhole/sleeve cap. If the pattern is worked top-down you can add the length right after the armhole or before the first decrease on sleeve.

Regarding additional yarn amount, this will depend on how much length you add, but it is better with a skein too many than too few.

All yarns will have excess fibres (from production) that might come off as lint or shedding. Brushed yarns (ie hairier yarns) have more of these loose, excess fibres, causing more shedding.

Shedding also depends on what is worn under or over the garment, and whether this pulls at the yarn fibres. It’s therefore not possible to guarantee that there will be no shedding

Below are some tips on how to get the best result when working with hairier yarns:

1. When the garment is finished (before you wash it) shake it vigorously so the looser hairs come off. NOTE: do NOT use a lint roller, brush or any method that pulls at the yarn.

2. Place the garment in a plastic bag and put it in your freezer - the temperature will cause the fibres to become less attached to each other, and excess fibres will come off easier.

3. Leave in the freezer for a few hours before taking it out and shaking it again.

4. Wash the garment according to the instructions on the yarn label.

Pilling is a natural process that happens to even the most exclusive of fibers. It's a natural sign of wear and tear that is hard to avoid, and that is most visible in high friction areas of your garment like a sweater's arms and cuffs.

You can make your garment look as new by removing the pilling, using a fabric comb or a pill/lint remover.

Still can't find the answer you need? Then scroll down and leave your question so one of our experts can try to help you. This will be done normally within 5 to 10 working days.
In the meantime, you can read the questions and answers that others have left to this pattern or join the DROPS Workshop on Facebook to get help from fellow knitters/crocheters!

You might also like...

Post a comment to pattern DROPS Children 26-6

We would love to hear what you have to say about this pattern!

If you want to leave a question, please make sure you select the correct category in the form below, to speed up the answering process. Required fields are marked *.

Comments / Questions (115)

country flag Rukhsana wrote:

I didnt uderstand this, «to slip the first 4 sts on a stitch holder (work them first),{ are these 4 sts cast off first }then cast off the next -12 sts for neck. Then cast off 1 st on next row towards the neck = 14 sts .plz explain

22.02.2021 - 13:14

DROPS Design answered:

Dear Rukhsana, work the first 4 sts from right side (left shoulder) / from wrong side (right shoulder) and slip them on a thread. Work row to the end, turn and work return row. At the beg of next row from neck (the same side where you slipped the 4 sts), cast off 1 more stitch. When working neck edge, you will then knit up these 4 sts while picking up stitches along neck edge. Happy knitting!

22.02.2021 - 13:40

country flag Rukhsana wrote:

Plz explain it how to work on first 4 sts im knitting 110/116 size, slip the first 4 sts on a stitch holder (work them first), then cast off the next 10-11-12-13-13 sts for neck. Then cast off 1 st on next row towards the neck = 11-12-14-15-17 sts remain on the shoulder. Thank you

21.02.2021 - 20:10

DROPS Design answered:

Hi Rukhsana, The first 4 stitches are the band, so they are worked in garter stitch. Happy knitting!

22.02.2021 - 07:36

country flag Kausar wrote:

Hei , on size 110/116 .when work seprtly back nd forth, first row is purl could i decrease 1 st from here or from knit row plz explain

20.02.2021 - 18:30

DROPS Design answered:

Dear Mrs Kausar, when you work back piece after dividing piece, if you start first row from WS then just purl first row binding off 2 stitches at the beg of next 2 rows, then bind off 1 stitch at the beg of next 2 rows. Happy knitting!

22.02.2021 - 08:14

country flag Rukhsana wrote:

Rukhsana 19.02.2021 - 20:32: Hei, im working on110/116 size . reached on back piece after cast off (total 12 sts )im little confuse , bcoz after sepreting ,the work row is purl , should i decrease1 st from this purl row or just go for knit nd decrease there . Plz exp

20.02.2021 - 13:18

DROPS Design answered:

See answer below :)

22.02.2021 - 07:59

country flag Rukhsana wrote:

Hei, im working on110/116 size . reached on back piece after cast off (total 12 sts )im little confuse , bcoz after sepreting ,the work row is purl , should i decrease1 st from this purl row or just go for knit nd decrease there . Plz explain. Thnkyou

19.02.2021 - 20:32

DROPS Design answered:

Dear Rukhsana, after dividing piece you have now to cast off the stitches for armhole on each side, so sure, you will have to cast off 2 stiches 1 time on each side, this means cast off 2 sts at the beginning of next 2 rows, beginning from WS, then cast off 1 stitch at the beg of next 2 rows. Hope this helps. Happy knitting!

22.02.2021 - 07:29

country flag Rukhsana wrote:

I worked for 110/116 nd reached on back piece but cn’t understand can you please explain more this “Continue cast off for armholes in each side at beg of every row as follows: 2 sts 1 time and 1 st 2-2-1-1-2 times = 48-52-58-62-66 sts”

18.02.2021 - 21:17

DROPS Design answered:

Hi Rukhsana, The continued casting off shapes the armholes. You do not say which size you are working, but if we use the smallest size as an example, after casting off for the armholes you cast off 2 stitches at the beginning of both of the next 2 rows, then 1 stitch at the beginning of the next 4 rows (2 times on each side), which leaves you with 48 stitches on the row. Happy knitting!

19.02.2021 - 07:37

country flag Rita G wrote:

Buongiorno, per diminuzioni alternate su A3 cosa si intende? In un giro le diminuzioni sono tutte prima di A3 e in quello successivo sono dopo? Ho diminuito contemporaneamente prima e dopo infatti ho 154 maglie prima del previsto. Grazie mille per la risposta!

21.01.2021 - 00:07

DROPS Design answered:

Buonasera Rita, su un giro di aumenti deve aumentare prima di A.3, sul giro di aumenti successivo dopo A.3. Buon lavoro!

21.01.2021 - 20:01

country flag Monica Robinson wrote:

Under A3 står, upprepa minskning växelvis före och efter A3.. Jag förstår inte hur ni menar med växelvis. Växelvis när?

06.01.2021 - 19:30

DROPS Design answered:

Hej Monica, första gången minskar du före A3 nästa gång minskar du efter A3, så gör du minskningarna växelvis. Lycka till :)

15.01.2021 - 15:56

country flag Andrea Winkler wrote:

Hallo, ich stricke das Kleid in Runden. Muss ich bei der Strickschrift A 1 die 1. Reihe links stricken, die 2. rechts, die 3. links , die 4. rechts, die 5. 2 M. re zusammenstr., die 8. wieder rechts, usw. Danke

04.11.2020 - 00:35

DROPS Design answered:

Liebe Frau Winkler, ja genau so wird das Diagram in Runden gestrickt - hier lesen Sie mehr über Diagramme. Viel Spaß beim stricken!

04.11.2020 - 09:33

country flag Christine Carr wrote:

How many sts each rep after round 31 on A2? I have 29 on last rep to end of round marker which I think is right. I am doing size 5/6. To knit the last 10 sts of 31 I moved the markers, making each repeat 32sts. Thank you for any help.

30.09.2020 - 15:21

DROPS Design answered:

Dar Mrs Carr, from row 31 A.2 will still worked over the same number of sts, but on every other round, start first repeat on round with last st on previous round = the yarn over is now the last st of the round, and work the last st in each A.2 tog with the first 2 sts next repeat (fist YO is now last st previous A.2). Happy knitting!

30.09.2020 - 16:03