DROPS Baby Merino
DROPS Baby Merino
100% Wool
from 4.55 $ /50g
Get the yarn to make this pattern from 31.85$.

The yarn cost is calculated from the pattern’s smallest size and the yarn’s cheapest product type. Looking for an even better price? You might find it on the DROPS Deals!

DROPS Super Sale

Sweet Buttercup Blanket

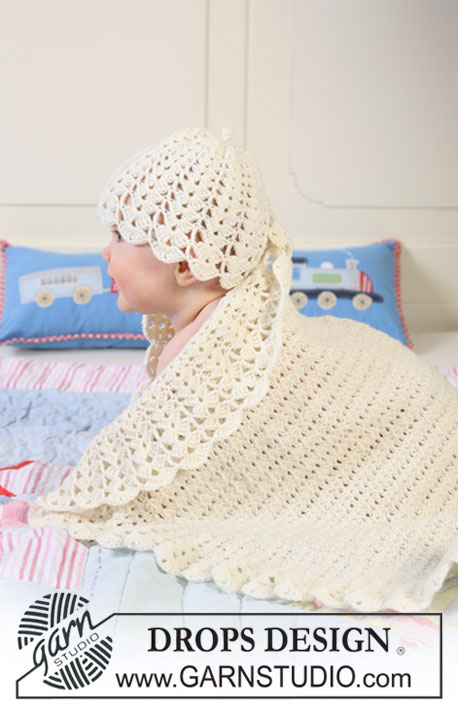
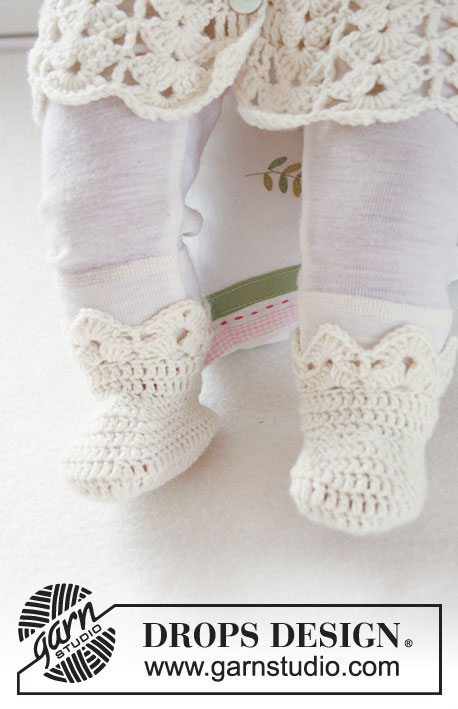
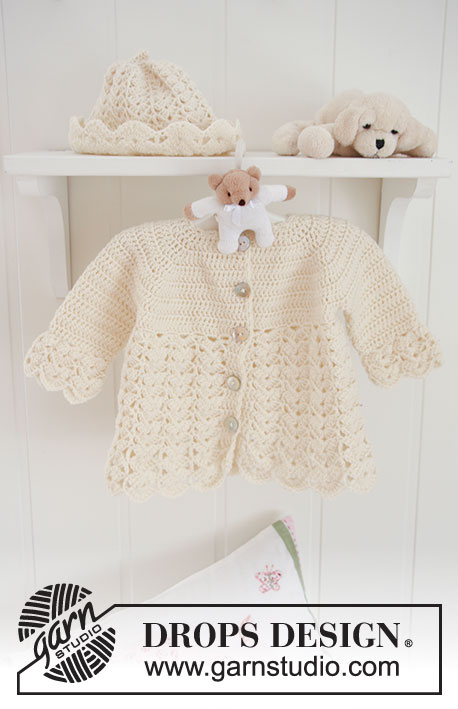
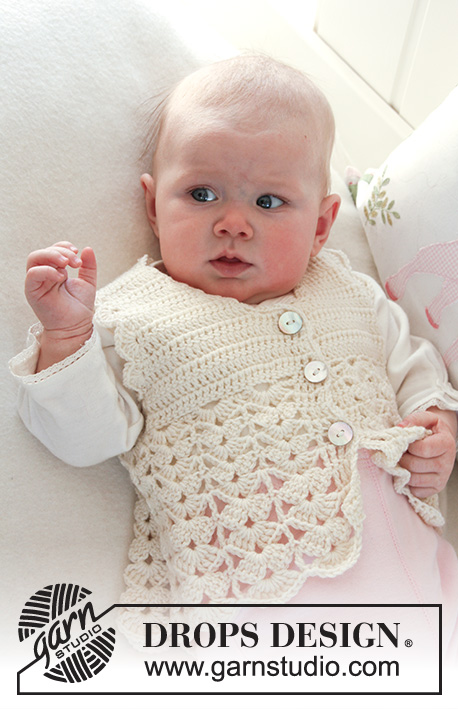
Set of crochet blanket with wide edge in fan pattern and hat for baby and children in DROPS BabyMerino Theme: Baby blanket

DROPS Baby 19-6
DROPS design: Pattern no BM-009-by-BM-011-by
---------------------------------------------------------
BLANKET:
Measurements: approx 66 x 80 cm / 26x31½ inches.

Materials: DROPS BABY MERINO from Garnstudio
300 g color no 02, off-white

DROPS HOOK size 3.5 mm/E/4 – or size needed to get 5½ dc-groups = width 10 cm / 4''.
---------------------------------------------------------
HAT:
Size: 1/3 - 6/9 - 12/18 months (2/4) years
Head circumference:
40/42 - 44/46 - 46/48 (48/52) cm / 16"-17 3/4"-18½" (20")

Materials: DROPS BABY MERINO from Garnstudio
50 g for all sizes color no 02, off-white

DROPS HOOK size 3.5 mm/E/4 – or size needed to get 1 fan = width 3 cm / 1 1/8''.

-------------------------------------------------------

Alternative Yarn – See how to change yarns here
Yarn Groups A to F – Use the same pattern and change the yarn here
Yarn usage using an alternative yarn – Use our yarn converter here

-------------------------------------------------------

DROPS Baby Merino
DROPS Baby Merino
100% Wool
from 4.55 $ /50g
Get the yarn to make this pattern from 31.85$.

The yarn cost is calculated from the pattern’s smallest size and the yarn’s cheapest product type. Looking for an even better price? You might find it on the DROPS Deals!

DROPS Super Sale

SAVE 30% on 6 cotton favorites!
Valid until 04.12.2024

Pattern instructions

NOTE: This pattern is written in American English. All measurements in charts are in cm. For conversion from inches to cm - click here. There are different terms for crocheting in American and British English. If this pattern includes crochet, click for "crochet terms" here. For this pattern in British English, please click here.
BLANKET:

First crochet the blanket in dc-groups and then crochet a wide border in fan pattern round the whole blanket.

Ch 119 LOOSE (includes 3 ch to turn with) with hook size 3.5 mm/E/4 and Baby Merino.
ROW 1: Crochet 4 dc in 6th ch from hook, * skip 4 ch, 4 dc in next ch, *, repeat from *-* a total of 22 times, skip ch 2 and finish with 1 dc in last ch = 23 dc-groups on row, turn piece.
ROW 2: ch 3, then 4 dc between the 2 middle dc in each dc-group, finish with 1 dc in 3rd ch from beg of previous row, turn piece.
Repeat row 2 until blanket measures approx 56 cm / 22''.

BORDER WITH FAN PATTERN:
ROUND 1: Crochet 1 round with ch-loops round the whole blanket as follows – beg in a corner: 1 sl st in corner, 3 ch, 1 sc in the same st, ch 2, 1 sc in the same st, ch 2, 1 sc in the same st (= 3 ch-loops in corner), * ch 2, skip approx 1-1.5 cm / 3/8''-½'', 1 sc in next st *, repeat from *-* to the next corner, in corner crochet: ch 2, 1 sc in corner, ch 2, 1 sc in the same st, ch 2, 1 sc in the same st, continue along the next side – NOTE: There should be approx 29 ch-loops along both the short sides and approx 37 ch-loops along both the long sides and 3 ch-loops in each corner, i.e. the number of ch-loops between each corner must be divisible by 2 + 1 (= an uneven no of ch-loops). Finish round with ch 2 and 1 sl st in first ch from beg of round.

ROUND 2: 1 sl st in first ch-loop in corner, 3 ch, 1 dc in the same ch-loop, ch 1, 2 dc in the same ch-loop, * 1 dc in next sc, 2 dc + ch 1 + 2 dc in next ch-loop in corner *, repeat from *-* one more time (= 3 ”fans” in corner), * 1 dc in next ch-loop, 3 dc + ch 1 + 3 dc in next ch-loop *, repeat from *-* until 1 ch-loop before the 3 loops in corner remain, 1 dc in this loop, 2 dc + ch 1 + 2 dc in first ch-loop in corner, 1 dc in next sc, 2 dc + ch 1 + 2 dc in next ch-loop in corner, 1 dc in next sc, 2 dc + ch 1 + 2 dc in last ch-loop in corner (there are now 3 fans in corner), 1 dc in next ch-loop, 3 dc + ch 1 + 3 dc in next ch-loop, continue in the same way round the whole blanket and finish with 1 sl st in 3rd ch from beg of round.

ROUND 3 +4: Crochet sl sts to the beg of first ch-loop (= ch-loop between the 4 dc), 3 ch, 2 dc in the same ch-loop, ch 1, 3 dc in the same ch-loop, * 1 dc in dc from previous round, 3 dc + ch 1 + 3 dc in next ch-loop *, repeat from *-* and finish with 1 dc in last dc and 1 sl st in 3rd ch from beg of round.

ROUND 5 + 6: Crochet sl sts to the beg of first ch-loop (= ch-loop between the 6 dc), 3 ch, 3 dc in the same ch-loop, ch 1, 4 dc in the same ch-loop, * 1 dc in dc from previous round, 4 dc + ch 1 + 4 dc in next ch-loop *, repeat from *-* and finish with 1 dc in last dc and 1 sl st in 3rd ch from beg of round.

ROUND 7: Like round 6 but ch 2 in stead of ch 1 between each dc-group.

ROUND 8-10: Crochet sl sts to the beg of first ch-loop (= ch-loop between the 8 dc), ch 4, 3 tr in the same ch-loop, ch 2, 4 tr in the same ch-loop, * 1 tr in dc/tr from previous round, 4 tr + ch 2 + 4 tr in next ch-loop *, repeat from *-* and finish with 1 tr in last dc/tr and 1 sl st in 4th ch from beg of round.
Cut the thread and fasten after round 10, border measures approx 12 cm / 4¾''.

---------------------------------------------------------

HAT:

CROCHET INFO:
Replace first sc on row with ch 1 and finish each round with 1 sl st in ch from beg of round.
---------------------------------------------------------
Hat crochet from the top down.

With hook size 3.5 mm/E/4 and Baby Merino ch 4 and form a ring with 1 sl st in first ch.
ROUND 1: 6 sc in ring – See CROCHET INFO.
ROUND 2-4: 1 sc in each sc = 6 sc.
ROUND 5: 2 sc in each sc = 12 sc.
ROUND 6: 2 sc in each sc = 24 sc.
ROUND 7: * 1 sc in first sc, 2 sc in next sc *, repeat from *-* = 36 sc.
ROUND 8: * 1 sc in each of the first 2 sc, 2 sc in next sc *, repeat from *-* = 48 sc.
ROUND 9: * 1 sc in each of the first 3 sc, 2 sc in next sc *, repeat from *-* = 60 sc.
ROUND 10: ch 3, * skip 2 sc (skip 1 sc instead of 2 sc at regular intervals a total of 6-12-18 (24) times), 1 sc in next sc, ch 2 *, repeat from *-* so that you end up with 22-24-26 (28) ch-loops, finish with 1 sl st in ch from beg of round.
ROUND 11: Crochet sl sts to the middle of the first ch-loop, ch 1, * 2 dc + ch 1 + 2 dc in next ch-loop, 1 sc in next ch-loop *, repeat from *-* and finish with 2 dc + ch 1 + 2 dc in the last ch-loop and 1 sl st in ch from beg of round = 11-12-13 (14) fans.
ROUND 12-15: ch 3, * 3 dc + ch 1 + 3 dc in the middle of next dc-group (i.e. in ch at the top of fan), 1 dc in sc/dc from previous round *, repeat from *-* and finish with 3 dc + ch 1 + 3 dc in the middle of the last dc-group and 1 sl st in 3rd ch from beg of round.
ROUND 16: ch 3, * 3 dc + ch 2 + 3 dc in the middle of next dc-group, 1 dc in dc from previous round *, repeat from *-* and finish with 3 dc + ch 2 + 3 dc in the middle of the last dc-group and 1 sl st in 3rd ch from beg of round.
ROUND 17: ch 3, * 4 dc + ch 2 + 4 dc in the middle of next dc-group, 1 dc in dc from previous round *, repeat from *-* and finish with 4 dc + ch 2 + 4 dc in the middle of the last dc-group and 1 sl st in 3rd ch from beg of previous round.
Repeat ROUND 17 until hat measures approx 10-11-12 (13) cm / 4"-4 3/8"-4 3/4" (5 1/8") from the top of head.
CROCHET NEXT ROUND AS FOLLOWS:
ch 4, * 4 tr + ch 2 + 4 tr in the middle of next dc-group, 1 tr in dc from previous round *, repeat from *-* and finish with 4 tr + ch 2 + 4 tr in the middle of the last dc-group and 1 sl st in 4th ch from beg of round.
Repeat this round until hat measures approx 14-15-16 (18) cm / 5½"-6"-6 1/4" (7") from the top of head. Cut and fasten thread.

This pattern has been corrected.

Updated online: 12.08.2010
HAT: ...ROUND 10: ch 3, * skip 2 sc (skip 1 sc instead of 2 sc at regular intervals a total of 6-12-18 (24) times), 1 sc in next sc, ch 2 *, repeat from *-* so that you end up with 22-24-26 (28) ch-loops, finish with 1 sl st in ch from beg of round.
Do you have a question? See a list of frequently asked questions (FAQ)

Knitting tension is what determines the final measurements of your work, and is usually measured per 10 x 10 cm. It is provided like so: number of stitches in width x number of rows in height - eg: 19 stitches x 26 rows = 10 x 10 cm.

The knitting tension is very individual; some people knit/crochet loosely while others work tightly. You adjust the knitting tension with the needle size, which is why the suggested needle size only serve as a guide! You need to adjust this (up or down) to ensure that YOUR knitting tension matches the knitting tension provided in the pattern. If you work with a different knitting tension than provided you will have a different yarn consumption, and your work will have different measurements than what the pattern suggests.

The knitting tension also determines which yarns can replace each other. As long as you achieve the same knitting tension you can replace one yarn with another.

See DROPS lesson: How to measure your tension/gauge

See DROPS video: How to make a gauge tension swatch

The required amount of yarn is provided in grams, eg: 450 g. To calculate how many balls you’ll need you first need to know how many grams are in 1 ball (25g, 50g or 100g). This information is available if you click on the individual yarn quality on our pages. Divide the amount required with the amount of each ball. For example, if each ball is 50g (the most common amount), the calculation will be as follows: 450 / 50 = 9 balls.

The important thing when changing from one yarn to another is that the knitting/crochet tension remains the same. This is so that the measurements of the finished piece will be the same as on the sketch provided. It is easier to achieve the same knitting tension using yarns from the same yarn group. It is also possible to work with multiple strands of a thinner yarn to achieve the knitting tension of a thicker one. Please try our yarn converter. We recommend you to always work a test swatch.

Please NOTE: when changing yarn the garment might have a different look and feel to the garment in the photo, due to individual properties and qualities of each yarn.

See DROPS lesson: Can I use a different yarn than the one mentioned in the pattern?

All our yarns are categorised into yarn groups (from A to F) according to thickness and knitting tension – group A contains the thinnest yarns and group F the thickest. This makes it easier for you to find alternative yarns to our patterns, should you wish to switch yarn. All yarns within the same group have a similar knitting tension and can easily replace each other. However, different yarn qualities have different structures and properties which will give the finished work a unique look and feel.

Click here for an overview of the yarns in each yarn group

At the top of all our patterns you’ll find a link to our yarn converter, which is a helpful tool should you wish to use a different yarn than suggested. By filling in the yarn quality you wish to replace, the amount (in your size) and number of strands, the converter will present good alternative yarns with the same knitting tension. Additionally it will tell you how much you’ll require in the new qualities and whether you’ll need to work with multiple strands. Most skeins are 50g (some are 25g or 100g).

If the pattern is worked with multiple colours, every colour will have to be converted separately. Similarly, if the pattern is worked with several strands of different yarns (for example 1 strand Alpaca and 1 strand Kid-Silk) you will have to find alternatives for each, individually.

Click here to see our yarn converter

Since different yarns have different qualities and textures we have chosen to keep the original yarn in our patterns. However, you can easily find options among our available qualities by using our yarn converter, or simply pick a yarn from the same yarn group.

It is possible that some retailers still have discontinued yarns in stock, or that someone has a few skeins at home that they would like to find patterns for.

The yarn converter will provide both alternative yarn as well as required amount in the new quality.

If you think it's hard to decide what size to make, it can be a good idea to measure a garment you own already and like the size of. Then you can pick the size by comparing those measures with the ones available in the pattern's size chart.

You'll find the size chart at the bottom of the pattern.

See DROPS lesson: How to read size chart

The needle size provided in the pattern serves only as a guide, the important thing is to follow the knitting tension. And since knitting tension is very individual, you will have to adjust the needle size to ensure that YOUR tension is the same as in the pattern – maybe you’ll have to adjust 1, or even 2 needle sizes, up or down to achieve the correct tension. For this, we recommend that you work test swatches.

Should you work with a different knitting tension than the one provided, the measurements of the finished garment might deviate from the measurement sketch.

See DROPS lesson: How to measure your tension/gauge

See DROPS video: How to make a gauge tension swatch

Working a garment top-down provides more flexibility and room for personal adjustment. For example it is easier to try the garment on while working, as well as making adjustments to length of yoke and shoulder caps.

The instructions are carefully explaining every step, in the correct order. Diagrams are adjusted to the knitting direction and are worked as usual.

The diagram depicts all rows/rounds, and every stitch seen from the right side. It is read from bottom to top, from right to left. 1 square = 1 stitch.

When working back and forth, every other row is worked from the right side and every other row is worked from the wrong side. When working from the wrong side, the diagram will have to be worked reversed: from left to right, knit stitches are purled, purl stitches are knit etc.

When working in the round every round is worked from the right side and the diagram are worked from right to left on all rounds.

See DROPS lesson: How to read knitting diagrams

The diagram depicts all rows/rounds, and every stitch seen from the right side. It is worked from bottom to top, from right to left.

When working back and forth every other row is worked from the right side: from right to left and every other row is worked from the wrong side: from left to right.

When working in the round, every row in the diagram are worked from the right side, from right to left.

When working a circular diagram you start in the middle and work your way outwards, counter clockwise, row by row.

The rows usually start with a given number of chain stitches (equivalent to the height of the following stitch), this will either be depicted in the diagram or explained in the pattern.

See DROPS lesson: How to read crochet diagrams

Instructions for working several diagrams after each other on the same row/round, will often be written like so: “work A.1, A.2, A.3 a total of 0-0-2-3-4 times". This means you work A.1 once, then A.2 is worked once, and A.3 is repeated (in width) the number of times provided for your size – in this case like so: S = 0 times, M = 0 times, L=2 times, XL= 3 times and XXL = 4 times.

The diagrams are worked as usual: begin with the first row in A.1, then work the first row in A.2 etc.

See DROPS lesson: How to read knitting diagrams

See DROPS lesson: How to read crochet diagrams

The total width of the garment (from wrist-to-wrist) will be larger in the larger sizes, despite the actual sleeves being shorter. The larger sizes have longer sleeve caps and wider shoulders, so there will be a good fit in all sizes.

The measurement sketch/schematic drawing provides information regarding the full length of the garment. If it’s a jumper or a jacket the length is measured from the highest point on the shoulder (usually closest to the neckline), and straight down to the bottom of the garment. It is NOT measured from the tip of shoulder. Similarly, the length of yoke is measured from the highest point on the shoulder and down to where yoke is split into body and sleeves.

See DROPS lesson: How to read a schematic drawing

Diagrams are often repeated on the round or in height. 1 repeat is the diagram the way it appears in the pattern. If it says to work 5 repeats of A.1 in the round, then you work A.1 a total of 5 times after/next to each other in the round. If it says to work 2 repeats of A.1 vertically/in height you work the entire diagram once, then begin again at the start and work the entire diagram one more time.

Chain stitches are slightly narrower than other stitches and to avoid working the cast-on edge too tight, we simply chain more stitches to begin with. The stitch count will be adjusted on the following row to fit the pattern and measurement sketch.

The rib edge is more elastic and will contract slightly compared to, for example, stocking stitch. By increasing before the rib edge, you avoid a visible difference in width between the rib edge and the rest of the body.

It’s very easy to cast off too tightly, and by making yarn overs while casting off (and simultaneously casting these off) you avoid a too tight cast off edge.

See DROPS video: How to bind off with yarn overs (yo)

To achieve an even increase (or decrease) you can increase on, for example: every 3rd and 4th row alternately, like so: work 2 rows and increase on the 3rd row, work 3 rows and increase on the 4th. Repeat this until the increase is complete.

See DROPS lesson: Increase or decrease 1 st on every 3rd and 4th row alternately

Should you prefer to work in the round instead of back and forth, you may of course adjust the pattern. You’ll need to add steeks mid-front (usually 5 stitches), and follow the instructions. When you would normally turn and work from the wrong side, simply work across the steek and continue in the round. At the end you’ll cut the piece open, pick up stitches to work bands, and cover the cut edges.

See DROPS video: How to knit steeks and cut open

Should you prefer to work back and forth instead of in the round, you may of course adjust the pattern so you work the pieces separately and then assemble them at the end. Divide the stitches for the body in 2, add 1 edge stitch in each side (for sewing) and work the front and back pieces separately.

See DROPS lesson: Can I adapt a pattern for circular needles into straight needles?

Pattern repeats can vary slightly in the different sizes, in order to get the correct proportions. If you’re not working the exact same size as the garment in the photo, yours might deviate slightly. This has been carefully developed and adjusted so that the complete impression of the garment is the same in all sizes.

Make sure to follow instructions and diagrams for your size!

If you have found a pattern you like which is available in women’s size it’s not very difficult to convert it to men’s size. The biggest difference will be the length of sleeves and body. Start working on the women size that you think would fit across the chest. The additional length will be worked right before you cast off for the armhole/sleeve cap. If the pattern is worked top-down you can add the length right after the armhole or before the first decrease on sleeve.

Regarding additional yarn amount, this will depend on how much length you add, but it is better with a skein too many than too few.

All yarns will have excess fibres (from production) that might come off as lint or shedding. Brushed yarns (ie hairier yarns) have more of these loose, excess fibres, causing more shedding.

Shedding also depends on what is worn under or over the garment, and whether this pulls at the yarn fibres. It’s therefore not possible to guarantee that there will be no shedding

Below are some tips on how to get the best result when working with hairier yarns:

1. When the garment is finished (before you wash it) shake it vigorously so the looser hairs come off. NOTE: do NOT use a lint roller, brush or any method that pulls at the yarn.

2. Place the garment in a plastic bag and put it in your freezer - the temperature will cause the fibres to become less attached to each other, and excess fibres will come off easier.

3. Leave in the freezer for a few hours before taking it out and shaking it again.

4. Wash the garment according to the instructions on the yarn label.

Pilling is a natural process that happens to even the most exclusive of fibers. It's a natural sign of wear and tear that is hard to avoid, and that is most visible in high friction areas of your garment like a sweater's arms and cuffs.

You can make your garment look as new by removing the pilling, using a fabric comb or a pill/lint remover.

Still can't find the answer you need? Then scroll down and leave your question so one of our experts can try to help you. This will be done normally within 5 to 10 working days.
In the meantime, you can read the questions and answers that others have left to this pattern or join the DROPS Workshop on Facebook to get help from fellow knitters/crocheters!

You might also like...

Post a comment to pattern DROPS Baby 19-6

We would love to hear what you have to say about this pattern!

If you want to leave a question, please make sure you select the correct category in the form below, to speed up the answering process. Required fields are marked *.

Comments / Questions (48)

country flag Lafont Catherine wrote:

Bonsoir,je vous remercie pour votre reponse.je vais etre arrière grand mère dans quelques mois donc au travail!!!!!!

25.01.2023 - 17:44

country flag Lafont Catherine wrote:

Bonsoir comment savoir le nombre de pelottes pour le modele 19-6 baby d avance merci cordialement

24.01.2023 - 21:47

DROPS Design answered:

Bonjour Mme Lafont, vous trouverez systématiquement les quantités requises (pour chaque taille si besoin) dans l'en-tête, autrement dit, il faut ici pour la couverture 300 g DROPS Baby Merino / 50 g la pelote = 6 pelotes. Bon crochet!

25.01.2023 - 11:50

country flag Isabelle wrote:

Bonjour, je ne comprends pas comment on peut avoir uniquement 23 groupes de brides avec une chaînette de 119 mailles. J'en ai 29 sans compter les brides de début et fin de rang. Par ailleurs, quelle mesure en cm doit faire ce rang? Merci pour votre réponse

04.05.2022 - 18:27

DROPS Design answered:

Bonjour Isabelle, crochetez 4 brides dans la 6ème ml à partir du crochet (= soit 1 groupe de brides / 6 ml); puis répétez *sautez 4 ml, 4 b dans la ml suivante* 22 fois au total (= 22 groupes de brides / 22x5 ml = 110 ml), sautez 2 ml, 1 bride dans la dernière ml (= 1 bride/3 ml), soit: 6+110+3= 119 ml et vous avez: 1 bride (= les 3 ml du début du rang), 23 groupes de brides et 1 bride (à la fin du rang). Bon crochet!

05.05.2022 - 09:02

country flag Con wrote:

When I follow the crochet pattern for the afghan, the single dc between the the groups of 4 dcs doesn’t appear yet I have 23 groups of 4 dcs and began with 119 chain stitches. Is the pattern correct for the blanket which is pictured, or has a step been left out? The blanket which is pictured is lovely, but mine doesn’t look exactly like the picture. It is ok, but not what I was looking forward to making. Thanks for your help.

02.09.2021 - 10:55

DROPS Design answered:

Dear Mrs Con, pattern is correct, the dc between dc groups you can see on the 3rd and 4th picture belongs to the edge see video here worked around the blanket, when working the main part of the blanket, you will just have dc-groups, ie 23 groups of 4 dc as you described. Happy crocheting!

02.09.2021 - 12:49

country flag Kirstine wrote:

Jeg forstår ikke hvad der menes i 3+4. OMG. Hvad skal man gøre i hjørnet?

18.03.2021 - 11:14

country flag THERESE MARIE BUNS wrote:

BONJOUR JE VOUDRAIS FAIRE CE MODELE ... EN LAINE BLANCHE UNI COLOR 1 POUVEZ VOUS ME DIRE COMMENT FAIRE POUR AVOIR CE COLORI ? MERCI CORDIALEMENT

31.07.2020 - 17:59

DROPS Design answered:

Bonjour Mme Buns, Cliquez sur la petite icône en face de Baby Merino, puis sur "Commander", ou bien retrouvez ici la liste de tous les magasins DROPS en France. Bon tricot!

03.08.2020 - 07:13

country flag Paola wrote:

Posso chiedere gentilmente qual è il multiplo per la copertina se si volesse realizzare con altro filato tipi cotone per esempio? Grazie

07.03.2020 - 12:29

DROPS Design answered:

Buonasera Paola, se vuole lavorarla in cotone, può utilizzare Safran che appartiene allo stesso gruppo filati, usando le stesse istruzioni. Buon lavoro!

07.03.2020 - 18:32

country flag Kristin J wrote:

Försöker sticka mössan. Har ökat till 60 maskor och kommer nu in på varv 10. Beroende på hur stor mössan ska bli gör man olika många bågar. Jag förstår inte hur samma uppbyggnad på 60m kan få olika många bågar. Hoppas ni förstår vad jag menar och ni kan hjälpa mig.

27.05.2019 - 16:15

DROPS Design answered:

Hei Kristin. Du begynner med 3 luftmasker, videre skal du egentlig hekle slik:* hopp over 2 fastmasker, hekle 1 fastmaske i neste fastmaske, hekle 2 luftmasker *. MEN for å få ulike antall luftmaskebuer i de ulike størrelsene hopper du noen ganger over kun 1 fastmaske (isteden for de 2 fastmaskene som står). Dette gjør du 6-12-18 (24) ganger. Hvis du feks hekler størrelse 46/48 skal du hoppe over 1 maske 18 ganger jevnt fordelt, mens du hopper over 2 masker de resterende gangene. På omgang 11 skal du hekle i hver luftmaskebue, så slik blir luen gradvis større i de ulike størrelsene. God fornøyelse

28.05.2019 - 07:45

country flag Anna wrote:

Jeg vil gerne hækle dette tæppe i to farver. Hvor mange g skal jeg beregne til henholdvis midterstykket og kanten?

14.03.2019 - 08:49

DROPS Design answered:

Hej Anna, du skal nok bruge ca en fjerdedel til kanten, men køb hellere lidt ekstra, så du ikke får for lidt garn. God fornøjelse!

14.03.2019 - 11:14

country flag Syrynyty2009 wrote:

I’m sorry but the written pattern is not what is shown in the picture provided. Yes I understand it is a variant but please use the appropriate picture for the pattern provided.

22.06.2018 - 01:38

DROPS Design answered:

Dear Syrynyty2009, the pictures shown match the written pattern, it is a quite popular pattern that has been already successfully worked several times. You are welcome to ask any question here, or, for any further individual assistance request help from the store where you bought your yarn. Happy crocheting!

22.06.2018 - 08:21