
Popular categories
Looking for a yarn?


|
|||||||||||||||||||||||||
DROPS Children 12-21 |
|||||||||||||||||||||||||
|
|
|||||||||||||||||||||||||
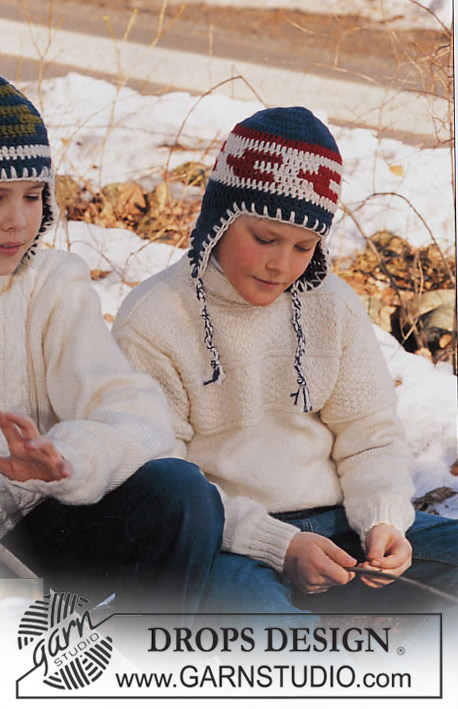
Drops jumper and hat
DROPS Children 12-21 |
|||||||||||||||||||||||||
|
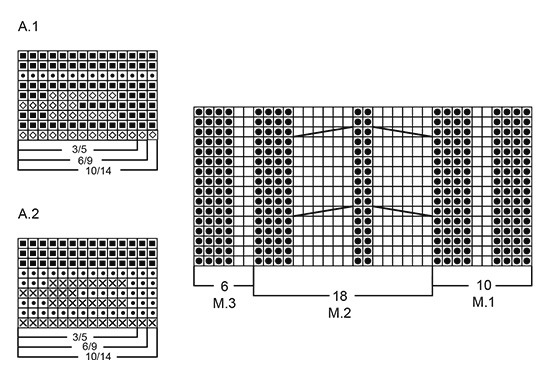
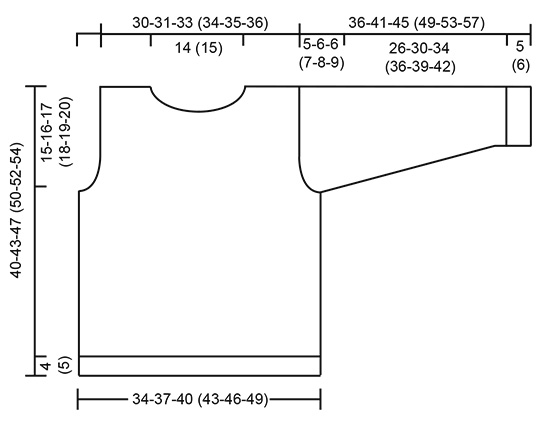
Jumper: Knitting Tension: 21 sts x 28 rows on needles size 4 mm in stocking sts. = 10 x 10 cm. Rib: *K2, P2*, repeat from *-*. Pattern: See diagrams M.1 to M.3. The diagram is seen from the right side. Front piece: Cast on 74-82-86 (94-98-106) sts (inclusive of 1 edge st each side) with Karisma on needles size 3 mm. Knit 4-4-4 (5-5-5) cm rib with an edge st each side – adjust so that next row is knitted from the right side. Change to needles size 4 mm and knit 2 rows garter sts and knit 1 row stocking sts, at the same time inc 8-6-8 (10-12-10) sts evenly over the middle 24-24-24 (38-38-38) sts = 82-88-94 (104-110-116) sts. Knit the next row as follows from the wrong side: 1 edge st, purl 14-17-20 (16-19-22) sts (stocking sts seen from the right side), M.1 (= 10 sts), M.2 (= 18 sts) 2-2-2 (3-3-3) times, M.3 (= 6 sts), purl 14-17-20 (16-19-22) sts, 1 edge st. Continue the pattern. Remember the knitting tension! When piece measures 25-27-30 (32-33-34) cast off for armhole each side on every other row as follows: 3 sts 1 time, 2 sts 0-1-1 (2-3-4) times and 1 st 2-2-3 (3-3-3) times = 72-74-78 (84-86-88) sts. When piece measures 34-37-41 (43-45-47) knit the neck as follows: Dec 2 sts over the 2 middle cables = 68-70-74 (80-82-84) sts. Now cast off the middle 12-12-12 (14-14-14) sts for neck and cast off to shape the neckline on every other row: 3 sts 1 time, 2 sts 1 time and 1 st 4 times = 19-20-22 (24-25-26) sts left on each shoulder. When piece measures 40-43-47 (50-52-54) cm dec 2 sts over the cable on shoulder on the 3 larger sizes = 19-20-22 (22-23-24) sts. Cast of remaining sts on next row. Back piece: Cast on 74-82-86 (94-98-106) sts (inclusive of 1 edge st each side) with Karisma on needles size 3 mm. Knit 4-4-4 (5-5-5) cm rib with an edge st each side – adjust so that next row is knitted from the right side. Now change to needle size 4mm, knit 2 rows garter sts and continue in stocking sts, at the same time dec 0-2-0 (2-0-2) sts evenly on the first row of garter sts = 74-80-86 (92-98-104) sts. Cast off for armhole as for front piece = 64-66-70 (72-74-76) sts. When piece measures 38-41-45 (48-50-52) cm, cast off the middle 24-24-24 (22-23-24) sts for neck and dec 1 st on neckline = 19-20-22 (22-23-24) sts left on each shoulder. Cast off when piece measures 40-43-47 (50-52-54) cm. Sleeve: Read all of the sleeve section before knitting it! Cast on 46-46-50 (50-54-54) sts (inclusive of 1 edge st each side) with Karisma on needles size 3 mm. Knit 5-5-5 (6-6-6) cm rib with an edge st each side. Change to needles size 4 mm, knit 2 rows garter sts and continue in stocking sts. When sleeve measures 7 cm inc 1 st each side a total of 8-9-10 (12-12-14) times on every 3rd cm (alternate the inc between every 8th and 9th row) = 62-64-70 (74-78-82) sts. When sleeve measures 31-35-39 (42-45-48) cast off for sleeve cap each side on every other row: 4 sts 1 time, 3 sts 1 time and then 2 sts each side until sleeve measures 35-40-44 (48-52-56) cm, now cast off 3 sts each side 1 time and cast off remaining sts when sleeve measures approx 36-41-45 (49-53-57) cm. Assembly: sew shoulder seams. Neck: Pick up approx 80 to 92 sts (divisible by 4) round the neck on double pointed needles size 3 with Karisma. Purl 1 round, knit 1 round and continue in Rib. When neck measures 5-6-7 (7-8-9) cm cast off in Rib. Sew in the sleeves. Sew the sleeves and the side seams inside the edge sts. --------------------------------------------------------------------- HAT: Crochet tension: 16 tr x 8 rounds = 10 x 10 cm on crochet hook size 5mm. Crochet info: Replace 1st tr on round with 3 ch. Finish each round with 1 sl st in 3rd ch from previous round. Pattern: See diagram. The entire pattern is crochet in tr. Crochet A.1 for the blue/green version and A.2 for the red/blue version. Hat with or without earflaps: Read Crochet info! Crochet 5 ch on crochet hook size 5mm with blue/grey and form a ring with a sl st. 1st round: 12 tr in ring 2nd round: 2 tr in each tr = 24 tr 3rd round: *1 tr in first tr, 2 tr in next tr*, repeat from *-* = 36 tr 4th round: *1 tr in each of the first 2 tr, 2 tr in next tr*, repeat from *-* = 48 tr 5th round: *1 tr in each of the first 3 tr, 2 tr in next tr*, repeat from *-* = 60 tr NB: discontinue inc for size 3/5 years here. 6th round: Crochet tr whilst inc evenly to 65 tr (inc by crocheting 2 tr in 1) NB: discontinue inc for size 6/9 years here. 7th round: Crochet tr whilst inc evenly to 70 tr NB: discontinue inc for size 10/14 years here. Read the rest before continuing! After the last inc in all sizes there are 60-65-70 tr on round. Continue in pattern – see explanation above and see arrow for appropriate size. If no earflaps, finish the piece after A.1/A.2, the hat measures approx 18-19-20 cm. Hat with earflaps: After the last round in pattern insert 2 marking threads as follows: First marking thread after 6 tr (1st earflap starts here), second thread after 40-43-46 (incl the first 6 tr) tr (2nd earflap starts here). Earflap: Crochet in grey/blue. Begin by 1st marking thread and crochet 14-16-18 tr, turn the piece, 1 sl st in first tr, 12-14-16 tr, *turn the piece, 1 sl st in first tr, crochet until 1 tr left on row*, repeat from *-* another 3-3-4 times = 4-6-6 tr left on row. The flap now has 6-6-7 rows and measures 7.5-7.5-9 cm. Cut the thread and sew. Repeat on the other side of hat by beginning by the 2nd marking thread. There should be 20-21-22 tr between the earflaps mid front and 12 tr mid back. Crochet border: Crochet long, loose dc with off-white along the bottom edge and round the earflaps as follows: *1 dc in first st on the second but last row (pull the loop so that it becomes slightly long), skip 1 st, 1 dc in next st in the same way*, repeat from *-* all the way round and finish with a sl st in 1st dc from beginning of round. Tie-strings: Cut 4 threads (= 2 threads blue/grey and 2 threads off-white) each measuring 130 cm and pull them through the row of dc at the bottom of earflap. Tie knots with 4 threads in each knot until there are approx 6 cm let. Now tie a knot with all threads. Repeat for the other earflap. --------------------------------------------------------------------- English explanation to pattern diagram: 1 square in diagram = 1 tr --------------------------------------------------------------------- |
|||||||||||||||||||||||||
Diagram explanations |
|||||||||||||||||||||||||
|
|||||||||||||||||||||||||
|
|||||||||||||||||||||||||
|
|||||||||||||||||||||||||
|
Have you made this or any other of our designs? Tag your pictures in social media with #dropsdesign so we can see them! Do you need help with this pattern?You'll find tutorial videos, a Comments/Questions area and more by visiting the pattern on garnstudio.com. © 1982-2024 DROPS Design A/S. We reserve all rights. This document, including all its sub-sections, has copyrights. Read more about what you can do with our patterns at the bottom of each pattern on our site. |
|||||||||||||||||||||||||


With over 40 years in knitting and crochet design, DROPS Design offers one of the most extensive collections of free patterns on the internet - translated to 17 languages. As of today we count 304 catalogues and 11422 patterns - 11422 of which are translated into English (UK/cm).
We work hard to bring you the best knitting and crochet have to offer, inspiration and advice as well as great quality yarns at incredible prices! Would you like to use our patterns for other than personal use? You can read what you are allowed to do in the Copyright text at the bottom of all our patterns. Happy crafting!
Comments / Questions (6)
Bei der Anleitung zum Ärmel heißt es "gegen die Schulter arbeiten". Bedeutet das, dass man die Abnahme nur einseitig macht und damit der linke und der rechte Ärmel unterschiedlich (entsprechend der Seiten) ist? Und ist diese Seite dann vorne oder hinten?
10.10.2022 - 05:37DROPS Design answered:
Liebe Heike, bei den Ärmeln ketten Sie am Anfang jeder Reihe ab, dh bei den Hin- sowie bein den Rückreihen damit beide Seiten symmetrisch sind. Viel Spaß beim stricken!
10.10.2022 - 10:05Bonjour, J' ai tricoté ce pull Drop Children 12-21 , je ne vois pas comment coudre les manches au tricot. pourriez-vous me renseigner ? merci de votre réponse
15.10.2017 - 09:28DROPS Design answered:
Chere Chantal, cliquez sur le video ci-apres Comment coudre les manches à un pull tricoté en jersey . Bon travail!
16.10.2017 - 09:37Vad menas med oliven och burgunder ?
23.10.2015 - 14:16DROPS Design answered:
Hej. De diagramsymbolerna var inte översatta från norska men det är rättat nu. Ljus oliv är färg nr 45 och vinröd är färg nr 11. (De diagrammen används till mössan). Lycka till!
29.10.2015 - 12:16In der deutschsprachigen Anleitung fehlt das zweite Diagramm: Es müsste "/drops/mag/s12/21/21-diag2.jpg" statt "/drops/mag/s12/21/21-d2.jpg" heißen.
06.08.2015 - 13:10Bij het motief staat geen nederlandse vertaling kan ik die ergens anders vinden
30.01.2014 - 11:47DROPS Design answered:
Hoi Wilma. Kijk nu - het is aangepast.
30.01.2014 - 12:36This pattern speaks of a hat but there is no pattern. is there a pattern for the hat? thank you
16.01.2014 - 07:44DROPS Design answered:
Dear Shirley, you will find the pattern for the hat here. Happy crocheting!
16.01.2014 - 09:46