
Popular categories
Looking for a yarn?


|
||||||||||
Lille Trille |
||||||||||
 |
 |
|||||||||
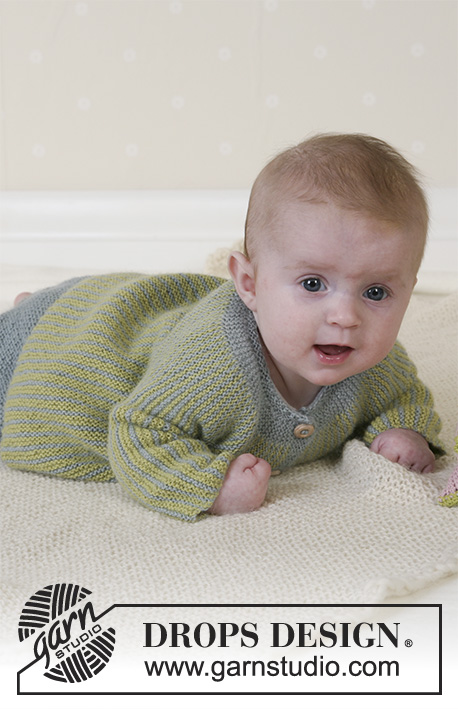
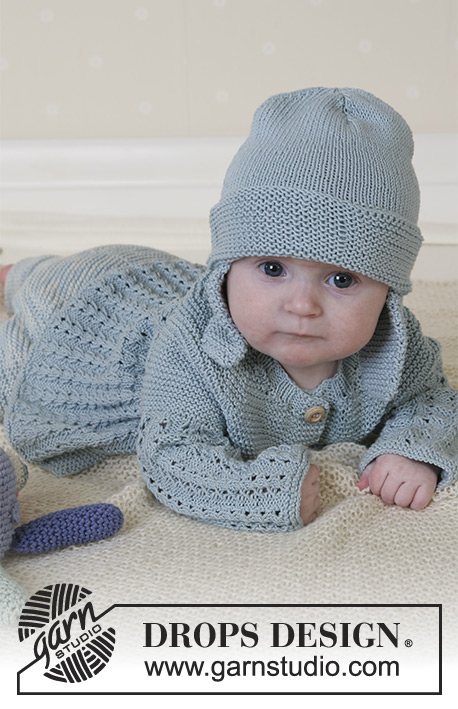
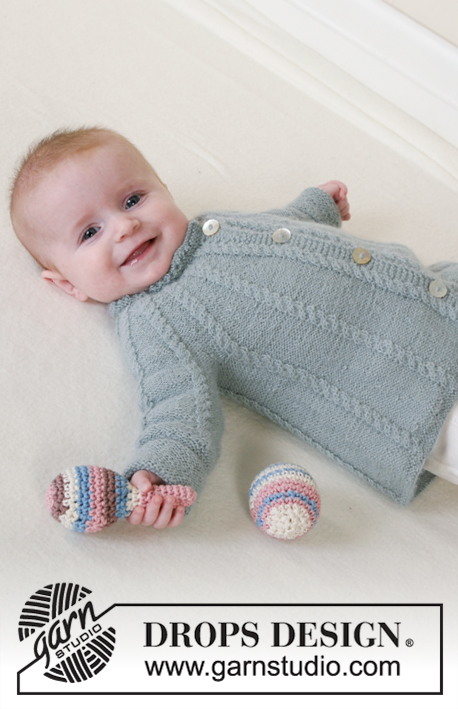
Knitted jacket with round yoke and cables, hat with pompon, mittens and socks in DROPS Alpaca for baby and children. Size 1 to 3 years.
DROPS Baby 14-2 |
||||||||||
|
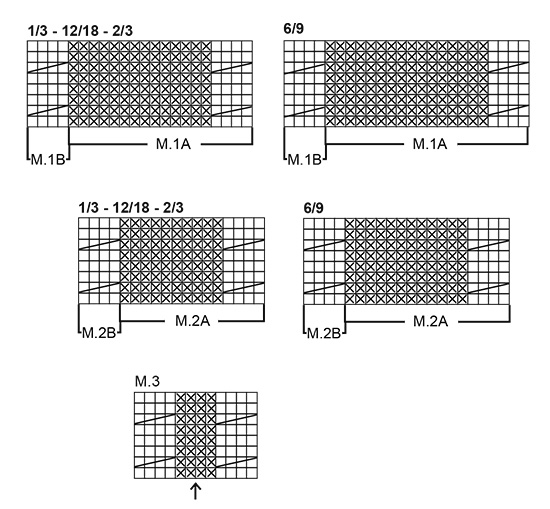
Knitting tension: 26 sts x 34 rows on needles size 2.5mm in stocking sts = 10 x 10 cm. Pattern: See diagrams M.1 to M.3. The diagrams show the pattern from the right side. Garter sts: Knit all rows Garter sts (on circular needle): knit 1 round, purl 1 round Button holes: Make button holes on right front band from the right side as follows: Knit tog 2nd and 3rd st from the edge, 1 yo (knit yo on next row). Make buttonholes as follows: Size 1/3 months: 5, 12, 19 and 26.5 cm Size 6/9 months: 7, 14, 21 and 28.5 cm Size 12/18 months: 8, 16, 24 and 32.5 cm Size 2/3 years: 9, 16, 23, 30 and 37.5 cm JACKET: Front and back piece: Knit the jacket back and forth on circular needle from mid front. Remember buttonholes on right front band – see above. Cast on 179-199-213 (246) sts (incl 5 front band sts, knitted in garter sts throughout) with Alpaca on needle size 2.5 and knit 6 rows garter sts (1st row = right side). Continue with 1 row stocking sts, at the same time inc 15-15-17 (20) sts evenly on row (do not inc over front band sts) = 194-214-230 (266) sts. Knit next row as follows from the wrong side: 5 front band sts, M.1B (= 4 sts), M.1A over the next 180-200-216 (252) sts (chose diagram for appropriate size - from wrong side, read the diagram from left to right) and finish with 5 front band sts. Continue the pattern. At the same time, when piece measures 4-5-5 (6) cm dec 1 st in each purled section by knitting the 2 middle P sts tog (seen from the right side). Repeat the dec on every 3.5-3.5-4.5 (5) cm a total of 3 times until there are 10-12-10 (10) P sts left in each purled section = 154-174-182 (210) sts on row. When piece measures 17-18-20 (23) cm, knit next row as follows: knit 39-43-45 (52) sts (= front piece), cast off 6-8-8- (8) sts for armhole, knit 64-72-76 (90) sts (= back piece), cast off 6-8-8 (9) sts for armhole, knit 39-43-45 (52) sts (= front piece). Put the piece aside and knit the sleeves. Sleeve: Cast on 40-42-44 (48) sts with Alpaca on double pointed needles size 2.5 and knit garter sts round on needles. When piece measures 5 cm, insert a marking thread – measure piece from here. Continue in garter sts until piece measures 5 cm and knit 1 round stocking sts, at the same time inc 4-6-18 (20) sts evenly on round = 44-48-62 (68) sts. Knit next round as follows – remember diagram for appropriate size: Size 1/3 months: M.2B (= 4 sts), P4, M.2A over the next 28 sts, M.2B (= 4 sts), P4 Size 6/9 months: M.2B (= 4 sts), P4, M.2A over the next 32 sts, M.2B (= 4 sts), P4 Size 12/18 months: P1, M.2A over the next 56 sts, M.2B (= 4 sts), P1 Size 2/3 years: M.2B (= 4 sts), P2, M.2A over the next 56 sts, M.2B (= 4 sts), P2 Insert a marking thread at the beginning of round and let the thread follow the piece as you progress (for size 1/3 months + 6/9 months + 2/3 years, insert the marking thread in the middle of the first cable on round) = mid underarm. Continue in pattern as described above – at the same time when piece measures 6 cm inc 2 sts mid under arm (for size 1/3 months + 6/9 months + 2/3 years, inc 1 st on each side of cable). Inc 2 sts a total of 5-8-5 (9) times, for size 1/3 months: on every 6th round, for size 6/9 months: on every 5th round, for size 12/18 months: on every 8th round, for size 2/3 years: on every 7th round = 54-64-72 (86) sts – purl new sts. When piece measures 15-17-17 (24) cm – adjust so that next row is knitted on the same row in diagram as back and front pieces so that pattern continues when body and sleeves are put in on the same needle – cast off 6-8-8 (8) sts mid under arm = 48-56-64 (78) left. Put sts on a thread and knit the other sleeve. Yoke: Put sleeves in on the same needle as body piece where you cast off for armholes = 238-270-294 (350) sts. There are now 10-12-10 (10) purled sts (seen from the right side) between each cable all the way round. Continue in pattern as before. Knit 3 or 4 rows (for size 2/3 years, knit 7 or 8 rows) before starting the decreases – make sure that 1st row with dec are from the right side. Now dec 1 st in each purled section by purling tog the 2 middle P sts from the right side. Dec on every 6th row: 0-0-6 (8) times, on every 4th row: 8-8-2- (0) times and on every other row 0-2-0 (0) times. After the last dec there are 2 purled sts between each cable all the way round and there are 110-110-134 (158) sts on row. Discontinue the pattern after 1 row after a cable. Now knit 1 row from the right side, at the same time adjusting number of sts to 63-65-69 (73) (do not dec over the front band sts). Knit 3 rows garter sts and knit next row as follows (holes): K5, *yo, K2 tog*, repeat from *-* until there are 4 sts left and knit these in garter sts. Knit 2 rows garter sts and cast off loosely from wrong side. Assembly: Sew the openings under the arms. Sew on buttons. Fold 5 cm on each sleeve edge towards the right side and attach with small, neat sts. HAT: Size: 1/3 – 6/9 – 12/18 months (2/4 years) To fit head circumference: 40/42 – 42/44 – 44/46 (48/50) cm The hat is knitted round. Loosely cast on 104-109-114 (120) sts with Alpaca on needles size 2.5 mm and knit garter sts. When piece measures 5-6-6 (7) cm insert a marking thread (folding edge) - measure piece from here. When piece measures 5-6-6 (7) cm knit 1 round, at the same time inc evenly to 112-128-126 (140) sts. Now knit M.2A (remember diagram for appropriate size). When piece measures 12-12-14 (16) cm dec 1 st in each purled section by knitting tog the 2 middle P sts on each round (the last time knit tog 1 P and 1 K st) until there are 32-32-36 (40) sts left. Pull a double strand of Alpaca through the remaining sts and pull tight. The hat measures approx 15-16-17 (19) cm from marking thread. Fold the bottom edge towards the right side and attach each side with neat sts. Pompon: Make a pompon with a diameter of approx 5-6 cm and attach to top of hat. MITTENS: Size: 1/3 – 6/9 – 12/18 months (2/4 years) The 2 bigger sizeswith thumbs, the 2 smaller sizes without.. The mitten is knitted round. Loosely cast on 34-36-36 (38) sts with Alpaca on needles size 2.5 and knit garter sts – se explanation above – until piece measures 2 cm. Now knit 1 round garter sts, at the same time dec 6-4-4- (2) sts evenly = 28-32-32- (36) sts. Continue in Rib with K2/P2. When piece measures 4-4-5 (6) cm knit 1 round garter sts, at the same time increasing evenly to 32-36-39 (40) sts – insert a marking thread at the beginning of round and after 16-18-18 (20) sts – measure piece from here. Now purl, at the same time knitting M.3 over the middle 12 sts on top of hand (the first 16-18-18 (20) sts = top of hand) – arrow in diagram marks the middle. The 2 bigger sizes: At the same time, after 1 (2) cm in pattern, put the last 5 (6) sts on round on a thread for thumb. Cast on 5 (6) new sts over the thread on next row. All sizes: When piece measures 6-7-8 (9) cm – adjust after 1 or 2 rows after a cable – dec 8-9-9 (10) sts evenly on every other row a total of 3 times = 8-9-9 (10) sts left (dec 1 st by P2 tog). Pull a double strand of Alpaca through remaining sts, pull tight and sew. Thumb: Put the 5 (6) sts from thread back on double pointed needles size 2.5 and pick up 7 (8) sts behind these = 12 (14) sts. Purl until thumb measures 3 (4) cm. Now knit all sts 2 and 2 tog. Pull thread through remaining sts and sew. Knit another mitten, but knit thumb the other side (applies to the 2 bigger sizes). String: Cast on 4 sts using Alpaca on needles size 2.5 and knit a tube as follows: *K1, put thread in front of piece, slip 1 st as if to purl, put thread behind piece*, repeat from *-* on all rows until string measures approx 62-67-74 (86 to 96) cm (length between child’s wrists). Cast off and attach string to each mitten. SOCKS: Size: 1/3 – 6/9 – 12/18 months (2/4 years) To fit foot length: 10-11-12 (14) cm The sock is knitted round. Cast on 44-48-52 (56) sts using Alpaca on needles size 2.5. Knit 1 round and continue in Rib with K2/P2 until piece measures 8-8-9 (10) cm. Knit 1 round, at the same time dec 4-8-8 (8) sts evenly = 40-40-44 (48) sts. Knit heel as follows: Knit 3-3.5–3.5 (4.5) cm stocking stitch back and forth over 16-16-16 (18) sts mid back. Heel decreases: (1st row = right side): K 9-9-9- (10), K2 tog into back of st, K1, turn the piece, 2nd row: slip 1 st as if to knit, P 3-3-3 (4), P2 tog, P1, turn the piece, 3rd row: slip 1 st as if to knit, K 4-4-4- (5), K2 tog into back of st, K1, turn the piece, 4th row: slip 1 st as if to knit, P 5-5-5 (6), P2 tog, P1, turn the piece, 5th row: slip 1 st as if to knit, K 6-6-6 (7), K2 tog into back of st, K1, turn the piece, 6th row: slip 1 st as if to knit, P 7-7-7 (8), P2 tog, P1, turn the piece, 7th row: K2 tog, K 6-6-6 (8), K2 tog into back of st = 8-8-8 (10) sts on row( = total 32-32-36 (40) sts. Pick up 7-8-8- (11) sts on each side of heel and put all sts on same needle = 46-48-52 (62) sts. Continue in stocking st over all sts. At the same time, dec on each side of the upper 18-20-22 (26) sts: 1 st on every other row a total of 7 times = 32-34-38 (48) sts. When foot measures 8-9-9 (11) cm from the beginning of the dec for heel, insert a marking thread each side. Now dec on both sides of each marking thread (= 4 dec per round) a total of 7-7-8 (10) times. Pull thread though remaining sts and sew. BLANKET: see pattern 14-20 RATTLE: see pattern 14-30 |
||||||||||
Diagram explanations |
||||||||||
|
||||||||||
|
||||||||||

|
||||||||||
|
Have you made this or any other of our designs? Tag your pictures in social media with #dropsdesign so we can see them! Do you need help with this pattern?You'll find tutorial videos, a Comments/Questions area and more by visiting the pattern on garnstudio.com. © 1982-2024 DROPS Design A/S. We reserve all rights. This document, including all its sub-sections, has copyrights. Read more about what you can do with our patterns at the bottom of each pattern on our site. |
||||||||||


With over 40 years in knitting and crochet design, DROPS Design offers one of the most extensive collections of free patterns on the internet - translated to 17 languages. As of today we count 304 catalogues and 11422 patterns - 11422 of which are translated into English (UK/cm).
We work hard to bring you the best knitting and crochet have to offer, inspiration and advice as well as great quality yarns at incredible prices! Would you like to use our patterns for other than personal use? You can read what you are allowed to do in the Copyright text at the bottom of all our patterns. Happy crafting!
Comments / Questions (105)
Estoy a la espera de tu respuesta.Muchas gracias
27.07.2020 - 16:46Buen dia.Quiero saber si este modelo lo encuentro en talle mas grande,Deseo tejerlo para 10 años,12, 14 etcLo teji en los que publicaron y les aseguro que las personas aman este diseño.Dime si no es posible como hago para lograr mi requerimiento.DAME UNA MANO !!!!!por favor Saludos y que estemos pronto todos muy bien Gracias
08.07.2020 - 12:47DROPS Design answered:
Hola Adela, no hacemos patrones personalizados. Para realizar este modelo para tallas más grandes tienes que hacer los cálculos necesarios. Para ello, puedes inspirarte en patrones de nuestra colección hechos para las tallas deseadas.
17.08.2020 - 20:17Hola. Disculpa que insista, pero cuando hago las repeticiones de M2A, en los 56 puntos termino con los 4 puntos de la trensa y despues se tejen los 6 puntos restantes que empiezan con los 4 puntos de la trensa y despues los 2 reveses. , entonces en ese momento es cuando termino con una trensa en los 56 puntos e inicio los 6 puntos que quedan con otra trensa (M2B). Ahi debo colocar MP para el aumento. he repetido esta parte mas de 4 veces y me sale lo mismo. Gracias por tu tiempo y paciencia.
22.11.2019 - 07:16DROPS Design answered:
Hola Maritza. M2A se termina con los puntos de revés y no con la trenza. Talla 2 años: M.2B (= 4 puntos/trenza) + 2 reveses, + M.2A (14 puntos x 4 repeticiones = 56 puntos/ la repetición termina con 10 puntos de revés) + M.2B (= 4 puntos/trenza) + 2 reveses.
15.12.2019 - 19:50Hola . Estoy tejiendo la chaqueta para 2 años, pero en las mangas no me calza el patrón M2B , 2R, M2A, M2B, 2R. ,con la cantidad de puntos, ya que me quedan 2 torsadas juntas al final. Después sale en las correcciones, que debo tejer en punto musgo pero cuantos cm.? y después debo seguir el patrón ?. Por favor ayúdame. Maritza
04.11.2019 - 21:39DROPS Design answered:
Hola Maritza. Primero se teje en redondo en punto musgo 5 cm ( ver las explicaciones en el patrón). Después continuar para la talla 2 años como sigue, M.2B (= 4 pts), 2r, M.2A sobre los 56 pts sig, es decir, 5 repeticiones completas de M.2A más los 6 primeros puntos del diagrama (= 4 puntos de la trenza más 2 reveses), M.2B (= 4 pts), 2r. Entre las trenzas hay 2 reveses. Según el patrón no hay 2 trenzas juntas.
10.11.2019 - 18:00Hej. Jag har tänkt att sticka vantar. Det ser ut som att det är stickad i aviga, men i mönstret står det rätstickning. Vänder man den ut och in sedan... eller? Det står inget om det i mönstret.
24.09.2019 - 09:18DROPS Design answered:
Hej. Du stickar rätstickning i 2 cm och efter det resår. Efter resåren stickar du ett varv räta samtidigt som du ökar antalet maskor. Sedan börjar du sticka aviga m och du börjar då också på diagram M.3. Lycka till!
24.09.2019 - 11:47Thankyou for this lovely pattern. How can I use this pattern for a 5 -year old ? How do I calculate the increase in stitches? Thankyou.
14.06.2019 - 10:28DROPS Design answered:
Dear Gana, we are unfortunately not able to adjust every pattern to every single request. You can take inspiration from a pattern with round yoke with same tension you'd like to use - for any further individual assistance please contact the store where you bought the yarn. Happy knitting!
14.06.2019 - 10:57Hei. Jeg elsker denne jakka. Men vil så gjerne strikke den i str 3-4. Tips til hvordan jeg kan strikke den til å bli større i størrelse ? Håper dere kan hjelpe meg. Mvh Ida
05.02.2019 - 23:21DROPS Design answered:
Hei Ida. Så hyggelig å høre! Det finnes ikke oppskrift på den i større størrelser dessverre, men det er selvfølgelig ikke noe i veien for at du selv tilpasser den om du ønsker det. Du kan bruke strikkefasteheten for å regne ut hvor mange masker som må legges opp (gang ønsket antall cm med 2,6). Bruk barnets mål, og målsksissen nederst for å regne deg frem til målene du trenger på de forskjellige stadiene. Du kan også se på andre jakkeoppskrifter (i riktig størrelse) med samme strikkefasthet. for økinger/fellinger osv. God fornøyelse
08.02.2019 - 14:45Vil gerne strikke Lille Trille by Droops str. 5 år, men opskriften er kun til 3 år. Hvad gør jeg - strikke på en tykkere pind eller flere masker - hvor mange. Håber I kan hjælpe mig. Tak
05.02.2019 - 13:43DROPS Design answered:
Hej Birgit, Den har vi desværre ikke til større børn. Her ser du hvad vi har til børn med rundt bærestykke Børn + rundt bærestykke
06.02.2019 - 10:33Lige et sidste spørgsmål 😄 Huen: der står jeg skal strikke 2 vrang sammen på hver pind. Så er det jo overstået på 10 pinde da der er 10 masker mellem snoningerne. På billedet ser der ud til at være mere end 10 pinde med snoninger.
08.11.2018 - 21:55DROPS Design answered:
Hei Jill. Du begynner ikke å felle før arbeidet måler 12-12-14 (16) cm fra brettekanten. Du strikker altså først 5-6-6 (7) cm riller, og setter et merke i arbeidet som du nå skal måle arbeidet fra. Videre strikker du M.2A til arbeidet måler 12-12-14 (16) cm fra merket, og her begynner du å felle 1 maske i hver vrangrapport til du har 32-32-36 (40) masker igjen på pinnen. God fornøyelse.
09.11.2018 - 08:10Jeg tror jeg har fattet det nu😏
02.11.2018 - 10:35