
Looking for a yarn?


Comments / Questions (27)
![]() Maya wrote:
Maya wrote:
Hello, for RIGHT FRONT, your pattern said: “When the inc for collar are complete (piece measures approx 45-47-49-51-53-55 cm / 17¾"-18½"-19¼"-20"-21"-21⅝"), dec 13-13-13-13-14-14 tr towards mid front for neck and dec for neckline on every row of tr as follows: 2 tr 1 time and 1 tr 1 time ”. Question: for size S, do I decrease the 13tr first, then decrease 2tr in the next tr row, then decrease 1tr in the next tr row? Thank you!
26.03.2025 - 01:56DROPS Design answered:
Hi Maya, You decrease the 13 tr mid-front on the same row as the first decrease for the neckline. Happy crocheting!
26.03.2025 - 06:33
![]() Amber wrote:
Amber wrote:
Hiya. Just making this lovely garment but I don’t understand how to mirror the front panel. Thank you. Amber
01.10.2024 - 11:53DROPS Design answered:
Dear Amber, for the left front piece, work the increases towards mid front at the end of row from RS/beg of row from WS; and increase for the side at the beg of row from RS/end of row from WS. Increase for neck at the end of row from RS/beg of row from WS and shape armhole at the right side of piece, seen from RS. Happy crocheting!
02.10.2024 - 09:15
![]() Parizet wrote:
Parizet wrote:
Bonjour Avez vous le diagramme car je trouve les explications très compliquées Merci
05.04.2018 - 10:33DROPS Design answered:
Bonjour Mme Parizet, il n'y a pas de diagrammes pour ce modèle, lisez attentivement les explications et n'hésitez pas à poser une question si besoin. Bon crochet!
05.04.2018 - 11:17
![]() Madelon wrote:
Madelon wrote:
Ik wil graag verder met het linker voorpand, dat ik gespiegeld van het rechtervoorpand moet haken. Maar, hoe doe ik de meerderingen aan het begin. In de instructie staat alleen het meerderen aan het eind van een tr. Het gaat met name om de meerderingen van 4 en 3 dst, de enkele lukt wel. Ik hoor het graag!
17.06.2017 - 13:36DROPS Design answered:
Hoi Madelon, Dit staat inderdaad niet duidelijk beschreven in de instructies. Misschien heb je wat aan deze video, waarin uitgelegd wordt hoe je steken opzet tijdens het haken. Dit kun je namelijk ook gebruiken bij het meerderen aan het eind van de toer.
17.06.2017 - 19:47
![]() Wilms Anke wrote:
Wilms Anke wrote:
Hallo, ich arbeite gerade an der Jacke 95/35. Im Vorderteil habe ich Maschen angeschlagen und soll dann Erhöhen zur inneren Mitte...
28.03.2017 - 18:30DROPS Design answered:
Liebe Frau Wilms, die Zunahmen gegen Mitte werden wie im Video unten gehäkelt, siehe auch 3Beim Zunehmen mehrerer D-Stb" am Anfang der Anleitung. Viel Spaß beim häkeln!
29.03.2017 - 09:18
![]() Wilms Anke wrote:
Wilms Anke wrote:
Hallo, herzliche Danke für soviel tolle Anleitungen. Eigentlich komme ich auch ganz gut klar, aber bei dieser klappt es nicht so ... Können Sie mir bitte erklären, wie das mit dem " Erhöhen zur inneren Mitte" geht. Das wäre echt toll. Vielen Dank und liebe Grüße
27.03.2017 - 09:19DROPS Design answered:
Dear Frau Wilms, können Sie bitte erklären, im welchem Teil Sie in der Anleitung sind, bzw welches Teil Sie nicht richtig verstehen? Danke im voraus.
27.03.2017 - 10:03
![]() Marielle Klerks wrote:
Marielle Klerks wrote:
Ik ben bezig met het achterpand op de hoogte van 12 cm, waar ik moet meerderen. Er staat dat ik aan elke kant 9cm (m) in totaal 3 keer moet meerderen. Je gaat dan van 52 dst naar 58dst. Of het aantal steken of het aantal cm klopt niet.
18.03.2017 - 23:27DROPS Design answered:
Hoi Marielle. Je meerdert 1 stk aan beide zijkanten 3 keer = 6 nieuwe stokjes: 52+6 = 58 stokjes. Je meerdert op elke 8 cm voor maat S (52 stokjes), dus op 12 cm, dan op 20 en laatste keer op 28 cm.
20.03.2017 - 13:25
![]() HOCHET Valérie wrote:
HOCHET Valérie wrote:
Merci de m'avoir répondu et rapidement en plus. Je vais regarder tout ça.
07.09.2016 - 22:37
![]() HOCHET Valérie wrote:
HOCHET Valérie wrote:
Je fais suite à mon message plus. si vous pensez que cela n'ira pas, pouvez vous alors me conseiller : 1) avec quel fil moins onéreux je pourrai réaliser cette veste 2) quel autre gilet pourrai je réaliser avec le fil DROPS BRUSHED ALPACA SILK UNI
07.09.2016 - 14:41DROPS Design answered:
Bonjour Mme Hochet, vous pouvez calculer d'après les liens du message précédents quelle qualité choisir. Vous trouverez ici et là des modèles de gilets et de vestes en groupe du fil C. Votre magasin DROPS saura vous conseiller le meilleur choix si besoin. Bon crochet!
07.09.2016 - 15:49
![]() HOCHET Valérie wrote:
HOCHET Valérie wrote:
Bonjour. Pensez vous que je pourrais faire le modèle de veste DROPS 95-35 by DROPS Design Veste Drops au crochet et Haut de Bikini en Paris, Brushed Alpaca Silk et Safran uniquement avec le fil DROPS Brushed Alpaca Silk. cela aura t il le même effet, ou n'aura t il pas le même maintien. Je débute au crochet et vos conseils sont précieux. Merci
07.09.2016 - 12:39DROPS Design answered:
Bonjour Mme Hochet, la veste se crochète entièrement en Paris, on utilise Brushed Alpaca Silk uniquement pour la bordure et Safran pour les boutons. Le haut de bikini se fait uniquement en Safran. Paris est du groupe C vous pouvez la remplacer par un autre fil du groupe C ou 2 fils du groupe A - voir aussi ici. Bon crochet!
07.09.2016 - 13:54
|
|
Sea View |
|
|
|
|
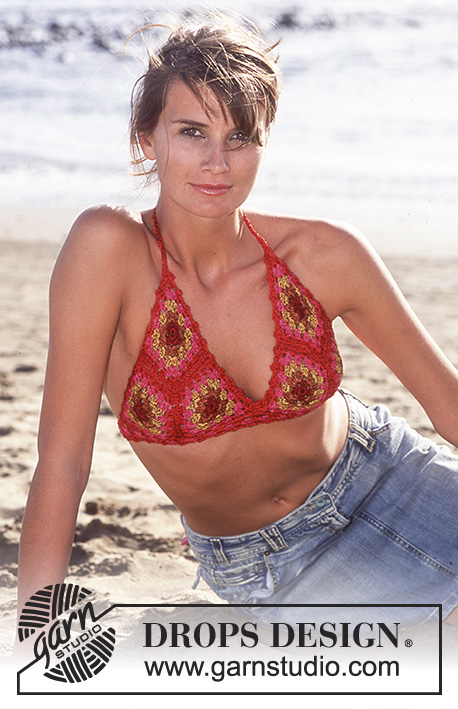
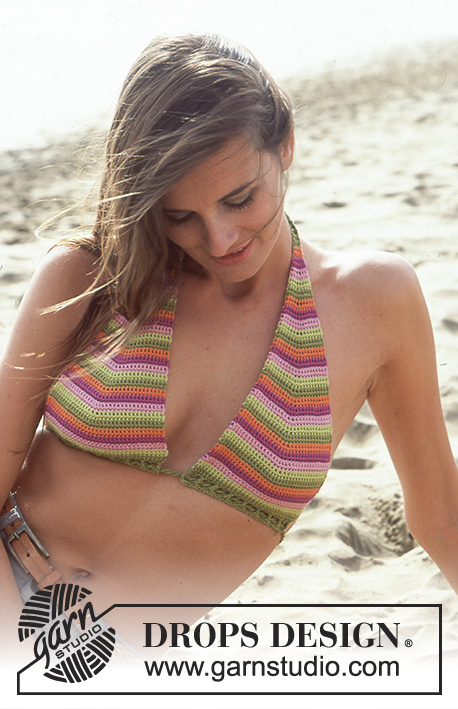
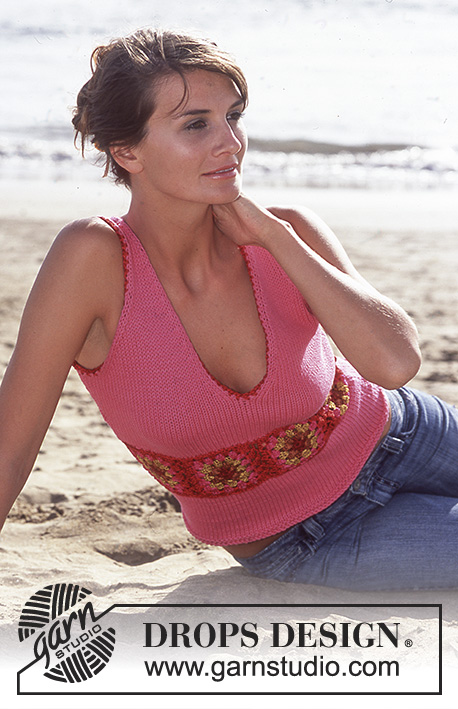
DROPS Crochet jacket in Paris, Brushed Alpaca Silk and Safran. Size: XS - XXL
DROPS 95-35 |
|
|
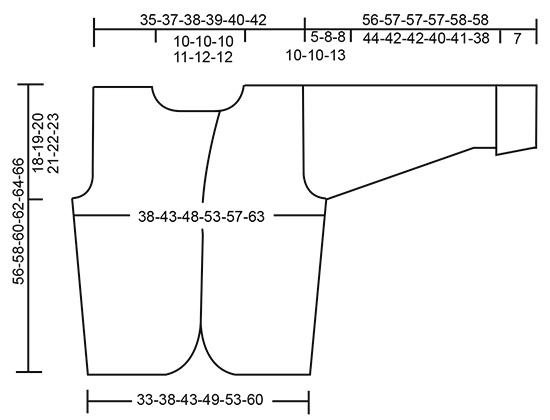
Crochet Gauge: width of 12 sc/tr and length of 4 rows of pattern (i.e. 1 row of sc + 1 row tr x 4) using crochet hook size 5 mm/ H/8 = 10 x 10 cm / 4" x 4". Crochet info: At the beginning of each row of sc replace the 1st sc with ch 1, and at the beginning of each row of tr replace the first tr with ch 4. Finish each row of sc with 1 sc in 4th ch from beginning of previous row. Finish each row of tr with 1 tr in 1st ch from previous row. Pattern: *1 row of sc, 1 row of tr*, repeat from *-* until finished measurements. Note! Crochet in each st and not in between. Decreasing tips: Only dec in rows of tr. Decreasing several tr: Dec as follows at beginning of row: replace 1 tr with a sl st. Dec as follows at end of row: Turn the piece when number of tr to be dec are left on row. Decreasing 1 tr: Dec 1 tr by crocheting 2 tr together as follows: crochet 1 tr but wait with last yo and pull through (= 2 st on hook), crochet 1 tr and pull thread through all sts on hook. Increasing tips: Increase 1 sc/tr by crocheting 2 sc/tr in last st from previous row. Increase several sc/tr as follows: At the end of the row of sc before increases are to be made, crochet ch corresponding number of tr to be increased + 4 ch to turn with – i.e. if you are to increase 4 tr crochet ch 7, turn the piece, crochet 1 tr in 5th ch from the hook and then 1 tr in each of the next ch 2, continue on row. Measuring tips: Because of the weight of the yarn, all measurements should be made while the garment is hanging. BACK PIECE Loosely ch 55-63-71-80-87-98 (includes 4 ch to turn with) using hook size 5 mm / H/8 and Paris. Crochet the 1st row as follows: 1 tr in the 5th. ch from the hook, 1tr in the next ch *skip 1ch, 1 tr in the next 3 ch* repeat from *-* and finish with 1 tr in the last ch (for size L finish with 1 tr in each of the last 2 ch)= 40-46-52-59-64-72 tr, turn the piece. Continue in pattern – see explanation above. When the piece measures approx 12 cm / 4¾" inc a tr each side on every 8-8-9-12-12-12 cm / 3⅛"-3⅛"-3½"-4¾"-4¾"-4¾" a total of 3-3-3-2-2-2 times – see Increasing tips above = 46-52-58-63-68-76 sc/tr. When the piece measures approx 38-39-40-41-42-43 cm / 15-15¼"-15¾"-16⅛"-16½"-17" dec off for armhole each side on every tr row –see Decreasing tips - as follows: 4 tr 0-0-0-1-1-1 times, 3 tr 0-1-1-0-0-1 times, 2 tr 1-0-1-1-2-2 times and 1 tr 0-1-1-2-2-2 times = 42-44-46-47-48-50 tr left. Cut the thread when piece measures 56-58-60-62-64-66 cm / 22"-22¾"-23⅝"-24⅜"-25¼"-26". Insert a marker on each side of the middle 12-12-12-13-14-14 sts (= neck). RIGHT FRONT Loosely ch 19-22-25-29-31-34 (includes 4 ch to turn with) using hook size 5 mm / H/8 and Paris. Crochet 1st row as follows: 1 tr in the 5th ch from the hook, *skip 1ch, 1 tr in the next 3 ch* repeat from *-* but for size XS + XL finish with a tr in the last 5 ch (instead of the last 3 ch) and for size S + XXL finish with a tr in the last 4 ch = 13-15-17-20-22-24 tr, turn the piece. Read all of the following before continuing: Front edges: Continue in pattern, at the same time inc towards mid front on every row of tr – see Increasing tips above - as follows: 4 tr 1 time, 3 tr 1 time and 1 tr 4-5-6-6-7-9 times. After the last inc insert a marking thread within the 4 outermost sts towards mid front – let the thread follow the piece as you progress. Increases at side: At the same time, when piece measures 12 cm / 4¾" inc as described for back piece. Collar: At the same time when piece measures approx 30-32-34-36-38-40 cm / 11¾"-12½"-13⅜"-14¼"-15"-15¾ inc for collar mid front: 1 tr on every row of tr a total of 6 times. Armhole: At the same time when piece measures approx 38-39-40-41-42-43 cm / 15-15¼"-15¾"-16⅛"-16½"-17" dec for armhole as described for back piece. When the inc for collar are complete (piece measures approx 45-47-49-51-53-55 cm / 17¾"-18½"-19¼"-20"-21"-21⅝"), dec 13-13-13-13-14-14 tr towards mid front for neck and dec for neckline on every row of tr as follows: 2 tr 1 time and 1 tr 1 time = 15-16-17-17-17-18 sc/tr left on shoulder. Continue until piece measures approx 56-58-60-62-64-66 cm / 22"-22¾"-23⅝"-24⅜"-25¼"-26" (make sure it’s the same as back piece) and cut the thread. LEFT FRONT Crochet as right front piece, but mirrored. SLEEVE Ch 36-38-39-40-42-42 (includes 1 ch to turn with) using hook size 5 mm/ H/8 and Paris. Crochet the 1st row as follows: 1 sc in the 2nd ch from the hook, *skip 1ch, 1 sc in the next 3 ch* repeat from *-* but for size XS + L finish with 1 sc in the last 5 ch (instead of the last 3 ch), and size M finish with 1 sc in the last 4 ch = 28-29-30-31-32-32 sc, turn the piece. Crochet 1 sc in each sc from previous row. When piece measures 7 cm / 2¾" insert a marker in piece (marks folding edge) and measure piece from this point from now on. When piece measures 7 cm / 2¾" continue in pattern as on back and front pieces. When piece measures approx 14-16-16-17-17-19 cm / 5½"-6¼"-6¼"-6¾"-6¾"-7½" inc 1 sc/tr each side on every 7-6-5-4-3.5-2.5 cm / 2¾"-2⅜"-2"-1½"-1¼"-⅞" a total of 6-6-7-8-9-10 times – see Increasing tips = 40-41-44-47-50-52 sc/tr. When piece measures 51-49-49-47-48-45 cm / 20"-19¼"-19¼"-18½"-19"-17¾" dec for sleeve cap each side on every row of tr as follows: 3 tr 1 time, 2 tr 1 time and 1 tr each side until piece measures approx 56-57-57-57-58-58 cm / 22"-22½"-22½"-22½"-22¾"-22¾". Cut the thread. ASSEMBLY Sew shoulder seams – the shoulder on back piece ends by the marking thread. Set in sleeves. Sew sleeve and side seams – leave approx 4 cm / 1½" at sleeve edges for slit. COLLAR Crochet approx 28 to 36 sc round the neck using crochet hook size 5 mm / H/8 and Paris – crochet from the right side and start by marker on right front piece, crochet around neck and finish by marker on left front piece. Crochet pattern. When collar measures 3 cm / 1⅛" inc 5 sc/tr evenly along neck edge on back piece (inc 1 sc/tr by crocheting 2 sc/tr in same st). Repeat the increase when collar measures 8 cm / 3⅛". When collar measures approx 9-10 cm / 3½"-4" cut the thread. CROCHET BORDER Crochet a border round all edges including the sleeve edges on crochet hook size 5 mm /H/8 and Brushed Alpaca Silk as follows: 1sc in the first st, *1 ch, skip approx 1 cm / ⅜" (the edge should be nice and straight not wavy), 1 sc in the next st.* repeat from *-* and finish with 1 ch in first sc from beginning of round. CROCHET BUTTONS Crochet button covers using crochet hook size 3 mm/C and remnants of Safran (change color for each round). Colour suggestion 1: 1 st round: light blue, 2 nd round: light purple, 3 rd round: orange, 5 th round: Apple green Colour suggestion 2: 1 st round: orange, 2 nd round: light purple, 3 rd round: apple green, 4 th round: blue-purple, 5 th round: orange Colour suggestion 3: 1 st round: Apple green, 2 nd round: orange, 3 rd round: blue-purple, 4 th and 5 th round: light blue 1 button: ch 2, 8 sc in the first of the ch, 1 sl st in 1st sc (= 1st round) 2nd round: 2 sc in each sc and finish with 1 sl st in first sc from beginning of round (= 16 sc) 3rd + 4th round: 1 sc in each sc and finish with 1 sl st in first sc from beginning of round (= 16 sc) 5th round: 1 sc in every other sc and finish with 1 sl st in first sc from beginning of round (= 8 sc) Put buttons in cover, sew round the opening and fasten thread. Place buttons on left front piece, the top one approx 1 cm / ⅜" under the collar and the lower one approx 20 to 26 cm / 8" to 10" from the bottom edge. _______________________________________________________ BIKINI TOP Size: S – M – L, equivalent to cup size A - B – C Materials: DROPS Safran from Garnstudio 50-50-50 g color no. 14, olive 50-50-50 g color no. 15, heather 50-50-50 g color no. 02, rose 50-50-50 g color no. 28, orange 50-50-50 g color no. 31, pistachio DROPS crochet hook size 3 mm / C Crochet gauge: 22 dc x 12 rows = 10 x 10 cm / 4" x 4" Crochet info: Turn the piece with 3 ch. Increasing tips: Inc 2 dc by crocheting 3 dc in dc by marking thread. Stripes: Each stripe = 1 row of dc. Crochet stripes in the following order: pistachio, rose, heather, orange, olive. CUP Crochet each cup separately from bottom up. Ch 46-55-64 using hook size 3 mm / C and olive. 1st row: 1 sc in the 3rd ch from the hook, *skip ch 1, 1 sc in each of the next 2 ch*, repeat from *-* and finish with 1 sc in the last ch = 31-37-43 sc (the first sc = 2 ch). Turn the piece. 2nd row: ch 5, skip 1 sc, 1 dc in next st, *1 ch, skip 1 sc, 1 dc in next st*, repeat from *-* = 15-18-21 ch spaces. Turn the piece. 3rd row: Crochet 1 dc in each st from previous row – see Crochet info = 31-37-43 dc. Insert a marker in the middle dc and let the marker follow the piece as you progress. Next rows: Change to pistachio and crochet stripes as described above. Crochet 1 dc in each dc, at the same time inc 2 dc in the middle of the piece – see Increasing tips above – on the next 4-4-5 rows = 39-45-53 dc. Now start decreasing in the middle of the piece. On first row skip 1 dc by marker, on the following rows skip 2 dc and continue until there are 4 dc left - the piece now measures approx 20-23-27 cm / 8"-9"-10½". Change to olive and crochet tie-string over the top 4 dc, 1 dc in each dc until string measures approx 40 cm / 15¾". Cut the thread. Crochet one more cup. Twisted string: Cut 5 strands of olive each measuring 3 meters/ 3.2 yds. Twist them and fold them double, let the 2 ends twist together and tie a knot each end. Insert string through holes at lower bikini edge. |
|
|
|
Have you finished this pattern?Tag your pictures with #dropspattern or submit them to the #dropsfan gallery. Do you need help with this pattern?You'll find 11 tutorial videos, a Comments/Questions area and more by visiting the pattern on garnstudio.com. © 1982-2025 DROPS Design A/S. We reserve all rights. This document, including all its sub-sections, has copyrights. Read more about what you can do with our patterns at the bottom of each pattern on our site. |


With over 40 years in knitting and crochet design, DROPS Design offers one of the most extensive collections of free patterns on the internet - translated to 17 languages. As of today we count 314 catalogs and 11822 patterns - 11812 of which are translated into English (US/in).
We work hard to bring you the best knitting and crochet have to offer, inspiration and advice as well as great quality yarns at incredible prices! Would you like to use our patterns for other than personal use? You can read what you are allowed to do in the Copyright text at the bottom of all our patterns. Happy crafting!
Post a comment to pattern DROPS 95-35
We would love to hear what you have to say about this pattern!
If you want to leave a question, please make sure you select the correct category in the form below, to speed up the answering process. Required fields are marked *.