
Popular categories
Looking for a yarn?


Comments / Questions (13)
![]() Judith Rainbow wrote:
Judith Rainbow wrote:
Would love to knit this for my 4 year old granddaughter. is there a pattern for this age please.
22.03.2022 - 16:23DROPS Design answered:
Dear Mrs Rainbow, you can maybe take inspiration from a cardigan in the right size and adjust the pattern according to. Happy knitting!
22.03.2022 - 16:43
![]() Judith Rainbow wrote:
Judith Rainbow wrote:
Thank you for replying to my previous questions. Makes more sense now. Maybe the instructions should be changed to lessen confusion
16.03.2022 - 17:51
![]() Judith Rainbow wrote:
Judith Rainbow wrote:
I am knitting 6-9 months of the DROPS baby 2-16 jacket. I have come to the decrease part of the sleeve. If I dec as the pattern suggests I am only decreasing on one side of the sleeve. Should the pattern read ; Dec 3 stitches at the beginning next 2 rows then dec 1 stitch on every other row 3 times. The pattern also doesn't state how many stitches should be left once the decreasing has been done.
15.03.2022 - 18:05DROPS Design answered:
Dear Mrs Rainbow, for sleeve cap, cast off (and don't decrease): 3 sts at the beginning of next 2 rows (= 3 sts on each side), then cast off 6 stitches at the beginning of next 6 rows (= 3 times on each side), so that: 54 - (3 sts x 2 sides) - (6 sts x3 times x2 sides) =12 sts remain. Happy knitting!
16.03.2022 - 09:00
![]() Judith wrote:
Judith wrote:
I cannot make out how the instructions for the decreasing on the drops baby 2-16 jacket is going to turn out correct.
14.03.2022 - 19:06DROPS Design answered:
Dear Judith, can you tell us more? Which size are you working? Which decreases aren't you going to turn out right? So that we can help you further. Thanks for your comprehension.
15.03.2022 - 09:50
![]() Irmgard wrote:
Irmgard wrote:
Welche Farb Nr. wenn ich mit Drops Karisma dieses Model stricken möcht und bleibt die Maschenanzahl so wie bei Drops Muskat? Vielen Dank und einen schönen Sonntag Lg. Irmgard
23.01.2022 - 13:26DROPS Design answered:
Liebe Frau Imrgard, Muskat und Karisma gehören beide selbe Garngruppe B, dh solange Sie die richtige Maschenprobe haben/behalten, dann stimmt die Anleitung. Viel Spaß beim stricken!
24.01.2022 - 09:40
![]() Britt-Marie Dahlberg wrote:
Britt-Marie Dahlberg wrote:
Är Muskat samma garn som Muskat Soft Kan man byta ut Muskat Soft mot Muskat
01.09.2021 - 18:29DROPS Design answered:
Hej Britt-Marie, ja DROPS Muskat er også bomuld og kan bruges til Muskat Soft mønster :)
02.09.2021 - 15:59
![]() Joantine wrote:
Joantine wrote:
1. Moet je de kleurbanen van 4 cm beginnen te meten na de gerstekorrel rand of vanaf het begin van het werk?? 2. Verder vraag ik me af of ik als ik de kleinste maat brei, wel uitkom zoals op het plaatje staat, met donkerblauw bovenaan. 3. De 15 cm hoogte waarop je voor de kleinste maat moet beginnen met minderen voor het mouwgat, is dat totale hoogte of na de gerstekorrel- rand?
19.04.2021 - 19:40DROPS Design answered:
Dag Joantine,
Vraag 1: Deze meet je vanaf het begin van het werk. Vraag 2: In de kleinste maat brei je 4 cm in elke kleur, dus kom je in totaal op 24 cm. Er blijft dan nog 3 cm over, dus gedeelte in denimblauw wordt iets langer. Vraag 3: Dat is de totale lengte, dus vanaf het opzetten.
21.04.2021 - 12:53
![]() Sabine Rückert wrote:
Sabine Rückert wrote:
Leider ist nicht angegeben wann die weiteren Knopflöcher gestrickt werden.
04.03.2021 - 19:27DROPS Design answered:
Liebe Frau Rückert, danke für den Hinweis, deutsche Anleitung wird angepasst. Knopflöcher werden bei der 1. Reihe jeder Streife gestrickt. Viel Spaß beim stricken!
05.03.2021 - 07:23
![]() Kerstin Tenning wrote:
Kerstin Tenning wrote:
Bålen: När arbetet mäter 15-17-16-21 osv ska det avmaskas till ärmhålen. På måttskissen är måttet nerifrån till ärmhålen 3+ 27-30-30-36 ( cm?) Hur stämmer det?
18.10.2020 - 19:25DROPS Design answered:
Hej Kerstin. Måttet 27-30-30-36 på måttskissen är mått hela vägen upp till axeln, så det stämmer att du ska avmaska till ärmhål när arbetet mäter 15-17-16-21 cm. Mvh DROPS Design
20.10.2020 - 10:32
![]() Willy Lammers wrote:
Willy Lammers wrote:
Minderen van de mouw staat 1x3 en 3x 6 steken. Moet de mindering aan beide kanten of alleen aan begin van de naald?
31.10.2019 - 19:01DROPS Design answered:
Dag Willy,
De minderingen maak je steeds aan het begin van de naald. Dus je kant eerst 3 steken af aan het begin van de naald, dan brei je de naald helemaal uit, je keert het werk en kant weer 3 steken af aan het begin van de naald.
05.11.2019 - 13:25
|
||||||||||
DROPS Baby 2-16 |
||||||||||
|
|
||||||||||
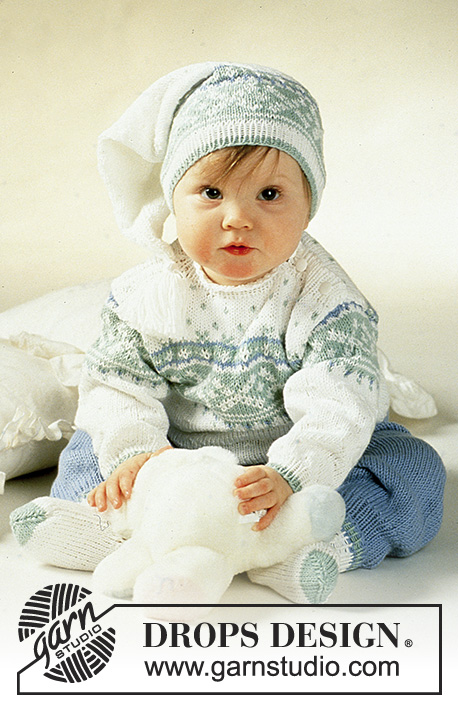
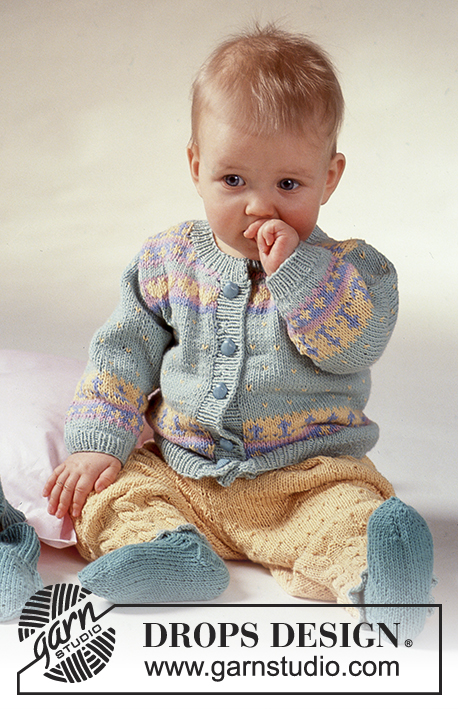
DROPS jacket and socks in “Paris” or “Muskat”.
DROPS Baby 2-16 |
||||||||||
|
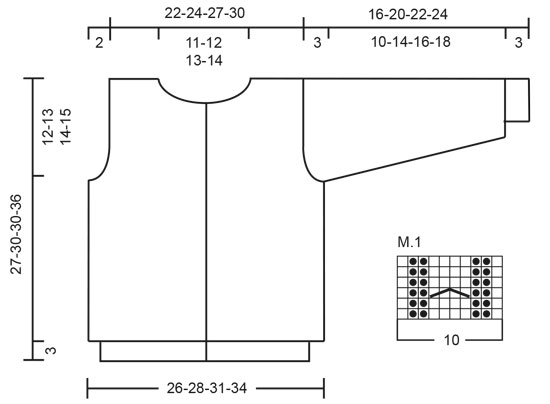
Knitting tension: 10 x 10 cm = Muskat: 21 sts x 28 rows on needles size 3.5 mm in pattern. Paris: 17 sts x 23 rows on needle size 5 mm. Moss st: first row: K1, P1. Second row: P over K, K over P. Repeat second row. Stripes: 4-5-5-5-6 cm in each colour in the following order: mint, light mint, yellow, purple, light blue, blue. Pattern: See diagram. The diagrams show the pattern from the RS. BACK AND FRONT PIECES Worked back and forth on needle from mid front. Numbers in () = Paris. Cast on 124-134-146-158 (104-112-120-132) sts on needle size 2.5 (3.5) mm with mint and work 3 cm moss st. Change to needle size 3.5 (5) mm and continue as follows and in stripes, also on front bands: 5 moss sts (= front band), M.1, 94-104-116-128 (74-82-90-102) stocking sts, M.1, 5 moss st (= front band). Remember the knitting tension. At the same time make buttonholes on right front band on first row of each stripe 2 sts from edge. 1 buttonhole = cast off 2 sts and cast on 2 new sts on return row. When piece measures 15-17-16-21 cm work next row as follows: 33-36-39-42 (28-30-32-35) sts = front piece, cast off 4 sts for armhole, 50-54-60-66 (40-44-48-54) sts = back piece, cast off 4 sts for armhole, 33-36-39-42 (28-30-32-35) sts = front piece. BACK PIECE 50-54-60-66 (40-44-48-54) sts. Dec to shape the armhole on every other row: 1 st twice = 46-50-56-62 (36-40-44-50) sts. When piece measures 25-28-28-34 cm cast off the middle 20-22-24-26 (14-16-18-20) sts for neck and dec 2 sts on neckline on next row. Cast off remaining sts when piece measures 27-30-30-36 cm. RIGHT FRONT PIECE 33-36-39-42 (28-30-32-35) sts. Dec for armhole as described for back piece = 31-34-37-40 (26-28-30-33) sts. When piece measures 23-26-26-32 cm cast off for neckline on every other row: 16-18-19-20 (13-14-15-16) sts 1 time, 2 sts 1 time, 1 st twice. Cast off remaining sts when piece measures 27-30-30-36 cm. LEFT FRONT PIECE Like right front piece, but mirrored. SLEEVE Cast on 32-34-36-36 (26-28-32-32) sts on pointed needles size 2.5 (3.5) mm with mint and work 3 cm moss st. Change to needle size 3.5 (5) mm, at the same time inc 0-4-6-10 (0-2-2-6) sts evenly = 32-38-42-46 (26-30-34-38) sts. Continue in stocking st and stripes, at the same time inc 1 st each side 9-8-8-9 (7-7-7-7) times as follows: Size 3 months: on every other and 3rd round alternately Size 6/9 months: on every 4th round Size 12/18 months: on every 4th and 5th round alternately Size 24 months: on every 5th round = 50-54-58-64 (40-44-48-52) sts. When piece measures 13-17-19-21 cm cast off on every other row: 3 sts 1 time, 6 sts 3 (2) times. Cast off remaining sts when piece measures 16-20-22-24 cm. ASSEMBLY Sew shoulder seams. Pick up approx 74-78 (70-74) sts on needle size 2.5 (3.5) mm with blue round the neck, work 1.5 cm moss st, cast off. Set in sleeves and sew on buttons. _____________________________________________________________________ SOCKS: Size: 3 – 6/9 – 9/12 -24 months Foot length: 10-11-12-14 cm DROPS double pointed needles size 2.5 mm and 3 mm Knitting tension: 24 sts x 32 rows on needles size 3 mm in stocking sts = 10 x 10 cm. Rib: *K1, P1*, repeat from *-*. SOCK The sock is worked in the round. Cast on 34-36-36-38 sts on needles size 2.5 mm with mint Safran and work 1.5 cm Rib. When piece measures 7-8-8-9 cm work heel as follows: 3 cm stocking st back and forth on needle on 18 sts mid back. Decreases for heel: Row 1: K10, K2 tog into back of st, K1, turn the piece Row 2: slip 1 st as if to P, P4, P2 tog, P1, turn the piece Row 3: slip 1 st as if to K, K5, K2 tog into back of st, K1, turn the piece Row 4: slip 1 st as if to P, P6, P2 tog, P1, turn the piece Row 5: slip 1 st as if to K, K7, K2 tog into back of st, K1, turn the piece Row 6: slip 1 st as if to P, P8, P2 tog, P1, turn the piece Row 7: K2 tog, K8, K2 tog into back of st = 10 sts on needle. Now pick up 7-7-8-8 sts on both sides of heel and put all sts on needles = 40-42-44-46 sts. Continue in Rib on the upper 16-18-18-20 sts and work remaining sts in stocking st. Dec on both sides of Rib on every round: 1 st 4-4-5-5 times = 32-34-34-36 sts. When foot measures 7-8-9-11 cm insert a Marking Thread (MT) each side and dec on both sides of MT (= 4 dec per round) on every other round: 1 st 4-4-5-5 times and on every round: 1 st twice. Cut the thread, pull through remaining sts and fasten. |
||||||||||
Diagram explanations |
||||||||||
|
||||||||||
|
||||||||||
Have you finished this pattern?Tag your pictures with #dropspattern or submit them to the #dropsfan gallery. Do you need help with this pattern?You'll find 25 tutorial videos, a Comments/Questions area and more by visiting the pattern on garnstudio.com. © 1982-2025 DROPS Design A/S. We reserve all rights. This document, including all its sub-sections, has copyrights. Read more about what you can do with our patterns at the bottom of each pattern on our site. |
||||||||||


With over 40 years in knitting and crochet design, DROPS Design offers one of the most extensive collections of free patterns on the internet - translated to 17 languages. As of today we count 314 catalogues and 11822 patterns translated into English (UK/cm).
We work hard to bring you the best knitting and crochet have to offer, inspiration and advice as well as great quality yarns at incredible prices! Would you like to use our patterns for other than personal use? You can read what you are allowed to do in the Copyright text at the bottom of all our patterns. Happy crafting!
Post a comment to pattern DROPS Baby 2-16
We would love to hear what you have to say about this pattern!
If you want to leave a question, please make sure you select the correct category in the form below, to speed up the answering process. Required fields are marked *.