
Popular categories
Looking for a yarn?


Comments / Questions (8)
![]() Ananja Wieringa wrote:
Ananja Wieringa wrote:
Dank je!! Ananja 🌷
29.03.2020 - 16:08
![]() Ananja Wieringa wrote:
Ananja Wieringa wrote:
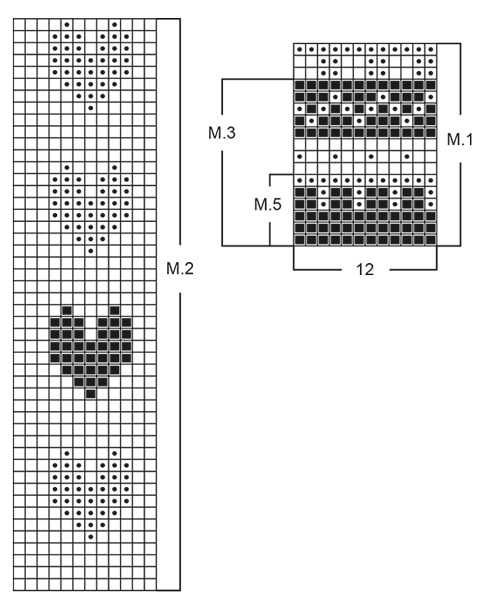
De telpatronen voor het vestje zijn voorzien van de letter M1, M2, M3 en M 5. In de werkbeschrijving voor het lijfje wordt gesproken over Patroon 1, Patroon 2, voor de mouwen over Patroon 3 en Patroon 4. Mag ik aannemen dat na de boord van het lijfje M1 = Patroon 1 gebreid wordt, daarna M2 = Patroon 2? En dat voor de mouwen Patroon 3 = M3 en Patroon 4 ( welk telpatronen is dat op de tekening?) Patroon 5 voor de hals al dan M5 zijn. Ik hoor het graag! Ananja
28.03.2020 - 18:38DROPS Design answered:
Dag Ananja,
Je kan inderdaad een M ervoor zetten, dus 1 is M.1, 2 is M.2 enzovoorts. Patroon 4 is geen telpatroon, maar staat omschreven bij de instructies voor het patroon, bovenaan.
28.03.2020 - 19:06
![]() Deedie wrote:
Deedie wrote:
Yarn suggested for baby’s hat is cotton chenille but, I can’t find it listed. Please tell me what to select. Thank you.
09.03.2020 - 14:54DROPS Design answered:
Dear Deedie, this yarn is already discontinuied, but you can choose between yarns from Yarn group B, such as: You can substitute DROPS Tynn Cotton Chenille with: DROPS Belle DROPS Cotton Light DROPS Cotton Merino DROPS Karisma DROPS Lima DROPS Merino Extra Fine DROPS Muskat DROPS Puna DROPS Sky The one that will give you the most similar result is DROPS Sky. Happy crafting!
09.03.2020 - 15:03
![]() Stephanie wrote:
Stephanie wrote:
I think there is a mistake in the instructions for the collar. After 1 row yellow I think you should go to row 4 of pattern 5.
12.01.2020 - 23:02
![]() Anne Reffstrup wrote:
Anne Reffstrup wrote:
Jeg kan ikke forstå, at der skal slås 5 masker op midt foran efter 18 cm? Hvorfor er det ikke kun i siderne til ærmerne?
03.09.2019 - 17:50DROPS Design answered:
Hej Anne, det er opklipsmasker for ærmegab, så du kan fortsætte med at strikke rundt på rundpind. God fornøjelse!
06.09.2019 - 08:45
![]() Christine wrote:
Christine wrote:
Het telpatroon ontbreekt. Kunt u dit toeveogen svp.
22.11.2018 - 13:41DROPS Design answered:
Dag Christine,
Bedankt voor het doorgeven. Het is nu toegevoegd. Veel breiplezier!
25.11.2018 - 16:37
![]() Christine Waardenburg-Warnaars wrote:
Christine Waardenburg-Warnaars wrote:
Het TELPATROON voor DROPS Baby 5-21ontbreekt. Kunt u dit toevoegen svp.
21.11.2018 - 13:20
![]() Meiler wrote:
Meiler wrote:
Zwecks Material, danke schön.
19.04.2015 - 17:29
|
||||||||||
DROPS Baby 5-21 |
||||||||||
|
|
||||||||||
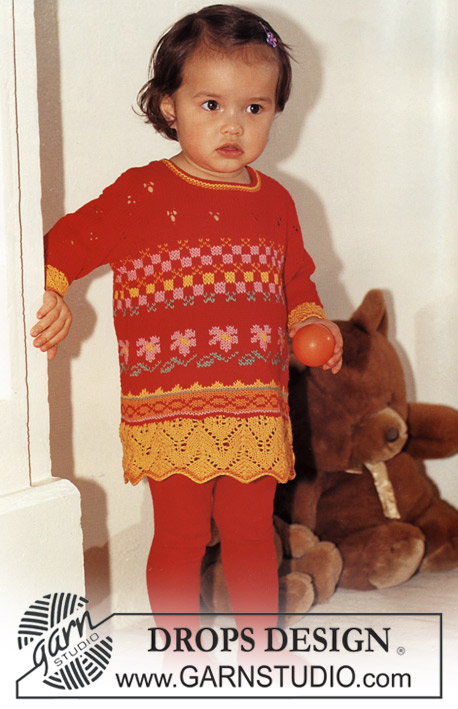
DROPS Baby’s knitted jacket in Camelia with hearts and Crochet hat in Cotton Chenille
DROPS Baby 5-21 |
||||||||||
|
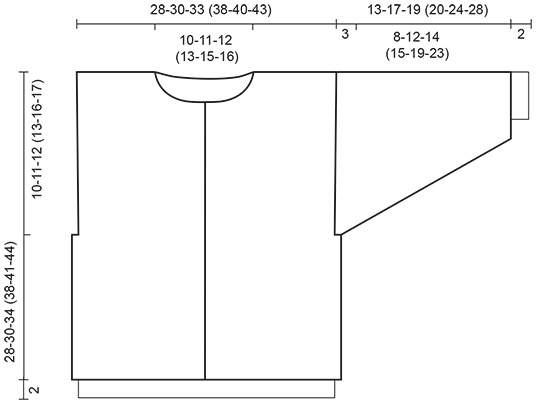
JACKET: Knitting tension: 24 stitches x 32 rows with needle size 3 mm and stocking stitch = 10 x 10 cm. Remember needle size is only a guide! Pattern: See diagram (1 diagram = 1 repeat). The pattern in the diagram is seen from the right side. The whole pattern is worked in stocking stitch. M.4: * 3 rounds of red, 3 rounds of pink, 3 rounds of red, 3 rounds of pink, 3 rounds of red, 3 rounds of pink, 3 rounds of red, 3 rounds of yellow *, repeat from * - * upwards. Rib: * K1, P1 *. Repeat from *-*. Edge: Work 2 cm stocking stitch, purl 1 row (= folding edge), 2 cm stocking stitch. ------------------------------------------------------ Body: The jacket is worked in the round with circular needle after the rib and is cut for armholes and mid front afterwards. Cast on 134-146-158 (182-194-206) stitches (incl. 2 edge stitches) with circular needle size 2.5 mm and yellow and work rib back and forth for 2 cm. Change to circular needle size 3 mm and work M.1 in the round at the same time as you increase 3 stitches mid front - these stitches + edge stitches = 5 stitches to cut in afterwards and are not worked into pattern. Remember the knitting tension. After M.1 finish working with M.2. When piece measures 18-19-22 (25-25-27) cm, work the next round as follows: 5 cutting stitches, 33-36-39 (45-48-51) stitches front piece, cast on 5 stitches (= cutting stitches which are not worked into pattern), 66-72-78 (90-96-102) stitches back piece, cast on 5 m (=cutting stitches which are not worked into pattern), 33-36-39 (45-48-51) stitches front piece. When piece measures 23-25-29 (33-36-39) cm, cast off the middle 6-8-10 (14-18-20) stitches + 5 cutting stitches in front for neck and finish working back and forth on needle. Continue to decrease towards neck every 2nd row: 3 stitches x 2, 2 stitches x 1, 1 stitch x 1. At the same time, when piece measures 26-28-32 (36-39-42) cm, cast off the middle 20-22-24 (28-32-34) stitches at back for neck. Then decrease 2 stitches in each side on the next row towards neck at back. Cast off when piece measures 28-30-34 (38-41-44) cm (adjust for pattern if necessary). Sleeve: Cast on 38-40-40 (42-42-44) stitches with double pointed needles size 2.5 mm and yellow and work rib for 2 cm at the same time as you increase 2-4-6 (6-6-8) stitches evenly on last round = 40-44-46 (48-48-52) stitches. Change to double pointed needles size 3 mm and work M.3 and then to finished length with M.4 (see description above) at the same time as you increase mid under sleeve: 2 stitches x 4-4-6 (7-14-15) in Size 1/3 months: Every 5th round, Size 6/9 months: Alternately every 8th and 9th round, Size 12/18 months: Alternately every 6th and 7th round, Size 2 years: Every 6th round and Sizes 3/4 + 5/6 years: Every 4th round = 48-52-58 (62-76-82) stitches. When piece measures 10-14-16 (17-21-25) cm, place the 4 stitches mid under sleeve on a thread for sleeve cap. Continue working back and forth on needle at the same time as you place stitches on the thread in each side every 2nd row: 4-4-4 (5-6-6) stitches x 4. The piece now measures approx. 13-17-19 (20-24-28) cm. Place all stitches from the thread back on the double pointed needles and work in the round over all stitches with red as follows: 2 cm stocking stitch with wrong side out as a lining over the cut edge on body, cast off. Assembly: Sew a marker thread down the middle of the cutting stitches in each side and mid front. Sew two machine seams on each side of the marker thread, seam 1 = 1/2 stitch from marker thread, seam 2 = 1/2 stitch from seam 1. Cut for armholes and mid front. Sew shoulder seams. Knit up approx. 60-65-75 (85-90-100) stitches with yellow and needle size 2.5 mm along left front piece and work Edge back and forth on needle. Repeat along right front piece, but after 0.5 cm work 5-5-5 (6-6-6) buttonholes evenly on row - 1 buttonhole = cast off 2 stitches and cast on 2 new stitches over the cast off stitches on the next row; top buttonhole worked 2 stitches from edge, bottom buttonhole 1 cm from edge (remember buttonhole on folded side too. Knit up approx. 90-100 stitches around neck with needle size 2.5 mm and yellow and work 1 row stocking stitch and then M.5, change to red and work 1 row stocking stitch, purl 1 row (= folding edge), 5 rows red, cast off. Sew sleeves to body from the right side as follows: Sew alternately 1 stitch in the last knitted round on sleeve before the lining and 1 stitch on body after the machine seam. Turn the jumper inside out and sew lining from the sleeve over the cut edge on the body by hand. Sew on buttons. Crochet HAT in Cotton Chenille. Circumference: 35-37-38 (42-45-47) cm. Materials: Cotton Chenille 50-50-50 (50-100-100) g colour no 09, red DROPS Crochet hook size 4 mm. Crochet tension: approx. 13 double crochets in width and 12 rows in height with hook size 4 mm = 10 x 10 cm. Remember hook size is only a guide! Hat: The hat is crocheted in red with hook size 4 mm. Work 4 chain stitches and form them into a ring with 1 slip stitch in the first chain stitch. Begin all rounds with 1 chain stitch which replaces the first double crochet and finish all rounds with 1 slip stitch. Work 6 double crochets in the ring. Then work 2 double crochets in each double crochet = 12 double crochets. On the next round work as follows: * 2 double crochets in the first double crochet, 1 double crochet in the next double crochet *, repeat from *-* to end of round = 6 increases = 18 double crochets. Then work the next round as follows: * 2 double crochets in the first double crochet, 2 double crochets *, repeat from *-* to end of round. Now increase in this way every round, but add 1 more double crochet between each time you work 2 double crochets in 1 double crochet, i.e. next round there will be 3 double crochets between and the following round there will be 4 double crochets between etc. Continue the increases until piece measures 4-4-5 (5-6-6) cm from the middle. Then increase every 2nd round until piece measures 7.5-8.5-9 (10.5-10.5-11) cm from the middle. On the next round decrease /increase to 46-48-50 (54-58-62) double crochets evenly on round. Then continue to work without increasing until piece measures 16-17-18 (18-19-19) cm from the middle. Then work the brim as follows: Round 1: * 2 double crochets, 2 double crochets in next double crochet *. Repeat from *-* to end of round. Rounds 2+3+4: Work without increasing. Repeat rounds 1-4 until the brim measures 5-10 cm or the desired width, finish with 1 slip stitch in first double crochet (finish with either Round 3 or 4 as the brim will then look nicest!). Cut the strand and fasten the ends. |
||||||||||
Diagram explanations |
||||||||||
|
||||||||||
|
||||||||||
|
||||||||||
Have you finished this pattern?Tag your pictures with #dropspattern or submit them to the #dropsfan gallery. Do you need help with this pattern?You'll find 31 tutorial videos, a Comments/Questions area and more by visiting the pattern on garnstudio.com. © 1982-2025 DROPS Design A/S. We reserve all rights. This document, including all its sub-sections, has copyrights. Read more about what you can do with our patterns at the bottom of each pattern on our site. |
||||||||||


With over 40 years in knitting and crochet design, DROPS Design offers one of the most extensive collections of free patterns on the internet - translated to 17 languages. As of today we count 314 catalogues and 11821 patterns translated into English (UK/cm).
We work hard to bring you the best knitting and crochet have to offer, inspiration and advice as well as great quality yarns at incredible prices! Would you like to use our patterns for other than personal use? You can read what you are allowed to do in the Copyright text at the bottom of all our patterns. Happy crafting!
Post a comment to pattern DROPS Baby 5-21
We would love to hear what you have to say about this pattern!
If you want to leave a question, please make sure you select the correct category in the form below, to speed up the answering process. Required fields are marked *.