
Popular categories
Looking for a yarn?


Comments / Questions (17)
![]() Lea wrote:
Lea wrote:
Hello, \r\nI have trouble understanding the increases for the armholes. It says: ROW 1 (right side): Knit 3, increase 1 stitch towards the left - remember INCREASE TIP-1, knit as far as the band, work the band as before. But this doesn’t make sense, seeing as the row starts on the I band on the right side and ends on the I band on the wrong side … there must be à mistake. Could someone clarify this for me please
24.04.2025 - 19:42DROPS Design answered:
Dear Lea, on the left front piece you will increase for armhole at the end of a row from the right side when 3 sts remain before end of the row, but on the right front piece you will increase at the end of a row from the right side just before band stitches. Can this help? Happy knitting!
25.04.2025 - 07:38
![]() Raunier Jean Luc wrote:
Raunier Jean Luc wrote:
Bonjour, Comprends pas les explications pour les manches il y a t il une vidéo ou mieux m expliquer Merci
23.02.2025 - 11:27DROPS Design answered:
Bonjour Mr Raunier, cette vidéo devrait être celle qu'il vous faut. Pour la technique des rangs raccourcis utilisée ici, c'est cette vidéo. Bon tricot!
24.02.2025 - 09:07
![]() Jean Luc Raunier wrote:
Jean Luc Raunier wrote:
Bonjour \r\nPour la diminution de la bordure et l augmentation de l encolure doit t on le faire en même temps ou l un après l autre\r\nMerci
15.01.2025 - 06:48DROPS Design answered:
Bonjour Mr Raunier, les diminutions de la bordure devant commencent en même temps que les augmentations pour l'encolure V, mais elles se font à une fréquence différente - tous les 7-6 cm pour les diminutions de la bordure devant et 4 à 6 fois tous les 2 rangs, 4 fois tous les 4 rangs et 2 fois tous les 6 rangs pour l'encolure. Bon tricot!
15.01.2025 - 09:39
![]() Jean Luc Raunier wrote:
Jean Luc Raunier wrote:
Un question pour rassembler le dos au devant on doit positionner le dos comment endroit au dessus ou au dessous car si on met l endroit en dessous
07.01.2025 - 07:21DROPS Design answered:
Bonjour Mr Raunier, le rang qui réunit les devants et le dos va se faire sur l'envers: vous tricotez d'abord les mailles du devant droit, puis vous montez les mailles pour le côté, vous tricotez les mailles en attente du dos, vous montez les mailles du côté et vous terminez par les mailles du devant gauche - dans cette leçon, nous montrons (pour un pull) comment tricoter cette partie DOS & DEVANT, la seule différence par rapport à la veste, c'est que les rangs commencent ici au milieu du devant par le devant droit (sur l'envers). Bon tricot!
07.01.2025 - 09:55
![]() Jean Luc Raunier wrote:
Jean Luc Raunier wrote:
Bonjour je ne comprends pas comment comment fixe la bordure devant icord au dos car j ai la parti tricoter de bordure devant de 8 cm qui reste non rattaché Merci de votre aide
02.01.2025 - 17:04DROPS Design answered:
Bonjour Mr Raunier, pour le devant gauche, tricotez d'abord les mailles de la bordure devant comme avant puis relevez les mailles le long de l'épaule gauche du dos (cf vidéo ou leçon) et tricotez comme comme indiqué. Pour le devant droit, vous tricotez d'abord la bordure devant, vous coupez le fil, puis vous relevez les mailles le long de l'épaule droite du dos et vous terminez, sur l'endroit par les mailles de la bordure du devant droit. Bon tricot!
03.01.2025 - 07:46
![]() Cecilia wrote:
Cecilia wrote:
Har fastnat i upptagning av maskor till ärmen. Ska jag börja plocka upp i armhålan,sen bara ha 48maskor runt hela?har markerat på axeln. Eller hur jag förstår inte hur jag stickar armen?hoppas ni kan förklara. Jättemysig kofta så vill få till armen med.
17.11.2024 - 19:06DROPS Design answered:
Hej Cecilia. Jag tror att denna video kan hjälpa dig att förstå hur du ska göra. Mvh DROPS Design
20.11.2024 - 14:14
![]() Suzanne wrote:
Suzanne wrote:
Wanneer moet je nou beginnen met het meerderen voor de V-hals? Volgens het patroon voor links, tegelijk met het minderen voor de voorbies en voor rechts na het minderen voor de voorbies. Dan worden de voorpanden toch ongelijk...
23.09.2024 - 21:52DROPS Design answered:
Dag Suzanne,
Voor beide voorpanden geldt dat de meerderingen voor het armsgat al beginnen voordat de meerderingen voor de hals klaar zijn. De beide panden zijn gespiegeld van elkaar. Voor het armsgat meerder je ook op eenzelfde hoogte voor beide panden.
25.09.2024 - 08:22
![]() Camilla wrote:
Camilla wrote:
In the pattern, there are instructions for Icord in the back. but checking the pictures I can't understand where it should be done, after making the increases for the armhole.
21.09.2024 - 16:51DROPS Design answered:
Dear Camilla, the I-cord is worked in the left and right bands, which serve as the starting point for the front pieces, before picking up stitches from the shoulders in the back piece. These bands are later sewn together in the mid-back. Happy knitting!
23.09.2024 - 00:49
![]() Giada wrote:
Giada wrote:
I have troubles in understanding how to pickup stitches on the left shoulder. There is something like a video tutorial which can help me?? I don't know how to go on from this point on because I've done the Left Band with the I-CORD but i don't understand how to attach it. many thanks
12.09.2024 - 10:18DROPS Design answered:
Sure Gloria, in this video as well as in this lesson we show how to pick up the stitches for the shoulder on such a pattern. Find even more videos/lessons for European shoulders under both tabs Videos/Lessons. Happy knitting!
13.09.2024 - 08:02
![]() Lisa Bergmann wrote:
Lisa Bergmann wrote:
Das ist toll , eine super Sache
08.09.2024 - 07:27
|
|
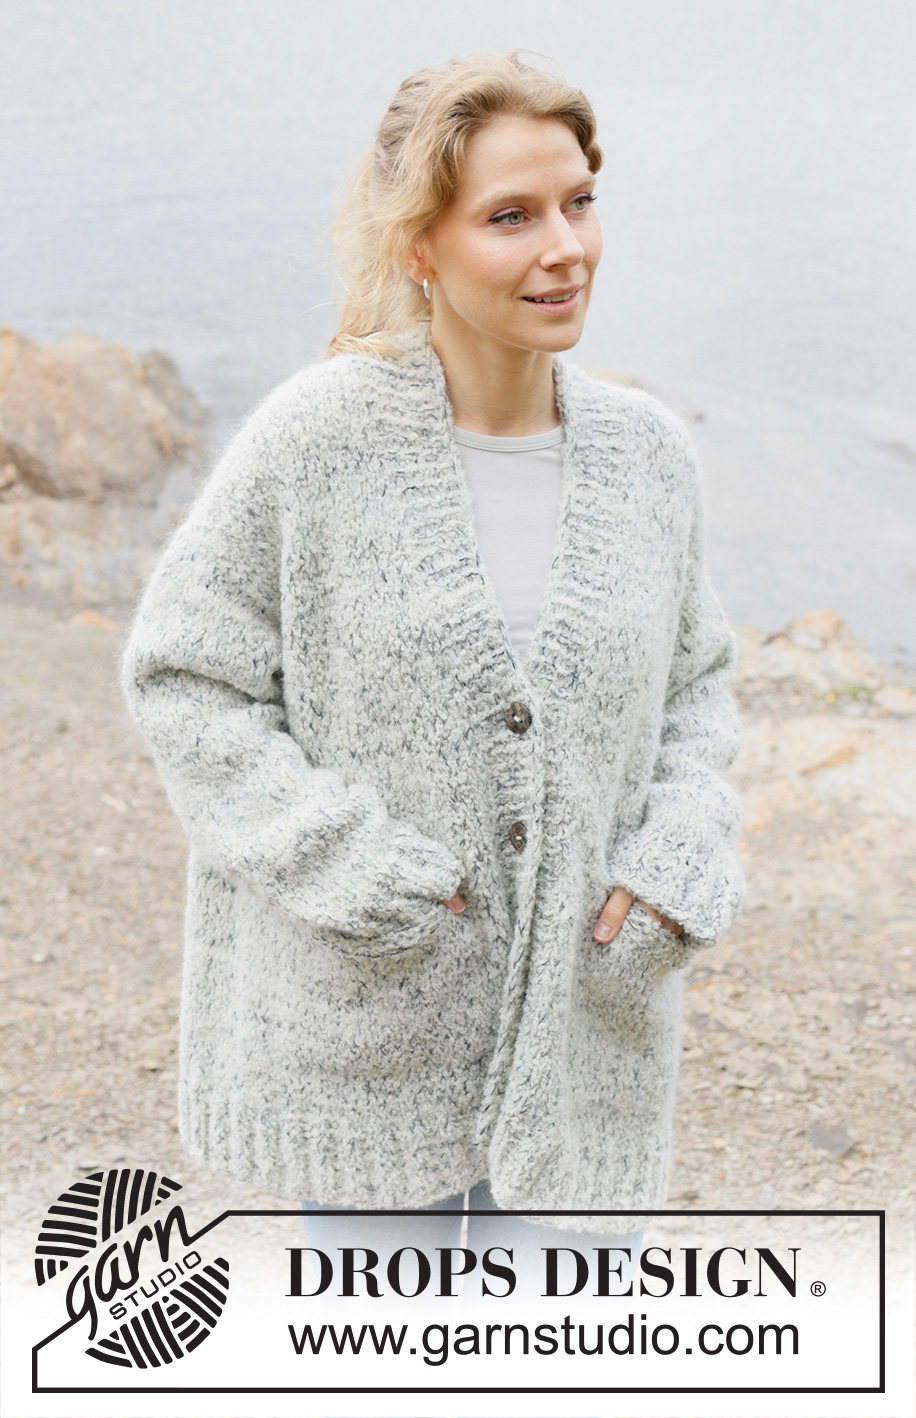
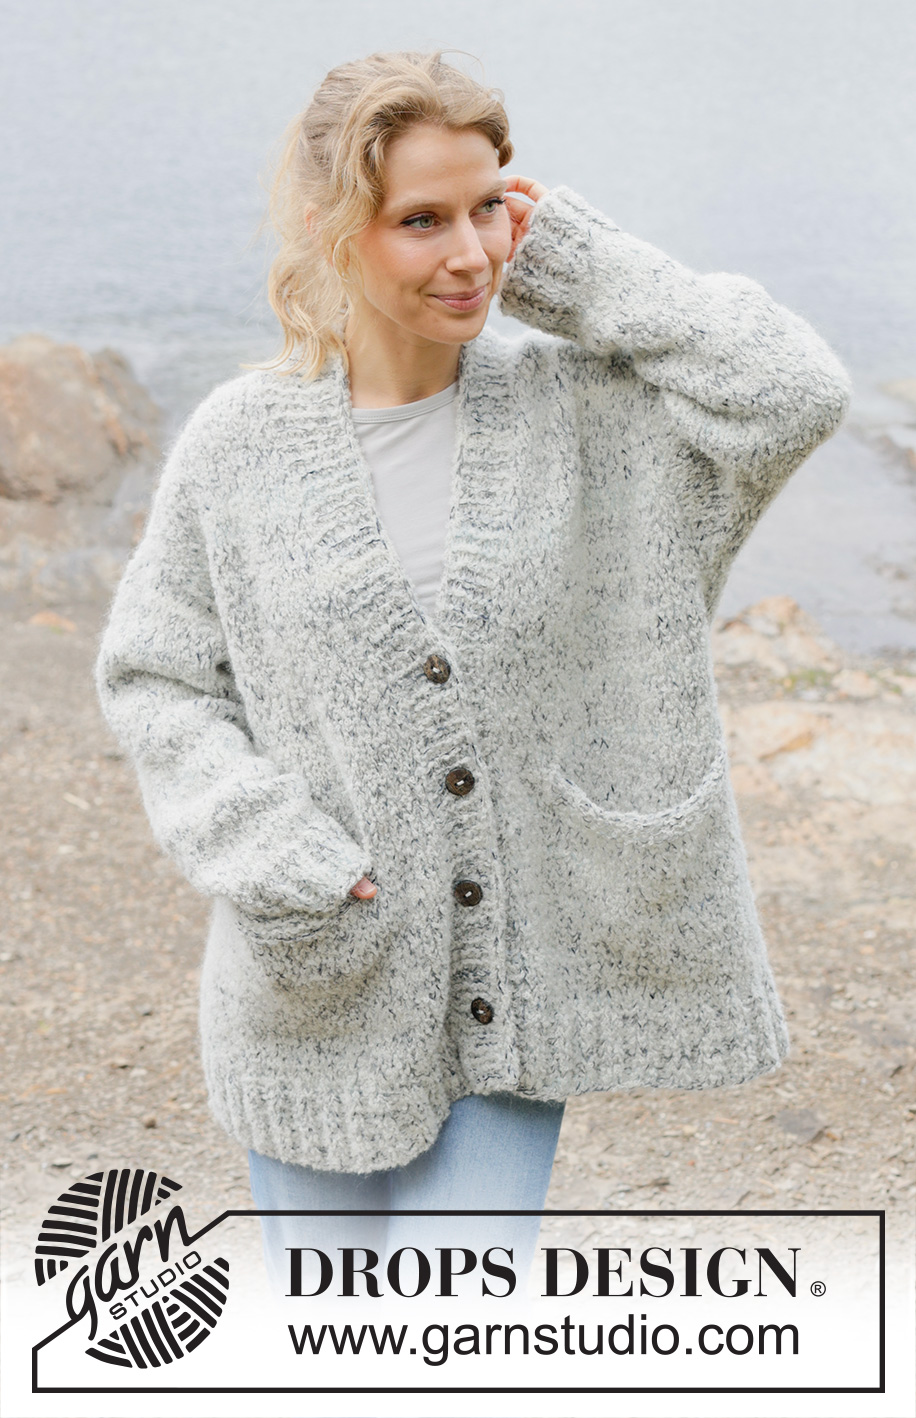
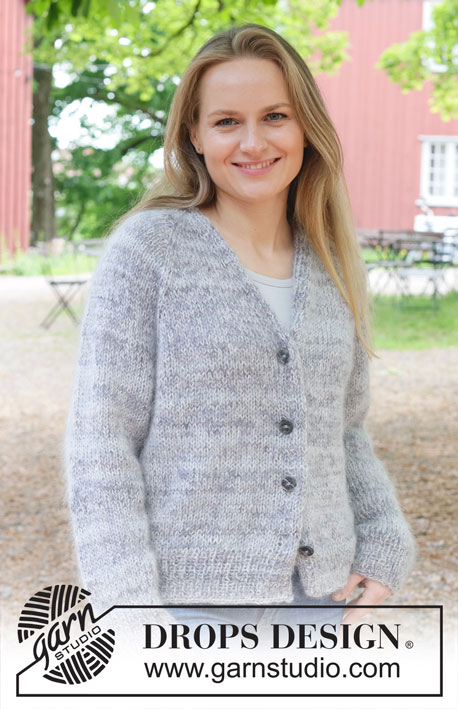
Frosty Dream Cardigan#frostydreamcardigan |
|
 |
 |
Knitted long, over-sized jacket in 1 strand DROPS Fabel, 1 strand DROPS Kid-Silk and 1 strand DROPS Alpaca Bouclé. The piece is worked top down with European/diagonal shoulders, V-neck, I-cord and pockets. Sizes S - XXXL.
DROPS 252-22 |
|
|
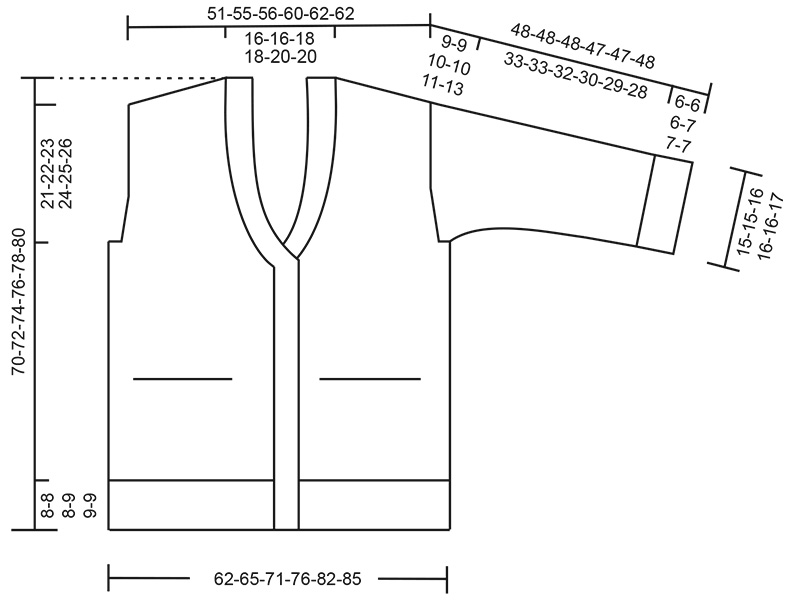
------------------------------------------------------- EXPLANATIONS FOR THE PATTERN: ------------------------------------------------------- GARTER STITCH (worked back and forth): Knit all rows, from both the right and wrong side. 1 ridge in height = knit 2 rows. LEFT BAND WITH I-CORD: RIGHT SIDE: Slip 1 stitch purl-wise with strand in front, knit 1, work 9-9-9-10-10-10 garter stitches. WRONG SIDE: Work 9-9-9-10-10-10 garter stitches, slip 1 stitch purl-wise with strand in front, knit 1. RIGHT BAND WITH I-CORD: RIGHT SIDE: Work 9-9-9-10-10-10 garter stitches, slip 1 stitch purl-wise with strand in front, knit 1. WRONG SIDE: Slip 1 stitch purl-wise with strand in front, knit 1, work 9-9-9-10-10-10 garter stitches. INCREASE TIP-1: INCREASE 1 STITCH TOWARDS LEFT – from right side: Use left needle to pick up the strand between 2 stitches from the previous row, pick up the strand from the front and knit through the back. INCREASE 1 STITCH TOWARDS RIGHT – from right side: Use left needle to pick up the strand between 2 stitches from the previous row, pick up the strand from the back and knit through the front. INCREASE TIP-2: INCREASE 1 STITCH TOWARDS LEFT – from wrong side: Use left needle to pick up the strand between 2 stitches from the previous row, pick up the strand from the back and purl through the front. INCREASE 1 STITCH TOWARDS RIGHT – from wrong side: Use left needle to pick up the strand between 2 stitches from the previous row, pick up the strand from the front and purl through the back. BUTTONHOLES: Work the buttonholes from the right side, when there are 5 stitches left on the row. ROW 1 (right side): Make 1 yarn over, knit 2 together, knit 1, slip 1 purl-wise with strand in front, knit 1. ROW 2 (wrong side): Work the band as before, knit the yarn over to leave a hole. The first buttonhole is worked from the right side, 1 cm after the increases for the V-neck are finished. Then work the other 3-3-3-4-4-4 buttonholes with 10½-11-11-9-9-9½ cm between each one. KNITTING TIP: When working short rows, there will be a small hole after each turn. This hole can be closed by tightening the strand or using the technique German Short Rows as follows: Slip the first stitch purl-wise, take the strand over the right needle and tighten well from the back (2 loops on the needle). These loops are worked together on the next row. DECREASE TIP: Decrease 1 stitch on each side of the marker-thread as follows: Work until there are 3 stitches left before the marker-thread, knit 2 together, knit 2 (marker-thread sits between these 2 stitches), slip 1 stitch knit-wise, knit 1 and pass the slipped stitch over the knitted stitch (2 stitches decreased). ------------------------------------------------------- START THE PIECE HERE: ------------------------------------------------------- JACKET – SHORT OVERVIEW OF THE PIECE. The pattern uses both long and short needles; start with the length which fits the number of stitches and change when necessary. Start by casting on stitches for the back of the neck, continue the back piece top down, increasing stitches for the shoulders which are slightly diagonal. Work until the armholes are finished, then work the front pieces while the back waits. For the front pieces, start by casting on stitches and working the band, then knitting up stitches for the front piece along the back shoulder and working top down until the armhole is finished, increasing for the V-neck. The front and back pieces are joined and the body worked back and forth. Stitches are knitted up around the armholes for the sleeves which are started with short rows for the sleeve cap, then finished in the round. The bands are sewn to the neckline and sewn together mid-back. BACK PIECE: The piece is worked back and forth on circular needle. Cast on 20-20-22-22-24-24 stitches with circular needle size 8 mm, 1 strand DROPS Fabel, 1 strand DROPS Kid-Silk and 1 strand DROPS Alpaca Bouclé (= 3 strands). ROW 1 (wrong side): Purl. ROW 2 (right side): Read INCREASE TIP-1, knit 3, increase 1 stitch towards the left, knit until there are 3 stitches left, increase 1 stitch towards the right, knit 3. ROW 3 (wrong side): Read INCREASE TIP-2, purl 3, increase 1 stitch towards the left, purl until there are 3 stitches left, increase 1 stitch towards the right, purl 3. Work ROWS 2 and 3 a total of 9-10-10-11-11-11 times (18-20-20-22-22-22 rows worked) = 56-60-62-66-68-68 stitches. Insert 1 marker outermost on one side; the piece is now measured from here! Continue with stocking stitch - remember to maintain the knitting tension - until the piece measures 11-12-10-10-9-8 cm from the marker, measured along the edge. Now increase for the armholes. INCREASE FOR ARMHOLES: ROW 1 (right side): Remember INCREASE TIP-1, knit 3, increase 1 stitch towards the left, knit until there are 3 stitches left, increase 1 stitch towards the right, knit 3. ROW 2 (wrong side): Purl. Work ROWS 1 and 2 a total of 3-3-5-5-7-8 times (6-6-10-10-14-16 rows worked) = 62-66-72-76-82-84 stitches. Continue working until the piece measures 15-16-17-17-18-19 cm, from the marker, measured along the armhole. Finish with a row from the right side. Cut the strand, place the stitches on a stitch holder, work the left band and front piece along the left back shoulder as follows. LEFT BAND: Cast on 11-11-11-12-12-12 stitches with circular needle size 8 mm and 1 strand of each quality (= 3 strands). Work LEFT BAND WITH I-CORD – read description above, back and forth for 8-8-9-9-10-10 cm, finishing with a row from the wrong side. LEFT FRONT PIECE: Find the left back shoulder as follows: Lay the back piece flat, right side up, with the stitch holder towards you; left side of piece = left shoulder. Start from the right side by the neck and knit up stitches along the left back shoulder as follows: ROW 1 (right side): Work the 11-11-11-12-12-12 band stitches, knit up 1 stitch in each stitch inside the outermost stitch (= 18-20-20-22-22-22 stitches knitted up from the neck to the shoulder) = 29-31-31-34-34-34 stitches. All length measurements on the front piece are taken from this knitted-up row. ROW 2 (wrong side): Purl until there are 11-11-11-12-12-12 stitches left, work the 11-11-11-12-12-12 band-stitches as before. ROW 3 (right side): Work the band as before, knit to end of row. ROW 4 (wrong side): Purl until there are 11-11-11-12-12-12 stitches left, work the band as before. Work ROWS 3 and 4 until the piece measures 6-6-7-7-7-7 cm from the knitted-up row. OVERVIEW OF NEXT SECTIONS: Now stitches are decreased over the band, stitches increased for the V-neck and for the armhole. The increases for the armhole start before the V-neck is finished, so read the next 3 sections before continuing. DECREASING ON BAND: ROW 1 (right side): Work the first 2 band-stitches as before, knit 2 together, work the rest of the band as before, increase for V-neck as described below and work the rest of the front piece as before (= 1 decreased stitch). Repeat this row every 7-7-7-6-6-6 cm a total of 3-3-3-4-4-4 times (i.e., the band decreases from 11-11-11-12-12-12 to 8 stitches). INCREASE FOR V-NECK: ROW 1 (right side): Work the band, increase 1 stitch towards the left - remember INCREASE TIP-1, knit to end of row. ROW 2 (wrong side): Purl to the band, work the band as before. Work ROWS 1 and 2 a total of 4-4-5-5-6-6 times (8-8-10-10-12-12 rows worked). Now increase as follows: ROW 1 (right side): Work the band as before, increase 1 stitch towards the left, knit to end of row. ROW 2 (wrong side): Purl to the band, work the band as before. ROW 3 (right side): Work the band as before, knit to end of row. ROW 4 (= wrong side): Purl to the band, work the band as before. Work ROWS 1 to 4 a total of 4-4-4-4-4-4 times (20-20-20-20-20-20 rows worked). Now increase as follows: ROW 1 (right side): Work the band as before, increase 1 stitch towards the left, knit to end of row. ROW 2 (wrong side): Purl to the band, work the band as before. ROW 3 (right side): Work the band as before, knit to end of row. ROW 4 (wrong side): Purl to the band, work the band as before. ROW 5 (right side): Work the band as before, knit to end of row. ROW 6 (wrong side): Purl to the band, work the band as before. Work ROWS 1 to 6 a total of 2-2-2-2-2-2 times (12-12-12-12-12-12 rows worked). You have increased a total of 10-10-11-11-12-12 times for the V-neck. Continue with stocking stitch and the band as before (NOTE: The last increases for the V-neck are worked after the front and back pieces are joined). INCREASE FOR ARMHOLE: When the piece measures 23-24-22-24-23-22 cm (from the knitted-up row), increase for the armhole as follows: ROW 1 (right side): Work the band as before, knit until there are 3 stitches left, increase 1 stitch towards the right - remember INCREASE TIP-1, knit 3. ROW 2 (wrong side): Purl to the band, work the band as before. Work ROWS 1 and 2 a total of 3-3-5-5-7-8 times (6-6-10-10-14-16 rows worked). Continue working until the piece measures 27-28-29-31-32-33 cm, measured from the knitted-up row, finishing with a row from the right side. Cut the strand, place the stitches on a stitch holder and work the right band and front piece along the right back shoulder as follows. RIGHT BAND: Cast on 11-11-11-12-12-12 stitches with circular needle size 8 mm and 1 strand of each quality (= 3 strands). Work RIGHT BAND WITH I-CORD – read description above, back and forth for 8-8-9-9-10-10 cm, finishing with a row from the wrong side. Cut the strand and place the stitches on a stitch holder. RIGHT FRONT PIECE: Knit up 1 stitch in each stitch along the right back shoulder, inside the outermost stitch – starting from the right side, by the shoulder and knitting up towards the neck (18-20-20-22-22-22 stitches), then work the 11-11-11-12-12-12 band-stitches = 29-31-31-34-34-34 stitches. All length measurements on the front piece are taken from this knitted-up row. ROW 1 (wrong side): Work the 11-11-11-12-12-12 band-stitches as before, purl to end of row. ROW 2 (right side): Knit until there are 11-11-11-12-12-12 stitches left, work the band as before. Work ROWS 1 and 2 until the piece measures 6-6-7-7-7-7 cm from the knitted-up row. OVERVIEW OF NEXT SECTIONS: Now stitches are decreased over the band, increased for the V-neck and increased for the armhole. The increases for the armhole start before the V-neck is finished, so read the next 3 sections before continuing. DECREASING ON BAND: ROW 1 (right side): Work until there are 4 stitches left on the band, knit 2 twisted together, work the last 2 band stitches as before (= 1 stitch decreased). Repeat this row every 7-7-7-6-6-6 cm a total of 3-3-3-4-4-4 times (i.e., the band decreases from 11-11-11-12-12-12 to 8 stitches). INCREASE FOR V-NECK: ROW 1 (right side): Knit as far as the band, increase 1 stitch towards the right – remember INCREASE TIP-1, work the band as before. ROW 2 (wrong side): Work the band as before, purl to end of row. Work ROWS 1 and 2 a total of 4-4-5-5-6-6 times (8-8-10-10-12-12 rows worked). Now increase as follows: ROW 1 (right side): Knit as far as the band, increase 1 stitch towards the right, work the band as before. ROW 2 (wrong side): Work the band as before, purl to end of row. ROW 3 (right side): Knit as far as the band, work the band as before. ROW 4 (wrong side): Work the band as before, purl to end of row. Work ROWS 1 to 4 a total of 4-4-4-4-4-4 times (20-20-20-20-20-20 rows worked), Now increase as follows: ROW 1 (right side): Knit as far as the band, increase 1 stitch towards the right, work the band as before. ROW 2 (wrong side): Work the band as before, purl to end of row. ROW 3 (right side): Knit as far as the band, work the band as before. ROW 4 (wrong side): Work the band as before, purl to end of row. ROW 5 (right side): Knit as far as the band, work the band as before. ROW 6 (wrong side): Work the band as before, purl to end of row. Work ROWS 1 to 6 a total of 2-2-2-2-2-2 times (12-12-12-12-12-12 rows worked), You have increased a total of 10-10-11-11-12-12 times for the V-neck. Continue with stocking stitch and the band (NOTE: The last increases for the V-neck are worked after the front and back pieces are joined). INCREASE FOR ARMHOLE: When the piece measures 23-24-22-24-23-22 cm, increase for the armhole as follows: ROW 1 (right side): Knit 3, increase 1 stitch towards the left - remember INCREASE TIP-1, knit as far as the band, work the band as before. ROW 2 (wrong side): Work the band as before, purl to end of row. Work ROWS 1 and 2 a total of 3-3-5-5-7-8 times (6-6-10-10-14-16 rows worked). Continue working until the piece measures 27-28-29-31-32-33 cm, measured from the knitted-up row, finishing with a row from the right side. Now the front and back pieces are joined for the body. BODY: Work all pieces from the wrong side: Work the stitches on the right front piece as before, cast on 6-6-6-8-8-10 new stitches (= mid-under sleeve), work the 62-66-72-76-82-84 stitches from the back piece, cast on 6-6-6-8-8-10 new stitches (= mid-under sleeve), work the stitches from the left front piece. The piece is now measured from here! Work back and forth, with stocking stitch and the bands, continuing to increase for the V-neck on each side as before. When the V-neck increases are finished, there are 152-160-172-184-196-204 stitches - remember the BUTTONHOLES, described above. Work until the body measures 14-15-16-16-17-18 cm from the join. Now work pocket openings. POCKET OPENINGS: While working the next row, make pocket openings as follows: Work the band as before, then 6-8-8-10-10-12 stocking stitches, place the next 22-22-24-24-26-26 stitches on a thread, cast on 22-22-24-24-26-26 stitches on the needle, work stocking stitch until there are 36-38-40-42-44-46 stitches left, place the next 22-22-24-24-26-26 stitches on a thread, cast on 22-22-24-24-26-26 stitches on the needle, work 6-8-8-10-10-12 stocking stitches and the band as before = 152-160-172-184-196-204 stitches. Continue the bands and stocking stitch but work the 22-22-24-24-26-26 cast-on stitches over each pocket opening in GARTER STITCH – read description above. When you have worked 3 ridges over the openings, continue with stocking stitch over all stitches (bands worked as before). Work until the body measures 38-39-40-39-40-41 cm from the join. On the next row from the right side, begin the rib. AT THE SAME TIME increase 42-46-46-50-54-58 stitches evenly on the row (do not increase over the bands) = 194-206-218-234-250-262 stitches, as follows: Change to circular needle size 6 mm, work the band as before, work rib (knit 2, purl 2 – remember the increases) until there are 10 stitches left, knit 2, work the band as before. When the rib measures 8-8-8-9-9-9 cm, cast off a little loosely with knit over knit and purl over purl. The front piece measures 73-75-77-79-81-83 cm from the knitted-up row. The front piece is approx. 3 cm longer than the back piece because the knitted-up row is a little way down the back piece. The jacket measures approx. 70-72-74-76-78-80 cm. POCKETS: Place the 22-22-24-24-26-26 stitches from the thread on needle size 8 mm. Work stocking stitch back and forth (with 1 strand of each quality = 3 strands) for 24-24-24-23-23-23 cm or until the pocket reaches the beginning of the rib – finish after a row from the wrong side. Cast off. SLEEVES: The sleeve is worked top down. Lay the piece flat. Insert 1 marker at the top of the armhole = mid-top of shoulder (NOTE! Mid-top of shoulder is not the knitted up row on the front piece but 6 to 7 cm down the front piece). Use circular needle size 6 mm. Start in the middle of the cast-on stitches under the sleeve and knit up 48-50-54-58-62-66 stitches – knit up equal numbers of stitches on each side of the marker. Change to circular needle size 8 mm. Starting mid-under the sleeve, work stocking stitch back and forth with short rows to give the sleeve a better fit as follows: ROW 1 (right side): Work to 3-3-4-4-5-5 stitches past the marker on top of the sleeve, turn – read KNITTING TIP. ROW 2 (wrong side): Work to 3-3-4-4-5-5 stitches past the marker, turn. ROW 3 (right side): Work to 2-2-3-3-2-2 stitches past the previous turn, turn. ROW 4 (wrong side): Work to 2-2-3-3-2-2 stitches past the previous turn, turn. Repeat ROWS 3 and 4 until you have turned a total of 14-14-14-16-16-20 times (7-7-7-8-8-10 times on each side and the last row from the wrong side). AFTER THE LAST TURN: When the last row 4 has been worked, turn and work back to mid-under the sleeve. The round now begins here. Insert 1 marker-thread at the beginning of the round, which is used when decreasing under the sleeve. Allow the thread to follow your work onwards. Work stocking stitch in the round. When the sleeve measures 1 cm measured under the sleeve from the join, decrease 2 stitches under the sleeve– read DECREASE TIP. Decrease like this every 2nd round 3-3-5-5-7-7 times, then every 3-3-3-2-2-1½ cm 5-6-5-7-6-7 times = 32-32-34-34-36-38 stitches. Continue working until the sleeve measures 42-42-42-40-40-41 cm from the shoulder. Change to double pointed needles size 6 mm and work rib (knit 2, purl 2) increasing 8-8-6-10-8-10 stitches evenly on the first round = 40-40-40-44-44-48 stitches. When the rib measures 6-6-6-7-7-7 cm, cast off a little loosely with rib. The sleeve measures approx. 48-48-48-47-47-48 cm from mid-top of shoulder. ASSEMBLY: Sew together the bands mid-back, then sew the bands to the neckline. Sew the buttons onto the left band. Sew the pockets together with loose stitches. |
|
|
|
Have you finished this pattern?Tag your pictures with #dropspattern #frostydreamcardigan or submit them to the #dropsfan gallery. Do you need help with this pattern?You'll find 34 tutorial videos, a Comments/Questions area and more by visiting the pattern on garnstudio.com. © 1982-2025 DROPS Design A/S. We reserve all rights. This document, including all its sub-sections, has copyrights. Read more about what you can do with our patterns at the bottom of each pattern on our site. |
|


With over 40 years in knitting and crochet design, DROPS Design offers one of the most extensive collections of free patterns on the internet - translated to 17 languages. As of today we count 314 catalogues and 11821 patterns translated into English (UK/cm).
We work hard to bring you the best knitting and crochet have to offer, inspiration and advice as well as great quality yarns at incredible prices! Would you like to use our patterns for other than personal use? You can read what you are allowed to do in the Copyright text at the bottom of all our patterns. Happy crafting!
Post a comment to pattern DROPS 252-22
We would love to hear what you have to say about this pattern!
If you want to leave a question, please make sure you select the correct category in the form below, to speed up the answering process. Required fields are marked *.