
Popular categories
Looking for a yarn?


|
||||||||||||||||||||||||||||||||||
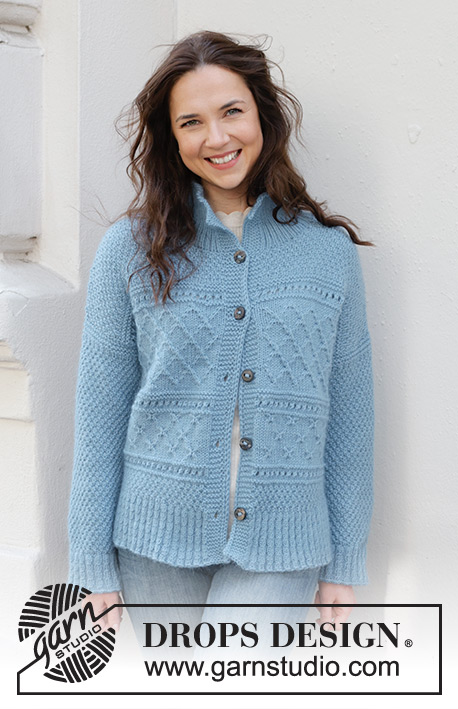
Snow Flake Cardigan |
||||||||||||||||||||||||||||||||||
 |
 |
|||||||||||||||||||||||||||||||||
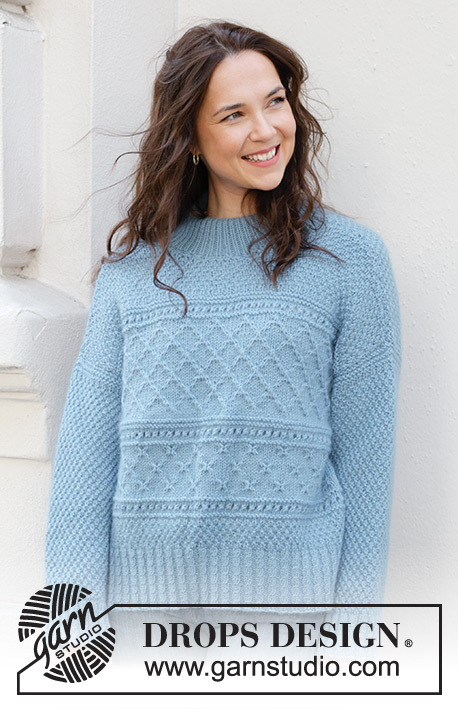
Knitted jacket in DROPS Merino Extra Fine and DROPS Kid-Silk. The piece is worked sideways with cables, lace pattern, double neck and split in sides. Sizes XS - XXL.
DROPS 243-31 |
||||||||||||||||||||||||||||||||||
|
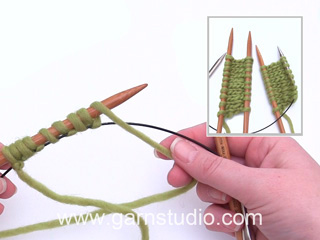
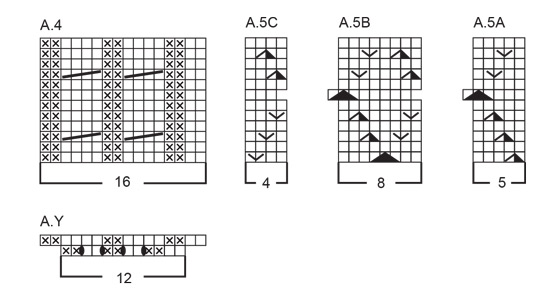
------------------------------------------------------- EXPLANATIONS FOR THE PATTERN: ------------------------------------------------------- EDGE STITCH: 1 or 2 edge stitches are worked at the beginning and end of each row, as described in the text. These edge stitches are knitted from both the right and wrong side (garter stitch). PATTERN: See diagrams A.1 to A.5. The diagrams show all rows in the pattern from the right side. A.X and A.Y show the increases for the cables. PROVISIONAL CAST-ON: By casting on provisionally, you get open stitches which sit on an auxiliary thread/ needle, instead of a finished cast-on edge. When the bands are worked, the auxiliary thread/needle is pulled out and the stitches are placed on the needle. Start by forming a loop with 1 strand DROPS Merino Extra Fine and 1 strand DROPS Kid-Silk held together (2 strands). Place this loop on the needle you will cast on with, then hold the auxiliary thread/needle with your thumb and hold the strands of Merino Extra Fine + Kid-Silk with your index finger. Cast on as normal so that the stitches lie around the auxiliary thread/needle. Leave the auxiliary thread/needle in the work and work onwards. The auxiliary thread/needle is removed later, and the stitches placed on the working needles for the band. See the video for Provisional Cast-on at the bottom of the pattern or search under Help and Tips on our website. ITALIAN CAST-OFF: Cast off by sewing Italian cast-off to give an elastic edge. The strand-ends that are used for this must be a least 4 times longer than the piece which is to be cast off. Start by “locking” the 1st knitted stitch as follows: Insert the needle into the 1st stitch purl-wise and tighten. Do not slip the stitch from the needle. Insert the needle from the back between the 1st and 2nd stitch so that the strand comes to the front, pull the strand through, insert the needle into the 2nd stitch knit-wise, pull the strand through. Insert the needle into the 1st stitch knit-wise, pull the strand through then slip the 1st stich off the needle. Insert the needle into the 2nd stitch purl-wise, pull the strand through, insert the needle into the 1st stitch purl-wise, pull the thread through, slip the 1st stitch off the needle (the strand is now at the back). From the back, insert the needle between the 1st and 2nd stitch, pull the strand through. From the front, insert the needle into the 2nd stitch knit-wise, pull the strand through, insert the needle into the 1st stitch knit-wise, pull the strand through, slip the 1st stitch from the needle. Now start casting off in rib. 1: When casting off a purled stitch, sew as follows: Insert the needle into the 2nd stitch (a knitted stitch) purl-wise, pull the strand through, insert the needle into the 1st stitch (a purled stitch) purl-wise, pull the strand through, slip 1st stitch from the needle (the strand is now at back). 2: When casting off a knitted stitch, sew as follows: From the back, insert the needle between 1st and 2nd stitch, pull the strand through. From the front, insert the needle into the 2nd stitch (a purled stitch) knit-wise, pull the strand through, insert the needle into the 1st stitch knit-wise, pull the strand through, slip 1st stitch from the needle. Repeat directions 1 and 2 until all stitches are cast off (the last 2 stitches are cast off in the same way even though they are both knitted stitches). Pull the strand through the last stitch. INCREASE TIP (for sleeves): Start 1 stitch before the marker-thread, 1 yarn over, knit 2 (marker-thread sits between these 2 stitches), 1 yarn over. On the next round knit the yarn overs twisted to avoid holes. Then work the new stitches in stocking stitch. ------------------------------------------------------- START THE PIECE HERE: ------------------------------------------------------- JACKET – SHORT OVERVIEW OF THE PIECE: The front and back pieces are worked simultaneously, in one large piece, from right to left. Stitches are cast off for the neckline, other stitches placed on a stitch holder/thread for the right band, new stitches cast on for the left band, stitches increased for the neck and the piece worked to finished length. The sleeves are worked in the round, bottom up. The piece is sewn together. The bottom rib, double neck and bands are worked to finish. RIGHT SIDE OF PIECE (when the piece is worn): Cast on 169-169-185-185-201-201 stitches with circular needle size 5 mm, 1 strand DROPS Merino Extra Fine and 1 strand DROPS Kid-Silk held together (2 strands). Knit 1 row from the right side, knit 1 row from the wrong side. Insert 1 marker in the 85th-85th-93rd-93rd-101st-101st stitch on the row. The first 84-84-92-92-100-100 stitches before the marker-stitch (from right side) = right front piece and the 84-84-92-92-100-100 stitches after the marker-stitch = back piece. The marker-stitch is mid-shoulder – allow the marker to follow your work onwards. Work as follows from the right side: 1 EDGE STITCH – read description above, 6 stocking stitches, A.1, 21-21-21-21-29-29 stocking stitches, A.X, A.1, 61-61-77-77-77-77 stocking stitches (the marker sits in the 31st-31st-39th-39th-39th-39th stitch), A.1, A.Y, 21-21-21-21-29-29 stocking stitches, A.1, 6 stocking stitches, 1 edge stitch = 177-177-193-193-209-209 stitches. Work back from the wrong side with knit over knit and purl over purl (remember to work the yarn overs twisted to avoid holes). Work as follows from the right side: 1 edge stitch, 6 stocking stitches, A.1, A.2A, work A.2B 1-1-1-1-2-2 times, A.2C, A.3, A.1, A.2A, work A.2B 6-6-8-8-8-8 times, A.2C, A.1, A.4, A.2A, work A.2B 1-1-1-1-2-2 times, A.2C, A.1, 6 stocking stitches and 1 edge stitch. Continue this pattern back and forth until there is 1 row left before A.2 has been worked 3-3-4-4-5-5 times in height (ie one row from the wrong side left). On the next row cast off for the neckline: Work until there are 6 stitches left before the marker-stitch, cast off 16 stitches over the shoulder (6 stitches before the marker-stitch on the back piece, the stitch with the marker and 9 stitches after the marker-stitch on the front piece), work to end of row. The piece measures approx. 19-19-25-25-31-31 cm from the cast-on edge. Continue the right front piece and back pieces separately. RIGHT FRONT PIECE: = 79-79-87-87-95-95 stitches. Continue the pattern back and forth – AT THE SAME TIME cast off for the neckline at the beginning of each row from the wrong side as follows: 2 stitches 3 times = 73-73-81-81-89-89 stitches. Work until A.2 has been worked 4½-4½-5½-5½-6½-6½ times in height from the cast-on edge, finishing after row 7 in A.2 so the squares are closed at the top. Place the 73-73-81-81-89-89 stitches on a stitch holder. The right front piece measures approx. 27-27-33-33-39-39 cm from the cast-on edge. BACK PIECE: = 82-82-90-90-98-98 stitches. Start from the right side and continue the pattern back and forth. When you have worked 2 rows, cast off 2 stitches for the neckline on the next row from the right side = 80-80-88-88-96-96 stitches. Work until there are 3 rows left before A.2 has been worked 6-6-7-7-8-8 times in height from the cast-on edge (with the next row from the wrong side). On the next row (wrong side), cast on 2 stitches for neck at the end of the row = 82-82-90-90-98-98 stitches. On the next row from the wrong side, cast on 16 stitches at the end of the row = 98-98-106-106-114-114 stitches. A.2 has now been worked 6-6-7-7-8-8 times in height from the cast-on edge. Place the stitches on a stitch holder. LEFT FRONT PIECE: Cast on 73-73-81-81-89-89 stitches with circular needle size 5 mm and PROVISIONAL CAST ON – read description above (gives you open stitches along the cast-on edge). Work back as follows from the wrong side (the diagrams are read from left to right when working from the wrong side): 15-15-23-23-23-23 stocking stitches, work row 2 in the diagrams in the following order: A.1, A.3, A.2C, work A.2B 1-1-1-1-2-2 times, A.2A, A.1, 6 stocking stitches and 1 edge stitch. Work as follows from the right side (all diagrams now worked from row 1, except A.2 which starts on row 7 so that you start the pattern in the same way as you finished A.2 on the right front piece): Work 1 edge stitch, 6 stocking stitches, A.1, A.2A, work A.2B 1-1-1-1-2-2 times, A.2C, A.3, A.1, A.2A, work A.2B to end of row. Continue until you have worked 12 rows in A.2. Now increase for the neckline by casting on 2 stitches at the end of each row from the right side 3 times = 79-79-87-87-95-95 stitches. Work back from the wrong side. The left front piece should have finished A.2 on the same row as the back piece. Now join the left front piece and back piece together: LEFT SIDE OF PIECE (when the garment is worn): Work as before over the left front piece, then work over the back piece = 177-177-193-193-209-209 stitches. Continue until A.2 has been worked 3-3-4-4-5-5 times in height after the neckline (9-9-11-11-13-13 times from the cast-on edge at the beginning of the piece). Work 1 row from the right side so the squares in A.2 are closed at the top – AT THE SAME on this row, decrease 2 stitches over each cable in A.3 and A.4 by knitting the stitches together 2 and 2 = 169-169-185-185-201-201 stitches. Work back from the wrong side with knit over knit and purl over purl. Insert 1 marker in the 85th-85th-93rd-93rd-101st-101st stitch on the row. The stitch with the marker-stitch is mid-shoulder. Knit 1 row from the right side, knit 1 row from the wrong side. Cast off with knit from right side. The piece measures approx. 54-54-66-66-78-78 cm from the cast-on edge. RIB AT BOTTOM OF BACK PIECE: Knit up from the right side with circular needle size 3.5 mm and 1 strand of each quality, 113-113-139-139-163-163 stitches inside 1 edge stitch. The stitch count should be divisible by 2 + 1. Work as follows from the wrong side: 2 EDGE STITCHES – read description above, * purl 1, knit 1 *, work from *-* until there are 3 stitches left, purl 1 and 2 edge stitches. Continue this rib back and forth for 7 cm. Cast off with ITALIAN CAST-OFF – read description above, or with knit over knit and purl over purl. The piece measures approx. 59-59-64-64-69-69 cm from the marker on the shoulder. RIB AT BOTTOM OF RIGHT FRONT PIECE (when the garment is worn): Knit up from the right side with circular needle size 3.5 mm and 1 strand of each quality, 56-56-70-70-82-82 stitches inside 1 edge stitch. The stitch count should be divisible by 2. Work as follows from the wrong side (mid-front): 1 edge stitch, * purl 1, knit 1 *, work from *-* until there are 3 stitches left, purl 1 and 2 edge stitches. Continue this rib back and forth for 7 cm. Cast off in the same way as on the back piece. RIB AT BOTTOM OF LEFT FRONT PIECE: Knit up from the right side the same number of stitches as on the right front piece and work from the wrong side as follows (from the side): 2 edge stitches, * purl 1, knit 1 *, work from *-* until there are 2 stitches left, purl 1 and 1 edge stitch. Continue this rib for 7 cm. Cast off with Italian cast-off; when you have «locked» the first stitch go to explanations 1 and 2 and cast off all stitche or cast off with knit over knit and purl over purl. SLEEVES: Cast on 62-64-66-68-72-74 stitches with double pointed needles size 3.5 mm and 1 strand of each quality (2 strands). Knit 1 round. Then work rib (knit 1, purl 1) for 7 cm. Knit 1 round and decrease 11-13-15-9-13-15 stitches evenly spaced = 51-51-51-59-59-59 stitches. Insert 1 marker-thread at the beginning of the round and allow it to follow your work onwards. Change to double pointed needles size 5 mm. Knit 1 round. Then work the next round as follows: Knit 1, A.5A, work A.5B 5-5-5-6-6-6 times, A.5C, knit 1. Continue this pattern. When the sleeve measures 10 cm, increase 1 stitch on each side of the marker-thread – read INCREASE TIP. Increase like this every 12-6-4-7-3-3 cm a total of 3-5-6-4-6-7 times = 57-61-63-67-71-73 stitches. Work until the sleeve measures 43-45-40-41-36-37 cm – it is neatest to finish after round 2 or 8 in A.5. Cast off a little loosely with knit. Work the other sleeve in the same way. ASSEMBLY: Insert a marker 18-19-20-21-22-23 cm below the marker on the shoulder on both the front and back pieces = armhole (adjust to match the width of the top of the sleeve). Sew the side seams inside the cast-off and cast-on edges (the ridge should be visible) – starting the seam at the bottom of the armhole and sewing down to the rib = 7 cm split on each side. Sew in the sleeves, inside the cast-off and cast-on edges on the body (the ridge should be visible). DOUBLE NECK: Use circular needle size 3.5 mm and 1 strand of each quality (2 strands). Knit up from the right side 105 to 115 stitches along the neck, inside the 1 edge stitch. The stitch count should be divisible by 2 + 1. Work as follows from the wrong side: 1 edge stitch, * purl 1, knit 1 *, work from *-* until there are 2 stitches left, purl 1 and 1 edge stitch. Work this rib back and forth for 14-14-15-15-16-16 cm. Cast off a little loosely with knit over knit and purl over purl. Fold the neck double to the inside and sew down. To avoid the neck being tight and rolling outwards, it is important that the seam is elastic. RIGHT BAND: Use circular needle size 3.5 mm and 1 strand of each quality (2 strands). Start from the right side at the bottom of the right front piece and knit up 14 stitches inside 1 edge stitch along the rib, place the 73-73-81-81-89-89 stitches from the stitch holder onto the needle. Knit the stitch-holder stitches and increase 6-6-8-8-10-10 stitches evenly over these stitches, then knit up 14-14-14-14-16-16 stitches inside 1 edge stitch along the neck (through both layers) = 107-107-117-117-129-129 stitches. The stitch count should be divisible by 2 + 1. Work as follows from the wrong side: 1 edge stitch, * purl 1, knit 1 *, work from *-* until there are 2 stitches left, purl 1 and 1 edge stitch. Work this rib back and forth. AT THE SAME TIME after 1 cm work 6-6-7-7-7-7 buttonholes evenly spaced (the top buttonhole is worked in the transition between the neck and the body, the bottom buttonhole 3-4 cm above the bottom edge). 1 BUTTONHOLE = make 1 yarn over and work 2 stitches together. Work until the band measures 3½ to 4 cm. Cast off with Italian cast-off but when you have «locked» the first stitch go straight to explanations 1 and 2 and cast off all stitches (or cast off with knit over knit and purl over purl). LEFT BAND: Use circular needle size 3.5 mm and 1 strand of each quality (2 strands). Start from the right side at the top of the left front piece and knit up 14 stitches inside 1 edge stitch along the rib on the neck (through both layers), place the 73-73-81-81-89-89 stitches from the stitch holder on the needle. Knit these stitches and increase 6-6-8-8-10-10 stitches evenly over these stitches then knit up 14-14-14-14-16-16 stitches inside 1 edge stitch along the rib = 107-107-117-117-129-129 stitches – adjust so that there is the same number of stitches as for right band. Work as follows from the wrong side: 1 edge stitch, * purl 1, knit 1 *, work from *-* until there are 2 stitches left, purl 1 and 1 edge stitch. Work this rib back and forth for 3½ to 4 cm. Cast off in the same way as on the right band. Sew on the buttons. |
||||||||||||||||||||||||||||||||||
Diagram explanations |
||||||||||||||||||||||||||||||||||
|
||||||||||||||||||||||||||||||||||
|
||||||||||||||||||||||||||||||||||

|
||||||||||||||||||||||||||||||||||

|
||||||||||||||||||||||||||||||||||

|
||||||||||||||||||||||||||||||||||
|
Have you made this or any other of our designs? Tag your pictures in social media with #dropsdesign so we can see them! Do you need help with this pattern?You'll find tutorial videos, a Comments/Questions area and more by visiting the pattern on garnstudio.com. © 1982-2024 DROPS Design A/S. We reserve all rights. This document, including all its sub-sections, has copyrights. Read more about what you can do with our patterns at the bottom of each pattern on our site. |
||||||||||||||||||||||||||||||||||


With over 40 years in knitting and crochet design, DROPS Design offers one of the most extensive collections of free patterns on the internet - translated to 17 languages. As of today we count 304 catalogues and 11422 patterns - 11422 of which are translated into English (UK/cm).
We work hard to bring you the best knitting and crochet have to offer, inspiration and advice as well as great quality yarns at incredible prices! Would you like to use our patterns for other than personal use? You can read what you are allowed to do in the Copyright text at the bottom of all our patterns. Happy crafting!
Comments / Questions (5)
Bonjour, auriez-vous un vidéo qui montre comment faire le 7ième icône. Merci
14.03.2024 - 11:15DROPS Design answered:
Bonjour Jos, tout à fait, retrouvez-la ici. Bon tricot!
14.03.2024 - 16:32On ne voit jamais de photos du dos de vos modèles . pourquoi ? c est dommage
12.09.2023 - 10:45DROPS Design answered:
Bonjour Kate, on ne montre des photos du dos que lorsqu'il a un intérêt particulier, ici, comme souvent, il est tout simplement comme le devant (sans les bordures des devants au milieu bien sûr). Bon tricot!
12.09.2023 - 16:58Classy cables
07.08.2023 - 03:03Irina Shirley
03.08.2023 - 21:30Soft winter cardi
03.08.2023 - 16:38