
Popular categories
Looking for a yarn?


|
||||||||||||||||||||||
Sweet History |
||||||||||||||||||||||
 |
 |
|||||||||||||||||||||
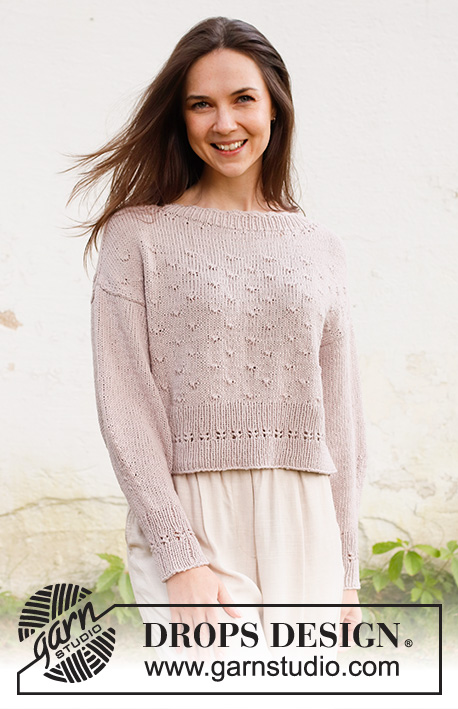
Knitted jumper in DROPS Belle. Piece is knitted top down in stocking stitch with saddle shoulders. Size: S - XXXL
DROPS 232-44 |
||||||||||||||||||||||
|
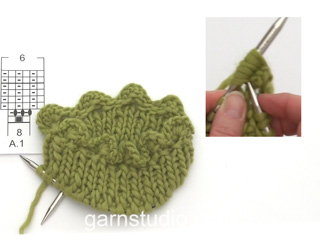
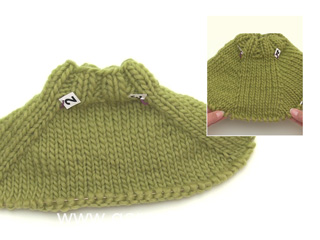
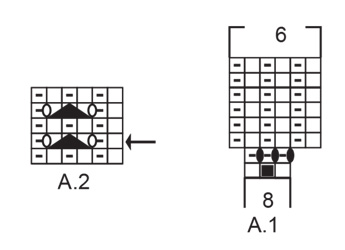
---------------------------------------------------------- EXPLANATION FOR THE PATTERN: ---------------------------------------------------------- GARTER STITCH (back and forth): Knit all rows. 1 ridge vertically = knit 2 rows. PATTERN: See diagrams A.1 and A.2. INCREASE TIP-1 (evenly): To calculate how to increase evenly, use the total number of stitches on row (e.g. 102 stitches) and divide stitches by number of increases to be done (e.g. 12) = 8.5. In this example increase by making 1 yarn over after alternately every 8th and 9th stitch. On next round work yarn overs twisted to avoid holes. INCREASE TIP-2: BEFORE MARKER: Work until stitch with marker, The new stitch is twisted towards the right. Use left needle to pick up yarn between 2 stitches from round below, pick up yarn from the back and knit stitch in front loop of stitch. AFTER MARKER: The new stitch is twisted towards the left. Use left needle to pick up yarn between 2 stitches from round below, pick up yarn from the front and knit stitch in back loop of stitch. DECREASE TIP-1(applies to front and back piece): All decreases are done from the right side. Work 1 edge stitch in garter stitch, slip 1 stitch knitwise, knit 1, pass slipped stitch over stitch worked(= 1 stitch decreased), work until 3 stitches remain, knit 2 together(= 1 stitch decreased), work 1 edge stitch in garter stitch. DECREASE TIP-2 (applies to body and sleeves): Work until 3 stitches remain before marker thread, knit 2 together (= 1 stitch decreased), knit 2 stitches (marker thread is between these stitches), slip 1 stitch knitwise, knit 1, pass slipped stitch over stitch worked (= 1 stitch decreased). CAST-OFF TIP: To avoid a tight cast-off edge when casting off, you may use a larger needle. If this still is too tight make 1 yarn over after approx. every 4th stitch while casting off (cast off yarn overs as stitches). ---------------------------------------------------------- START THE PIECE HERE: ---------------------------------------------------------- JUMPER - SHORT OVERVIEW OF THE PIECE: Work neck edge in the round on a short circular needle. Work yoke in the round on circular needle until saddle shoulders are done. Then finish back piece and front piece back and forth on circular needle separately down until increase for armholes are done. Then slip front piece and back piece on to same circular needle and work body in the round on circular needle until finished measurements. Work sleeves first back and forth until sleeve cap is done, then work in the round on a short circular needle/double pointed needles the top and down. Sew in the sleeves as explained in pattern. NECK EDGE: Cast on 136-144-144-152-152-160 stitches on short circular needle size 3 mm with DROPS Belle. Knit 1 row from wrong side, turn piece and work in the round as follows: Work A.1 (= 17-18-18-19-19-20 repetitions of 8 stitches). When entire A.1 has been worked, there are 102-108-108-114-114-120 stitches on round. Then work knit over knit and purl over purl until piece measures 4 cm at the shortest (where arches in the edge turns inwards in rib). Knit 1 round while increasing 12-10-10-8-8-6 stitches evenly - read INCREASE TIP-1 = 114-118-118-122-122-126 stitches. YOKE: Switch to circular needle size 4 mm. Now insert 1 marker thread and 2 markers in the piece. Insert marker threads between 2 stitches and markers in a stitch as follows: Insert 1 marker thread at beginning of round (= mid back), yoke is measured from this marker thread, skip the next 28-29-29-30-30-31 stitches, insert a marker in next stitch (= shoulder stitch), skip the next 56-58-58-60-60-62 stitches (= front piece), insert a marker in next stitch (= shoulder stitch), 28-29-29-30-30-31 stitches remain on round after last marker. Move markers upwards when working, increase on each side of stitches with markers. SADDLE SHOULDER INCREASE: Work in stocking stitch in the round. AT THE SAME TIME on first round increase 4 stitches for saddle shoulder as follows: Increase 1 stitch in each side of stitches with marker - READ INCREASE TIP-2. Increase only on front piece and back piece, and number of shoulder stitches (= 1 stitch) stays the same. Continue in the round like this, and increase on every round 28-28-31-31-34-34 times in total = 226-230-242-246-258-262 stitches. After last increase piece measures approx. 10-10-11-11-12-12 cm from marker thread by the neck Work next round as follows from mid back: Work the first 56-57-60-61-64-65 stitches (= half back piece), cast off stitch in the middle of shoulder, work the next 112-114-120-122-128-130 stitches before slipping them on a thread (= front piece), cast off stitch in the middle of shoulder, work the last 56-57-60-61-64-65 stitches (= half back piece). Cut the yarn. BACK PIECE: = 112-114-120-122-128-130 stitches. Insert a marker here - NOW MEASURE PIECE FROM HERE! Now work in stocking stitch with 1 edge stitch in GARTER STITCH - read explanation above, in each side. When 2 cm have been worked from division, decrease 1 stitch in each side of piece - read DECREASE TIP-1. Decrease like this every other row 8-7-6-5-5-4 times in total = 96-100-108-112-118-122 stitches. Continue to work until piece measures 17-17-18-19-18-17 cm. Now cast on stitches for armholes at the end of every row in each side as follows: Cast on 1 stitch 1-3-3-3-5-9 times = 98-106-114-118-128-140 stitches. Piece now measures 18-19-20-21-22-23 cm from marker. Cut the yarn, put piece aside and work the front piece. FRONT PIECE: Slip stitches from thread back on circular needle size 4 mm = 112-114-120-122-128-130 stitches. Work as on back piece. When increases for armholes are done, there are 98-106-114-118-128-140 stitches on the needle. BODY: Now work next row from right side as follows: Work in stocking stitch over all stitches on front piece, cast on 4-6-6-12-14-16 new stitches on needle (= in the side under sleeve), work in stocking stitch over stitches on back piece, cast on 4-6-6-12-14-16 new stitches on needle = 204-224-240-260-284-312 stitches for body. Move the marker here – NOW MEASURE PIECE FROM HERE! Insert a marker thread in the middle of the new stitches cast-on in the side under the sleeves (= 2-3-3-6-7-8 new stitches on each side of marker thread). Move the marker threads upwards when working; they are used for decreases in the sides later. Continue in the round in stocking stitch. When piece measures 3 cm, decrease 1 stitch on each side of marker threads – read DECREASE TIP-2. Repeat decrease when piece measures 8-9-9-10-10-11 cm = 196-216-232-252-276-304 stitches. Work until piece measures 12-13-13-14-14-15 cm from marker. Try the jumper on and work until desired length (approx. 10 cm with rib remain before finished measurements). To stop the rib from contracting increase 32-36-38-42-48-50 stitches evenly = 228-252-270-294-324-354 stitches. Switch to circular needle size 3 mm. Now work rib (= knit 1/purl 1) for 4½ cm. Then work from arrow in diagram A.2. When A.2 has been worked vertically, continue with knit over knit and purl over purl until rib measures 10 cm in total. Cast off with knit over knit and purl over purl - read CAST-OFF TIP. Jumper measures approx. 50-52-54-56-58-60 cm (measured on the inside at the neck edge) and down. SLEEVES: Sleeve is worked top down. Cast on 62-62-64-60-54-50 stitches on circular needle size 4 mm with DROPS Belle (cast on fewer stitches in the larger sizes because of more increases in each side for sleeve cap). Work stocking stitch back and forth, at the same time cast on stitches at the end of every row in each side as follows: Cast on 3-1-1-1-1-1 stitches 1-4-4-5-8-11 times, then on next row from right side, cast on 4-6-6-12-14-16 stitches = 72-76-78-82-84-88 stitches. Insert a marker thread in the middle of the 4-6-6-12-14-16 stitches that were cast on under sleeve (= mid under sleeve). Move marker thread upwards when working. Use it later when decreasing under sleeve. NOW MEASURE PIECE FROM HERE! Begin round at the marker thread and work stocking stitch in the round on a short circular needle/double pointed needles size 4 mm. When piece measures 4 cm, decrease 1 stitch on each side of both marker threads – remember DECREASE TIP-2. In size M, L and XXXL, repeat decrease when piece measures 10 cm = 70-72-74-80-82-84 stitches. Continue to work in stocking stitch until sleeve measures 27-25-25-23-21-19 cm. Now insert a new marker thread in the middle of sleeve so that there are 35-36-37-40-41-42 stitches between the 2 marker threads. Work stocking stitch in the round, at the same time decrease 1 stitch on each side of both marker threads - remember DECREASE TIP-2. Decrease like this every 4th round 7-7-7-8-8-8 times = 42-44-46-48-50-52 stitches. Work in stocking stitch until sleeve measures approx. 37-35-35-34-32-30 cm – or desired length (approx. 10 cm now remain with rib until finished measurements and shorter measurements in the larger sizes because of wider shoulders). Knit 1 round while increasing 6-4-8-6-10-8 stitches evenly = 48-48-54-54-60-60 stitches. Switch to double pointed needles size 3 mm. Work rib (knit 1/purl 1) in the round for 4½ cm. Now work from round with arrow in A.2 in the round. When A.2 has been worked, work rib until rib measures 10 cm in total. Cast off with knit over knit and purl over purl - remember CAST-OFF TIP. Work the other sleeve the same way. ASSEMBLY: Sew sleeves in body inside 1 edge stitch in garter stitch on body and inside cast-on edge on sleeves. |
||||||||||||||||||||||
Diagram explanations |
||||||||||||||||||||||
|
||||||||||||||||||||||
|
||||||||||||||||||||||

|
||||||||||||||||||||||
|
Have you made this or any other of our designs? Tag your pictures in social media with #dropsdesign so we can see them! Do you need help with this pattern?You'll find tutorial videos, a Comments/Questions area and more by visiting the pattern on garnstudio.com. © 1982-2024 DROPS Design A/S. We reserve all rights. This document, including all its sub-sections, has copyrights. Read more about what you can do with our patterns at the bottom of each pattern on our site. |
||||||||||||||||||||||


With over 40 years in knitting and crochet design, DROPS Design offers one of the most extensive collections of free patterns on the internet - translated to 17 languages. As of today we count 304 catalogues and 11422 patterns - 11422 of which are translated into English (UK/cm).
We work hard to bring you the best knitting and crochet have to offer, inspiration and advice as well as great quality yarns at incredible prices! Would you like to use our patterns for other than personal use? You can read what you are allowed to do in the Copyright text at the bottom of all our patterns. Happy crafting!
Comments / Questions (11)
Las instrucciones para la orilla del cuello, no son correctas, ya que despues de tener 18 arcos, con 2 puntos en promedio, dan como resultado 54 puntos para el cuello, no 108, como dicen las instrucciones. Por favor CORREGIR¡.
21.04.2024 - 19:48Bonjour, Je tricote le modèle en taille S. J’ai terminé le dos / devant qui correspond aux mesures indiquées. Le montage de la manche est problématique, 72mailles après les augmentations pour commencer à tricoter en rond ne sont pas suffisantes. Il manque une vingtaine de mailles sur le haut de manche pour correspondre à l’emmanchure. Pourriez-vous vérifier le montage de la manche? Je peux vous envoyer une photo si nécessaire ;o) en vous remerciant par avance, d.
01.01.2024 - 19:56Ich bin am verzweifeln, ich bekomme die Ärmel einfach nicht schön eingenäht . Es sind viel mehr Maschen am Schulter Teil als wie bei dem Ärmel , ich konnte einen schon annähen von weiten sah es ok aus aber bei genauen hinsehen sieht die Naht einfach nicht schön aus weil es nicht gleichmäßig ist . Ein Video wie man diesen Ärmel einnähen soll wäre hilfreich
12.11.2023 - 16:56DROPS Design answered:
Liebe Petra, die letzten 4-6-6-12-14-16 angeschlagenen Maschen beim Ärmel werden an den 4-6-6-12-14-16 Maschen, die zwischen Vorder- und Rückenteil angeschlagen wurden, dann die restlichen Maschen am oberen Teil vom Armkugel werden am Armausschnitt angenäht. Viel Spaß beim fertigstellen!
13.11.2023 - 08:23Ich habe jetzt die Ärmel so gestrickt wie in meiner Frage beschrieben. Die Maschen nach dem Faden haben 5 Reihen , die Maschen hinter dem Faden aber schon 6 Reihen . Denn die Masche wo ich anfangen musste in runden zu stricken haben ja mehr Reihen als die letzten zwei vierer maschen , weil die noch nicht gestrickt wurden , aber jetzt als neue Runde zählen. Wenn ich über die letzten zwei gehe wäre es wieder der normale runden Anfang und nicht der neue runden Beginn.
07.11.2023 - 16:01DROPS Design answered:
Liebe Petra, stimmt, es wird 1 Reihe/Runde unterschied aber dies wird nicht sichtbar. Nach den neuen Maschen, legen Sie die Arbeit in Runden, dh stricken Sie die ersten Maschen von der Hinreihe bis die 2 letzten neuen Maschen, setzen Sie eine Markierung hier für den Rundbeginn. Viel Spaß beim stricken!
08.11.2023 - 07:52Ich bin jetzt bei den Ärmeln in Größe S : ich habe beidseitig 3 Maschen zugenommen, jetzt muss ich in der nächsten vier Maschen anschlagen und in runden Stricken. Verbinde ich die 4 Maschen mit der ersten Masche von den drei von vorhin , denn wie soll die Runde bei der ersten Masche nach dem Makierungsfaden sein , oder ist das egal das es eigentlich der Anfang wo anders ist und es wird ab dem Makierungsfaden das als Anfang gesehen ?
07.11.2023 - 10:36DROPS Design answered:
Liebe Petra, am Ende einer Hin-Reihe schlagen Sie die 4 neuen Maschen an, dann stricken Sie in der Runde bis in der Mitte von diesem 4 Maschen, die Runden beginnen dann hier. Der Markierungsfaden setzen Sie in der Mitte von diesen 4 Maschen. Viel Spaß beim stricken!
07.11.2023 - 13:34Ich bin gerade bei dem Schritt nachdem man die letzten 56 Maschen strickt (halbes Rücken teil ) jetzt steht ich soll den Faden abscheiden . Muss ich also dann mit einem neun paar Nadeln ganz am Rand anfangen um hin und zurück zu Stricken ? Oder wo soll ich mit dem Rückenteil anfangen?
31.10.2023 - 12:29DROPS Design answered:
Liebe Petra, jetzt stricken Sie alle Maschen von Rückenteil, so die Hälfte der Maschen (56) heben Sie ab und setzen Sie mit der anderen Hälfte vom Rückenteil, so können Sie die 112 Maschen vom Rückenteil stricken. Viel Spaß beim stricken!
31.10.2023 - 16:22Guten Tag, Wann schließe ich bei den Ärmeln zur Runde? Ich setze den Markierungsfaden zwischen die sechs neuen Maschen. Dort soll ich die Runde beginnen. Was ist mit den anderen 3 Maschen? Vielen Dank für Ihre Hilfe und die vielen tollen Anleitungen und Videos!
09.03.2023 - 10:19DROPS Design answered:
Liebe Frau Vögeding, wenn alle Maschen angeschlagen sind, dh wenn die letzten 6 Maschen am Ende der letzten Hinreihe angeschlagen sind stricken Sie jetzt in der Runde. Der Markierungsfaden setzen Sie in der Mitte von diesen 6 Maschen = neue Rundbeginn. Viel Spaß beim stricken!
09.03.2023 - 12:15Hallo, für dieses Modell würde ich gerne das Garn " soft Tweed"verwenden, da ich davon noch Material habe. was ist dabei zu beachten? danke im voraus und liebe Grüße. Gerda
11.08.2022 - 13:36DROPS Design answered:
Liebe Frau Jersombeck, beide Garne gehören selbe Garngruppe, so können Sie unseren Garnumrechner benutzen , damit bekommen Sie die neue Garnmenge mit Soft Tweed. Viel Spaß beim stricken!
11.08.2022 - 14:01Hallo, kann ich bei diesem hohen Maschenanschlag auch einen magicloop machen? meine Rundnadel ist nur 80 cm lang? Danke und lg, gerda
08.08.2022 - 17:39DROPS Design answered:
Liebe Frau Jersombeck, ja sicher können Sie hier die Maschen mit dem Magicloop stricken - Sie brauchen dann nur eine 80 cm Rundnadel. Viel Spaß beim stricken!
09.08.2022 - 08:36Kann ich bei diesem Topdown Modell die Ärmel nicht wie üblich direkt anstricken? Warum muß ich sie bei diesem Pullover getrennt arbeiten und dann extra annähen ? Die Ärmelnaht sieht gar nicht gut aus.
27.07.2022 - 16:55DROPS Design answered:
Liebe Undine, Dies ist ein Sattelschultermodell. Die übliche Möglichkeit ist, die Ärmel nachträglich zu nähen. Sie können jedoch Maschen abketten und aufnehmen, obwohl dies etwas schwieriger als gewöhnlich ist.
31.07.2022 - 19:56