
Popular categories
Looking for a yarn?


Comments / Questions (72)
![]() Judesbois wrote:
Judesbois wrote:
Bonjour, "Continuer en jersey et augmenter maintenant pour le raglan à un rythme différent sur le dos/le devant et sur les manches: toutes les 2 augmentations on va augmenter seulement le dos/le devant (= on augmente alors 4 mailles à chaque fois); autrement dit: augmenter tous les 2 tours sur le dos/le devant et tous les 4 tours sur les manches. " Sur quel marqueur (1, 2 3 ou 4 )devons nous augmenter lorsque qu'on augmente le dos/devant ? Merci beaucoup !
27.05.2025 - 16:37DROPS Design answered:
Bonjour Mme Judesbois, les tours commencent au milieu dos, les manches vont donc se trouver entre le 1er et le 2ème marqueur et entre le 3ème et le 4ème marqueur, autrement dit, tous les 2 tours, augmentez pour le dos/devant avant le 1er marqueur (fin dos), après le 2ème marqueur (début devant), avant le 3ème marqueur (fin devant) et après le 4ème marqueur (début dos). Bon tricot!
28.05.2025 - 07:49
![]() Pascale wrote:
Pascale wrote:
Bonjour, je tricote la laine Melody préconisée pour ce modèle. Je vous,sur les pelotes que c est une laine à tricoter avec des aiguilles 8mm. Or, votre patron est en aiguilles 4,5mm et 6mm... j ai fait ce pull avec les,aiguilles que vous,avez proposé et il est vraiment trop petit. Je l ai recommencé avec des aiguilles 8 mm et 6mm, et il est parfait. Je me demande pourquoi vous avez autant diminué la taille des aiguilles alors sue la laine doit se tricoter plus souplement? Merci
26.05.2025 - 10:45DROPS Design answered:
Bonjour Pascale, les dimensions finales d'un modèle dépendent de la tension choisie, nous avons ici un échantillon de 14 mailles x 16 rangs jersey = 10 x 10 cm, il nous a fallu des aiguilles 6 pour le réaliser; si vous n'aviez pas le bon échantillon, cela explique pourquoi il était trop petit; la taille des aiguilles peut varier en fonction de chacune, ce qui compte avant tout pour avoir les bonnes mesures, c'est que l'échantillon soit juste. Si la tension est juste, la texture sera identique à celle du modèle présenté - mais on peut parfois souhaiter une texture plus dense, grâce à des aiguilles plus petites ou plus aérée, avec des aiguilles plus grosses. Bon tricot!
26.05.2025 - 14:32
![]() Anne wrote:
Anne wrote:
Er det feil cm oppgitt i lengden på bolen før vrangbord? Strikk glattstrikk rundt over alle maskene til arbeidet måler 23-22-22-21-21-20 cm fra delingen.
24.03.2025 - 19:58DROPS Design answered:
Hei Anne, Fra nederst på ermehull til vrangbord (bolen) skal det være lengdene du siterer. Men du kan gjerne strikke kortere eller lengre bol hvis du ønsker. God fornøyelse!
25.03.2025 - 06:37
![]() Monica Stallvik wrote:
Monica Stallvik wrote:
Bruker man dobbelt tråd? Jeg skulle ønske man kunne få en oppskrift som er tilsvarende, med bare nedenfra og opp.
05.02.2025 - 06:27DROPS Design answered:
Hei Monica, Nei, man bruker enkel tråd Drops Melody i denne oppskriften. Hvis du søker under Gratis oppskrifter og skriver inn "Genser nedenfra opp" får du alle våre oppskrifter på slike gensere. Håper du finner noe du liker!
05.02.2025 - 06:36
![]() Inés P wrote:
Inés P wrote:
Hola,\r\nEstoy haciendo talla M, estoy haciendo el canesú, pero creo que tengo aumentos de más.\r\nCuántos puntos tengo que tener antes de empezar los aumentos únicamente en el delantero y espalda?\r\n72 inicial + 8 (1er aumento ) + 16 (2x8 escote ) + 64 ( 8x8) = 160 puntos \r\nEs correcto?\r\nY después, Cuantos puntos tengo tener al final de todas los aumentos del canesú? \r\nGracias
02.02.2025 - 15:45
![]() Bella wrote:
Bella wrote:
Help please! My stitch count is off and I can’t figure it out Cast on 68 sts Place stitch markers: +8 sts Neckline: +24 sts Yoke: 8rows x 8sts = 64 sts 8rows x 4sts = 32 sts 4rows x 4sts = 16 sts Total: 68+24+64+32+16 = 204 I have 204 sts instead of 180 sts
25.01.2025 - 20:46DROPS Design answered:
Dear Bella, as indicated in the yoke: "continue to increase to raglan every 2nd round until you have increased a total of 8 times (including the increases on the short rows)." So the first increase row (=8sts), the 2 rows from the RS in the neckline (=16 sts) + 5 more rows in the yoke (=40 sts) and then 8x4 (=32) sts for the body and 4x4 (= 16) sts for the sleeves. These sts added to the 68 initial sts = 68+8+16+40+32+16 = 180 sts. Happy knitting!
25.01.2025 - 22:16
![]() Anna wrote:
Anna wrote:
At the beginning of the yoke it’s says to do raglan increases for every second round until it’s increased a total of 8 times. Am I suppose to increase 8 stitches every other round for 8 rounds total or 16 rounds total? How many increases total are done during this step specifically?
24.01.2025 - 16:59DROPS Design answered:
Dear Anna, increase 8 times on alternate rounds (or every 2nd round). So you work 16 rounds and increase only in 8 of them. Since you increase 8 stitches on each increase round you increase a total of 8x8 = 64 stitches for the raglan. Happy knitting!
25.01.2025 - 19:38
![]() Benia wrote:
Benia wrote:
Mam problem ze schematem na rozmiar M Zaczynając jest 72 oczka na ściągaczu, przy wkładaniu markerów dodajemy 8 o= 80o Przy karczku kolejne 2 razy na reglan 16o. Dalej musimy dodać 10x8o. Później dodawać 8 razy na przodzie/tyle =32o I w tym samym czasie 4 razy 4 oczka na rękawy =16o. Łącznie na przodzie wyszło zgodnie ze schematem 61o, a na rękawach wychodzi 49 oczek. Pod koniec reglanu wychodzi 220o. Musi być gdzieś błąd w dodawaniu oczek na rękawy. Pozdrawiam
26.12.2024 - 18:10DROPS Design answered:
Witaj Beniu, pierwsze dodawanie oczek w okrążeniu, gdzie wkładamy markery do robótki jest już pierwszym dodaniem oczek na reglan, podobnie w rzędach skróconych mamy 2 powtórzenia dodawania oczek na reglan > łącznie 3 powtórzenia z podanych później 10 razy. Tak więc wychodząc od 72 o., w rozmiarze M dodajesz 10 x 8 oczek (tył, przód i rękawy), 8 razy 4 oczka (tylko tył i przód), 4 razy 4 oczka (rękawy) > 72+80+32+16=200 oczek. Pozdrawiamy!
28.12.2024 - 17:34
![]() Judith wrote:
Judith wrote:
Hola! Estoy haciendo la talla M, en el momento de tejer el canesú una Vez acabado los 10 aumentos, primero tengo que hacer los aumentos para el cuerpo cada 2a vuelta y luego finalizados los 8 aumentos del cuerpo, cada 4a los de la manga, o se hacen a la vez? Muchas gracias!
15.12.2024 - 18:57DROPS Design answered:
Hola Judith, se trabajan a la vez. Es decir, vas a aumentar cada 2ª vuelta, pero en una de las vueltas con aumentos aumentas solo 4 puntos (aumentos solo en el cuerpo) y en la siguiente vuelta con aumentos aumentas 8 puntos (4 del cuerpo y 4 de la manga). Cuando trabajes tanto la vuelta con 4 aumentos como la de 8 aumentos 4 veces cada una habrás terminado los aumentos.
15.12.2024 - 23:27
![]() Bella wrote:
Bella wrote:
Wie ist der zweite Teil der Passe zu verstehen? Stricke ich dort weiterhin nur in jeder zweiten Reihe eine Raglanzunahme oder in jeder Reihe? Und wie bzw. an welchen Stellen muss ich für den Rumpf zunehmen, wenn ich dort in jeder zweiten Runde Raglanzunahmen stricken soll (und nur in jeder vierten an den Ärmeln)? Ich habe meine Maschenmarkierer von eins bis vier nummeriert, aber weiß nichts mit der Anleitung anzufangen.
07.12.2024 - 15:49DROPS Design answered:
Liebe Bella, man wird zuerst 8 Maschen (jeweils 2 Maschen für Rumpf und Ärmel) in jeder 2. Runde zunehmen, dann wird man abwechslungsweise 8 Maschen wie zuvor (Rumpf und Ärmel) und 4 Maschen (nur Rumpf = vor der 1. Markierung + nach der 4. Markierung (Rückenteil) und nach der 2. und vor der 3. Markierung (Vorderteil) - nach keine Zunahmen bei den Ärmeln) zunehmen. Viel Spaß beim Stricken!
09.12.2024 - 08:28
|
|
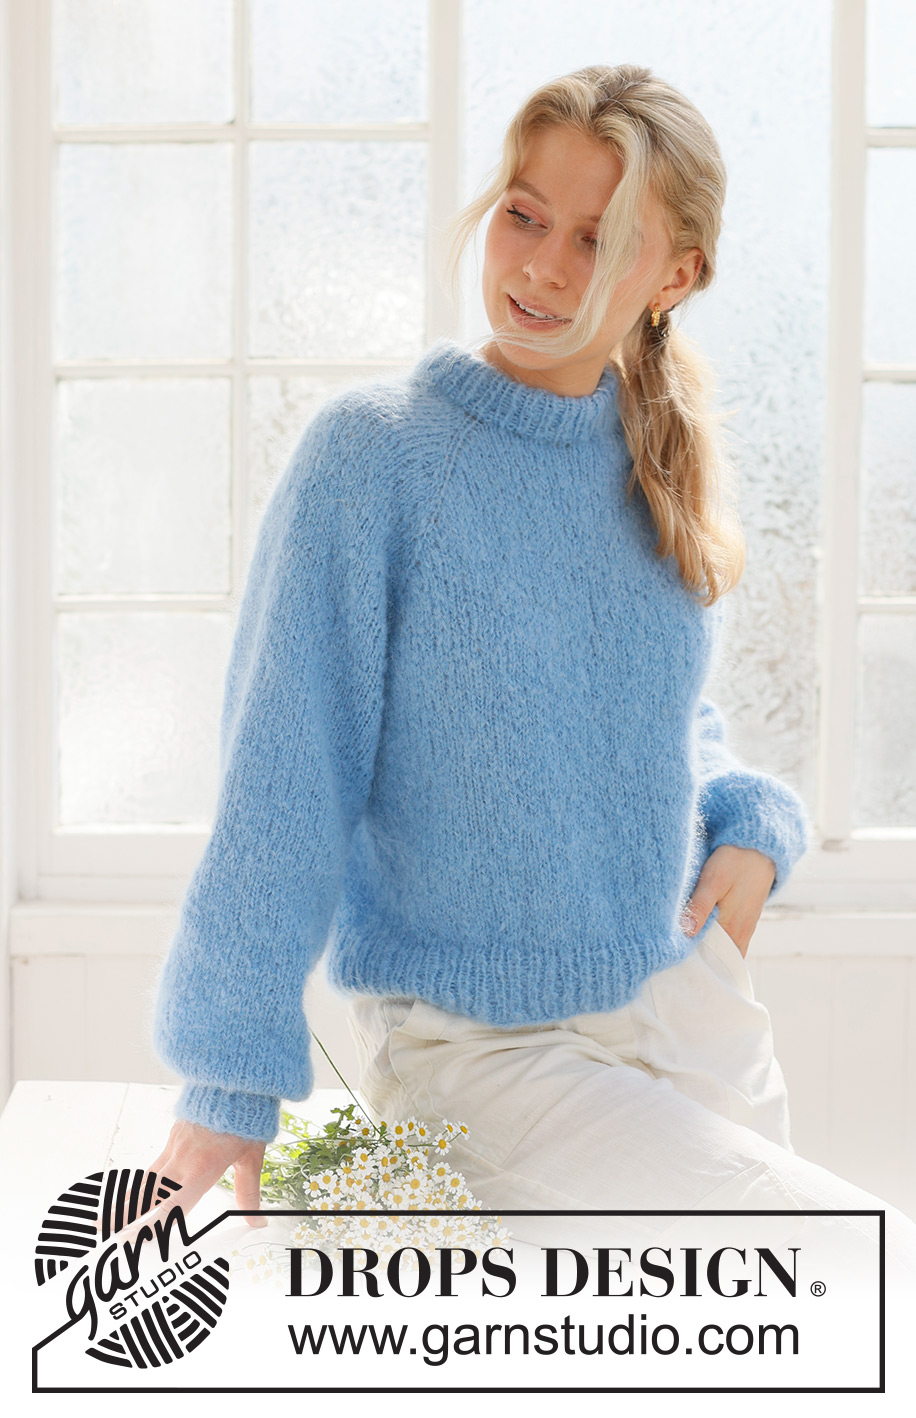
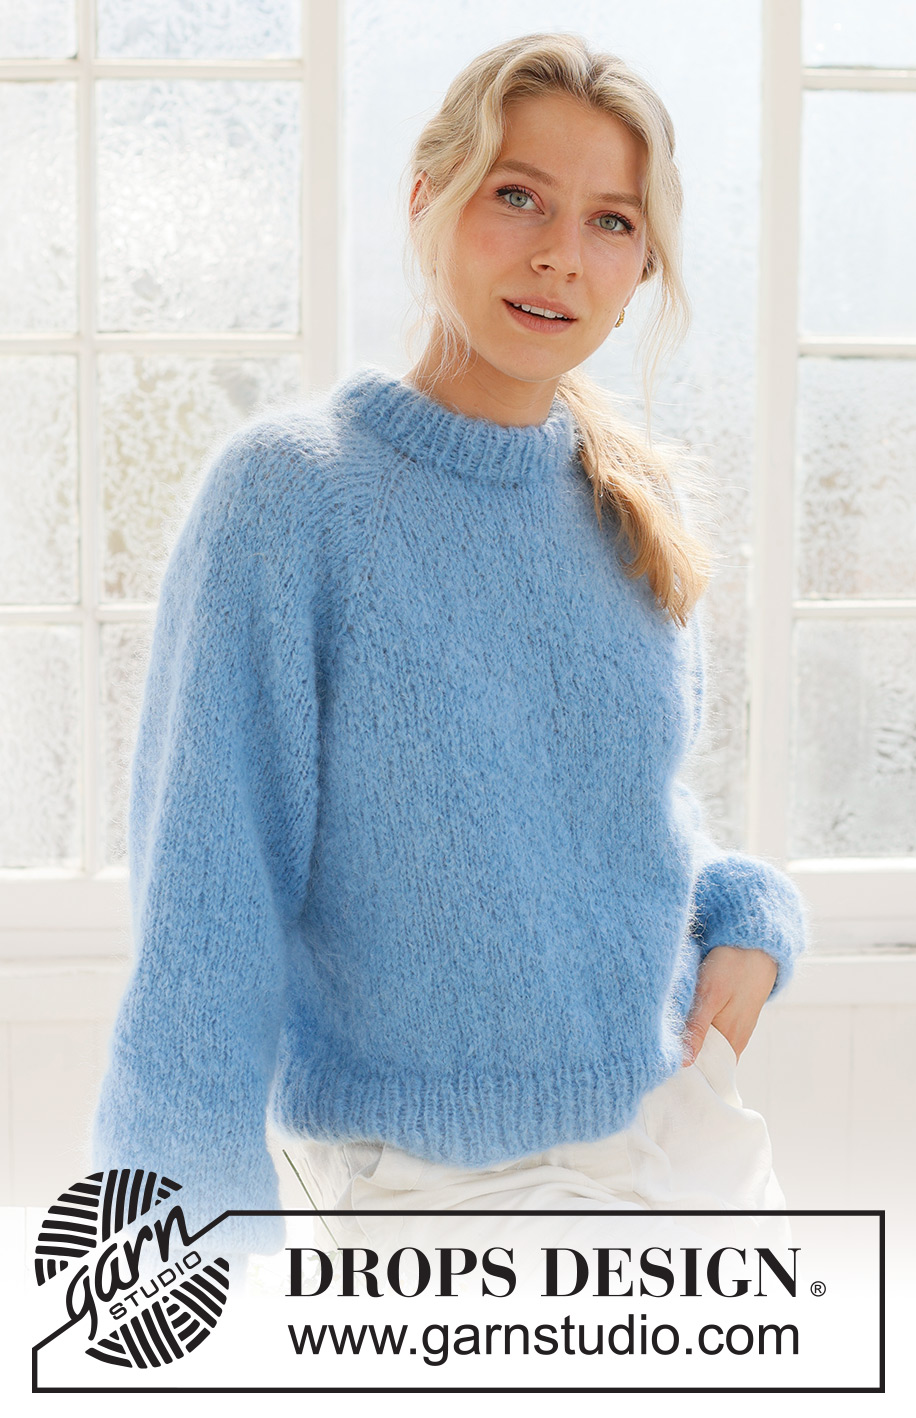
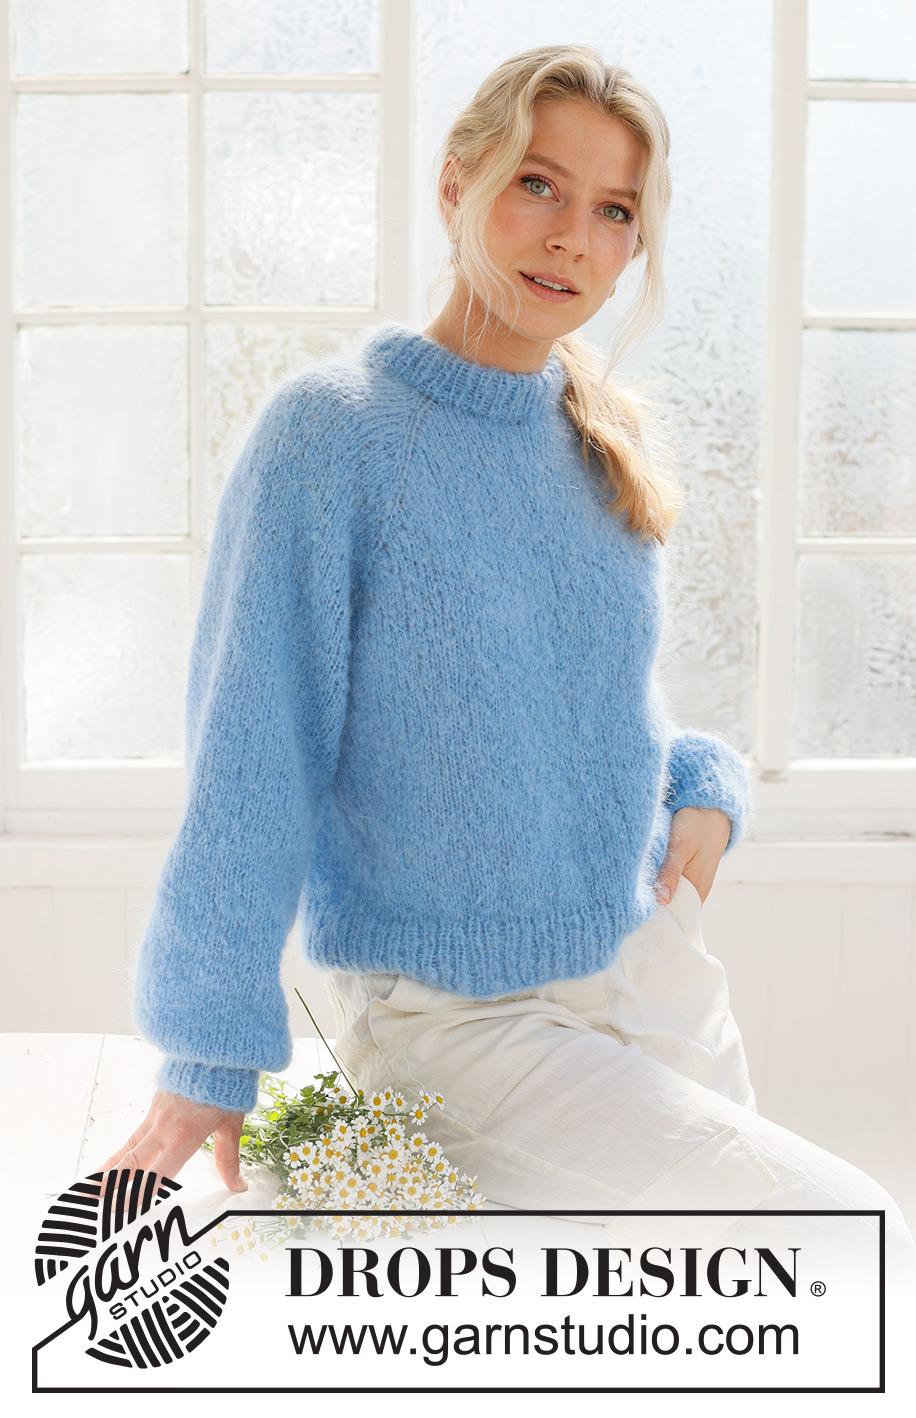
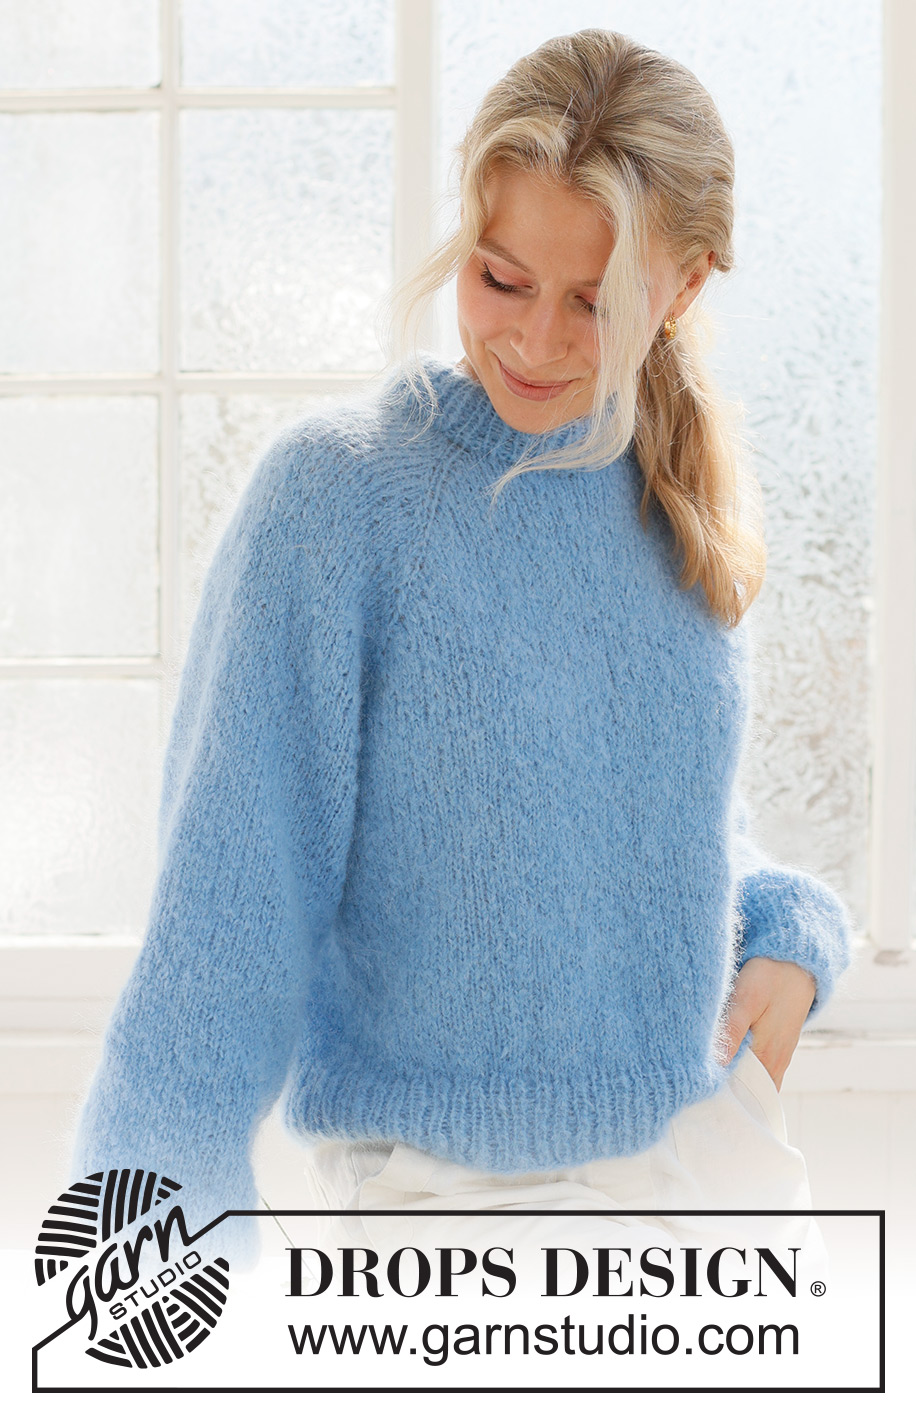
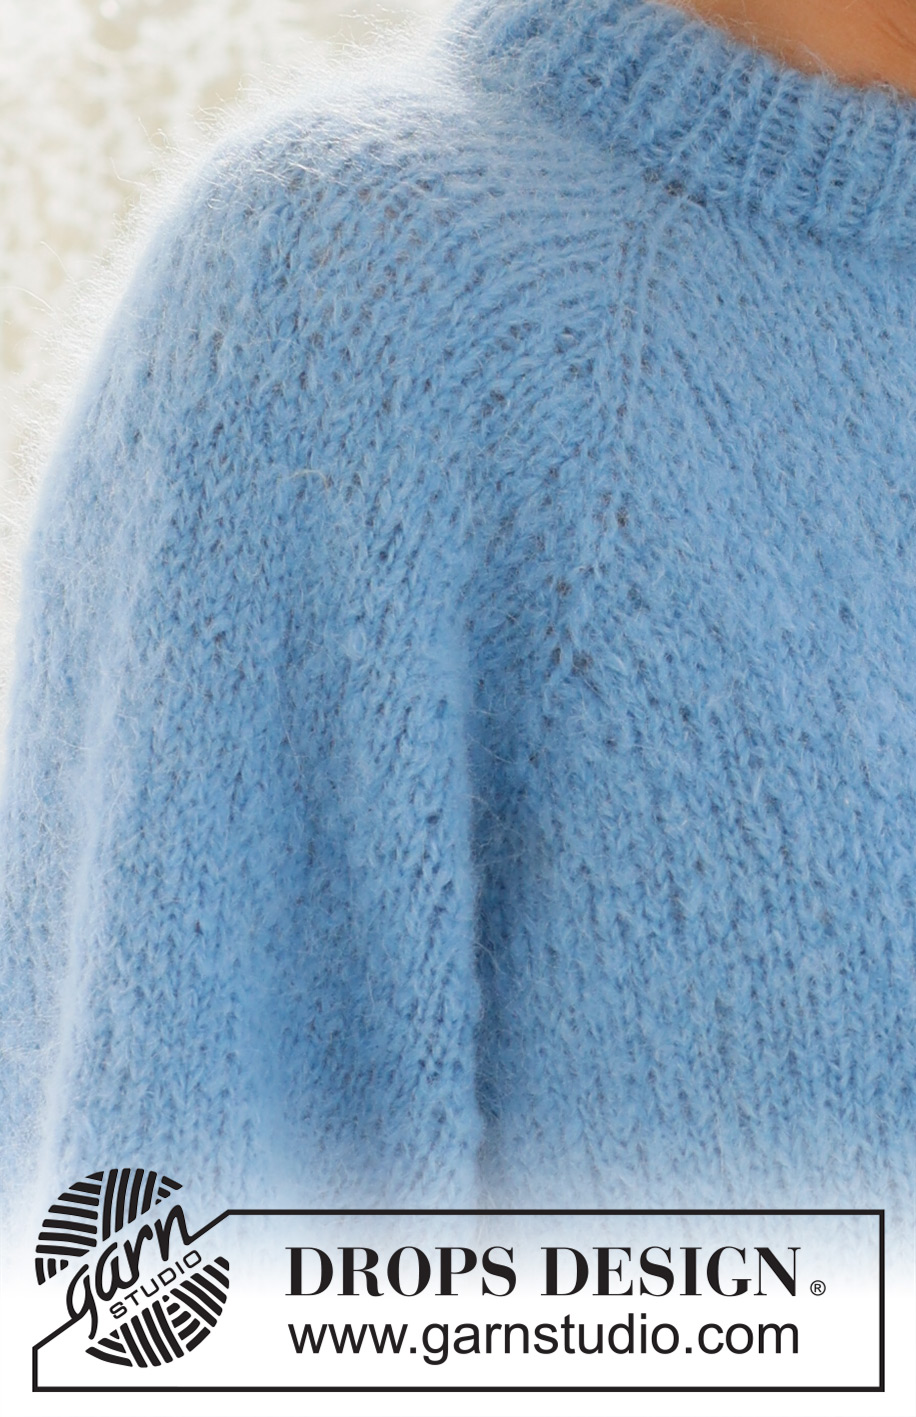
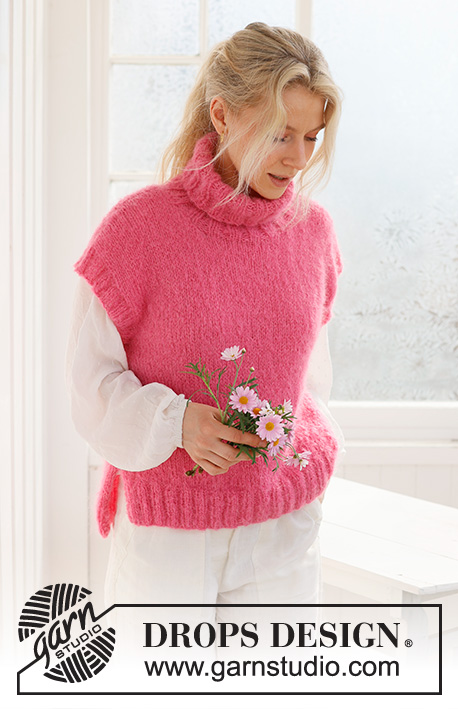
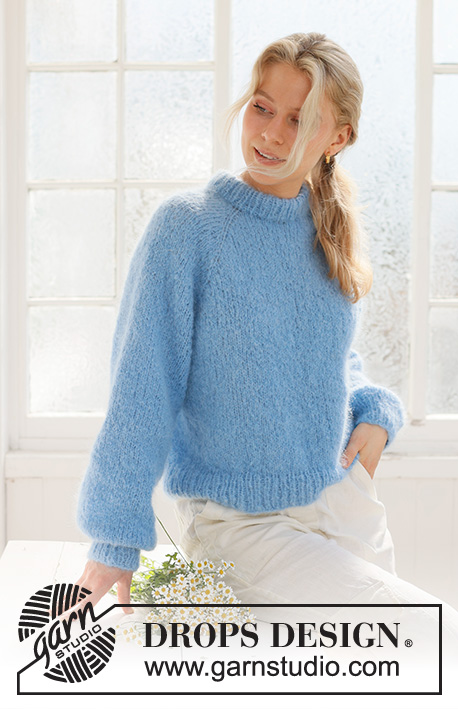
Blueberry Cream Sweater#blueberrycreamsweater |
|
 |
 |
Knitted jumper in DROPS Melody. The piece is worked top down, with raglan and double neck. Sizes S - XXXL.
DROPS 231-57 |
|
|
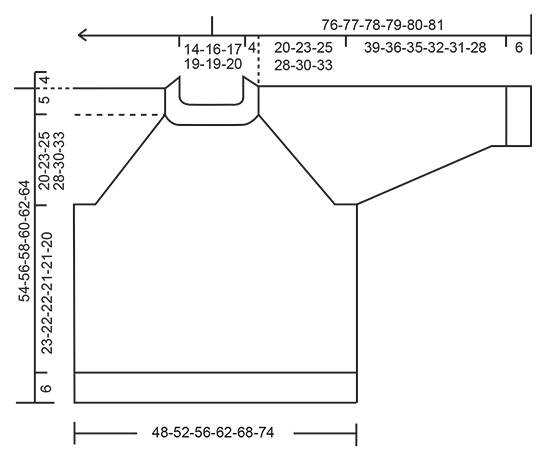
------------------------------------------------------- EXPLANATIONS FOR THE PATTERN: ------------------------------------------------------- RAGLAN: Increase 1 stitch on each side of the stitches with a marker (8 stitches increased on the round). Increase 1 stitch by making 1 yarn over; on the next row/round work the yarn overs twisted to avoid holes. Then work the new stitches in stocking stitch. DECREASE TIP (mid-under sleeves): Start 3 stitches before the marker, knit 2 together, knit 2 (marker sits between these 2 stitches), slip 1 stitch as if to knit, knit 1 and pass the slipped stitch over the knitted stitch. ------------------------------------------------------- START THE PIECE HERE: ------------------------------------------------------- JUMPER - SHORT OVERVIEW OF THE PIECE: The neck and yoke are worked in the round with circular needle, top down. The yoke is divided for the body and sleeves and the body is continued in the round. The sleeves are worked in the round with double pointed needles/short circular needle. DOUBLE NECK: Cast on 68-72-76-80-80-84 stitches with DROPS Melody, using a short 4.5 mm and a short 6 mm circular needle held together. Pull out the needle size 6 mm and continue with size 4.5 mm (this makes the cast-on edge elastic). Work rib in the round (knit 1, purl 1) for 9 cm. Fold the neck double to the inside – work the next round of rib as before, working every other stitch together with every other stitch on the cast-on edge. Change to circular needle size 6 mm On the next round insert 4 markers as described below. Each marker is inserted in a knitted stitch and will be used when increasing to raglan. Insert a marker thread at the beginning of the round = approx. mid-back. Work the next round as follows from the marker thread: Knit 10-10-12-12-12-14, make 1 yarn over, insert marker 1 in the next stitch, knit this stitch, make 1 yarn over, knit 15 (sleeve), 1 yarn over, insert marker 2 in the next stitch, knit this stitch, 1 yarn over, knit 17-19-21-23-23-25 (front piece), 1 yarn over, insert marker 3 in the next stitch, knit this stitch, 1 yarn over, knit 15 (sleeve), 1 yarn over, insert marker 4 in the next stitch, knit this stitch, 1 yarn over, knit 7-9-9-11-11-11 = 76-80-84-88-88-92 stitches. Knit 1 round, with the yarn overs knitted twisted. Cut the strand. NECK-LINE: Now work a neck-line with short rows as follows. Start from the right side, 3 stitches before marker 3 (i.e. on the left-hand side of the front neck, when garment is worn), knit until you are 3 stitches past marker 2 (= right-hand side of the front neck) – AT THE SAME TIME on this row increase to RAGLAN – read description above. Turn, tighten the strand and purl back from the wrong side to 7 stitches past marker 3. Turn, tighten the strand and knit to 7 stitches past marker 2 – remember to increase to raglan. Turn, tighten the strand and purl to 3 stitches past marker 3. Cut the strand and work the yoke as described below. YOKE: Start at the marker thread mid-back and work stocking stitch in the round over all stitches. AT THE SAME TIME continue to increase to raglan every 2nd round until you have increased a total of 8-10-12-14-20-22 times (including the increases on the short rows). Continue with stocking stitch and increases to raglan, but every second increase, increase only on the body (4 increased stitches); i.e. increase every 2nd round on the body and every 4th round on the sleeves. Increase like this 8-8-8-8-4-4 times on the body (4-4-4-4-2-2 times on the sleeves). It has been now increased a total of 16-18-20-22-24-26 times on the body and 12-14-16-18-22-24 times on the sleeves. After the final increase there are 180-200-220-240-264-284 stitches. The piece measures approx. 20-23-25-28-30-33 cm measured mid-front; continue working, if necessary, to the correct length. On the next round divide for the body and sleeves as follows: Work 29-31-35-37-41-45 stitches as before (approx. ½ back piece), place the next 35-39-43-47-51-55 stitches on a thread for the sleeve, cast on 12-12-12-14-14-16 stitches (in side under sleeve), work 55-61-67-73-81-87 stitches (front piece), place the next 35-39-43-47-51-55 stitches on a thread for the sleeve, cast on 12-12-12-14-14-16 stitches (in side under sleeve), work the last 26-30-32-36-40-42 stitches (approx. ½ back piece). The body and sleeves are finished separately. The body is measured from here! BODY: = 134-146-158-174-190-206 stitches. Work stocking stitch in the round for a further 23-22-22-21-21-20 cm. Change to circular needle size 4.5 mm. Work rib (knit 1, purl 1) for 6 cm. Cast off. The jumper measures approx. 54-56-58-60-62-64 cm from the shoulder down. SLEEVES: Place the 35-39-43-47-51-55 stitches from the thread on the one side of the piece on double pointed needles/short circular needle size 6 mm and knit up 1 stitch in each of the 12-12-12-14-14-16 stitches cast on under the sleeve = 47-51-55-61-65-71 stitches. Insert a marker in the middle of the new stitches under the sleeve. Allow the marker to follow your work onwards; it is used when decreasing under the sleeve. Start at the marker and work stocking stitch in the round. SIZES XL-XXL-XXXL: When the sleeve measures 4-4-4 cm from the division, decrease 2 stitches under the sleeve – read DECREASE TIP. Decrease like this every 15-10-10 cm a total of 2-3-3 times (do not decrease in sizes S, M and L) ALL SIZES: = 47-51-55-57-59-65 stitches. Work until the sleeve measures 39-36-35-32-31-28 cm from the division. Knit 1 round where you decrease 15-17-19-19-19-23 stitches evenly spaced = 32-34-36-38-40-42 stitches. Change to double pointed needles size 4.5 mm. Work rib (knit 1, purl 1) for 6 cm. Cast off. The sleeve measures approx. 45-42-41-38-37-34 cm. Work the other sleeve in the same way. |
|
|
|
Have you finished this pattern?Tag your pictures with #dropspattern #blueberrycreamsweater or submit them to the #dropsfan gallery. Do you need help with this pattern?You'll find 30 tutorial videos, a Comments/Questions area and more by visiting the pattern on garnstudio.com. © 1982-2025 DROPS Design A/S. We reserve all rights. This document, including all its sub-sections, has copyrights. Read more about what you can do with our patterns at the bottom of each pattern on our site. |
|


With over 40 years in knitting and crochet design, DROPS Design offers one of the most extensive collections of free patterns on the internet - translated to 17 languages. As of today we count 314 catalogues and 11822 patterns translated into English (UK/cm).
We work hard to bring you the best knitting and crochet have to offer, inspiration and advice as well as great quality yarns at incredible prices! Would you like to use our patterns for other than personal use? You can read what you are allowed to do in the Copyright text at the bottom of all our patterns. Happy crafting!
Post a comment to pattern DROPS 231-57
We would love to hear what you have to say about this pattern!
If you want to leave a question, please make sure you select the correct category in the form below, to speed up the answering process. Required fields are marked *.