DROPS Sky
DROPS Sky
74% Alpaca, 18% Polyamide, 8% Wool
from 5.40 € /50g
Get the yarn to make this pattern from 10.80€.

The yarn cost is calculated from the pattern’s smallest size and the yarn’s cheapest product type. Looking for an even better price? You might find it on the DROPS Deals!

DROPS SS24

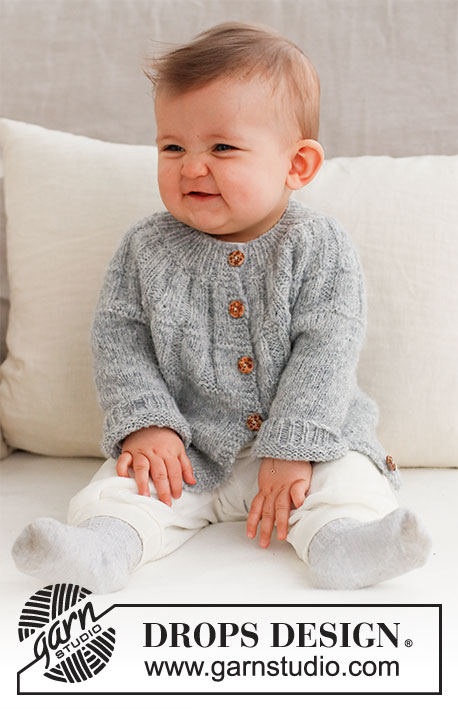
Sweet Gleam Cardigan

Knitted jacket for baby in DROPS Sky. The piece is worked top down, with round yoke and ribbing on the yoke. Sizes: Premature to 2 years.

DROPS Baby 43-6
DROPS Design: Pattern sk-006-by
Yarn group B
-------------------------------------------------------

SIZES:
(<0) 0/1 - 1/3 - 6/9 - 12/18 months (2 years)
Child’s height in cm:
(40/44) 48/52 - 56/62 - 68/74 - 80/86 (92)

MATERIALS:
DROPS SKY from Garnstudio (belongs to yarn group B)
(100) 100-100-100-150 (150) g colour 02, pearl grey

DROPS BUTTONS NO 628: (4) 5-6-6-6 (6) items.

NEEDLES:
DROPS CIRCULAR NEEDLE SIZE 4 MM: Length 80 cm.
DROPS CIRCULAR NEEDLE SIZE 3 MM: Length 80 cm.
DROPS DOUBLE POINTED NEEDLES SIZE 4 MM.
DROPS DOUBLE POINTED NEEDLES SIZE 3 MM.
The technique MAGIC LOOP can be used – you then only need circular needle of 80 cm in each size.

KNITTING TENSION:
21 stitches in width and 28 rows in height with stocking stitch = 10 x 10 cm.
NOTE: Needle size is only a guide. If you get too many stitches on 10 cm, change to a larger needle size. If you get too few stitches on 10 cm, change to a smaller needle size.

-------------------------------------------------------

Alternative Yarn – See how to change yarns here
Yarn Groups A to F – Use the same pattern and change the yarn here
Yarn usage using an alternative yarn – Use our yarn converter here

-------------------------------------------------------

DROPS Sky
DROPS Sky
74% Alpaca, 18% Polyamide, 8% Wool
from 5.40 € /50g
Get the yarn to make this pattern from 10.80€.

The yarn cost is calculated from the pattern’s smallest size and the yarn’s cheapest product type. Looking for an even better price? You might find it on the DROPS Deals!

Pattern instructions

-------------------------------------------------------

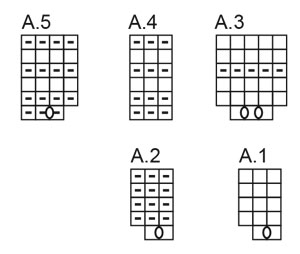
EXPLANATIONS FOR THE PATTERN:

-------------------------------------------------------

RIDGE/GARTER STITCH (worked back and forth):
Knit all rows.
1 ridge = knit 2 rows.

PATTERN:
See diagrams A.1 to A.5. The diagrams show all rows in the pattern from the right side.

DECREASE TIP (for sleeves):
Start 3 stitches left before the marker, knit 2 together, knit 2 (marker sits between these 2 stitches), slip 1 stitch as if to knit, knit 1 and pass the slipped stitch over the knitted stitch.

BUTTONHOLES:
Work the buttonholes on the right band (when the garment is worn). Work from the right side when there are 3 stitches left: Make 1 yarn over, knit 2 together and knit 1. On the next row (wrong side) knit the yarn over to leave a hole.
The first buttonhole is worked when the neck measures 1½-2 cm, the other (3) 4-5-5-5 (5) buttonholes are worked with (5) 5-5-5-5½ (6) cm between each one.

-------------------------------------------------------

START THE PIECE HERE:

-------------------------------------------------------

JACKET – SHORT OVERVIEW OF THE PIECE.
The neck and yoke are worked back and forth with circular needle, from mid front and top down. The yoke is divided for body and sleeves and the body continued back and forth. The sleeves are worked in the round with double pointed needles.

NECK:
Cast on (59) 63-71-75-79 (83) stitches with circular needle size 3 mm and DROPS Sky.
Purl 1 row from the wrong side, then work the next row as follows: 4 band stitches in GARTER STITCH – read description above, * knit 1, purl 1 *, work from *-* until there are 5 stitches left, knit 1 and 4 band stitches in garter stitch. Work this rib for (2) 2-3-3-4 (4) cm – remember the BUTTONHOLES on the right band – read description above.
On the next row from the right side increase every other purl-1 to purl-2 by making 1 yarn over – start to increase in the 2nd purled stitch after the band (knit the yarn overs twisted on the next row to avoid holes) = (12) 13-15-16-17 (18) increased stitches and (71) 76-86-91-96 (101) stitches. Continue the new rib until the neck measures (3) 3-4-4-5 (5) cm.
Insert 1 marker after the band; the yoke is measured from this marker!

YOKE:
Change to circular needle size 4 mm and work 1 ridge over all stitches – AT THE SAME TIME on the first row increase (3) 2-0-3-2 (1) stitches evenly spaced = (74) 78-86-94-98 (102) stitches.
After the ridge work as follows from the right side: 4 band stitches in garter stitch, * A.1, A.2 *, work from *-* until there are 6 stitches left, A.1 and 4 band stitches in garter stitch.
After the first row there are (107) 113-125-137-143 (149) stitches.
Complete A.1 and A.2, then continue with knit 3 /purl 3 until the yoke measures (4) 5-5-5-6 (6) cm from the marker on the neck.
Work the next row from the right side as follows:
SIZE (<0):
4 band stitches in garter stitch, * A.3, A.4 *, work from *-* until there are 7 stitches left, A.3 and 4 band stitches in garter stitch.
SIZES 0/1 – 1/3 – 6/9 – 12/18 months (2 years):
4 band stitches in garter stitch, * A.3, A.5 *, work from *-* until there are 7 stitches left, A.3 and 4 band stitches in garter stitch.

After the first row there are (141) 166-184-202-211 (220) stitches. Complete A.3 and A.4/A.5, then continue with knit 5 / purl 3 in size (<0) and knit 5 / purl 4 in the other sizes until the yoke measures (8) 10-10-10-12 (12) cm from the marker.
Knit 1 row from the right side where you adjust the number of stitches to (139) 163-175-191-195 (207) stitches.
Knit 1 row from the wrong side. Continue with stocking stitch and 4 band stitches in garter stitch on each side until the yoke measures (10) 11-12-12-13 (14) cm from the marker.
On the next row divide for the body and sleeves as follows: Work the first (22) 26-28-30-31 (33) stitches as before, place the next (30) 34-36-40-40 (42) stitches on a thread for the sleeve, cast on (4) 4-6-6-8 (8) stitches (in side under sleeve), work (35) 43-47-51-53 (57) stitches, place the next (30) 34-36-40-40 (42) stitches on a thread for the sleeve, cast on (4) 4-6-6-8 (8) stitches (in side under sleeve), work the last (22) 26-28-30-31 (33) stitches. The body and sleeves are finished separately. The piece is now measured from here!

BODY:
= (87) 103-115-123-131 (139) stitches. Continue with stocking stitch and 4 band stitches in garter stitch on each side for a further (6) 9-12-12-15 (16) cm. Knit 1 row from the right side where you increase (12) 14-16-18-18 (20) stitches evenly spaced = (99) 117-131-141-149 (159) stitches.
Change to circular needle size 3 mm and work as follows from the wrong side: 4 band stitches in garter stitch, * purl 1, knit 1 *, work from *-* until there are 5 stitches left, purl 1 and 4 band stitches in garter stitch. Continue this rib for (2) 2-2-3-3 (3) cm. Cast off a little loosely.
The jacket measures approx. (20) 24-28-30-34 (36) cm from the shoulder down.

SLEEVES:
Place the (30) 34-36-40-40 (42) stitches from the thread on the one side of the piece on double pointed needles size 4 mm and knit up 1 stitch in each of the (4) 4-6-6-8 (8) stitches cast on under the sleeve = (34) 38-42-46-48 (50) stitches. Insert a marker in the middle of the (4) 4-6-6-8 (8) stitches under the sleeve. Start at the marker and work stocking stitch in the round for 1 cm. Now decrease 2 stitches under the sleeve (does not apply to sizes <0 and 0/1 month) – read DECREASE TIP. Decrease like this every 4th round a total of (0) 0-1-1-1 (2) times = (34) 38-40-44-46 (46) stitches. Continue working until the sleeve measures (5) 8-10-13-15 (19) cm from the division. There is approx. (2) 2-2-3-3 (3) cm to finished length; try the jacket on and work to desired length.
Knit 1 round where you decrease (0) 0-0-4-4 (2) stitches evenly spaced = (34) 38-40-40-42 (44) stitches. Change to double pointed needles size 3 mm and work rib (knit 1, purl 1) for (2) 2-2-3-3 (3) cm. Cast off a little loosely The sleeve measures approx. (7) 10-12-16-18 (22) cm from the division.
Work the other sleeve in the same way.

ASSEMBLY:
Sew the buttons onto the left band.

Diagram

symbols = knit from right side, purl from wrong side
symbols = purl from right side, knit from wrong side
symbols = between 2 stitches make 1 yarn over; on the next row work the yarn over twisted as shown in the diagram (no hole)
diagram
diagram

Each of our patterns has specific tutorial videos to help you.

Do you have a question? See a list of frequently asked questions (FAQ)

Knitting tension is what determines the final measurements of your work, and is usually measured per 10 x 10 cm. It is provided like so: number of stitches in width x number of rows in height - eg: 19 stitches x 26 rows = 10 x 10 cm.

The knitting tension is very individual; some people knit/crochet loosely while others work tightly. You adjust the knitting tension with the needle size, which is why the suggested needle size is only meant as a guide! You need to adjust this (up or down) to ensure that YOUR knitting tension matches the knitting tension provided in the pattern. If you work with a different knitting tension than provided you will have a different yarn consumption, and your work will have different measurements than what the pattern suggests.

The knitting tension also determines which yarns can replace each other. As long as you achieve the same knitting tension you can replace one yarn with another.

See DROPS lesson: How to measure your tension/gauge

See DROPS video: How to make a gauge tension swatch

The required amount of yarn is provided in grams, eg: 450 g. To calculate how many balls you’ll need you first need to know how many grams are in 1 ball (25g, 50g or 100g). This information is available if you click on the individual yarn quality on our pages. Divide the amount required with the amount of each ball. For example, if each ball is 50g (the most common amount), the calculation will be as follows: 450 / 50 = 9 balls.

The important thing when changing from one yarn to another is that the knitting/crochet tension remains the same. This is so that the measurements of the finished piece will be the same as on the sketch provided. It is easier to achieve the same knitting tension using yarns from the same yarn group. It is also possible to work with multiple strands of a thinner yarn to achieve the knitting tension of a thicker one. Please try our yarn converter. We recommend you to always work a test swatch.

Please NOTE: when changing yarn the garment might have a different look and feel to the garment in the photo, due to individual properties and qualities of each yarn.

See DROPS lesson: Can I use a different yarn than the one mentioned in the pattern?

All our yarns are categorised into yarn groups (from A to F) according to thickness and knitting tension – group A contains the thinnest yarns and group F the thickest. This makes it easier for you to find alternative yarns to our patterns, should you wish to switch yarn. All yarns within the same group have a similar knitting tension and can easily replace each other. However, different yarn qualities have different structures and properties which will give the finished work a unique look and feel.

Click here for an overview of the yarns in each yarn group

At the top of all our patterns you’ll find a link to our yarn calculator, which is a helpful tool should you wish to use a different yarn than suggested. By filling in the yarn quality you wish to replace, the amount (in your size) and number of strands, the calculator will present good alternative yarns with the same knitting tension. Additionally it will tell you how much you’ll require in the new qualities and whether you’ll need to work with multiple strands. Most skeins are 50g (some are 25g or 100g).

If the pattern is worked with multiple colours, every colour will have to be calculated separately. Similarly, if the pattern is worked with several strands of different yarns (for example 1 strand Alpaca and 1 strand Kid-Silk) you will have to find alternatives for each, individually.

Click here to see our yarn calculator

Since different yarns have different qualities and textures we have chosen to keep the original yarn in our patterns. However, you can easily find options among our available qualities by using our yarn calculator, or simply pick a yarn from the same yarn group.

It is possible that some retailers still have discontinued yarns in stock, or that someone has a few skeins at home that they would like to find patterns for.

The yarn calculator will provide both alternative yarn as well as required amount in the new quality.

If you think it's hard to decide what size to make, it can be a good idea to measure a garment you own already and like the size of. Then you can pick the size by comparing those measures with the ones available in the pattern's size chart.

You'll find the size chart at the bottom of the pattern.

See DROPS lesson: How to read size chart

The needle size provided in the pattern serves only as a guide, the important thing is to follow the knitting tension. And since knitting tension is very individual, you will have to adjust the needle size to ensure that YOUR tension is the same as in the pattern – maybe you’ll have to adjust 1, or even 2 needle sizes, up or down to achieve the correct tension. For this, we recommend that you work test swatches.

Should you work with a different knitting tension than the one provided, the measurements of the finished garment might deviate from the measurement sketch.

See DROPS lesson: How to measure your tension/gauge

See DROPS video: How to make a tension/gauge swatch

Working a garment top-down provides more flexibility and room for personal adjustment. For example it is easier to try the garment on while working, as well as making adjustments to length of yoke and shoulder caps.

The instructions are carefully explaining every step, in the correct order. Diagrams are adjusted to the knitting direction and are worked as usual.

The diagram depicts all rows/rounds, and every stitch seen from the right side. It is read from bottom to top, from right to left. 1 square = 1 stitch.

When working back and forth, every other row is worked from the right side and every other row is worked from the wrong side. When working from the wrong side, the diagram will have to be worked reversed: from left to right, knit stitches are purled, purl stitches are knit etc.

When working in the round every round is worked from the right side and the diagram are worked from right to left on all rounds.

See DROPS lesson: How to read knitting diagrams

The diagram depicts all rows/rounds, and every stitch seen from the right side. It is worked from bottom to top, from right to left.

When working back and forth every other row is worked from the right side: from right to left and every other row is worked from the wrong side: from left to right.

When working in the round, every row in the diagram are worked from the right side, from right to left.

When working a circular diagram you start in the middle and work your way outwards, counter clockwise, row by row.

The rows usually start with a given number of chain stitches (equivalent to the height of the following stitch), this will either be depicted in the diagram or explained in the pattern.

See DROPS lesson: How to read crochet diagrams

Instructions for working several diagrams after each other on the same row/round, will often be written like so: “work A.1, A.2, A.3 a total of 0-0-2-3-4 times". This means you work A.1 once, then A.2 is worked once, and A.3 is repeated (in width) the number of times provided for your size – in this case like so: S = 0 times, M = 0 times, L=2 times, XL= 3 times and XXL = 4 times.

The diagrams are worked as usual: begin with the first row in A.1, then work the first row in A.2 etc.

See DROPS lesson: How to read knitting diagrams

See DROPS lesson: How to read crochet diagrams

The total width of the garment (from wrist-to-wrist) will be larger in the larger sizes, despite the actual sleeves being shorter. The larger sizes have longer sleeve caps and wider shoulders, so there will be a good fit in all sizes.

The measurement sketch/schematic drawing provides information regarding the full length of the garment. If it’s a jumper or a jacket the length is measured from the highest point on the shoulder closest to the neckline, and straight down to the bottom of the garment. It is NOT measured from the tip of shoulder. Similarly, the length of yoke is measured from the highest point on the shoulder and down to where yoke is split into body and sleeves.

On a jacket measures are never taken along bands, unless specifically stated. Always measure inside band stitches when measuring the length.

See DROPS lesson: How to read a schematic drawing

Diagrams are often repeated on the round or in height. 1 repeat is the diagram the way it appears in the pattern. If it says to work 5 repeats of A.1 in the round, then you work A.1 a total of 5 times after/next to each other in the round. If it says to work 2 repeats of A.1 vertically/in height you work the entire diagram once, then begin again at the start and work the entire diagram one more time.

Chain stitches are slightly narrower than other stitches and to avoid working the cast-on edge too tight, we simply chain more stitches to begin with. The stitch count will be adjusted on the following row to fit the pattern and measurement sketch.

The rib edge is more elastic and will contract slightly compared to, for example, stocking stitch. By increasing before the rib edge, you avoid a visible difference in width between the rib edge and the rest of the body.

It’s very easy to cast off too tightly, and by making yarn overs while casting off (and simultaneously casting these off) you avoid a too tight cast off edge.

See DROPS video: How to bind off with yarn overs (yo)

To achieve an even increase (or decrease) you can increase on, for example: every 3rd and 4th row alternately, like so: work 2 rows and increase on the 3rd row, work 3 rows and increase on the 4th. Repeat this until the increase is complete.

See DROPS lesson: Increase or decrease 1 st on every 3rd and 4th row alternately

Should you prefer to work in the round instead of back and forth, you may of course adjust the pattern. You’ll need to add steeks mid-front (usually 5 stitches), and follow the instructions. When you would normally turn and work from the wrong side, simply work across the steek and continue in the round. At the end you’ll cut the piece open, pick up stitches to work bands, and cover the cut edges.

See DROPS video: How to knit steeks and cut open

Should you prefer to work back and forth instead of in the round, you may of course adjust the pattern so you work the pieces separately and then assemble them at the end. Divide the stitches for the body in 2, add 1 edge stitch in each side (for sewing) and work the front and back pieces separately.

See DROPS lesson: Can I adapt a pattern for circular needles into straight needles?

Pattern repeats can vary slightly in the different sizes, in order to get the correct proportions. If you’re not working the exact same size as the garment in the photo, yours might deviate slightly. This has been carefully developed and adjusted so that the complete impression of the garment is the same in all sizes.

Make sure to follow instructions and diagrams for your size!

If you have found a pattern you like which is available in women’s size it’s not very difficult to convert it to men’s size. The biggest difference will be the length of sleeves and body. Start working on the women size that you think would fit across the chest. The additional length will be worked right before you cast off for the armhole/sleeve cap. If the pattern is worked top-down you can add the length right after the armhole or before the first decrease on sleeve.

Regarding additional yarn amount, this will depend on how much length you add, but it is better with a skein too many than too few.

All yarns will have excess fibres (from production) that might come off as lint or shedding. Brushed yarns (ie hairier yarns) have more of these loose, excess fibres, causing more shedding.

Shedding also depends on what is worn under or over the garment, and whether this pulls at the yarn fibres. It’s therefore not possible to guarantee that there will be no shedding

Below are some tips on how to get the best result when working with hairier yarns:

1. When the garment is finished (before you wash it) shake it vigorously so the looser hairs come off. NOTE: do NOT use a lint roller, brush or any method that pulls at the yarn.

2. Place the garment in a plastic bag and put it in your freezer - the temperature will cause the fibres to become less attached to each other, and excess fibres will come off easier.

3. Leave in the freezer for a few hours before taking it out and shaking it again.

4. Wash the garment according to the instructions on the yarn label.

Pilling is a natural process that happens to even the most exclusive of fibers. It's a natural sign of wear and tear that is hard to avoid, and that is most visible in high friction areas of your garment like a sweater's arms and cuffs.

You can make your garment look as new by removing the pilling, using a fabric comb or a pill/lint remover.

Still can't find the answer you need? Then scroll down and leave your question so one of our experts can try to help you. This will be done normally within 5 to 10 working days.
In the meantime, you can read the questions and answers that others have left to this pattern or join the DROPS Workshop on Facebook to get help from fellow knitters/crocheters!

You might also like...

Post a comment to pattern DROPS Baby 43-6

We would love to hear what you have to say about this pattern!

If you want to leave a question, please make sure you select the correct category in the form below, to speed up the answering process. Required fields are marked *.

Comments / Questions (50)

country flag Sabine wrote:

Danke für die schnelle Antwort. Dann muss in der Anleitung das anpassen auf zusammen stricken geändert werden damit man im Vorhinein Bescheid weis das man um diese Maschenanzahl reduzieren muss.

10.10.2022 - 17:11

country flag Sabine wrote:

Ich verstehe es nicht: habe 202 Maschen auf der Nadel und soll auf 191 Maschen anpassen. Was ist damit gemeint? Bedeutet es das ich 11 Maschen verteilt zusammen stricken muss.

10.10.2022 - 10:37

DROPS Design answered:

Liebe Sabine, ja genau, in diese Größe sollen Sie 11 Maschen regelmäßig verteilt abnehmen - vielleicht kann Ihnen damit diese Lektion helfen. Viel Spaß beim stricken!

10.10.2022 - 12:58

country flag Loredana wrote:

Ciao, nella foto si vede che tra le due sezioni di aumenti (A1/A2 e A3/A5) c'è una costa a dritto, nelle spiegazioni invece questo particolare è realizzato solo prima di A1 e A2. È cosi? Grazie

07.10.2022 - 11:26

country flag Lillemor wrote:

Hej. Förstår inte hur jag ska sticka A1 o A2, när ska omslaget göras? Ska dom göras i alla varv? Och hur stickas omslaget i nästa varv för att det ska bli 3 maskor rätt och 3 maskor avigt ? Snälla, förklara tydligt. Är ej någon van stickare:) Mvh Lillemor

06.10.2022 - 13:05

DROPS Design answered:

Hei Lillemor. Når du skal strikke 1. pinne av A.1 og A.2 strikker du slik: 4 stolpemasker, deretter A.1 (1rett + 1 kast + 1 rett), så A.2 (1 rett +1 kast + 1 rett). Når du har strikket A.1 + A.2 1 gang, så skal du gjenta A.1+A.2 til det gjenstår 6 masker på pinnen. Så strikker du A.1 og avslutter pinnen med 4 stolpemasker. På neste pinne strikker du kastene enten vridd rett eller vridd vrang slik at det blir 3 rett masker + 3 vrangmasker. Ta gjerne en titt på hjelpevideoene som ligger nederst på oppskriften (Omslag, Omslag fra vrangen, Udtagning i vrangmasker). mvh DROPS Design

10.10.2022 - 11:44

country flag Deb Funk wrote:

Is there a hat pattern to match Drops Baby 43-6? Thank you. D. Funk

16.09.2022 - 20:10

DROPS Design answered:

Dear Deb Funk! You could use DROPS Children 41-28 hat pattern to make hat in same DROPS Sky yarn. Happy knitting!

17.09.2022 - 11:11

country flag Sonia wrote:

How do I get from 102 stitches to 149 stitches after ridge on the yoke. There is an increase of 47 stitches.

04.09.2022 - 22:16

DROPS Design answered:

Dear Sonia, the increases are included in diagrams A.1 and A.2. Since you repeat A.1 and A.2 the whole round, you will have as many increases as repeats of A.1 and A.2 (which have one increase each). For the largest size you have initially 94 stitches + 4 edge stitches on each side (= 102). Since each repeat of A.1 or A.2 has 2 stitches initially (and includes 1 increase/yarn over), 94/2 = 47 repeats of A.1 or A.2 and 47 increases. Happy knitting!

04.09.2022 - 23:39

country flag Eamona wrote:

Hallo , beim Rumpfteil stehe das vor dem Rippenbündchen als Abschluss , Maschen zu genommen werden soll, ist das richtig , ich kenne es nur so das vor dem Bündchen Maschen abgenommen werden Viele Grüsse Ramona

03.08.2022 - 09:50

DROPS Design answered:

Liebe Eamona, ja genau so ist es richtig, man braucht mehr Maschen mit den dünneren Nadeln für das Rippenmuster als mit den grösseren Nadeln und glatt rechts, deshalb wird es zugenommen, die Breite wird dann gleich sein. Viel Spaß beim stricken!

03.08.2022 - 10:28

country flag Naïma wrote:

Bonjour \r\nRavie comme toujours de vos modèles, j’ai commencé ce joli cardigan mais j’ai du mal à suivre le diagramme A3/A5 au niveau du 4e rang:est ce que c’est tricoter à l’inverse donc cela donne un rang point mousse sur toutes les cotes\\r\\nMerci beaucoup pour tout

24.07.2022 - 20:34

DROPS Design answered:

Bonjour Naïma, vous tricotez les mailles de 4e rang de A.3 (et toutes les autres carres avec un trait au milieu) comme suit: 1 maille envers sur l'endroit, 1 maille endroit sur l'envers. Bon tricot!

26.07.2022 - 08:55

country flag Caro wrote:

Hola, tengo dudas de cada cuántos puntos se realiza el aumento en la parte que dice: "En la siguiente fila por el lado derecho aumentar cada 2ª sección de 1 revés a 2 reveses haciendo 1 hebra - comenzar los aumentos en la 2ª sección de revés después de la cenefa" ¿Cuántos puntos serían una sección? Muchas gracias

09.07.2022 - 18:16

DROPS Design answered:

Hola Caro, las secciones están compuestas por 1 revés inicialmente. Como aumentas 1 revés en ellas, pasas a tener secciones alternas de 1 revés (no aumentas en esta sección) o 2 reveses (has aumentado en esta sección).

09.07.2022 - 19:36

country flag Louise wrote:

Thank you for explaining - I had not read the chart properly. Apologies for sending the question twice but I got an automatic reply saying the first one had not gone through.

23.06.2022 - 05:56