DROPS Fabel
DROPS Fabel
75% Wool, 25% Polyamide
from 1.75 € /50g
DROPS Brushed Alpaca Silk
77% Alpaca, 23% Silk
from 3.10 € /25g
Get the yarn to make this pattern from 44.20€.

The yarn cost is calculated from the pattern’s smallest size and the yarn’s cheapest product type. Looking for an even better price? You might find it on the DROPS Deals!

DROPS Super Sale

Habitat Cardigan

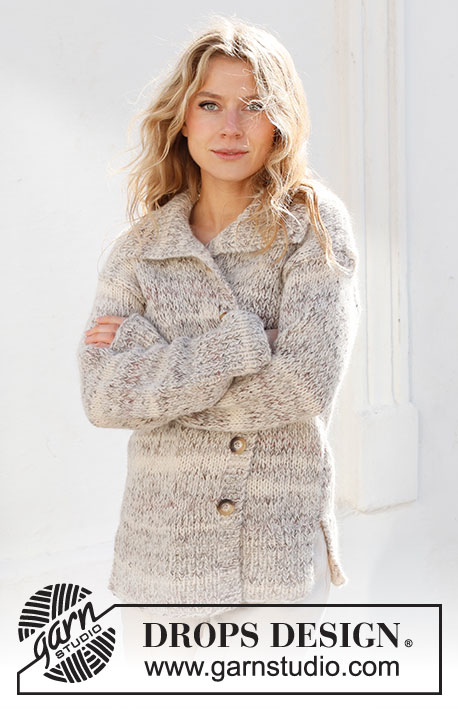
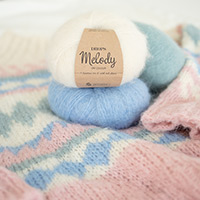
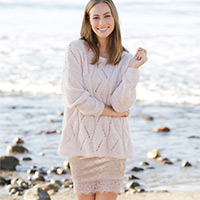
Knitted jacket with collar, in 1 strand DROPS Fabel and 2 strands DROPS Brushed Alpaca Silk. Sizes S - XXXL.

DROPS 227-15
DROPS Design: Pattern no fa-483
Yarn group A + C + C
-------------------------------------------------------

SIZES:
S - M - L - XL - XXL - XXXL

MATERIALS:
DROPS FABEL from Garnstudio (belongs to yarn group A)
200-250-250-300-300-350 g colour 912, soft chocolate
And use:
DROPS BRUSHED ALPACA SILK from Garnstudio (belongs to yarn group C)
300-325-350-400-425-475 g colour 01, off white

DROPS BUTTONS, Marble NO 629: 5-5-6-6-6-6 items.

NEEDLES:
DROPS CIRCULAR NEEDLE SIZE 8 MM: Length 80 cm.
DROPS CIRCULAR NEEDLE SIZE 6 MM: Length 80 cm.

KNITTING TENSION:
11 stitches in width and 15 rows in height with stocking stitch with 1 strand DROPS Fabel and 2 strands DROPS Brushed Alpaca Silk (3 strands) = 10 x 10 cm.
NOTE: Needle size is only a guide. If you get too many stitches on 10 cm, change to a larger needle size. If you get too few stitches on 10 cm, change to a smaller needle size.

-------------------------------------------------------

Alternative Yarn – See how to change yarns here
Yarn Groups A to F – Use the same pattern and change the yarn here
Yarn usage using an alternative yarn – Use our yarn converter here

-------------------------------------------------------

DROPS Fabel
DROPS Fabel
75% Wool, 25% Polyamide
from 1.75 € /50g
DROPS Brushed Alpaca Silk
77% Alpaca, 23% Silk
from 3.10 € /25g
Get the yarn to make this pattern from 44.20€.

The yarn cost is calculated from the pattern’s smallest size and the yarn’s cheapest product type. Looking for an even better price? You might find it on the DROPS Deals!

Pattern instructions

-------------------------------------------------------

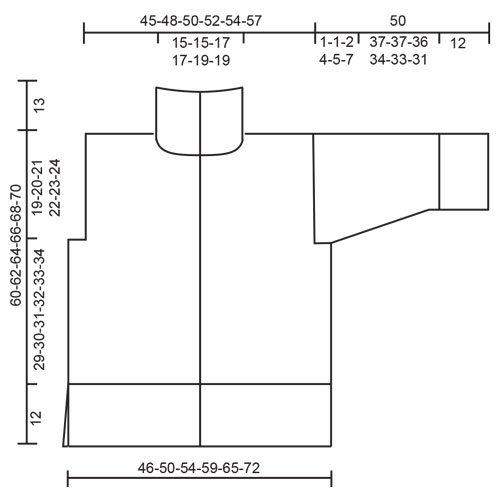
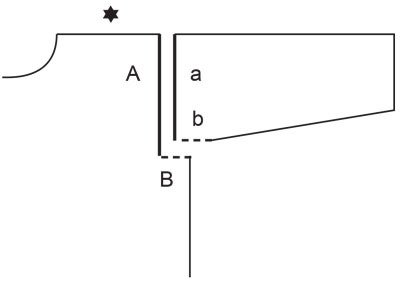
EXPLANATIONS FOR THE PATTERN:

-------------------------------------------------------

RIDGE/GARTER STITCH (worked back and forth):
Knit all rows.
1 ridge = knit 2 rows.

DECREASE TIP (evenly spaced):
To work out how to decrease evenly, count the total number of stitches on needle (e.g. 75 stitches) minus the edge stitches (e.g. 2 stitches) and divide the remaining stitches by the number of decreases to be made (e.g. 20) = 3.7. 
In this example decrease by knitting together alternately each 2nd and 3rd stitch and each 3rd and 4th stitch (approx.). Do not decrease the edge stitches.

INCREASE TIP (for sleeves):
All increases are worked from the right side!
Work 1 edge stitch, 1 yarn over, work until there is 1 stitch left, 1 yarn over and 1 edge stitch.
On the next row purl the yarn overs twisted to avoid holes.

CASTING-OFF TIP:
To avoid the cast-off edge being tight you can cast off with a larger size needle. If the edge is still tight, make 1 yarn over after approx. each 4th stitch at the same time as casting off; the yarn overs are cast off as normal stitches.

BUTTONHOLES (bottom up):
Work the buttonholes on the right band. 1 BUTTONHOLE = knit together the 3rd and 4th stitch from the edge and make 1 yarn over. On the next row knit the yarn over to leave a hole.
Work buttonholes when the piece measures:
S: 15, 24, 33, 42 and 50 cm.
M: 16, 25, 34, 43 and 52 cm.
L: 14, 22, 30, 38, 45 and 52 cm.
XL: 14, 22, 30, 38, 46 and 54 cm.
XXL: 14, 22, 30, 38, 46 and 54 cm.
XXXL: 14, 23, 32, 40, 48 and 56 cm.

-------------------------------------------------------

START THE PIECE HERE:

-------------------------------------------------------

JACKET – SHORT OVERVIEW OF THE PIECE:
The piece is worked back and forth in sections, bottom up and then sewn together. The collar is worked to finish.

BACK PIECE:
Cast on 69-75-81-87-97-107 stitches with circular needle size 6 mm and 1 strand DROPS Fabel and 2 strands DROPS Brushed Alpaca Silk (= 3 strands). Purl 1 row from the wrong side, then work as follows: 1 edge stitch in GARTER STITCH – read description above, rib (knit 1, purl 1) until there are 2 stitches left, knit 1 and 1 edge stitch in garter stitch.
Continue this rib back and forth for 12 cm. Knit 1 row from the right side where you decrease 18-20-22-22-26-28 stitches evenly spaced – read DECREASE TIP, and cast on 1 new stitch at the end of the row = 52-56-60-66-72-80 stitches.
Change to circular needle size 8 mm.
Purl 1 row from the wrong side and cast on 1 new stitch at the end of the row = 53-57-61-67-73-81 stitches.
Continue with stocking stitch and 1 edge stitch in garter stitch on each side.
REMEMBER THE KNITTING TENSION!
When the piece measures 41-42-43-44-45-46 cm, cast off 1-1-2-4-6-8 stitches at the beginning of the next 2 rows for the armholes = 51-55-57-59-61-65 stitches.
Continue with stocking stitch and 1 edge stitch in garter stitch on each side.
When the piece measures 58-60-62-64-66-68 cm, cast off the middle 15-15-17-17-19-19 stitches for the neck and each shoulder is finished separately.
Continue with stocking stitch and 1 edge stitch in garter stitch on each side, and cast off 1 stitch on the next row from the neck = 17-19-19-20-20-22 stitches on the shoulder. Continue working until the piece measures 60-62-64-66-68-70 cm. Cast off with knit from the right side.
Work the other shoulder in the same way.

RIGHT FRONT PIECE:
Cast on 39-43-45-49-53-59 stitches (including 5 band stitches towards mid-front), with circular needle size 6 mm and 1 strand DROPS Fabel and 2 strands DROPS Brushed Alpaca Silk (= 3 strands). Purl 1 row from the wrong side, then work as follows from the right side: 5 band stitches in garter stitch, rib (knit 1, purl 1) until there are 2 stitches left, knit 1 and 1 edge stitch in garter stitch.
Continue this rib back and forth for 12 cm. Knit 1 row from the right side where you decrease 9-11-11-12-13-15 stitches evenly spaced – remember DECREASE TIP, and cast on 1 new stitch at the end of the row = 31-33-35-38-41-45 stitches.
Change to circular needle size 8 mm.
Purl 1 row from the wrong side (band and edge stitches in garter stitch).
Continue with stocking stitch, the 5 band stitches towards mid-front and 1 edge stitch in garter stitch towards the side. Remember the BUTTONHOLES on the band – read description above.
When the piece measures 41-42-43-44-45-46 cm, cast off 1-1-2-4-6-8 stitches for the armhole at the beginning of the next row from the wrong side = 30-32-33-34-35-37 stitches.
When the piece measures 52-54-54-56-56-58 cm and the next row is from the right side, place the first 9-9-10-10-11-11 stitches on a thread for the neck, working the stitches first to avoid having to cut the strand.
Then cast off at the beginning of each row from the neck as follows: 1 stitch 4 times = 17-19-19-20-20-22 stitches on the shoulder.
Continue working until the piece measures 60-62-64-66-68-70 cm. Cast off with knit from the right side.

LEFT FRONT PIECE:
Cast on 39-43-45-49-53-59 stitches (including 5 band stitches towards mid-front), with circular needle size 6 mm and 1 strand DROPS Fabel and 2 strands DROPS Brushed Alpaca Silk (= 3 strands). Purl 1 row from the wrong side, then work as follows from the right side: 1 edge stitch in garter stitch, rib (knit 1, purl 1) until there are 6 stitches left, knit 1 and 5 band stitches in garter stitch.
Continue this rib back and forth for 12 cm. Knit 1 row from the right side where you decrease 9-11-11-12-13-15 stitches evenly spaced = 30-32-34-37-40-44 stitches.
Change to circular needle size 8 mm.
Purl 1 row from the wrong side (band in garter stitch) and cast on 1 stitch at the end of the row = 31-33-35-38-41-45 stitches.
Continue with stocking stitch and the 5 band stitches towards mid-front and 1 edge stitch in garter stitch towards the side.
When the piece measures 41-42-43-44-45-46 cm, cast off 1-1-2-4-6-8 stitches for the armhole at the beginning of the next row from the right side = 30-32-33-34-35-37 stitches.
When the piece measures 52-54-54-56-56-58 cm and the next row is from the right side, work until there are 9-9-10-10-11-11 stitches left and place these stitches on a thread for the neck.
Then cast off at the beginning of each row from the neck as follows: 1 stitch 4 times = 17-19-19-20-20-22 stitches on the shoulder.
Continue working until the piece measures 60-62-64-66-68-70 cm. Cast off with knit from the right side.

SLEEVES:
Cast on 44-44-46-46-50-50 stitches with circular needle size 6 mm and 1 strand DROPS Fabel and 2 strands DROPS Brushed Alpaca Silk (= 3 strands). Purl 1 row from the wrong side, then work as follows from the right side: 1 edge stitch in garter stitch, rib (knit 1, purl 1) until there is 1 stitch left, 1 edge stitch in garter stitch. When the rib measures 12 cm, knit 1 row from the right side where you decrease 10-10-10-10-12-12 stitches evenly spaced = 34-34-36-36-38-38 stitches.
Change to circular needle size 8 mm.
Continue with stocking stitch and 1 edge stitch in garter stitch on each side.
When the sleeve measures 14 cm, increase 1 stitch on each side – read INCREASE TIP.
Increase like this every 8-6½-6-5-4½-3½ cm a total of 5-6-6-7-7-8 times = 44-46-48-50-52-54 stitches. Continue working until the sleeve measures 49-49-48-46-45-43 cm, or to desired length (approx. 1-1-2-4-5-7 cm left for the sleeve cap).
Insert 1 marker on each side – they mark the bottom of the armhole and are used when sewing the sleeves to the body.
Continue working until the sleeve measures 50 cm in all sizes. Cast off with knit from the right side.
Work the other sleeve in the same way.

ASSEMBLY:
Sew the shoulder seams inside the cast-off edge. Sew in the sleeves, inside the 1 edge stitch along the armholes and the cast-off edge on the sleeve cap.
Sew together the bottoms of the armholes – the markers on the sleeve should match the sides of the body – see sketch.
Sew the sleeve and side seams in one go inside the 1 edge stitch, leaving a 12 cm split at the bottom of each side seam.

COLLAR:
Start from the right side with circular needle size 6 mm and 1 strand DROPS Fabel and 2 strands DROPS Brushed Alpaca Silk (= 3 strands).
Place the 9-9-10-10-11-11 stitches from the thread on the right front piece on the needle, knit up 77-77-83-83-89-89 stitches inside the 1 edge stitch around the neck and place the 9-9-10-10-11-11 stitches from the left front piece on the needle = 95-95-103-103-111-111 stitches.
Work rib from the wrong side as follows:
1 edge stitch in garter stitch, rib (purl 1 knit 1) until there are 2 stitches left, purl 1 and 1 edge stitch in garter stitch.
Continue this rib back and forth for 4 cm.
Work the next row from the right side as follows:
Work the first 27 stitches as before, then work 3 stitches in the next knitted stitch as follows: Knit 1 but do not slip it from the left needle, make 1 yarn over, knit 1 in the same stitch and slip the stitch from the left needle (= 2 stitches increased), * work the next 7 stitches, work 3 stitches in the next knitted stitch (in the same way as before) *, work from *-* until there are 27 stitches left and work these stitches as before = 107-107-117-117-127-127 stitches.
On the next row work the yarn overs twisted and into the rib. Continue the new rib until the collar measures 13 cm. Cast off with knit over knit and purl over purl – read CASTING-OFF TIP.

Diagram

symbols = The sleeve cap is sewn to the armhole: a to A and b to B
diagram
diagram

Each of our patterns has specific tutorial videos to help you.

Do you have a question? See a list of frequently asked questions (FAQ)

Knitting tension is what determines the final measurements of your work, and is usually measured per 10 x 10 cm. It is provided like so: number of stitches in width x number of rows in height - eg: 19 stitches x 26 rows = 10 x 10 cm.

The knitting tension is very individual; some people knit/crochet loosely while others work tightly. You adjust the knitting tension with the needle size, which is why the suggested needle size is only meant as a guide! You need to adjust this (up or down) to ensure that YOUR knitting tension matches the knitting tension provided in the pattern. If you work with a different knitting tension than provided you will have a different yarn consumption, and your work will have different measurements than what the pattern suggests.

The knitting tension also determines which yarns can replace each other. As long as you achieve the same knitting tension you can replace one yarn with another.

See DROPS lesson: How to measure your tension/gauge

See DROPS video: How to make a gauge tension swatch

The required amount of yarn is provided in grams, eg: 450 g. To calculate how many balls you’ll need you first need to know how many grams are in 1 ball (25g, 50g or 100g). This information is available if you click on the individual yarn quality on our pages. Divide the amount required with the amount of each ball. For example, if each ball is 50g (the most common amount), the calculation will be as follows: 450 / 50 = 9 balls.

The important thing when changing from one yarn to another is that the knitting/crochet tension remains the same. This is so that the measurements of the finished piece will be the same as on the sketch provided. It is easier to achieve the same knitting tension using yarns from the same yarn group. It is also possible to work with multiple strands of a thinner yarn to achieve the knitting tension of a thicker one. Please try our yarn converter. We recommend you to always work a test swatch.

Please NOTE: when changing yarn the garment might have a different look and feel to the garment in the photo, due to individual properties and qualities of each yarn.

See DROPS lesson: Can I use a different yarn than the one mentioned in the pattern?

All our yarns are categorised into yarn groups (from A to F) according to thickness and knitting tension – group A contains the thinnest yarns and group F the thickest. This makes it easier for you to find alternative yarns to our patterns, should you wish to switch yarn. All yarns within the same group have a similar knitting tension and can easily replace each other. However, different yarn qualities have different structures and properties which will give the finished work a unique look and feel.

Click here for an overview of the yarns in each yarn group

At the top of all our patterns you’ll find a link to our yarn calculator, which is a helpful tool should you wish to use a different yarn than suggested. By filling in the yarn quality you wish to replace, the amount (in your size) and number of strands, the calculator will present good alternative yarns with the same knitting tension. Additionally it will tell you how much you’ll require in the new qualities and whether you’ll need to work with multiple strands. Most skeins are 50g (some are 25g or 100g).

If the pattern is worked with multiple colours, every colour will have to be calculated separately. Similarly, if the pattern is worked with several strands of different yarns (for example 1 strand Alpaca and 1 strand Kid-Silk) you will have to find alternatives for each, individually.

Click here to see our yarn calculator

Since different yarns have different qualities and textures we have chosen to keep the original yarn in our patterns. However, you can easily find options among our available qualities by using our yarn calculator, or simply pick a yarn from the same yarn group.

It is possible that some retailers still have discontinued yarns in stock, or that someone has a few skeins at home that they would like to find patterns for.

The yarn calculator will provide both alternative yarn as well as required amount in the new quality.

If you think it's hard to decide what size to make, it can be a good idea to measure a garment you own already and like the size of. Then you can pick the size by comparing those measures with the ones available in the pattern's size chart.

You'll find the size chart at the bottom of the pattern.

See DROPS lesson: How to read size chart

The needle size provided in the pattern serves only as a guide, the important thing is to follow the knitting tension. And since knitting tension is very individual, you will have to adjust the needle size to ensure that YOUR tension is the same as in the pattern – maybe you’ll have to adjust 1, or even 2 needle sizes, up or down to achieve the correct tension. For this, we recommend that you work test swatches.

Should you work with a different knitting tension than the one provided, the measurements of the finished garment might deviate from the measurement sketch.

See DROPS lesson: How to measure your tension/gauge

See DROPS video: How to make a tension/gauge swatch

Working a garment top-down provides more flexibility and room for personal adjustment. For example it is easier to try the garment on while working, as well as making adjustments to length of yoke and shoulder caps.

The instructions are carefully explaining every step, in the correct order. Diagrams are adjusted to the knitting direction and are worked as usual.

The diagram depicts all rows/rounds, and every stitch seen from the right side. It is read from bottom to top, from right to left. 1 square = 1 stitch.

When working back and forth, every other row is worked from the right side and every other row is worked from the wrong side. When working from the wrong side, the diagram will have to be worked reversed: from left to right, knit stitches are purled, purl stitches are knit etc.

When working in the round every round is worked from the right side and the diagram are worked from right to left on all rounds.

See DROPS lesson: How to read knitting diagrams

The diagram depicts all rows/rounds, and every stitch seen from the right side. It is worked from bottom to top, from right to left.

When working back and forth every other row is worked from the right side: from right to left and every other row is worked from the wrong side: from left to right.

When working in the round, every row in the diagram are worked from the right side, from right to left.

When working a circular diagram you start in the middle and work your way outwards, counter clockwise, row by row.

The rows usually start with a given number of chain stitches (equivalent to the height of the following stitch), this will either be depicted in the diagram or explained in the pattern.

See DROPS lesson: How to read crochet diagrams

Instructions for working several diagrams after each other on the same row/round, will often be written like so: “work A.1, A.2, A.3 a total of 0-0-2-3-4 times". This means you work A.1 once, then A.2 is worked once, and A.3 is repeated (in width) the number of times provided for your size – in this case like so: S = 0 times, M = 0 times, L=2 times, XL= 3 times and XXL = 4 times.

The diagrams are worked as usual: begin with the first row in A.1, then work the first row in A.2 etc.

See DROPS lesson: How to read knitting diagrams

See DROPS lesson: How to read crochet diagrams

The total width of the garment (from wrist-to-wrist) will be larger in the larger sizes, despite the actual sleeves being shorter. The larger sizes have longer sleeve caps and wider shoulders, so there will be a good fit in all sizes.

The measurement sketch/schematic drawing provides information regarding the full length of the garment. If it’s a jumper or a jacket the length is measured from the highest point on the shoulder closest to the neckline, and straight down to the bottom of the garment. It is NOT measured from the tip of shoulder. Similarly, the length of yoke is measured from the highest point on the shoulder and down to where yoke is split into body and sleeves.

On a jacket measures are never taken along bands, unless specifically stated. Always measure inside band stitches when measuring the length.

See DROPS lesson: How to read a schematic drawing

Diagrams are often repeated on the round or in height. 1 repeat is the diagram the way it appears in the pattern. If it says to work 5 repeats of A.1 in the round, then you work A.1 a total of 5 times after/next to each other in the round. If it says to work 2 repeats of A.1 vertically/in height you work the entire diagram once, then begin again at the start and work the entire diagram one more time.

Chain stitches are slightly narrower than other stitches and to avoid working the cast-on edge too tight, we simply chain more stitches to begin with. The stitch count will be adjusted on the following row to fit the pattern and measurement sketch.

The rib edge is more elastic and will contract slightly compared to, for example, stocking stitch. By increasing before the rib edge, you avoid a visible difference in width between the rib edge and the rest of the body.

It’s very easy to cast off too tightly, and by making yarn overs while casting off (and simultaneously casting these off) you avoid a too tight cast off edge.

See DROPS video: How to bind off with yarn overs (yo)

To achieve an even increase (or decrease) you can increase on, for example: every 3rd and 4th row alternately, like so: work 2 rows and increase on the 3rd row, work 3 rows and increase on the 4th. Repeat this until the increase is complete.

See DROPS lesson: Increase or decrease 1 st on every 3rd and 4th row alternately

Should you prefer to work in the round instead of back and forth, you may of course adjust the pattern. You’ll need to add steeks mid-front (usually 5 stitches), and follow the instructions. When you would normally turn and work from the wrong side, simply work across the steek and continue in the round. At the end you’ll cut the piece open, pick up stitches to work bands, and cover the cut edges.

See DROPS video: How to knit steeks and cut open

Should you prefer to work back and forth instead of in the round, you may of course adjust the pattern so you work the pieces separately and then assemble them at the end. Divide the stitches for the body in 2, add 1 edge stitch in each side (for sewing) and work the front and back pieces separately.

See DROPS lesson: Can I adapt a pattern for circular needles into straight needles?

Pattern repeats can vary slightly in the different sizes, in order to get the correct proportions. If you’re not working the exact same size as the garment in the photo, yours might deviate slightly. This has been carefully developed and adjusted so that the complete impression of the garment is the same in all sizes.

Make sure to follow instructions and diagrams for your size!

If you have found a pattern you like which is available in women’s size it’s not very difficult to convert it to men’s size. The biggest difference will be the length of sleeves and body. Start working on the women size that you think would fit across the chest. The additional length will be worked right before you cast off for the armhole/sleeve cap. If the pattern is worked top-down you can add the length right after the armhole or before the first decrease on sleeve.

Regarding additional yarn amount, this will depend on how much length you add, but it is better with a skein too many than too few.

All yarns will have excess fibres (from production) that might come off as lint or shedding. Brushed yarns (ie hairier yarns) have more of these loose, excess fibres, causing more shedding.

Shedding also depends on what is worn under or over the garment, and whether this pulls at the yarn fibres. It’s therefore not possible to guarantee that there will be no shedding

Below are some tips on how to get the best result when working with hairier yarns:

1. When the garment is finished (before you wash it) shake it vigorously so the looser hairs come off. NOTE: do NOT use a lint roller, brush or any method that pulls at the yarn.

2. Place the garment in a plastic bag and put it in your freezer - the temperature will cause the fibres to become less attached to each other, and excess fibres will come off easier.

3. Leave in the freezer for a few hours before taking it out and shaking it again.

4. Wash the garment according to the instructions on the yarn label.

Pilling is a natural process that happens to even the most exclusive of fibers. It's a natural sign of wear and tear that is hard to avoid, and that is most visible in high friction areas of your garment like a sweater's arms and cuffs.

You can make your garment look as new by removing the pilling, using a fabric comb or a pill/lint remover.

Still can't find the answer you need? Then scroll down and leave your question so one of our experts can try to help you. This will be done normally within 5 to 10 working days.
In the meantime, you can read the questions and answers that others have left to this pattern or join the DROPS Workshop on Facebook to get help from fellow knitters/crocheters!

You might also like...

Post a comment to pattern DROPS 227-15

We would love to hear what you have to say about this pattern!

If you want to leave a question, please make sure you select the correct category in the form below, to speed up the answering process. Required fields are marked *.

Comments / Questions (37)

country flag Andreea wrote:

Hi, can I knit this model with 1 strand Fabel and 1 strand Air with needles 8 mm? It will fit the same measures that you have?

14.01.2022 - 20:52

DROPS Design answered:

Dear Andreea, you should work with 2 strands of Air, since you need 2 strands of Group C yarns, plus the strand of Fabel. In any case, you should work a swatch to see if the gauge will fit the one needed in the pattern. Happy knitting!

16.01.2022 - 21:34

country flag Yvonne Smeijsters wrote:

Gaat dit patroon er nog komen of hoe zit het volgens jullie zou her er al op staan maar dat is niet zo

01.11.2021 - 11:35

DROPS Design answered:

Dag Yvonne,

Het patroon is inmiddels geplaatst. Ook in het Nederlands. Veel breiplezier!

02.11.2021 - 17:14

country flag Ginette Lalonde wrote:

Why don’t we have instructions in French. I am a québécoise, à French Canadian, Pourquoi au Canada, n’avons nous pas les instructions en français. Si nous voulons acheter nous devons convertir et traduire. Merci de votre aide

30.10.2021 - 20:14

DROPS Design answered:

Dear Ginette, our translators working continiously to get all the patterns translated as soon as possible, but we are all humans, sometimes a pattern just gets translated a bit later. However, this cardigan is actually available in french, just open the roll down menue below the picture and select the french version. Happy Knitting!

30.10.2021 - 21:05

country flag Cynthia Mertens wrote:

Net als Yvonne Smeijsters wacht ik ook op dit patroon, dat inderdaad nog niet op de site staat. Jullie geven aan dat het onder nummer 227-15 op de site staat maar dan klopt dit nummer niet. Graag verduidelijking, is het patroon beschikbaar, zo ja, onder welk nummer, zo nee, wanneer komt het beschikbaar?

13.10.2021 - 15:50

country flag Yvonne Smeijsters wrote:

De beschrijving staat er nog niet op er kan niets afgedrukt worden

13.10.2021 - 08:33

country flag Yvonne Smeijsters wrote:

Wanneer komt het patroon uit.

12.10.2021 - 18:44

DROPS Design answered:

Dag Yvonne,

Het patroon staat al op de site, dus je kunt hem afdrukken. Al onze patronen zijn gratis af te drukken via de knop 'Afdrukken' onder de materialenlijst. Klik op de knop 'Afdrukken' en dan op 'Patroon'. In het pop-up venster dat vervolgens in beeld komt klik je rechts boven op de link 'Het patroon afdrukken'.

13.10.2021 - 07:41

country flag Cynthia Mertens wrote:

Kun u mij zeggen wanneer dit patroon beschikbaar komt, en wat wordt de stekenproef? Alvast dank.

12.10.2021 - 13:08

country flag Małgorzata wrote:

Postanowiłam zrobić sobie taki sweter, z innej włóczki o innej grubości. 1 . dlaczego po zrobieniu ściągacza trzeba zmniejszyć ilość oczek na drucie aż o 22 (chodzi na razie o tył, rozmiar L). Zwykle po zrobieniu ściągacza dodaje się oczka w jego ostatnim rzędzie. 2. Dlaczego na schemacie (rysunku) nie uwzględniono podkroju tyłu? Z opisu wynika, ze ma mieć 2 cm, i że po wykonaniu tych 2 cm, trzeba zakończyć wszystkie oczka ramion w tym samym rzędzie?

02.10.2021 - 19:42

DROPS Design answered:

Witaj Małgosiu, 1. dodajemy oczka, ale wtedy gdy przerabiamy od góry do dołu, tuż przed ściągaczem. Przerabiając od dołu do góry zamykamy oczka za ściągaczem, po to, aby ściągacz miał taką samą szerokość jak dalsza część swetra. 2. nie jest to widoczne na rysunku, ale przerabiaj tak jak jest w opisie. Pozdrawiamy!

03.10.2021 - 21:38

country flag Amanda wrote:

Finns det en måttskiss?

23.09.2021 - 20:33

DROPS Design answered:

Hej Amanda. Ja, du hittar den längst ner på mönstret. Mvh DROPS Design

24.09.2021 - 08:33

country flag Yvonne Smeijsters wrote:

Hoop dat het patroon snel uitkomt zou hem willen maken

23.09.2021 - 09:43