DROPS Soft Tweed
DROPS Soft Tweed
50% Wool, 25% Alpaca, 25% Viscose
from 3.05 € /50g
DROPS Kid-Silk
DROPS Kid-Silk
75% Mohair, 25% Silk
from 5.05 € /25g
Get the yarn to make this pattern from 46.60€.

The yarn cost is calculated from the pattern’s smallest size and the yarn’s cheapest product type. Looking for an even better price? You might find it on the DROPS Deals!

DROPS SS24

Walk with Nature

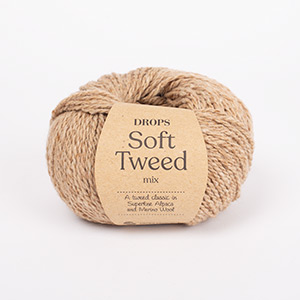
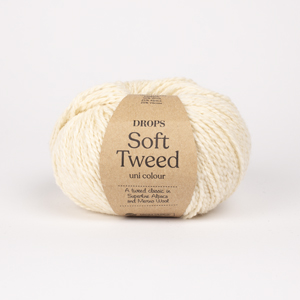
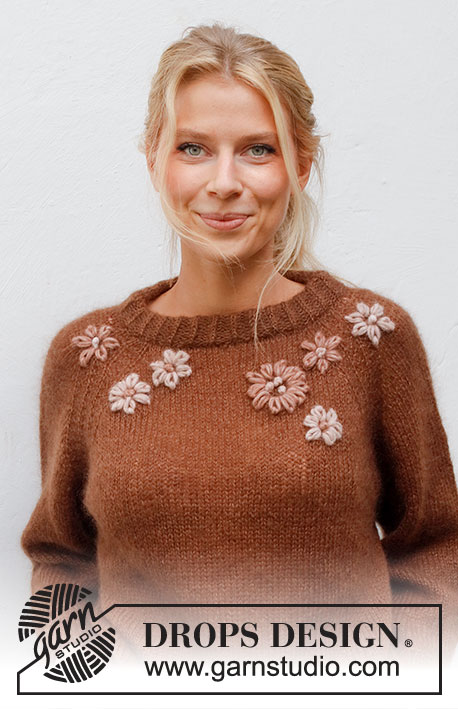
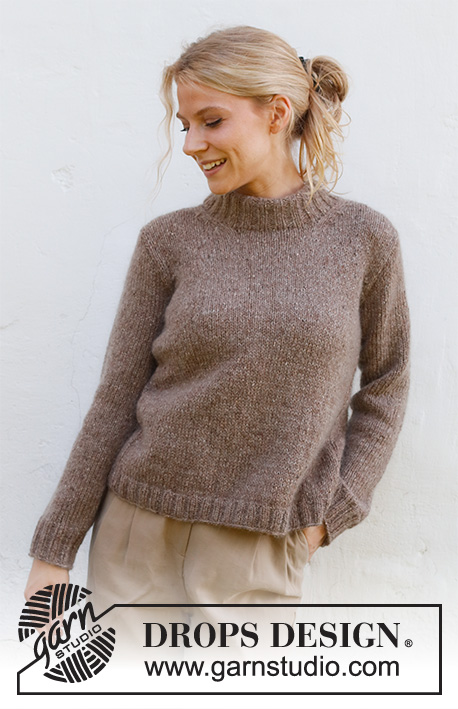
Knitted jumper in DROPS Soft Tweed and DROPS Kid-Silk. The piece is worked with double neck and ribbed edges. Sizes S - XXXL.

DROPS 227-46
DROPS Design: Pattern no st-007
Yarn group B + A
-------------------------------------------------------

SIZES:
S - M - L - XL - XXL - XXXL

MATERIALS:
DROPS SOFT TWEED from Garnstudio (belongs to yarn group B)
350-400-450-500-550-600 g colour 05, grizzly bear
And use:
DROPS KID-SILK from Garnstudio (belongs to yarn group A)
125-125-150-150-175-175 g colour 12, beige

DROPS CIRCULAR NEEDLE SIZE 5 MM: Length 40 cm and 80 cm.
DROPS CIRCULAR NEEDLE SIZE 4 MM: Length 40 cm and 80 cm.
DROPS DOUBLE POINTED NEEDLES SIZE 5 MM.
DROPS DOUBLE POINTED NEEDLES SIZE 4 MM.
The technique MAGIC LOOP can be used – you then only need circular needle of 80 cm in each size.

KNITTING TENSION:
16 stitches in width and 20 rows in height with stocking stitch and 1 strand of each quality = 10 x 10 cm.
NOTE: Needle size is only a guide. If you get too many stitches on 10 cm, change to a larger needle size. If you get too few stitches on 10 cm, change to a smaller needle size.

-------------------------------------------------------

Alternative Yarn – See how to change yarns here
Yarn Groups A to F – Use the same pattern and change the yarn here
Yarn usage using an alternative yarn – Use our yarn converter here

-------------------------------------------------------

DROPS Soft Tweed
DROPS Soft Tweed
50% Wool, 25% Alpaca, 25% Viscose
from 3.05 € /50g
DROPS Kid-Silk
DROPS Kid-Silk
75% Mohair, 25% Silk
from 5.05 € /25g
Get the yarn to make this pattern from 46.60€.

The yarn cost is calculated from the pattern’s smallest size and the yarn’s cheapest product type. Looking for an even better price? You might find it on the DROPS Deals!

Pattern instructions

-------------------------------------------------------

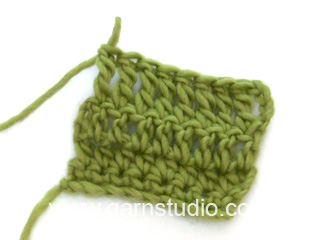
EXPLANATIONS FOR THE PATTERN:

-------------------------------------------------------

RIDGE/GARTER STITCH (worked back and forth):
Knit all rows.
1 ridge = knit 2 rows

PATTERN (for decreases to armholes and neck – read DECREASE TIP-2):
See diagrams A.1 to A.3. The diagrams show all rows in the pattern from the right side.

DECREASE TIP-1 (evenly spaced):
To work out how to decrease evenly, count the total number of stitches on needle (e.g. 184 stitches) and divide by number of decreases to be made (e.g. 32) = 5.8. 
In this example decrease by knitting together approx. each 5th and 6th stitch.

DECREASE TIP-2 (armholes and neck):
All decreases are worked from the right side!
DECREASE 2 STITCHES AT THE BEGINNING OF THE ROW:
Work 1 edge stitch in garter stitch, 2 stitches in stocking stitch, A.1 over the next 3 stitches (= 2 stitches decreased).
DECREASE 2 STITCHES AT THE END OF THE ROW:
Work until there are 6 stitches left, A.1 over the next 3 stitches (= 2 stitches decreased), 2 stitches in stocking stitch,1 edge stitch in garter stitch.

DECREASE 1 STITCH AT THE BEGINNING OF THE ROW:
Work 1 edge stitch in garter stitch, 2 stitches in stocking stitch, A.2 over the next 3 stitches (= 1 stitch decreased).
DECREASE 1 STITCH AT THE END OF THE ROW:
Work until there are 6 stitches left, A.3 over the next 3 stitches (= 1 stitch decreased), 2 stitches in stocking stitch,1 edge stitch in garter stitch.

INCREASE TIP (sleeves):
Work until there are 2 stitches left before the marker thread, 1 yarn over, knit 4 (marker thread sits between these 4 stitches), 1 yarn over (2 stitches increased). On the next round knit the yarn overs twisted to avoid holes. Then work the new stitches in stocking stitch. 

CASTING-OFF TIP:
To avoid the cast-off edge being tight you can cast off with a larger size needle. If the edge is still tight, make 1 yarn over after approx. each 5th stitch at the same time as casting off; the yarn overs are cast off as normal stitches.

-------------------------------------------------------

START THE PIECE HERE:

-------------------------------------------------------

JUMPER – SHORT OVERVIEW OF THE PIECE:
The piece is worked in the round with circular needle bottom up as far as the armholes, then the front and back pieces are finished separately, back and forth. The sleeves are worked in the round with double pointed needles/short circular needle, bottom up as far as the sleeve cap, then finished back and forth. The piece is sewn together and the neck is worked to finish.

BODY:
Cast on 184-196-216-236-256-280 stitches with circular needle size 4 mm and 1 strand of each quality (= 2 strands). Knit 1 round, then work rib in the round (knit 2, purl 2) for 4 cm. Knit 1 round where you decrease 32-32-36-40-44-48 stitches evenly spaced – read DECREASE TIP-1 = 152-164-180-196-212-232 stitches.
Insert 1 marker at the beginning of the round and 1 marker after 76-82-90-98-106-116 stitches (= sides). Allow the markers to follow your work onwards – they are used when casting off for the armholes.
Change to circular needle size 5 mm and continue with stocking stitch. REMEMBER THE KNITTING TENSION!
When the piece measures 35-36-37-38-39-40 cm, cast off for the armholes as follows: Start 3-3-4-4-5-6 stitches before the marker, cast off 6-6-8-8-10-12 stitches, work 70-76-82-90-96-104 stitches, cast off 6-6-8-8-10-12 stitches (3-3-4-4-5-6 stitches on each side of the marker) and work the remaining 70-76-82-90-96-104 stitches. Back and front pieces are finished separately.

BACK PIECE:
= 70-76-82-90-96-104 stitches. Start from the wrong side and work stocking stitch back and forth with 1 edge stitch in GARTER STITCH on each side – read description above. AT THE SAME TIME on the next row from the right side decrease for the armholes as described below – read DECREASE TIP-2:
Decrease 2 stitches on each side every 4th row a total of 1-3-4-5-6-8 times. Then decrease 1 stitch on each side every 4th row 2-0-0-1-1-0 times = 62-64-66-68-70-72 stitches.
When the piece measures 52-54-56-58-60-62 cm, cast off the middle 22-22-22-24-24-24 stitches for the neck and each shoulder is finished separately. On the next row from the right side decrease 2 stitches by the neck – remember DECREASE TIP-2 = 18-19-20-20-21-22 stitches on the shoulder.
Continue working until the piece measures 54-56-58-60-62-64 cm (19-20-21-22-23-24 cm from the bottom of the armholes). Cast off with knit.
Work the other shoulder in the same way.

FRONT PIECE:
= 70-76-82-90-96-104 stitches. Start from the wrong side and work stocking stitch back and forth with 1 edge stitch in garter stitch on each side. AT THE SAME TIME on the next row from the right side decrease for the armholes as described below – remember DECREASE TIP-2:
Decrease 2 stitches on each side every 4th row a total of 1-3-4-5-6-8 times. Then decrease 1 stitch on each side every 4th row 2-0-0-1-1-0 times = 62-64-66-68-70-72 stitches.
When the piece measures 46-48-49-51-52-54 cm, place the middle 14-14-14-16-16-16 stitches on a thread for the neck and each shoulder is finished separately. On the next row from the right side decrease 2 stitches by the neck – remember DECREASE TIP-2. Decrease like this every 4th row a total of 3 times = 18-19-20-20-21-22 stitches on the shoulder.
Continue working until the piece measures 54-56-58-60-62-64 cm (19-20-21-22-23-24 cm from the bottom of the armholes). Cast off with knit.
Work the other shoulder in the same way.

SLEEVES:
Cast on 44-48-48-52-52-56 stitches with double pointed needles size 4 mm and 1 strand of each quality (= 2 strands). Knit 1 round, then work rib in the round (knit 2, purl 2) for 6 cm. Knit 1 round where you decrease 6-8-6-8-8-10 stitches evenly spaced = 38-40-42-44-44-46 stitches.
Insert 1 marker thread at the beginning of the round (= mid-under sleeve). Allow the thread to follow your work onwards – it is used when increasing.
Change to double pointed needles size 5 mm and work stocking stitch in the round until sleeve measures 9-8-10-10-10-7 cm. Now increase 1 stitch on each side of the marker thread – read INCREASE TIP. Increase like this every 5-4½-3½-3-2½-2½ cm a total of 8-9-10-11-13-14 times = 54-58-62-66-70-74 stitches.
When the sleeve measures 46-46-45-44-43-41 cm, work as follows: Start 3-3-4-4-5-6 stitches before the marker thread, cast off 6-6-8-8-10-12 stitches and work to the end of the round = 48-52-54-58-60-62 stitches.
Starting from the wrong side, work stocking stitch back and forth for the sleeve cap. AT THE SAME TIME cast off at the beginning of each row as follows: 2 stitches 1-1-2-2-2-3 times and 1 stitch 4-4-5-5-6-7 times on each side. Then 2 stitches at the beginning of each row on each side until the piece measures 54-54-55-55-55-56 cm. Then 3 stitches at the beginning of the next 2 rows. Cast off the remaining stitches. The sleeve measures approx. 55-55-56-56-56-57 cm. Work the other sleeve in the same way.

ASSEMBLY:
Sew the shoulder seams inside the cast-off edge.
Sew in the sleeves, inside the 1 edge stitch on the armholes.

DOUBLE NECK:
Start at one shoulder seam and knit up 76 to 88 stitches around the neck (including the stitches from the thread) with short circular needle size 4 mm and 1 strand of each quality – the number of stitches should be divisible by 4.
Work rib in the round (knit 2, purl 2) for 7-7-7-8-8-8 cm. Now increase all purl-2 to purl-3 = 95 to 110 stitches. Continue the new rib until the neck measures 10-10-10-11-11-11 cm. Cast off with knit over knit and purl over purl – read CASTING-OFF TIP!
Fold the neck double to the inside and sew down. To avoid the neck being tight and rolling outwards, it is important that the seam is elastic.

This pattern has been corrected.

Updated online: 28.01.2022
FRONT PIECE: ... On the next row from the right side decrease 2 stitches by the neck – remember DECREASE TIP-2. Decrease like this every 4th row a total of 3 times = 18-19-20-20-21-22 stitches on the shoulder.
Updated online: 15.03.2024
The pattern has been updated. Correction under sleeve.

Diagram

symbols = knit from right side, purl from wrong side
symbols = purl 3 together (= 2 stitches decreased)
symbols = worked from wrong side: make 1 yarn over between 2 stitches; on the next row knit the yarn over twisted to avoid a hole
diagram

Each of our patterns has specific tutorial videos to help you.

Do you have a question? See a list of frequently asked questions (FAQ)

Knitting tension is what determines the final measurements of your work, and is usually measured per 10 x 10 cm. It is provided like so: number of stitches in width x number of rows in height - eg: 19 stitches x 26 rows = 10 x 10 cm.

The knitting tension is very individual; some people knit/crochet loosely while others work tightly. You adjust the knitting tension with the needle size, which is why the suggested needle size is only meant as a guide! You need to adjust this (up or down) to ensure that YOUR knitting tension matches the knitting tension provided in the pattern. If you work with a different knitting tension than provided you will have a different yarn consumption, and your work will have different measurements than what the pattern suggests.

The knitting tension also determines which yarns can replace each other. As long as you achieve the same knitting tension you can replace one yarn with another.

See DROPS lesson: How to measure your tension/gauge

See DROPS video: How to make a gauge tension swatch

The required amount of yarn is provided in grams, eg: 450 g. To calculate how many balls you’ll need you first need to know how many grams are in 1 ball (25g, 50g or 100g). This information is available if you click on the individual yarn quality on our pages. Divide the amount required with the amount of each ball. For example, if each ball is 50g (the most common amount), the calculation will be as follows: 450 / 50 = 9 balls.

The important thing when changing from one yarn to another is that the knitting/crochet tension remains the same. This is so that the measurements of the finished piece will be the same as on the sketch provided. It is easier to achieve the same knitting tension using yarns from the same yarn group. It is also possible to work with multiple strands of a thinner yarn to achieve the knitting tension of a thicker one. Please try our yarn converter. We recommend you to always work a test swatch.

Please NOTE: when changing yarn the garment might have a different look and feel to the garment in the photo, due to individual properties and qualities of each yarn.

See DROPS lesson: Can I use a different yarn than the one mentioned in the pattern?

All our yarns are categorised into yarn groups (from A to F) according to thickness and knitting tension – group A contains the thinnest yarns and group F the thickest. This makes it easier for you to find alternative yarns to our patterns, should you wish to switch yarn. All yarns within the same group have a similar knitting tension and can easily replace each other. However, different yarn qualities have different structures and properties which will give the finished work a unique look and feel.

Click here for an overview of the yarns in each yarn group

At the top of all our patterns you’ll find a link to our yarn calculator, which is a helpful tool should you wish to use a different yarn than suggested. By filling in the yarn quality you wish to replace, the amount (in your size) and number of strands, the calculator will present good alternative yarns with the same knitting tension. Additionally it will tell you how much you’ll require in the new qualities and whether you’ll need to work with multiple strands. Most skeins are 50g (some are 25g or 100g).

If the pattern is worked with multiple colours, every colour will have to be calculated separately. Similarly, if the pattern is worked with several strands of different yarns (for example 1 strand Alpaca and 1 strand Kid-Silk) you will have to find alternatives for each, individually.

Click here to see our yarn calculator

Since different yarns have different qualities and textures we have chosen to keep the original yarn in our patterns. However, you can easily find options among our available qualities by using our yarn calculator, or simply pick a yarn from the same yarn group.

It is possible that some retailers still have discontinued yarns in stock, or that someone has a few skeins at home that they would like to find patterns for.

The yarn calculator will provide both alternative yarn as well as required amount in the new quality.

If you think it's hard to decide what size to make, it can be a good idea to measure a garment you own already and like the size of. Then you can pick the size by comparing those measures with the ones available in the pattern's size chart.

You'll find the size chart at the bottom of the pattern.

See DROPS lesson: How to read size chart

The needle size provided in the pattern serves only as a guide, the important thing is to follow the knitting tension. And since knitting tension is very individual, you will have to adjust the needle size to ensure that YOUR tension is the same as in the pattern – maybe you’ll have to adjust 1, or even 2 needle sizes, up or down to achieve the correct tension. For this, we recommend that you work test swatches.

Should you work with a different knitting tension than the one provided, the measurements of the finished garment might deviate from the measurement sketch.

See DROPS lesson: How to measure your tension/gauge

See DROPS video: How to make a tension/gauge swatch

Working a garment top-down provides more flexibility and room for personal adjustment. For example it is easier to try the garment on while working, as well as making adjustments to length of yoke and shoulder caps.

The instructions are carefully explaining every step, in the correct order. Diagrams are adjusted to the knitting direction and are worked as usual.

The diagram depicts all rows/rounds, and every stitch seen from the right side. It is read from bottom to top, from right to left. 1 square = 1 stitch.

When working back and forth, every other row is worked from the right side and every other row is worked from the wrong side. When working from the wrong side, the diagram will have to be worked reversed: from left to right, knit stitches are purled, purl stitches are knit etc.

When working in the round every round is worked from the right side and the diagram are worked from right to left on all rounds.

See DROPS lesson: How to read knitting diagrams

The diagram depicts all rows/rounds, and every stitch seen from the right side. It is worked from bottom to top, from right to left.

When working back and forth every other row is worked from the right side: from right to left and every other row is worked from the wrong side: from left to right.

When working in the round, every row in the diagram are worked from the right side, from right to left.

When working a circular diagram you start in the middle and work your way outwards, counter clockwise, row by row.

The rows usually start with a given number of chain stitches (equivalent to the height of the following stitch), this will either be depicted in the diagram or explained in the pattern.

See DROPS lesson: How to read crochet diagrams

Instructions for working several diagrams after each other on the same row/round, will often be written like so: “work A.1, A.2, A.3 a total of 0-0-2-3-4 times". This means you work A.1 once, then A.2 is worked once, and A.3 is repeated (in width) the number of times provided for your size – in this case like so: S = 0 times, M = 0 times, L=2 times, XL= 3 times and XXL = 4 times.

The diagrams are worked as usual: begin with the first row in A.1, then work the first row in A.2 etc.

See DROPS lesson: How to read knitting diagrams

See DROPS lesson: How to read crochet diagrams

The total width of the garment (from wrist-to-wrist) will be larger in the larger sizes, despite the actual sleeves being shorter. The larger sizes have longer sleeve caps and wider shoulders, so there will be a good fit in all sizes.

The measurement sketch/schematic drawing provides information regarding the full length of the garment. If it’s a jumper or a jacket the length is measured from the highest point on the shoulder closest to the neckline, and straight down to the bottom of the garment. It is NOT measured from the tip of shoulder. Similarly, the length of yoke is measured from the highest point on the shoulder and down to where yoke is split into body and sleeves.

On a jacket measures are never taken along bands, unless specifically stated. Always measure inside band stitches when measuring the length.

See DROPS lesson: How to read a schematic drawing

Diagrams are often repeated on the round or in height. 1 repeat is the diagram the way it appears in the pattern. If it says to work 5 repeats of A.1 in the round, then you work A.1 a total of 5 times after/next to each other in the round. If it says to work 2 repeats of A.1 vertically/in height you work the entire diagram once, then begin again at the start and work the entire diagram one more time.

Chain stitches are slightly narrower than other stitches and to avoid working the cast-on edge too tight, we simply chain more stitches to begin with. The stitch count will be adjusted on the following row to fit the pattern and measurement sketch.

The rib edge is more elastic and will contract slightly compared to, for example, stocking stitch. By increasing before the rib edge, you avoid a visible difference in width between the rib edge and the rest of the body.

It’s very easy to cast off too tightly, and by making yarn overs while casting off (and simultaneously casting these off) you avoid a too tight cast off edge.

See DROPS video: How to bind off with yarn overs (yo)

To achieve an even increase (or decrease) you can increase on, for example: every 3rd and 4th row alternately, like so: work 2 rows and increase on the 3rd row, work 3 rows and increase on the 4th. Repeat this until the increase is complete.

See DROPS lesson: Increase or decrease 1 st on every 3rd and 4th row alternately

Should you prefer to work in the round instead of back and forth, you may of course adjust the pattern. You’ll need to add steeks mid-front (usually 5 stitches), and follow the instructions. When you would normally turn and work from the wrong side, simply work across the steek and continue in the round. At the end you’ll cut the piece open, pick up stitches to work bands, and cover the cut edges.

See DROPS video: How to knit steeks and cut open

Should you prefer to work back and forth instead of in the round, you may of course adjust the pattern so you work the pieces separately and then assemble them at the end. Divide the stitches for the body in 2, add 1 edge stitch in each side (for sewing) and work the front and back pieces separately.

See DROPS lesson: Can I adapt a pattern for circular needles into straight needles?

Pattern repeats can vary slightly in the different sizes, in order to get the correct proportions. If you’re not working the exact same size as the garment in the photo, yours might deviate slightly. This has been carefully developed and adjusted so that the complete impression of the garment is the same in all sizes.

Make sure to follow instructions and diagrams for your size!

If you have found a pattern you like which is available in women’s size it’s not very difficult to convert it to men’s size. The biggest difference will be the length of sleeves and body. Start working on the women size that you think would fit across the chest. The additional length will be worked right before you cast off for the armhole/sleeve cap. If the pattern is worked top-down you can add the length right after the armhole or before the first decrease on sleeve.

Regarding additional yarn amount, this will depend on how much length you add, but it is better with a skein too many than too few.

All yarns will have excess fibres (from production) that might come off as lint or shedding. Brushed yarns (ie hairier yarns) have more of these loose, excess fibres, causing more shedding.

Shedding also depends on what is worn under or over the garment, and whether this pulls at the yarn fibres. It’s therefore not possible to guarantee that there will be no shedding

Below are some tips on how to get the best result when working with hairier yarns:

1. When the garment is finished (before you wash it) shake it vigorously so the looser hairs come off. NOTE: do NOT use a lint roller, brush or any method that pulls at the yarn.

2. Place the garment in a plastic bag and put it in your freezer - the temperature will cause the fibres to become less attached to each other, and excess fibres will come off easier.

3. Leave in the freezer for a few hours before taking it out and shaking it again.

4. Wash the garment according to the instructions on the yarn label.

Pilling is a natural process that happens to even the most exclusive of fibers. It's a natural sign of wear and tear that is hard to avoid, and that is most visible in high friction areas of your garment like a sweater's arms and cuffs.

You can make your garment look as new by removing the pilling, using a fabric comb or a pill/lint remover.

Still can't find the answer you need? Then scroll down and leave your question so one of our experts can try to help you. This will be done normally within 5 to 10 working days.
In the meantime, you can read the questions and answers that others have left to this pattern or join the DROPS Workshop on Facebook to get help from fellow knitters/crocheters!

You might also like...

Post a comment to pattern DROPS 227-46

We would love to hear what you have to say about this pattern!

If you want to leave a question, please make sure you select the correct category in the form below, to speed up the answering process. Required fields are marked *.

Comments / Questions (34)

country flag Pradel Christine wrote:

J’ai un pb avec les manches. Je fais taille M. 6cm côtes puis 8cm jersey avant de commencer à augmenter 9 froid tous les 4,5cm = 50cm !! Or je dois commencer l’arrondi en allers/retours à 46 cm ! Confirmez vous que je ne dois tricoter que 4cm de jersey après les cotes au lieu de 8 ? Sinon qu’elle est votre correction ? Merci beaucoup pour votre réponse. Est-ce que la suite des explications vous paraît correcte ? Encore merci. Bonne journée. Christine

15.03.2024 - 15:08

DROPS Design answered:

Bonjour Mme Pradel, il faut en fait continuer en jersey jusqu'à ce que la manche mesure 8 cm (en taille M) - soit 6 cm de côtes + 2 cm jersey - merci pour votre retour, la correction a été faite. Bon tricot!

15.03.2024 - 16:07

country flag Trish wrote:

Can this be knitted without the kid silk just the soft tweed only thanks

18.12.2023 - 17:11

DROPS Design answered:

Dear Trish, you should replace Kid-Silk with any other yarn group A to keep correct tension. Use the yarn converter to see alternatives as well as new amount of yarn. Happy knitting!

19.12.2023 - 07:43

country flag Pirkko Tolvanen wrote:

Olen neulonut elämäni aikana melko paljon mutta yhä vain askarruttaa yksi juttu.\r\nKun neulon tasona, niin vasemman puolen (neule oikein päin itseeni) reunasilmukka jää aina löysemmälle kuin oikean puolen.\r\nKun reunasta otetaan silmukoita esim. hihaa varten, niin eron huomaa selvästi.\r\nMikä neuvoksi?\r\nKiitoksin Pirkko

03.10.2023 - 10:56

DROPS Design answered:

Hei, tämä tapahtuu usein, kun neulotaan työn nurjan puolen kerroksen ensimmäisiä silmukoita. Voit kiristää lankaa hieman tavallista enemmän aina kun neulot vasemman puolen ensimmäisen silmukan. Kokeile myös neuloa reunoissa 1 reunasilmukka ainaoikeaa.

23.10.2023 - 17:52

country flag France Langlois wrote:

Bonjour, Lorsqu'on rabat les mailles restantes pour l'épaule, combien reste t'il de mailles pour la grandeur M. Le patron ne fournit pas cette information.

06.03.2023 - 01:29

DROPS Design answered:

Bonjour Mme Langlois, il reste 19 mailles pour l'épaule (cf DOS: ... Au rang suivant sur l'endroit, diminuer 2 mailles côté encolure – ne pas oublier DIMINUTIONS-2 = 18-19-20-20-21-22 mailles pour l'épaule.. Bon tricot!

06.03.2023 - 10:38

country flag France Langlois wrote:

Bonjour, Diminutions pour les manches (A2 et A3)au début de chaque rang seulement ou à la fin aussi (autrement dit sur le même rang)? De plus, entre quelle maille doit-on faire un jeté sur l'envers après ces diminutions? Merci de votre aide.

03.03.2023 - 16:38

DROPS Design answered:

Bonjour Mme Langlois, les diminutions de A.2 et A.3 sont pour les emmanchures (elle ne sont pas faites pour les manches). Sur l'endroit, lisez les diagrammes de droite à gauche et sur l'envers, de gauche à droite, autrement dit, le jeté de A.2 se fait après 1 m env de A.2 et le jeté de A.3 se fait avant la m envers de A.3. Bon tricot!

06.03.2023 - 08:49

country flag Sylviane Eusebe wrote:

J'ai adoré faire ce pull pour ma maman et la laine super agréable mais une fois lavé je trouve que le bas c'est détendu comment faire pour éviter cela merci de votre réponse

18.02.2023 - 08:59

DROPS Design answered:

Bonjour Mme Eusebe, retrouvez toutes les consignes d'entretien de Soft Tweed sur son nuancier et encore plus d'astuces ici - votre magasin pourra également vous aider, même par mail ou téléphone. Bon tricot!

20.02.2023 - 09:21

country flag Sylviane Eusebe wrote:

Bonjour je suis sur le devant avec au départ 26 mailles il faut diminuer 2 mailles côté encolure et 3 fois diminution 2 côté épaule ce qui fait au total 8 mailles et je dois au final me retrouver avec 20 mailles et donc là impossible merci de votre aide

21.11.2022 - 17:21

DROPS Design answered:

Bonjour Mme Eusebe, si vous avez 26 mailles après avoir mis en attente les mailles pour l'encolure, vous allez diminuer 2 mailles 3 fois au total soit 6 mailles au total; 26-6= il reste 20 mailles. Bon tricot!

22.11.2022 - 10:27

country flag Pia wrote:

Kan man udskiftes til garn Puna og følge opskriften med samme pind? Kom til at skrive forkert forrige sendt spørgsmål

14.10.2022 - 09:32

country flag Pia wrote:

Kan man udskiftes til garnet Puna og bruge samme pind iflg denne opskrift?

14.10.2022 - 09:28

DROPS Design answered:

Hei Pia. Du kan bytte DROPS Soft-Tweed med DROPS Puna i denne oppskriften. Begge kvalitetene tilhører samme garngruppe (B), men DROPS Puna har en litt kortere løpelengde, så du trenger litt mer garn. Bruk vår garnkalkulator til å finne ut hvor mye i den størrelsen du vil strikke. Og husk å dobbeltsjekke at du får samme strikkefasthet med 1 tråd Puna + 1 tråd Kid-Silk som er oppgitt i oppskriften . mvh DROP Design

24.10.2022 - 09:45

country flag Kerstin wrote:

Hej Drops Design! Jag har precis stickat färdigt den här fina tröjan, men till min stora förvåning har jag kvar nästan 150 gram Soft Tweed och 35 gram Kid Silk. Alltså 3 hela nystan. Virkade Winter Sunshine for en tid sedan och fick även då en massa hela nystan över. Måste tillägga att tröjorna passar mej. Hur kommer det sig att det har blivit så här tokigt? Känns ju bättre att handla "på stan" då kan jag lämna tillbaka nystan. Vänligen Kerstin W

11.05.2022 - 10:37