
Beliebte Kategorien
Suchen Sie nach einem Garn?


Kommentare / Fragen (118)
![]() Silvia hat geschrieben:
Silvia hat geschrieben:
Hi, Dankeschön nochmal für die Hilfe, hat alles gut geklappt. Ich bin jetzt bei dem Kragen, was heißt in der Beschreibung - ‚ Partiene‘ ?????
07.02.2026 - 14:00DROPS Design hat geantwortet:
Liebe Silvia, es sind die links gestrickten Bereiche (Linksrippen) des Rippenmusters gemeint. Viel Spaß weiterhin!
08.02.2026 - 08:36
![]() Maya hat geschrieben:
Maya hat geschrieben:
Another question is why is there such a big decrease after the ribbing? It seems like that is a 15" decrease from the ribbing. Is that correct? Please advise. I'm confused about the sizing. Thanks!
03.02.2026 - 19:44DROPS Design hat geantwortet:
Hi Maya, the rib edge is more elastic and will contract slightly compared to, for example, stocking stitch. By decreasing after the rib edge, you avoid a visible difference in width between the rib edge and the rest of the body. Happy knitting!
07.04.2026 - 09:48
![]() Maya hat geschrieben:
Maya hat geschrieben:
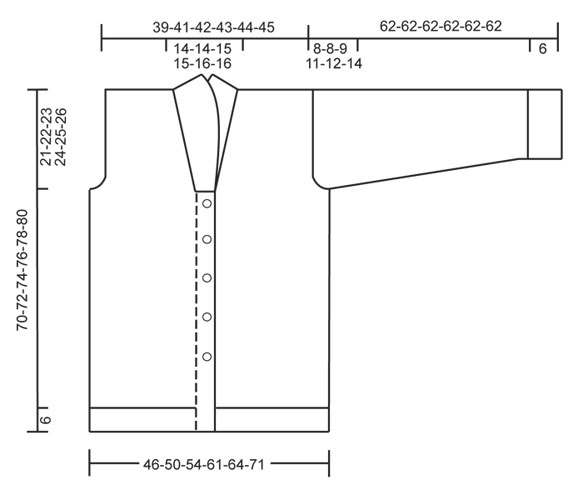
I am about to start the sweater for my husband. His chest measures 44". I thought I would make him an XL, as it seems that would be a 4" ease. The schematic seems like that would be correct, but the number of stitches seems weird. After you decrease from the ribbing, you should have 221 stitches. 221 divided by 4.25 = 52" Is that correct? That would be an 8" ease, which seems like to much for my husband, and looking at the picture it doesn't seem like the model has that much of an ease.
03.02.2026 - 19:43DROPS Design hat geantwortet:
Hi Maya, how to choose your size you will find HERE. Happy knitting!
07.04.2026 - 09:53
![]() Silvia hat geschrieben:
Silvia hat geschrieben:
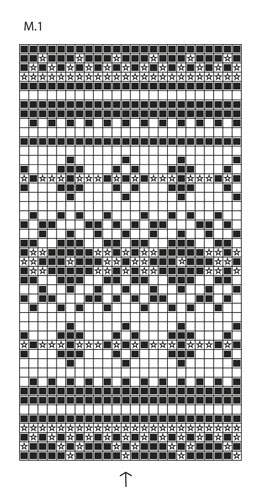
Ich verstehe nicht, wie ich das Muster für den Ärmel stricken soll. Ich beginne mit der äußeren Mitte des Ärmels und stricke nun die Symbole ab dem Pfeil in M1? Stricke ich das gesamte Muster ab Pfeil oder nur in der 1. Reihe? Und wie mache ich das mit den Zunahmen? Ich würde mich freuen wenn sie mir eine kleine Hilfestellung geben könnten. Q
27.01.2026 - 19:09DROPS Design hat geantwortet:
Liebe Silvia, Sie beginnen die Runde an der unteren Ärmelmitte, nicht an der oberen. Sie zählen aber ab der oberen Ärmelmitte das Muster ab, die Pfeil-Masche (= Mitte des Musters) muss an der oberen Ärmelmitte liegen. Sie müssen also die Maschenzahl, die Sie haben, von der unteren Ärmelmitte bis zur oberen Ärmelmitte abzählen und dann ausrechnen, mit welcher Masche das Muster an der unteren Ärmelmitte beginnt. Es wird an der unteren Ärmelmitte vermutlich nicht aufgehen. Sie beginnen das Muster mit der ersten Masche, von rechts gelesen. Die Zunahmen können Sie dann nach und nach in das Muster einarbeiten. Viel Spaß beim Weiterstricken!
28.01.2026 - 20:14
![]() Hennie Reiling hat geschrieben:
Hennie Reiling hat geschrieben:
Ik ben met bovenstaand patroon bezig. Nu zegt het patroon dat ik na de boord 69 steken moet minderen. Heb het idee dat het juist meerderen moet zijn, klopt dat. Vr gr Hennie
08.01.2026 - 13:08DROPS Design hat geantwortet:
Dag Hennie,
Het meerderen na de boord wordt gedaan om te voorkomen dat de boord het werk samentrekt.
10.01.2026 - 18:01
![]() Nikki hat geschrieben:
Nikki hat geschrieben:
Hi- I’m at the starting the button hole section- but I’m so confused. The ribbing looks like the collar, and how on earth does the collar get in between the two ‘sections’ of the button holes/buttons? And the measurements are just… I do not understand. I’ve knit a lot, but this is very confusing to me. Can someone explain it to me like I’m 5?
27.12.2025 - 00:15
![]() Kate hat geschrieben:
Kate hat geschrieben:
The ‘body’ section is for horizontal ribbing instead of vertical ribbing like in the photo!
24.12.2025 - 22:53
![]() Sarah hat geschrieben:
Sarah hat geschrieben:
I am trying to make a longer sleeve (for someone with longer than average arms). How do I make this adjustment to the sleeves?
21.11.2025 - 23:49DROPS Design hat geantwortet:
Dear Sarah, depending on how much cm you should add, you can add some extra cm before starting increasing, work some more rounds between each increase and/or divide piece mid under sleeve after the extra cm required. Happy knitting!
24.11.2025 - 08:23
![]() De Keyser Liesbet hat geschrieben:
De Keyser Liesbet hat geschrieben:
Kan dit op 2 nld worden gemaakt. Hoe is de verhouding dan?
21.11.2025 - 13:04
![]() De Keyser Liesbet hat geschrieben:
De Keyser Liesbet hat geschrieben:
Kan dit op gewone nld en de rug 246 st ik dat niveel voor xl
18.11.2025 - 10:51DROPS Design hat geantwortet:
Dag Liesbet,
De reden dat je op de rondbreinaald moet breien is omdat je veel steken op de naald hebt als je van midden voor naar midden voor breit.
Om een patroon aan te passen om op rechte naalden te breien hebben we een instructie gemaakt. Deze vind je hier.
22.11.2025 - 09:23
|
||||||||||
Harald#haraldjacket |
||||||||||
 |
 |
|||||||||
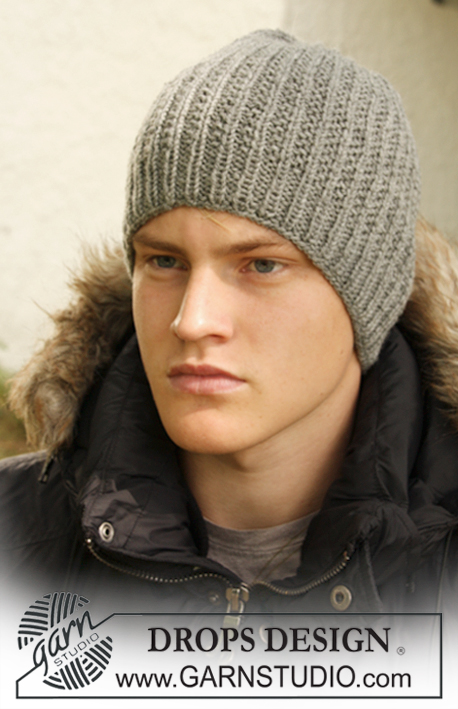
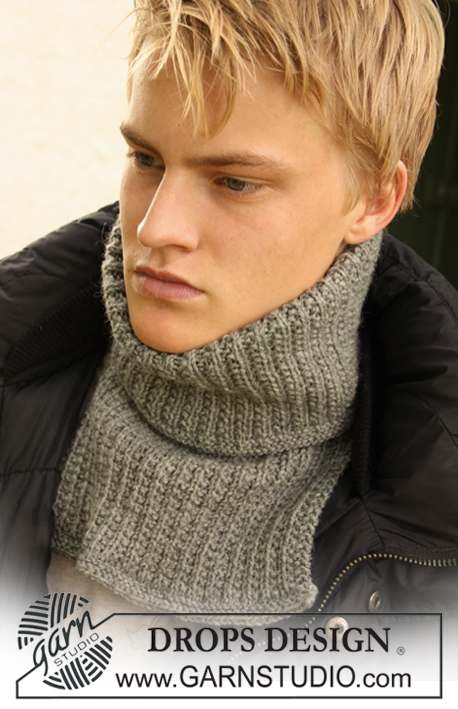
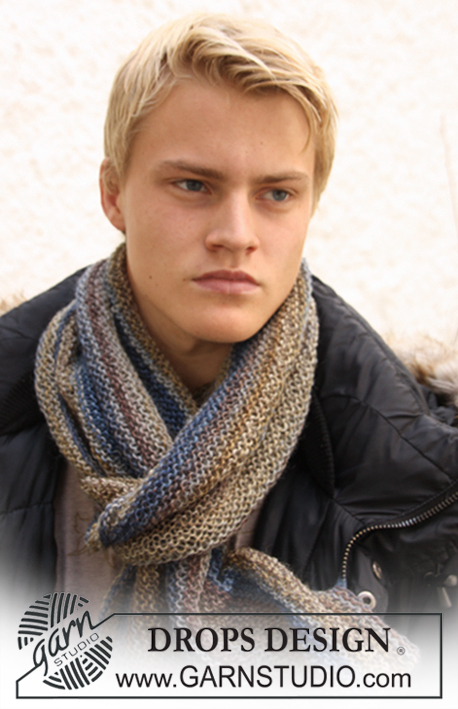
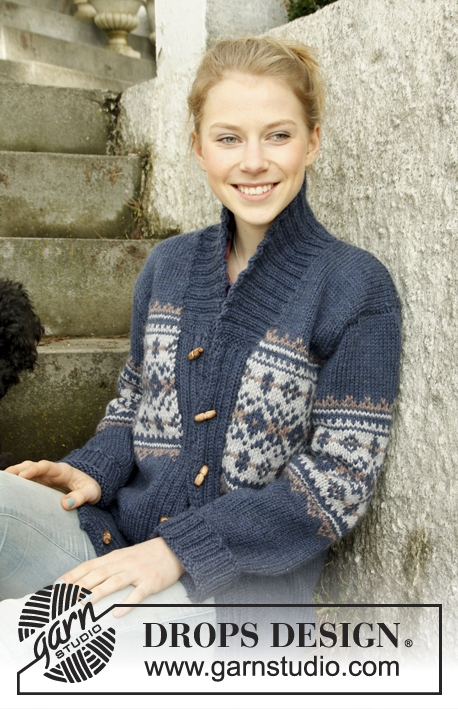
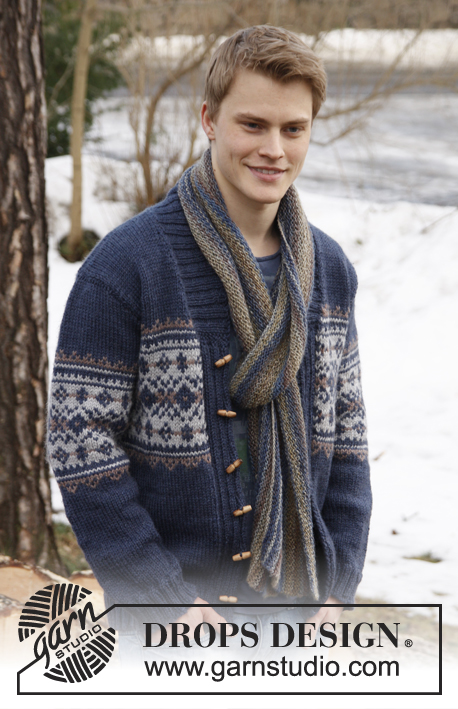
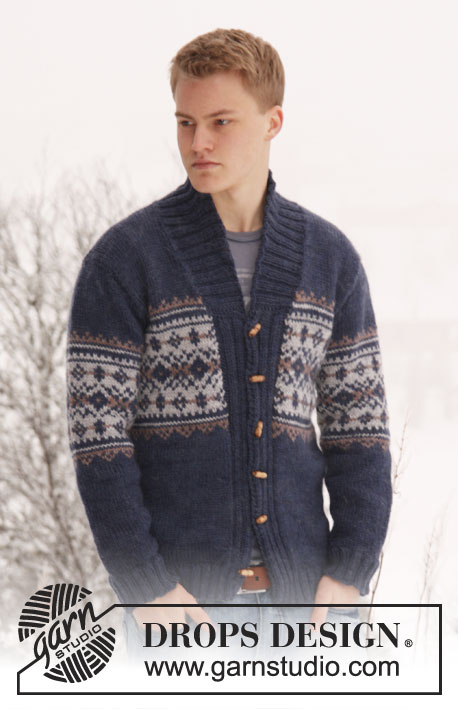
DROPS Herrenjacke in ”Alaska”. Grösse S – XXXL.
DROPS Extra 0-813 |
||||||||||
|
KRAUSRIPPE (hin und zurück): 1 Krausrippe = 2 R. re. KNOPFLÖCHER: Am linken Vorderteil werden Knopflöcher eingestrickt. 1 KNOPFLOCH = die 5. und 6. M. zusammenstricken und einen Umschlag machen. Die Knopflöcher wie folgt platzieren: Grösse S: 6, 14, 23, 31, 40 und 48 cm Grösse M: 6, 15, 24, 32, 41 und 49 cm Grösse L: 6, 15, 24, 33, 42 und 50 cm Grösse XL: 6, 13, 21, 28, 36, 43 und 51 cm Grösse XXL: 7, 14, 22, 29, 37, 44 und 52 cm Grösse XXXL: 7, 15, 22, 30, 37, 45 und 53 cm MUSTER: Siehe M1 – das Diagramm wird glatt gestrickt und zeigt 2 Musterrapporte. TIPP ZUM ABNEHMEN (für den Halsausschnitt): Die Arbeit wird auf einer Rundnadel hin und zurück gestrickt. Nach 1 Randm: 1 M. re. abheben, 1 re., die abgehobene über die gestrickte ziehen. Vor 1 Randm: 2 re. zusammen. -------------------------------------------------------- VORDER- UND RÜCKENTEIL: Die Arbeit wird auf einer Rundnadel hin und zurück gestrickt. Mit graublau auf Nadel Nr. 4, 226-246-262-286-302-330 M. anschlagen und 1 R. li. von der Rückseite stricken. Danach von der Vorderseite wie folgt: 2 Randm in KRAUSRIPPE – siehe oben, * 2 re. / 2 li.*, von *-* wiederholen bis noch 4 M. übrig sind und mit 2 re. und 2 Randm KRAUSRIPPE abschliessen. Nach 6 cm (die Knopflöcher nicht vergessen) zu Rundnadel 5 wechseln und von der Vorderseite wie folgt stricken: 2 M. Krausrippe, 2 re., 2 li., 2 re., 2 li., 2 re., 2 li.(= 14 Blendenm), glatt bis noch 14 M. übrig sind, GLEICHZEITIG gleichmässig verteilt 53-61-65-65-69-73 M. abn. (nicht über den Blendenm), mit 2 li., 2 re., 2 li., 2 re., 2 li., 2 re. und 2 M. Krausrippe abschliessen = 173-185-197-221-233-257 M. Auf beiden Seiten nach 47-50-53-59-62-68 M. je eine Markierung einziehen (= 79-85-91-103-109-121 M. = Rückenteil). Glatt mit je 14 Blendenm auf beiden Seiten weiterstricken. Stimmt die Maschenprobe? Nach 32-33-34-35-36-37 cm M1 stricken: 14 Blendenm wie gehabt mit graublau stricken, M1 bis noch 15 M. zu stricken sind, 1. M. in M1 (damit das Muster vorne überein stimmt), 14 Blendenm wie gehabt. Nach 49-50-51-52-53-54 cm die nächste R. von der Vorderseite wie folgt: die ersten 13 M. abk., die Arbeit hier markieren, 31-34-37-42-45-51 M. stricken (= rechtes Vorderteil), 6-6-6-8-8-8 M. für das Armloch abk., 73-79-85-95-101-113 M. stricken (= Rückenteil), 6-6-6-8-8-8 M. für das Armloch abk. und die restlichen M. stricken (= 44-47-50-55-58-64 M. für das linke Vorderteil). Die Arbeit drehen, die ersten 13 M. abk., eine Markierung einziehen und die R. fertig stricken = 31-34-37-42-45-51 M. Die Teile separat fertig stricken. RÜCKENTEIL: = 73-79-85-95-101-113 M. M1 weiterstricken nachdem M1 einmal in der Höhen gestrickt ist mit graublau fertig stricken) – GLEICHZEITIG auf beiden Seite für das Armloch abk.: 0-0-0-1-1-2 Mal 3 M., 1-1-2-2-3-4 Mal 2 M. und 1-3-3-4-4-4 Mal 1 M. = 67-69-71-73-75-77 M. Nach 68-70-72-74-76-78 cm die mittleren 21-21-23-23-25-25 M. für den Halsausschnitt abk. Bei der nächsten R. 1 M. gegen den Halsausschnitt abk. = 22-23-23-24-24-25 M. Nach 70-72-74-76-78-80 cm abk. RECHTES VORDERTEIL: = 31-34-37-42-45-51 M. Mit M1 und 1 Randm in Krausrippe gegen die vordere Mitte weiterstricken. GLEICHZEITIG auf der Seite wie am Rückenteil für das Armloch abk. GLEICHZEITIG nach 50-51-52-53-54-55 cm vorne 1 M. gegen den Halsausschnitt abk. – siehe TIPP ZUM ABNEHMEN! Total 3-3-4-4-6-6 Mal bei jeder 4. R. danach total 3-3-3-3-2-2 Mal bei jeder 8. R. Nach allen Abnahmen sind 22-23-23-24-24-25 M. auf der Nadel. Nach 70-72-74-76-78-80 cm abk. LINKES VORDERTEIL: Wie das rechte Vorderteil nur spiegelverkehrt. ÄRMEL: Die Arbeit wird rund gestrickt. Mit graublau auf Nadelspiel Nr. 4, 52-52-56-56-60-60 M. anschlagen und 1 Runde re. stricken. Danach 6 cm Bündchen stricken = 2 re. / 2 li. Zu Nadelspiel 5 wechseln und 1 Runde re. stricken. GLEICHZEITIG gleichmässig verteilt 11-9-11-11-13-13 M. abn. = 41-43-45-45-47-47 M. Den Anfang der R. markieren (= unter dem Ärmel). Danach glatt stricken. Nach 7-7-7-7-9-10 cm auf beiden Seiten der Markierung je 1 M. aufnehmen. Total 11-13-14-16-17-19 Mal, Grösse S: bei jeder 10. Runde, Grösse M: bei jeder 8. Runde, Grösse L: bei jeder 7. Runde, Grösse XL: bei jeder 6.Runde, Grösse XXL: bei jeder 5. Runde und Grösse XXXL: bei jeder 4. Runde = 63-69-73-77-81-85 M. GLEICHZEITIG nach 30-30-29-27-26-24 cm die Mitte der R. markieren (= oben auf dem Ärmel). M1 (die markierte M. ist die M. mit dem Pfeil im Diagramm. Nachdem M1 einmal in der Höhe gestrickt ist mit graublau weiterstricken. GLEICHZEITIG nach 54-54-53-51-50-48 cm (Auf Grund der breiteren Schultern sind die Ärmel bei den grossen Grössen kürzer) unter dem Ärmel 6-6-6-8-8-8 M. abk. und die Arbeit hin und zurück fertig stricken. GLEICHZEITIG beidseitig, am Anfang der R. für die Armkugel abk.: 3-3-3-3-3-4 Mal 2 M. und 2-2-2-4-4-5 Mal 1 M. Weiter auf beiden Seiten je 2 M. abk. bis die Arbeit 61 cm misst. Danach auf beiden Seiten 1 Mal je 3 M. abk. Danach abk. Die Arbeit misst ca. 62 cm. ZUSAMMENNÄHEN: Die Schulternaht zusammennähen. KRAGEN: Bei der Markierung am rechten Vorderteil anfangen und mit graublau auf Rundnadel 4 ca. 34 bis 44 M. aufnehmen (bis zur Schulter, danach im Nacken 22 bis 28 M. , zum Schluss am linken Vorderteil bis zur Markierung 34 bis 44 M. aufnehmen = 90 bis 116 M. 1 R. re. von der Rückseite GLEICHZEITIG die Maschenzahl auf 126-130-138-142-150-154 M. anpassen. Weiter von der Vorderseite wie folgt: 2 M. Krausrippe, * 2 re., 2 li.*, von *-* wiederholen und mit 2 re. und 2 M. Krausrippe abschliessen. Nach ca. 5 cm von der Vorderseite in jeder der mittleren 12 li.-Partiene (im Nacken) je 1 M. aufnehmen = 138-142-150-154-162-166 M. ca. 7 cm wie folgt. 1 R. wie gehabt stricken und danach die ersten 10 M. auf einen Hilfsfaden legen. Die Arbeit drehen, zurück stricken und danach auf der anderen Seite die äussersten 10 M. auf einen Hilfsfaden legen. Die Arbeit drehen, zurück stricken und danach auf die äussersten 10 M. auf den ersten Hilfsfaden legen. Die Arbeit drehen, zurück stricken und danach auf die äussersten 10 M. auf den zweiten Hilfsfaden legen. So weiterstricken bis auf beiden Seiten je 40 M. auf den Hilfsfäden liegen. Danach alle M. ieder auf die Nadel legen und 1 R. über alle 138-142-150-154-162-166 M. stricken (damit es in den Übergäben keine Löcher gibt 1 M. aufnehmen und mit der nächsten M. zusammenstricken). – Danach re. über re. und li. über li. abk. Den Kragen annähen. ZUSAMMENNÄHEN: Die Ärmel einnähen und die Knöpfe annähen. |
||||||||||
Erklärungen zum Diagramm |
||||||||||
|
||||||||||
 |
||||||||||
 |
||||||||||
Haben Sie diese Anleitung nachgearbeitet?Dann taggen Sie Ihre Fotos mit #dropspattern #haraldjacket oder schicken Sie sie an die #dropsfan Galerie Brauchen Sie Hilfe bei dieser Anleitung?Sie finden 28 Videotutorials, einen Kommentar/Fragen-Bereich und vieles mehr, wenn sie die Anleitung bei garnstudio.com aufrufen. © 1982-2026 DROPS Design A/S. Wir besitzen alle Rechte. Dieses Dokument, einschließlich aller Untersektionen, hat Urheberrechte. Mehr dazu, was Sie mit unseren Anleitungen machen können, finden Sie ganz unten auf der Seite zu jeder Anleitung. |
||||||||||


Mit über 40 Jahren Tätigkeit im Entwerfen von Strick- und Häkelmustern bietet Ihnen DROPS Design eine der umfangreichsten Sammlungen von kostenlosen Anleitungen im Internet - in 17 Sprachen übersetzt. Zum jetzigen Zeitpunkt haben wir insgesamt 325 Handarbeitshefte und 12298 Anleitungen auf Deutsch. 12210
Unser Ziel ist es, Ihnen die besten Angebote zum Stricken und Häkeln, Inspirationen und Ratschläge sowie qualitativ hochstehende Garne zu unglaublichen Preisen zu bieten! Möchten Sie unsere Anleitungen nicht nur für den persönlichen Gebrauch nutzen? Unsere Copyright Bedingungen finden Sie bei allen unseren Anleitungen ganz unten auf der jeweiligen Seite. Viel Spaß beim Handarbeiten!
Kommentieren Sie die Anleitung DROPS Extra 0-813
Wir würden gerne Ihre Meinung zu diesem Modell erfahren!
Wenn Sie eine Frage stellen möchten, prüfen Sie bitte, dass Sie die richtige Kategorie im unten stehenden Formular gewählt haben - so bekommen Sie schneller eine Antwort. Die obligatorischen Felder sind mit einem * gekennzeichnet.