
Catégories populaires
Vous cherchez un fil?


























Commentaires / Questions (151)
 Vennie a écrit:
I am thoroughly confused.... I cast on 48 stitches, worked the 5 rounds in k3/p3. I then I ribbed for 24 stitches, K 6 then did pattern with 15 sts worked on that until there was 11 stitches remaining, and piece measured 1 1/2 " so now I have a flap of 11 sts on 1 needle measuring 1 1/2 " long and 29 stitches left over at original length. Am I doing something wrong? I don't understand how i have 27 to work heel and 21 for st holder. Please help me Thank you
30.10.2016 - 01:48DROPS Design a répondu:
Dear Vennie, after ribbing, you work K3/P3 over the 24 sts as before, then K6, M1 and K3 over the remaining sts on round = 48 sts until piece measures 1½''. Then keep the first 27 sts on needle (for heel) and slip the last 21 sts on a st holder (mid upper foot, sts will be worked again later). Work heel back and forth over the 27 sts dec sts as explained for your size. Happy knitting!
31.10.2016 - 10:37Valda Stryde a écrit:
Had a little trouble doing first sock. but was watching TV at the same time. So I started to pay attention to what I was doing .When I got the first sock completed I had no trouble. I have completed four pairs now and I can watch TV while doing them now. Beautiful pattern and quite easy to follow. Just have to pay attention doing the first one then everything is quite easy after that. thank you for this pattern.
12.10.2016 - 17:04
Shirley Myles a écrit:
I wish someone would rewrite this pattern .... I needed help every step of the way !
10.10.2016 - 03:34DROPS Design a répondu:
Dear Mrs Myles, you are welcome to ask you question here, for any individual assistance, remember you will get help from your DROPS store, even per mail or telefon. Happy knnitting!
10.10.2016 - 10:20
Joanne a écrit:
I understand reading the pattern but don't know where the 23 stitches are coming from ?? is it the stitches that came off of stitch holder because I only have 21 ???? totally confused along with several people I have asked for assistance.
03.10.2016 - 20:42DROPS Design a répondu:
Dear Joanne, when you've finished with heel decreases and pick up sts, you'll end up with 52 sts. Now you've to put a marker as follows: keep M.1 (= 15 sts) as central, leave 4 sts each side of M.1 and place 1 marker each side of the 4 sts, so you'll have: marker, 4 sts, M.1, 4 sts, marker. Happy knitting!
04.10.2016 - 08:46
Joanne a écrit:
I am very confused .. I'm working on middle size .. I have one needle with 21 stitches from stitch holder, one needle with 10 stitches picked up side of heel, other needle with 11 from heel decrease, and 4th needle with 10 stitches for heel pickup .. total of 52 as pattern says .. I'm not sure where it says insert markers each side of 23 stitches .. which 23 stitches ..pls help trying to make these as a gift..
02.10.2016 - 03:58DROPS Design a répondu:
Dear Joanne, markers should be inserted as follows: 1st marker, 4 sts, M.1 (= 15 sts), 4 sts, 2nd marker (= 23 sts between markers = top of foot). Happy knitting!
03.10.2016 - 09:28
Marilyn a écrit:
Thank you for your response! I have another question. When it says "work rib back and forth on heel sts for 5-5.5-6 cm" does that mean that the entire piece, right from the first row should measure 5 cm or just from where you started the heel part? Thanks!
27.09.2016 - 17:24DROPS Design a répondu:
Dear Marilyn, the 5-5.5-6 cm apply only to heel, ie to the 21 sts worked back and forth. Happy knitting!
28.09.2016 - 08:32
Marilyn a écrit:
After the part where you pick up the 9 stitched on either side, this pattern blows my mind. I have NO IDEA how to proceed. Can you please elaborate? A video on the heel part of this slipper woukd be very helpful, the videos attached to the pattern are not specific to this pattern. Thanks
27.09.2016 - 04:55DROPS Design a répondu:
Dear Marilyn, when you have 48 sts on needle, then insert a marker as follows: 1st marker, 3 sts, M.1 (= 15 sts), 3 sts, 2nd marker (= 21 sts between markers). Continue now with stocking st and M.1 dec before 1st marker and after 2nd marker a total of 6 times every other round = 36 sts remain. Happy knitting!
27.09.2016 - 10:14
Chantal a écrit:
Hi Drops Design, I finally figured it out, with some assistance. For those in the same boat as I was it's marker - 23 sts - marker. Thanks :)
26.09.2016 - 03:06
Chantal a écrit:
Dear Drops Design, I realize a few people have asked this question already, but the placement of the markers is still baffling me. (Insert a marker each side of the middle 21-23-25 sts on upper foot (= 3-4-5 sts each side of M.1) I am knitting the middle size of this pattern. Do I place my markers before and after the 23rd stitch? Thanks in advance for your answer.
25.09.2016 - 16:50DROPS Design a répondu:
Dear Chantal, in 2nd size you should have on upper foot: 1st marker, 4 sts, 15 sts in M.1, 4 sts, 2nd marker. So that there are 23 sts for upper foot (15 sts in M.1 + 4 sts on each side of M.1). Happy knitting!
26.09.2016 - 10:51Rosalie a écrit:
First time making socks and I am stuck on one place. A video from start to finish; of making these gorgeous socks; would be wonderful.please explain this part to me : Insert a marker each side of the middle 21-23-25 sts on upper foot (= 3-4-5 sts each side of M.1). Continue in stockinette st and M.1 - AT THE SAME TIME dec each side as follows: K tog into back of loop the 2 last sts before first marker on upper foot and K tog the first 2 sts after second marker on upper foot. Thank you
21.09.2016 - 00:32DROPS Design a répondu:
Dear Rosalie, when all sts are on needle, insert a marker 3-4-5 sts before M.1 an 3-4-5 sts after M.1 then dec before 1st marker with K2 tog twisted and after 2nd marker with K2 tog (this will dec the number of sts you picked up along heel) = 36-38-42 sts remain. Happy knitting!
21.09.2016 - 09:23
|
|||||||||||||||||||||||||
Alaskan Cables |
|||||||||||||||||||||||||
 |
 |
||||||||||||||||||||||||
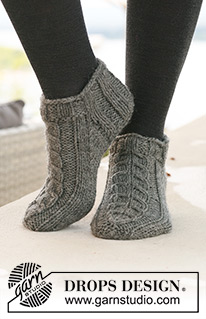
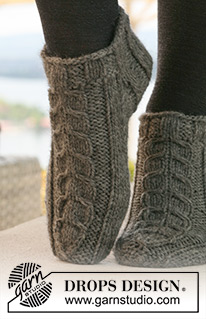
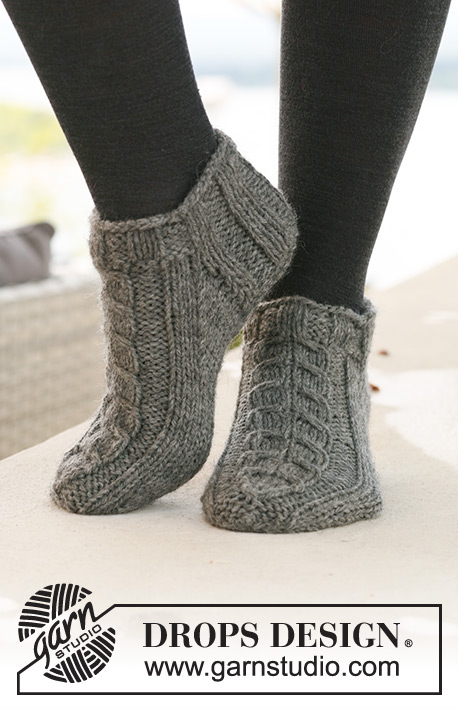
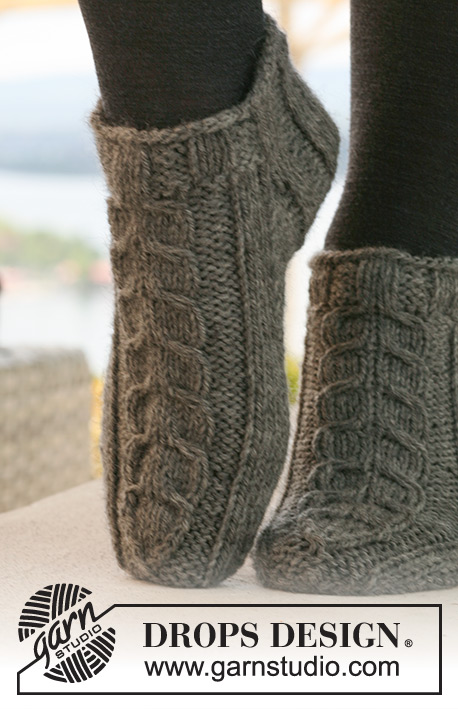
Chaussettes courtes DROPS avec torsades en ”Alaska”.
DROPS 125-15 |
|||||||||||||||||||||||||
|
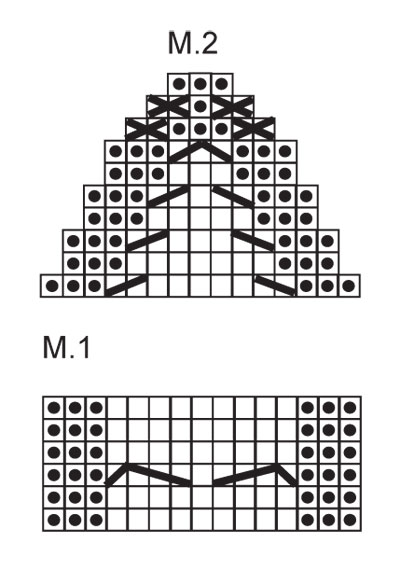
POINT FANTAISIE : Voir diagrammes M.1 (= 15 m) et M.2 (= 15 m). Les diagrammes montrent les motifs sur l'endroit. DIMINUTIONS TALON (se tricotent en jersey): Rang 1 (= endroit): Tricoter jusqu'à ce qu'il reste 6-7-7 m, glisser la m suiv à l'end, 1 m end, passer la m glissée par-dessus la m tricotée, tourner. Rang 2 (= envers): Tricoter jusqu'à ce qu'il reste 6-7-7 m, glisser la m suiv à l'env, 1 m env, passer la m glissée par-dessus la m tricotée, tourner. Rang 3 (= endroit): Tricoter jusqu'à ce qu'il reste 5-6-6 m, glisser la m suiv à l'end, 1 m end, passer la m glissée par-dessus la m tricotée, tourner. Rang 4 (= envers): Tricoter jusqu'à ce qu'il reste 5-6-6 m, glisser la m suiv à l'env, 1 m env, passer la m glissée par-dessus la m tricotée, tourner. Continuer à diminuer ainsi avec 1 m en moins avant chaque diminution jusqu'à ce qu'il y ait 9-11-11 m sur l'aiguille. -------------------------------------------------------- CHAUSSETTES : Se tricotent en rond. Monter 42-48-48 m avec les aiguilles doubles pointes 4,5 et le fil Alaska. Tricoter 2 tours end et 5 tours de côtes, 3 m end/3 m env. Au tour suivant, tricoter en POINT FANTAISIE - voir ci-dessus – ainsi : Continuer en côtes 3 m end/3 m env sur les 18-24-24 premières m, 6-6-6 m end, M.1 (= 15 m), 3-3-3 m end. PENSER À BIEN CONSERVER LA MÊME TENSION QUE POUR L'ÉCHANTILLON ! Continuer ainsi jusqu'à 4 cm de hauteur totale pour toutes les pointures. Conserver ensuite les 21-27-27 premières m sur l'aiguille pour le talon et glisser en attente les 21-21-21 dernières m restantes (= dessus du pied). Tricoter en côtes en allers retours sur les mailles du talon pendant 5-5.5-6 cm. NOTE ! Au dernier rang sur l'envers, diminuer ainsi : Pointure 35/37: 1 m dans la 1ère et la dernière section end en tricotant 2 m ens à l'end ; Pointure 38/40 et 41/43 : 1 m dans chacune des 4 sections end en tricotant 2 m ens à l'end. Toutes les pointures = 19-23-23 m. Placer un marqueur. Tricoter ensuite les DIMINUTIONS du TALON – voir ci-dessus ! Après les diminutions du talon, relever 9-10-12 m de chaque côté du talon et reprendre les 21-21-21 m en attente = 48-52-56 m. Placer un marqueur de chaque côté des 21-23-25 m du dessus du pied (= 3-4-5 m de chaque côté de M.1). Continuer en jersey et M.1 - EN MÊME TEMPS, diminuer de chaque côté ainsi : tricoter ens torse à l'end les 2 dernières m avant le 1er marqueur du dessus du pied et tricoter ens à l'end les 2 premières m après le deuxième marqueur du dessus du pied. Répéter ces diminutions 6-7-7 fois au total tous les 2 tours = 36-38-42 m. Continuer jusqu'à 18-20-22 cm du marqueur du talon – ajuster après un motif complet de M.1 (= il reste environ 4-4-5 cm). Placer un marqueur de chaque côté espacés de 19-19-21 m pour le dessous et 17-19-21 m pour le dessus du pied (= 1-2-3 m de chaque côté de M.1). Diminuer ensuite pour la pointe. LIRE ATTENTIVEMENT LA SUITE AVANT DE CONTINUER : (NOTE ! On diminue différemment pour le dessous et le dessus du pied mais les diminutions se font sur les mêmes tours). Diminuer pour le dessous du pied ainsi : tricoter ens torse à l'end les 2 m après le marqueur et tricoter ens à l'end les 2 m avant le marqueur. Répéter ces diminutions 4-4-4 fois au total tous les 2 tours, puis 3-3-4 fois au total tous les tours. EN MÊME TEMPS, diminuer pour le dessus du pied ainsi : tricoter M2 au-dessus de M1 (les 1-2-3 m de chaque côté de M.1 se tricotent en jersey comme avant). Terminer en tricotant les 3 derniers tours à l'envers pour la pointure 41/43 = il reste 10-12-14 m. Couper le fil, le passer dans les m restantes, serrer, arrêter. |
|||||||||||||||||||||||||
Légende diagramme(s) |
|||||||||||||||||||||||||
|
|||||||||||||||||||||||||
 |
|||||||||||||||||||||||||
Vous avez terminé ce modèle?Alors taguez vos photos avec #dropspattern ou bien présentez-les dans la galerie #dropsfan Vous avez besoin d'aide pour ce modèle ?Vous trouverez 12 tutoriels vidéo, une rubrique commentaires/questions et plus encore en vous rendant sur la page du modèle sur garnstudio.com © 1982-2026 DROPS Design A/S. Tous droits réservés. Ce document, y compris ces sous-sections, est protégé par les droits d'auteur (copyright). Apprenez-en davantage sur ce que vous pouvez faire avec nos modèles en bas de chacune des pages de notre site. |
|||||||||||||||||||||||||


Avec plus de 40 ans dans la conception de modèles tricot et crochet, DROPS Design offre l'une des plus vastes collections de modèles gratuits sur internet - traduits dans 17 langues. À ce jour, on compte 333 catalogues et 12536 modèles en français.
Nous nous efforçons de vous apporter le meilleur de ce que le tricot et le crochet peuvent vous offrir, inspiration et conseils mais également des fils de haute qualité à des prix incroyables! Vous souhaiteriez utiliser nos modèles autrement que pour un usage personnel? Vous pouvez lire ce que vous êtes autorisés à faire dans le Copyright en bas de page de chacun de nos modèles. Bon tricot!
Poster un commentaire sur le modèle DROPS 125-15
Nous aimerions connaître votre avis sur ce modèle !
Si vous souhaitez poser une question, merci de bien vouloir vérifier que vous avez choisi la bonne catégorie dans le formulaire ci-dessous afin d'accélérer la réponse. Les champs obligatoires sont indiqués par une *.