
Popular categories
Looking for a yarn?


Comments / Questions (35)
![]() Nathalie wrote:
Nathalie wrote:
Bonjour, Tout d'abord, félicitations pour ce site ! Ma question concerne le tour de cou, et son tricotage sur l'envers, comment et à quel moment tricoter sur l'envers la maille endroit située après les deux mailles de bordure au point mousse sur l'endroit ? En vous remerciant de vos explications, Bien cordialement.
30.10.2019 - 09:01DROPS Design answered:
Bonjour Nathalie, sur l'envers vous travaillez a l'envers la trosieme maille avant la fin du rang, vous finissez le rang par tricoter 2 dernieres mailles a l'endroit. Bon tricot!
30.10.2019 - 17:36
![]() Veerle Van Coillie wrote:
Veerle Van Coillie wrote:
Ik kom er wel uit hoor, maar begrijp de beschrijving niet
27.10.2019 - 09:03
![]() Veerle Van Coillie wrote:
Veerle Van Coillie wrote:
De eerste markeerdraad wordt ingevoegd na de eerste 3 steken op de naald (dus na 1 gebreide steek), ????????????????? Is dat nu na 1 of 3 steken ? (Na 20 cm muts minderen)
27.10.2019 - 07:53DROPS Design answered:
Dag Veerle,
Het staat er inderdaad een beetje onduidelijk in; het moet 1 rechte steek zijn (in plaats van 1 gebreide steek). Ik heb het nu aangepast. Veel breiplezier!
27.10.2019 - 15:55
![]() Frederikke Storm Hansen wrote:
Frederikke Storm Hansen wrote:
I'm having a hard time understanding the decrease. So on a pkk round, I purl the pk together and then kk or just k? And afer the decrease, I have 2 stitches where there used to be 3. What do I do on the next round? This pattern feels slightly incomplete...
05.02.2019 - 19:29DROPS Design answered:
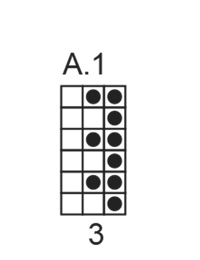
Dear Mrs Storm Hansen, if the dec happens on a row as row 1 in A.1, work the last st in A.1 (= K st = st before the marker), then Ptog the next 2 sts and purl this stitch on next round. Happy knitting!
06.02.2019 - 08:17
![]() Eliza wrote:
Eliza wrote:
Bedankt voor de snelle reactie. Volgens de tekening brei ik de eerste naald: 1 steek averecht, 2 steken recht, tweede naald 2 steken recht, 1 steek averecht enz. Maar dan krijg ik de binnenkant anders dan de buitenkant terwijl op de foto die hetzelfde zijn. Misschien ziet ik dat niet goed?
20.12.2018 - 11:53DROPS Design answered:
Dag Eliza,
Het klopt precies zoals je het beschrijft. Het is belangrijk dat je een meervoud van 3 steken hebt opgezet, zodat het patroon boven elkaar blijft zitten. Helaas kan ik van afstand niet meekijken, maar als je het op deze manier doet, zou het goed moeten komen.
20.12.2018 - 18:01
![]() Lisa T wrote:
Lisa T wrote:
So, no written pattern, just a diagram. And how do I read that pattern? Does it start at the top, the bottom, the right, the left? The way the diagram is shown, seems like it should start in the lower right but, who knows. And if it shows the right side, do I assume I reverse the instructions shown when working the wrong side? I like written directions, like you used to do. This? Well, I guess not doing this for Christmas as hoped.
20.12.2018 - 05:41DROPS Design answered:
Dear Lisa, you always start in the bottom corner on the right side and read towards the left from RS (and every round when working in the round) - from WS you read diagram from the left towards the right. See diagram key to know how to work the stitches from RS and from WS. read more about diagrams here. Happy knitting!
20.12.2018 - 08:22
![]() Eliza wrote:
Eliza wrote:
Ik snap niet hoe ik het telpatroon moet lezen bij rondbreien. Normaal van links naar rechts en terug en zo naar boven maar dat klopt op de rondbreinaald toch niet meer?
18.12.2018 - 22:41DROPS Design answered:
Dag Eliza,
Als je een telpatroon op de rondbreindaald breit, begin je bij de volgende naald weer aan het begin te lezen, dus opnieuw van rechts naar links.
20.12.2018 - 10:41Barbara wrote:
Thank you for your answer! My problem is how to make the second row with decreases in example do I purl tog the purl stitch from previous row with the knit stitch? In other words I always decrease the first two stitches that are after the marker?
10.12.2018 - 14:50DROPS Design answered:
Dear Barbara, always decrease the first 2 sts after the marker purling them together (until it says to K them twisted tog). Happy knitting!
11.12.2018 - 08:34Barbara wrote:
Hello, I am confused on how to continue with the decreases on the hat after the first time. Thank you
10.12.2018 - 14:07DROPS Design answered:
Dear Barbara, after the first decrease round, work in A.1 as before, and purl the decreased stitches in A.1 (P over the P2 tog). Happy knitting!
10.12.2018 - 14:15
![]() Prisca wrote:
Prisca wrote:
Bonjour, J’ai du mal à comprendre le diagramme A1. Dois-je le lire de gauche à droite et de haut en bas ?
27.02.2018 - 21:20DROPS Design answered:
Bonsoir! Comment lire les diagrammes des points fantaisie dans les explications vous trouverez ICI. Bon travail
27.02.2018 - 22:12
|
|||||||
Warm Snap#warmsnapset |
|||||||
 |
 |
||||||
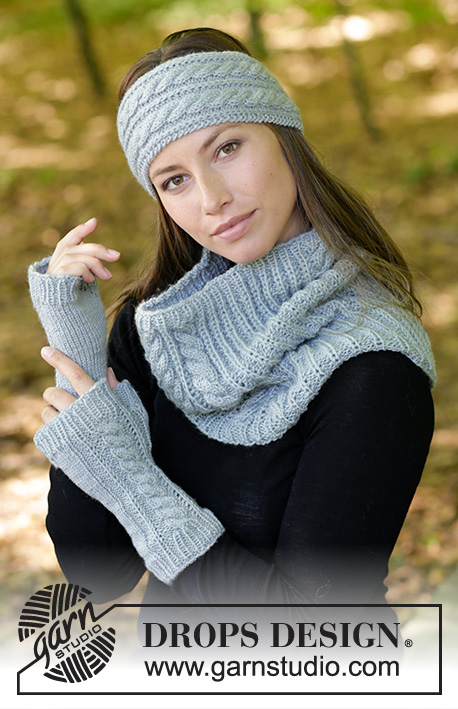
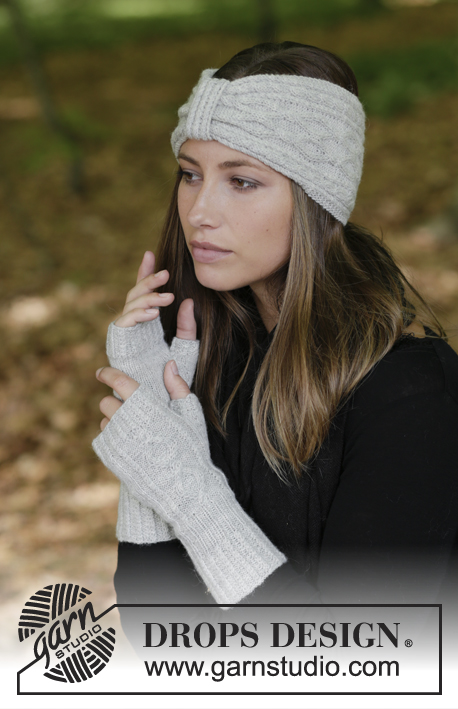
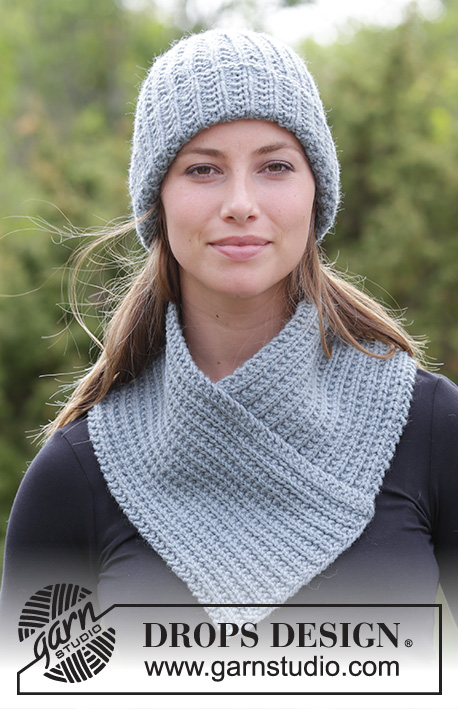
The set consists of: Knitted hipster hat, neck warmer and wrist warmers with textured pattern. The set is knitted in DROPS Nepal.
DROPS 182-17 |
|||||||
|
INFORMATION FOR THE PATTERN: RIDGE/GARTER STITCH (worked back and forth): 1 ridge = Knit 2 rows. PATTERN: See diagram A.1. The diagram shows all the rows in the pattern seen from the right side. ---------------------------------------------------------- HAT: The piece is worked in the round with circular needle. Change to double pointed needles when necessary. Cast on 84 stitches with circular needle size 5 mm and Nepal. Work PATTERN according to diagram A.1 in the round (= 28 repeats of 3 stitches). REMEMBER THE KNITTING TENSION! When the piece measures 20 cm insert 7 marker threads in the piece as follows: The first marker thread is inserted after the first 3 stitches on the round (i.e. after 1 knitted stitch), then insert the next 6 with 12 stitches between each. When the last marker thread has been inserted, there are 9 stitches left on the round. Now start the decreases. Continue A.1 upwards, but on the first round, decrease 1 stitch after each marker thread by purling 2 stitches together (= 7 stitches decreased). Decrease in this way every 2nd round a total of 9 times = 21 stitches left. Work 1 round without decreases. On the next round knit all stitches twisted together, two and two = 11 stitches left. Cut the strand, pull it through the remaining stitches, tighten and fasten well. The hat measures approx. 29 cm from the top down. Turn up an edge of approx. 5-6 cm at the bottom of the hat. ---------------------------------------------------------- NECK WARMER: The piece is worked back and forth on the needle and is sewn together at the end. Cast on 35 stitches with needle size 5 mm and Nepal. Work 1 RIDGE – see description above. Work pattern from the right side as follows: 2 edge stitches in garter stitch, knit 1, work PATTERN according to diagram A.1 (= 10 repeats of 3 stitches), 2 edge stitches in garter stitch. REMEMBER THE KNITTING TENSION! When the piece measures 21 cm insert a marker at the beginning of the next row from the right side (= marker for assembly). When the piece measures 89 cm work 1 ridge over all stitches. Cast off. To avoid getting a tight cast-off edge, you can use a larger needle size or make a yarn over after approx. every 4th stitch, which is then cast off. ASSEMBLY: Sew the cast-off edge to the one long-side (between the cast-on edge and the marker inserted after 21 cm). Sew inside the cast-off edge and in the outermost stitch along the edge so that the seam is not thick. Cut and fasten the strand. ---------------------------------------------------------- WRIST WARMERS: The piece is worked back and forth on the needle and is sewn together at the end. Cast on 32-35 stitches with needle size 5 mm and Nepal. Work pattern from the right side as follows: 2 edge stitches in GARTER STITCH - see description above, knit 1, work PATTERN according to diagram A.1 (= 9-10 repeats of 3 stitches), 2 edge stitches in garter stitch. Continue the pattern back and forth in this way. REMEMBER THE KNITTING TENSION! When the piece measures 16-17 cm cast off. To avoid getting a tight cast-off edge you can use a larger needle or make a yarn over after approx. every 4th stitch which is then cast off. Cut and fasten the strand. ASSEMBLY: Sew together the sides of the wrist warmer as follows: Sew in the outermost loop of the outermost stitch, in every stitch upwards so that the seam is not thick: Start at the bottom of the wrist warmer and sew the seam 9-10 cm upwards, Cut and fasten the strand. Skip 5 cm (= hole for the thumb) and sew the last 2 cm together. Work 1 more wrist warmer in the same way. |
|||||||
Diagram explanations |
|||||||
|
|||||||
 |
|||||||
Have you finished this pattern?Tag your pictures with #dropspattern #warmsnapset or submit them to the #dropsfan gallery. Do you need help with this pattern?You'll find 19 tutorial videos, a Comments/Questions area and more by visiting the pattern on garnstudio.com. © 1982-2026 DROPS Design A/S. We reserve all rights. This document, including all its sub-sections, has copyrights. Read more about what you can do with our patterns at the bottom of each pattern on our site. |
|||||||


With over 40 years in knitting and crochet design, DROPS Design offers one of the most extensive collections of free patterns on the internet - translated to 17 languages. As of today we count 324 catalogues and 12272 patterns translated into English (UK/cm). 12272
We work hard to bring you the best knitting and crochet have to offer, inspiration and advice as well as great quality yarns at incredible prices! Would you like to use our patterns for other than personal use? You can read what you are allowed to do in the Copyright text at the bottom of all our patterns. Happy crafting!
Post a comment to pattern DROPS 182-17
We would love to hear what you have to say about this pattern!
If you want to leave a question, please make sure you select the correct category in the form below, to speed up the answering process. Required fields are marked *.