
Popular categories
Looking for a yarn?


Comments / Questions (9)
![]() Stéphanie wrote:
Stéphanie wrote:
Bonjour, je souhaite réaliser ce modèle avec des fils baby mérinos (jeune maman, je préfère un fil facile à laver) dans des tons rosées/bordeaux. Est-ce qu’un dégradé avec les couleurs bordeaux (uni color 51), blush (mix48) rose desert (mix49) et poudre (uni color 44) irait bien comme option. Je ne souhaite pas de roses trop flashy. Sur mon écran, ces coloris semblent former un camaïeu agréable. Est-ce que cela correspondrait bien ?
17.12.2025 - 21:23DROPS Design answered:
Bonjour Stéphanie, pour toute assistance au choix des couleurs, contactez directement votre magasin DROPS, même par mail ou téléphone, ils pourront vous proposer les harmonies correspondantes à vos envies. Bon tricot!
18.12.2025 - 17:51
![]() Belén wrote:
Belén wrote:
Hol! Estoy tejiendo el segundo talle. Cuando comienzan las disminuciones, si disminuyo 14 veces estaré disminuyendo también los cinco puntos de la botonera, me quedaré sin puntos al inicio de la vuelta, me explico?
05.08.2023 - 20:50DROPS Design answered:
Hola Belén, como pone en el tip para disminuir, disminuyes 1 vez antes del marcapuntos y la siguiente después del marcapuntos. Por lo tanto, tendrás 7 puntos disminuidos antes del marcapuntos y 7 puntos disminuidos después del marcapuntos.
06.08.2023 - 21:48
![]() Nadine wrote:
Nadine wrote:
Ook kom ik 3 cm tekort voor de boordsteek bovenaan... Kan ik het kabelpatroon nog 3 cm doorbreien in de 5e streep? En dan beginnen aan de boordsteek?
03.08.2019 - 16:39DROPS Design answered:
Dag Nadine,
Ja hoor, dat kan. Het ajourpatroon is wel zo gemaakt dat het eindigt in een hoek. Kijk even voor jezelf hoe dat uitkomt en of je het b.v. mooi vindt dat het halverwege stopt. Daarnaast moeten de minderingen ook verdeeld worden in de hoogte over het laatste deel, zodat je cape mooi afbuigt naar de hals.
06.08.2019 - 16:13
![]() Nadine wrote:
Nadine wrote:
In de laatste alinea, vlak boven het kopje Telpatroon, staat in de 3e zin: Brei nu 2 nld in tricotst en minder op de eerste nld 10-13-12-13 st gelijkmatig = 112-117-122-127 st. Moet ik dus in de av. nld (dat is de 1e) minderen? Hoe doe ik dat met het kabelpatroon? Daar toch niet in minderen? Na het kabelpatroon beginnen en dan gelijkmatig? Of toch in de 2e nld minderen, in de rechte?
03.08.2019 - 15:56DROPS Design answered:
Dag Nadine,
De cape wordt in de rondte gebreid, dus als je 2 naalden tricotsteek breit op de goede kant, dan brei je 2 naalden recht. Je mindert deze steken gelijkmatige verdeeld over de naald, dus je hoeft niet op de markeerdraden te letten bij deze laatste minderingen voordat je de boord breit.
06.08.2019 - 16:18
![]() Pia Anderberg wrote:
Pia Anderberg wrote:
Hur många nystan behövs till capen med bara EN färg? Tack & MVH Pia
03.03.2019 - 10:16DROPS Design answered:
Hei Pia. Vi har dessverre ikke oversikt over garnforbruket med kun 1 farge, men vi runder alltiod opp til nærmeste hele nøste i våre oppskrifter. Så du kan anta du trenger noe mindre garn med kun 1 farge. God fornøyelse
04.03.2019 - 14:42
![]() Bibbi Linder wrote:
Bibbi Linder wrote:
Funderar på mönsteromgångarna. Enl diagrammet är det 3 varv utan mönster innan mönstret vänder. MEN efter en mönsteromgång är det bara ett varv utan mönster. Hur ska det vara? Mvh Bibbi
15.01.2019 - 08:56DROPS Design answered:
Hei Bibbi. ja, du har helt rett. Det skal strikkes totalt 3 omganger mellom vendingene i hullmønsteret. Diagrammet vil bli rettet snarest. Takk for beskjed og god fornøyelse.
23.01.2019 - 14:05
![]() Maria wrote:
Maria wrote:
Buongiorno,il coprispalle può essere lavorato con ferri diritti? Grazie
09.12.2018 - 16:33DROPS Design answered:
Buonasera Maria, il coprispalle è lavorato avanti e indietro quindi può utilizzare i ferri dritti. Buon lavoro!
09.12.2018 - 20:21
![]() Christine wrote:
Christine wrote:
Bonjour, Je souhaite tricoter ce modèle en Drops Alpaca bleu jeans taille S/M. Est ce que Je dois commander 500g de laine ? Cela me parait beaucoup puisque Je n'utilise qu'une seule couleur. Merci pour votre réponse.
03.11.2017 - 17:53DROPS Design answered:
Bonjour Christine, il est probable que vous en ayez besoin de moins si vous ne faites pas les rayures, toutefois comme ce modèle est tricoté avec 4 couleurs, nous ne pouvons vous donner la quantité exacte avec 1 seule couleur. Votre magasin DROPS saura fort probablement vous aider et vous renseigner. Bon tricot!
06.11.2017 - 10:15
![]() ATTAF Nicole wrote:
ATTAF Nicole wrote:
J'adore ! beau modèle et hop il va aller sur mes aiguilles !
04.11.2016 - 14:42
|
||||||||||||||||
Ashley |
||||||||||||||||
|
|
||||||||||||||||
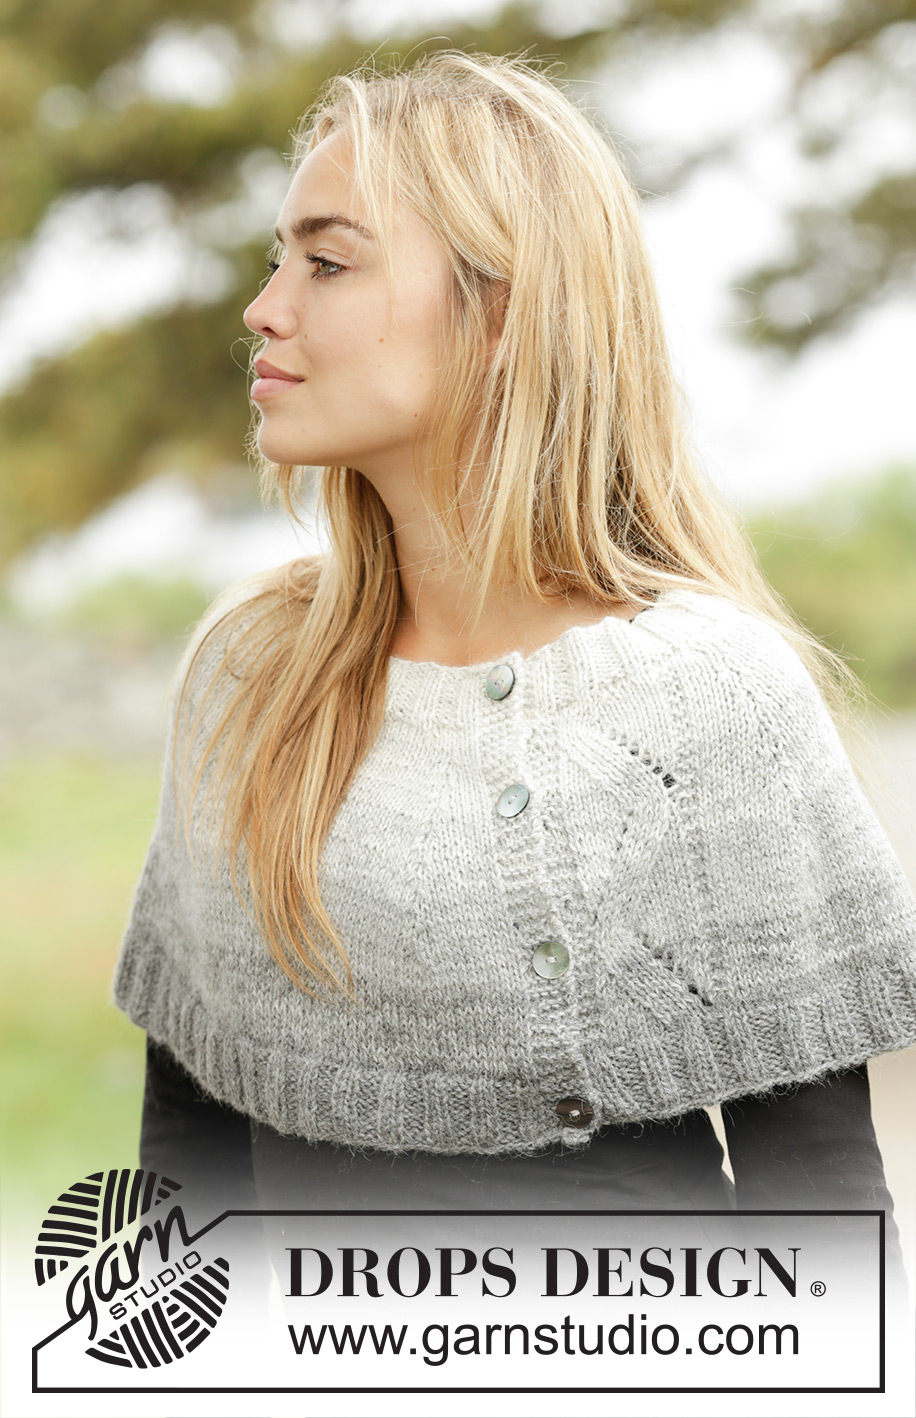
Knitted capelet with gradient colours, lace pattern and rib in 2 strands DROPS Alpaca.
DROPS Extra 0-1318 |
||||||||||||||||
|
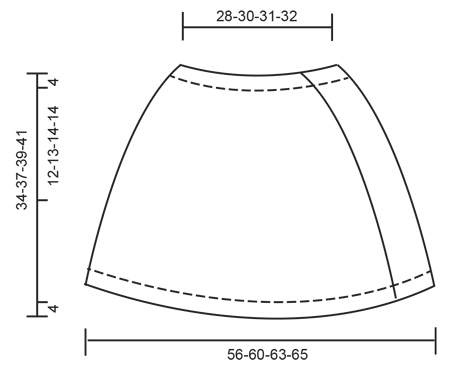
GARTER ST (back and forth): K all rows. 1 ridge = 2 rows K. PATTERN: See diagram A.1. The diagram shows all rows in pattern seen from RS. STRIPES: Work all stripes with 2 strands. Stripe 1: Work 5-6-6-7 cm with 2 strands medium grey. Stripe 2: Work 6-7-7-7 cm with 1 strand medium grey + 1 strand light grey (= 2 strands). Stripe 3: Work 6-6-7-7 cm with 2 strands light grey. Stripe 4: Work 6-6-7-7 cm with 1 strand light grey + 1 strand light pearl grey (= 2 strands). Stripe 5: Work 6-6-6-7 cm with 2 strands light pearl grey. Stripe 6: Work 5-6-6-6 cm with 1 strand light pearl grey + 1 strand off white (= 2 strands). BUTTONHOLES: Dec for buttonhole on right band (i.e. at the beg of row seen from RS). 1 buttonhole = K tog third and fourth st from edge and make 1 YO. Dec for buttonholes when piece measures: SIZE S/M: 2, 12, 22 and 32 cm SIZE L/XL: 3, 11, 19, 27 and 35 cm SIZE XXL: 3, 12, 20, 29 and 37 cm SIZE XXXL: 3, 12, 21, 30 and 39 cm DECREASE TIP: Dec alternately on the right and left side of all markers. I.e. on first row with dec, dec on the right side of all markers and next time dec on the left side of all markers, etc. Dec as follows after marker: K 2 tog. Dec as follows before marker: Work until 2 sts remain before marker, slip 1 st as if to K, K 1, psso. SHORT ROWS FOR BANDS: On every 10th row work short rows over the 5 sts in garter st in bands as follows (beg from RS): K 5 band sts, turn piece, tighten yarn and K back, turn piece and work as before over all sts, turn piece, K 5 band sts, turn piece, tighten yarn and K back. Turn piece and work over all sts from WS. That way the ridges in band will not contract as much. ---------------------------------------------------------- CAPE: Work back and forth on circular needle. Cast on 232-247-257-262 sts with 2 strands medium grey on circular needle size 4.5 mm. P 1 row from WS. Then work STRIPES – see explanation above and rib from RS as follows: 5 band sts in GARTER ST - see explanation above - work rib = K 2/P 3 until 7 sts remain, K 2, 5 band sts in garter st. REMEMBER BUTTONHOLES! Continue rib with bands sts in garter st and K over K and P over P until piece measures 4 cm - adjust so that last row is worked from WS. Switch to circular needle size 5 mm. Now work 1 row in stocking st with 5 band sts in garter st in each side while dec 32-33-33-32 sts evenly = 200-214-224-230 sts. Work 1 row stocking st (band sts in garter) from WS. Continue with pattern as follows: 5 band sts in garter st, stocking st until 20 sts remain, A.1 (= 15 sts), 5 band sts in garter st. AT THE SAME TIME on every 10th row work SHORT ROWS - see explanation above, over band sts in garter st. REMEMBER THE KNITTING TENSION When A.1 has been worked vertically, repeat repetition vertically until finished measurements (i.e. pattern end differently in the different sizes and may not be the same as on photo). When piece measures 18-20-21-23 cm, insert 6 markers in the piece as follows, beg from RS: Work the first 13-14-15-15 sts, insert a marker, work the next 27-30-31-32 sts, insert a marker, work the next 35-37-39-40 sts, insert a marker (= right shoulder), work the next 35-37-39-40 sts, insert a marker, work the next 27-30-31-32 sts, insert a marker work the next 35-37-39-40 sts, insert a marker (= left shoulder), work the remaining 28-29-30-31 sts on row as before. Work 1 row from WS. On next row beg dec. Dec 1 st before each marker - READ DECREASE TIP! Dec like this every row from RS (i.e. every other row) 13-14-15-15 times in total = 122-130-134-140 sts. Now work 2 rows in stocking st while dec 10-13-12-13 sts evenly on first row = 112-117-122-127 sts. Switch to circular needle size 4.5 mm and work rib as follows: 5 band sts in garter st, (K 2, P 3) until 7 sts remain, K 2, 5 band sts in garter st. When rib measures 4 cm, cast off with K over K and P over P. Fasten off. Sew the buttons on to the left front band. |
||||||||||||||||
Diagram explanations |
||||||||||||||||
|
||||||||||||||||
 |
||||||||||||||||
 |
||||||||||||||||
Have you finished this pattern?Tag your pictures with #dropspattern or submit them to the #dropsfan gallery. Do you need help with this pattern?You'll find 23 tutorial videos, a Comments/Questions area and more by visiting the pattern on garnstudio.com. © 1982-2026 DROPS Design A/S. We reserve all rights. This document, including all its sub-sections, has copyrights. Read more about what you can do with our patterns at the bottom of each pattern on our site. |
||||||||||||||||


With over 40 years in knitting and crochet design, DROPS Design offers one of the most extensive collections of free patterns on the internet - translated to 17 languages. As of today we count 324 catalogues and 12267 patterns translated into English (UK/cm). 12267
We work hard to bring you the best knitting and crochet have to offer, inspiration and advice as well as great quality yarns at incredible prices! Would you like to use our patterns for other than personal use? You can read what you are allowed to do in the Copyright text at the bottom of all our patterns. Happy crafting!
Post a comment to pattern DROPS Extra 0-1318
We would love to hear what you have to say about this pattern!
If you want to leave a question, please make sure you select the correct category in the form below, to speed up the answering process. Required fields are marked *.