
Popular categories
Looking for a yarn?


Comments / Questions (101)
![]() Meri Conant wrote:
Meri Conant wrote:
I love this bag but don't know how to crochet. Has anyone converted it to a knitting pattern? Thanks
13.12.2017 - 20:09DROPS Design answered:
Dear Mrs Conant, why not have a try crocheting? This video will give you the basis and you'll find more videos related to this pattern under tab "Video". Happy crocheting!
14.12.2017 - 08:35
![]() DAUPRAT Mauricette wrote:
DAUPRAT Mauricette wrote:
Merci pour votre aide
27.11.2017 - 11:09
![]() DAUPRAT Mauricette wrote:
DAUPRAT Mauricette wrote:
Bonjour, pouvez vous me dire a quel rang se trouve la fleche actuellement je suis au rang 12 merci
24.11.2017 - 18:27DROPS Design answered:
Bonjour Mme Dauprat, la flèche se trouve sur l'avant-dernier tour, c'est celui que l'on va crocheter (*1 B dans chacune des 3 premières B/ des 3 B suivantes, 1 ml, sauter 1 B*, répéter de *-*) - crochetez encore le dernier rang et le sac est terminé. Bon crochet!
27.11.2017 - 08:53
![]() DAUPRAT Mauricette wrote:
DAUPRAT Mauricette wrote:
Bonjour, pour une personne comme moi qui n'a jamais de sac mochila je trouve que les commentaires ne sont pas clairs a quel tour vous changer de couleur tour 1 en gris et apres vraiment pas facile pour une novice j ai achete la laine mais pense qu 'elle rester dans un tiroir dommage
17.11.2017 - 13:48DROPS Design answered:
Bonjour Mme Dauprat, le sac se commence en gris foncé et on crochète ensuite le diagramme A.1 (en le répétant 12 fois en largeur au total). Les couleurs sont indiqués dans A.1: les 2 premiers tours se font en gris foncé, le tour 3 en beige clair, le tour 4 en alternant 1 m beige clair, 1 m gris foncé et ainsi de suite - suivez bien en même temps les indications écrites pour les augmentations de A.1. Bon crochet!
17.11.2017 - 15:10
![]() MENANTEAU NADINE wrote:
MENANTEAU NADINE wrote:
Je rajoute que j'ai realise ce modele en qualité Paris en naturel et bleu marine, un autre en blanc et framboise. J'ai modifié les finitions j'ai mis les noeuds des anses a l interieur ajouté un cordonnet dans les jours du haut du sac mis des perles en bois aux extremites de ce cordonnet pour un système de fermeture coulissante j'ai doublé le sac avec un tissu coton assorti à la couleur principale et fait des poches. Votre site donne vraiment envie de creer.
24.09.2017 - 19:37
![]() MENANTEAU NADINE wrote:
MENANTEAU NADINE wrote:
Bonjour Je voulais vous faire part du grand plaisir que j'ai eu pour la realisation de ce modèle. Vos explications sont très claires et vos infos crochet très utiles. Dommage que je ne puisse pas vous envoyer des photos de mes realisations un peu modifiees. Et maintenant je me lance dans les corbeilles. Merci encore de m'avoir donné envie de faire.
24.09.2017 - 19:30DROPS Design answered:
Bonjour Mme Menanteau et merci pour votre message. Rejoignez le groupe DROPS Workshop ou taguez-nous sur les réseaux sociaux pour nous montrer votre ouvrage. Vous pouvez également envoyer des photos à votre magasin DROPS qui pourra également les publier pour vous sur ses réseaux sociaux. Bon crochet!
25.09.2017 - 10:58
![]() Soulié wrote:
Soulié wrote:
Bonjour, je viens de finir ce sac Santa Fé. J'en suis absolument ravie cependant alors que 200 g de chaque couleur sont prévues il ne m'a fallu que 3 pelotes de chacune. Il me reste 2 pelotes, les renvoyer me couterait aussi cher en frais de port que le remboursement. Je vous saurait gré de corriger les explications du modèle pour les futures amatrices. Cordialement
11.09.2017 - 15:28DROPS Design answered:
Bonjour Mme Soulié et merci pour votre retour. La quantité de fil utilisé au crochet peut varier en fonction de la façon de crocheter de chacune, et pour l'instant, nous avons plutôt un retour global sur la nécessité des 4 pelotes de chaque couleur. Bon crochet!
11.09.2017 - 16:17
![]() Anita wrote:
Anita wrote:
Hej! Förstår inte hur jag ska läsa diagram A1? På bilden ser det ut som varannan stolpe är grå o den andra vit.. men så ser det inte ut på diagrammet.. Hur läser jag ut detta?
07.09.2017 - 11:50DROPS Design answered:
Hei Anita. Du starter med grå og hekler 5 luftmasker som du setter sammen til en ring, så hekler du A.1 12 ganger om ringen, deretter hekler du 2 omganger (fortsatt grå, X i diagrammet), deretter 1 omgang hvit (hvit firkant i diagrammet) og så på 4.omgang hekler du med annenhver farge. God Fornøyelse!
07.09.2017 - 13:26
![]() Caterina wrote:
Caterina wrote:
Salve;il mio lavoro risulta inclinato a sinistra eppure sto seguendo correttamente lo schema. Sbaglio qualcosa?è giusto cambiare colore nell'ultimo passaggio della maglia di colore diverso?
24.08.2017 - 10:32DROPS Design answered:
Buongiorno Caterina, il cambio colore è corretto, l'ultimo gettato deve essere fatto con il nuovo colore, come indicato nel paragrafo "colori jacquard". Il lavoro dovrebbe procedere in verticale. Buon lavoro!
24.08.2017 - 10:55
![]() Eva wrote:
Eva wrote:
Jag förstår inte näst sista varvet, varvet med pil. Jag uppfattar det som att man ska börja 3 stolpar och sedan en lm och hoppa över en maska och sedan börja om med 3 stolpar. När jag sedan läser beskrivningen om hur man gör med axelremmarna så verkar det vara ett större hål på 3 maskor där remmarna ska igenom. Jag förstår inte. Kan ni vara vänliga och förklara hur jag ska göra med detta varv?
30.07.2017 - 10:45DROPS Design answered:
Hej, Jo du skall börja m 3 stolpar och sedan en lm och hoppa över som du skriver. Remmarna skall igenom lm-hålet på varje sida om de 3 stolparna. Lycka till!
17.08.2017 - 15:58
|
|||||||
Santa Fe#santafebag |
|||||||
|
|
|||||||
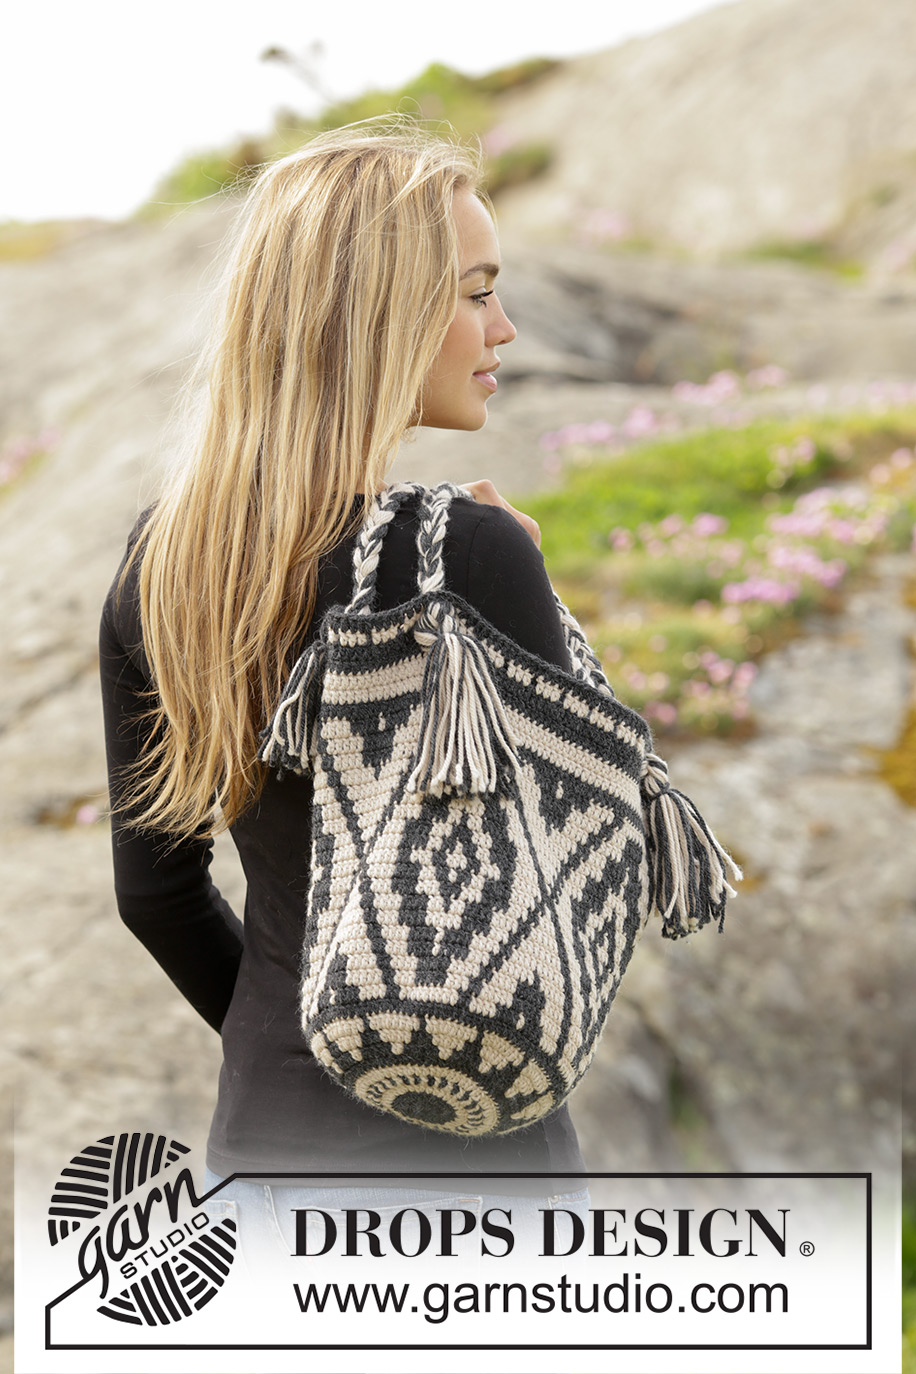
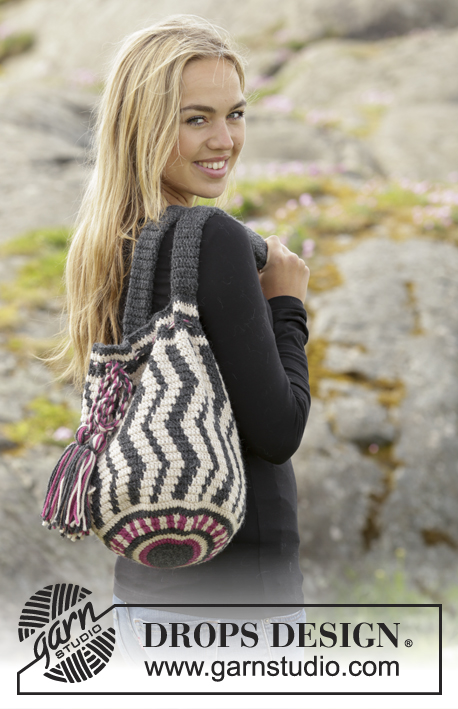
Crochet DROPS bag with colour pattern in ”Nepal”.
DROPS 173-1 |
|||||||
|
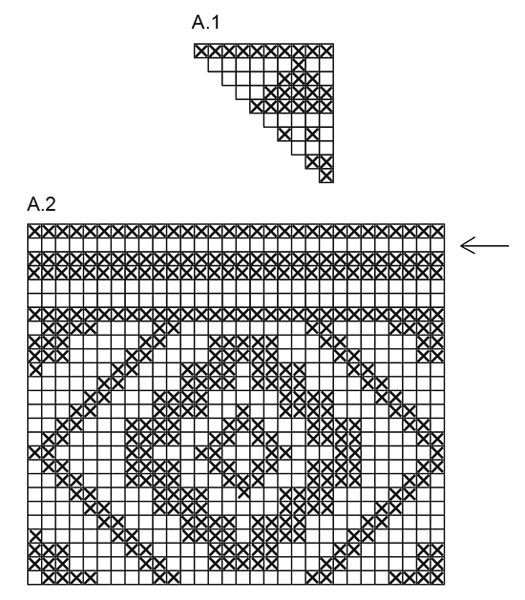
PATTERN: See diagrams A.1 and A.2. Diagrams show colours in pattern. 1 square = 1 tr. COLOUR PATTERN (worked in the round): When changing colour work as follows: Work last tr with first colour but wait with last pull through, switch to next colour and work last pull through, then work next tr. When working with two colours place strands for the colour not worked over sts from previous round, work around the strands so that they is hidden and follows in the round. CROCHET INFO: Replace first tr at beg of every round with 3 ch, finish round with 1 sl st in third ch. --------------------------------------------------------- BAG: Worked in the round. Work 5 ch with dark grey on hook size 3.5 mm and form a ring with 1 sl st in first ch. Then work in the round and according to A.1 (work 12 repetitions of A.1 in width) - READ COLOUR PATTERN. ROUND 1: Work 12 tr in ring – read CROCHET INFO. ROUND 2: Work 2 tr in every tr = 24 tr. ROUND 3: Work * 1 tr in first tr, 2 tr in next tr *, repeat from *-* the entire round = 36 tr. ROUND 4: Work * 1 tr in each of the first 2 tr, 2 tr in next tr *, repeat from *-* the entire round = 48 tr. REMEMBER THE CROCHET TENSION! ROUNDS 5-10: Continue with inc and pattern as before, i.e. on every round work 1 more tr between inc = 120 tr. ROUND 11: Continue to work in the round but without inc and work according to A.2 (= 4 repetitions in width). On round with arrow work as follows: * 1 tr in each of the first/next 3 tr, 1 ch, skip 1 tr *, repeat from *-*. Continue until A.2 has been worked, fasten off. STRAPS: Cut 18 lengths of each colour of 120 cm = 36 strands. Place the strands tog and tie a loose knot, leave approx. 12 cm after knot. Distribute strands in 3 piles with 12 strands in each pile. Plait the three piles tog until plait measures approx. 68 cm. Divide strands into 2 piles. Thread the 2 halves through bag, 3 tr apart, in round with holes. Tie the tog into a knot on the front of bag. Take the knot at beg of plait and fasten the end to bag the same way but in the opposite side. Make another plait the same way - see photo. |
|||||||
Diagram explanations |
|||||||
|
|||||||
 |
|||||||
Have you finished this pattern?Tag your pictures with #dropspattern #santafebag or submit them to the #dropsfan gallery. Do you need help with this pattern?You'll find 7 tutorial videos, a Comments/Questions area and more by visiting the pattern on garnstudio.com. © 1982-2026 DROPS Design A/S. We reserve all rights. This document, including all its sub-sections, has copyrights. Read more about what you can do with our patterns at the bottom of each pattern on our site. |
|||||||


With over 40 years in knitting and crochet design, DROPS Design offers one of the most extensive collections of free patterns on the internet - translated to 17 languages. As of today we count 324 catalogues and 12267 patterns translated into English (UK/cm). 12267
We work hard to bring you the best knitting and crochet have to offer, inspiration and advice as well as great quality yarns at incredible prices! Would you like to use our patterns for other than personal use? You can read what you are allowed to do in the Copyright text at the bottom of all our patterns. Happy crafting!
Post a comment to pattern DROPS 173-1
We would love to hear what you have to say about this pattern!
If you want to leave a question, please make sure you select the correct category in the form below, to speed up the answering process. Required fields are marked *.