
Popular categories
Looking for a yarn?


Comments / Questions (40)
![]() Sara wrote:
Sara wrote:
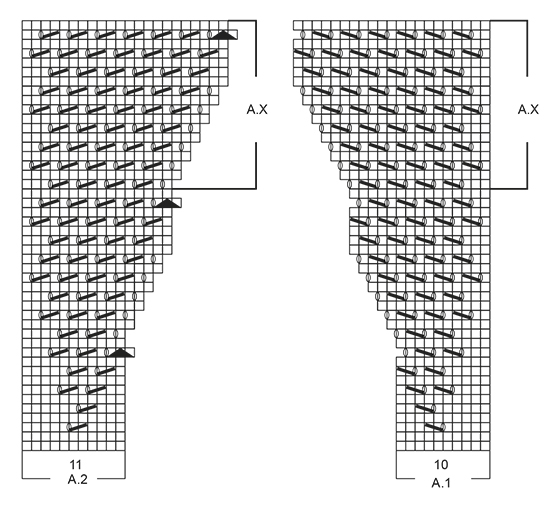
Hello, Could you please clarify how to repeat A.X?
22.04.2020 - 16:14DROPS Design answered:
Dear Sara, continue lace pattern as before repeating the A.X part of the diagrams, you will just have more stitches from 2nd time because of the increases on the middle of each side. the lace patterns should always be worked so that the lace are worked diagonally as before, increasing at the same time as shown in the diagram. Happy knitting!
22.04.2020 - 16:35
![]() Lorena wrote:
Lorena wrote:
Buongiorno. Per favore, avrei bisogno di una conferma. Le misure riportate sotto al disegno del modello si intendono riferite solo ad un pannello (e sono quindi da raddoppiare) ? Grazie e saluti. Lò
14.06.2019 - 19:41DROPS Design answered:
Buongiorno Lorena. Sì le misure sono riferite ad un solo pannello. Buon lavoro!
14.06.2019 - 20:46
![]() Monica wrote:
Monica wrote:
Buongiorno, sto cercando di realizzare il modello e mi trovo sul davanti, non ho capito quando fare gli aumenti per gli scalfi, è corretto farli dopo l avvio delle 27 m per il collo e quindi l unione delle due parti? Grazie, saluti.
17.02.2019 - 09:06DROPS Design answered:
Buongiorno Monica, per il davanti deve lavorare gli aumenti per lo scalfo quando il lavoro misura 13-12-12-10-10-7 cm a seconda della taglia che sta lavorando, tranne per la taglia XXXL, per cui gli aumenti iniziano prima degli aumenti per il collo. Per gli aumenti seguire le istruzioni del dietro. Buon lavoro!
17.02.2019 - 09:33
![]() Gry wrote:
Gry wrote:
Det lader til at der er lavet tastefejl i det færdige mål på diagrammet, hvor str. XXXL er 40 cm fra armhule til bunden, og i XXL er der 68 cm. I opskriften skal man strikke 4 pinde ret, efter arbejdet måler 48 cm, og 4 pinde fylder ikke 20 cm.
12.06.2018 - 15:21
![]() Franca wrote:
Franca wrote:
Buongiorno,nella versione italiana del modello c'é un errore nella spalla della destra del dietro? Devo fare un solo aumento o 3?
08.06.2018 - 15:52DROPS Design answered:
Buongiorno Franca. Deve aumentare 1 sola maglia. Abbiamo corretto il numero delle maglie dopo l'aumento. Buon lavoro!
08.06.2018 - 16:48
![]() Jacqueline Veilleux wrote:
Jacqueline Veilleux wrote:
Merci de votre réponse mais je ne comprends pas (tête dure), Bon après avoir tricoter tous les rangs du schéma de A1 à AX et A2 à AX, je fais quoi, je recommence en bas du schéma ou je ne refais que les rangs de AX jusqu'à longueur désirée? Désolée de vous harcelée. Jacqueline
04.06.2018 - 16:52DROPS Design answered:
Bonjour Mme Veilleux, après avoir tricoté A.1 et A.2 jusqu'à A.X vous reprenez A.1 et A.2 en commençant par le 1er rang de A.X et vous répétez les rangs de A.X jusqu'à la hauteur indiquée. Vous allez tricoter A.X en largeur sur plus de mailles qu'auparavant car vous avez augmenté le nbe de mailles du point fantaisie mais vous commencez et terminez A.X dans A.1 et A.2 comme avant (et vous répétez 2 m ens à l'end, 1 jeté, 1 m end) comme au milieu des rangs. Bon tricot!
05.06.2018 - 08:50
![]() Jacqueline Veilleux wrote:
Jacqueline Veilleux wrote:
Bonjour, j\'adore votre site. Je tricote le modèle 168-33. J\'ai fait A1, A2 et AX 1 fois un après l\'autre d\'après le schéma mais après AX, qu\'est-ce que je fait? Quand vous dites répéter AX en même temps je ne comprends pas. Et quand vous dites verticalement et horizontalement vous me perdez. merci
01.06.2018 - 23:21DROPS Design answered:
Bonjour Mme Veilleux, quand vous continuez A.x tricotez A.1 comme avant (mais sur davantage de mailles) et terminez A.1X comme dans le diagramme (= par 1 jeté au 1er rang de A.X), puis tricotez A.2X comme avant en commençant comme dans le diagramme (= par 1 m end, 1 jeté au 1er rang) et répétez A.X comme avant mais sur davantage de mailles. Vous allez ainsi continuer à augmenter au milieu des diagrammes comme avant, mais le point fantaisie va commencer et se terminer au même endroit, on augmente simplement le nombre de mailles tricotées au point ajouré. Bon tricot!
04.06.2018 - 08:50Debbie Pettipas wrote:
I have worked the lace pattern up to row 27, then the pattern is not working out for me. I have the correct amount of stitches, but when I get to the end of a.1 there is an extra stitch.... help!
16.07.2017 - 17:17DROPS Design answered:
Dear Mrs Petipas, this extra st at the end of row 27 will be worked as the first st in A.2 (slip 1 as if to K (= last st in A.2), then K2 tog (the first 2 sts in A.2), and psso, the remining st = first st in A.2. Happy knitting!
17.07.2017 - 09:25Rosario Caballero wrote:
Hola, no entiendo como hay que aumentar los 12 puntos a la vez q.ue se teje AX en vertical para hacer la ultima parte del cuerpo del top. instrucciones muy mal escritas
29.06.2017 - 15:10DROPS Design answered:
Hola Rosario. Los aumentos (en este caso los 12 puntos) están incluidos en el diagrama A.x. No hay que hacer aumentos adicionales.
01.07.2017 - 18:49Martina wrote:
Salve, sto lavorando il corpo del modello nella taglia M. Completata 1 ripetizione di A1 e A2 ho 10 m in più, ossia da 21 (11+10) m, 31 m. Le sommo alle 65 m rasate=96 m, per un totale di 192 m, non 216 m come da istruzioni. Partendo da (65 m + 21m )x2= 172 m, come aumento 44 m per arrivare alle 216 m. segnate?
18.06.2017 - 23:15DROPS Design answered:
Buongiorno Martina. Deve lavorare tutte le righe dei diagrammi A1 e A2, comprese le righe indicate con Ax. In questo modo. Quindi alla fine di tutte le righe, avrà 21 maglie per A1, 22 per A2. In questo modo il numero complessivo delle maglie per la taglia M sarà di 216. Buon lavoro!
19.06.2017 - 07:06
|
||||||||||||||||
Venezia Top#veneziatop |
||||||||||||||||
|
|
||||||||||||||||
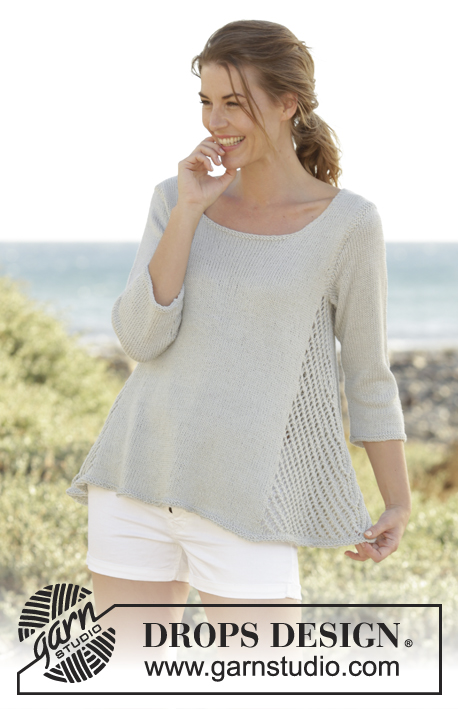
Knitted DROPS top with lace pattern in the sides and A-shape, worked top down in ”Belle”. Size: S - XXXL.
DROPS 168-33 |
||||||||||||||||
|
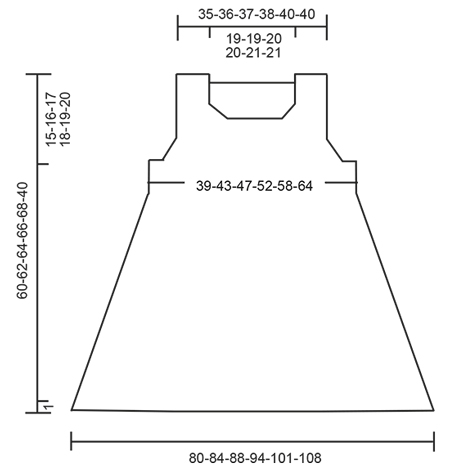
GARTER ST (worked in the round): 1 ridge = 2 rounds. * K 1 round and P 1 round *, repeat from *-*. GARTER ST (back and forth): K all rows. 1 ridge = 2 rows K. PATTERN: See diagrams A.1 and A.2. INCREASE TIP: Inc 1 st by making a YO. On next row P YO twisted (i.e. work in back loop of YO instead of front) to avoid holes. ---------------------------------------------------------- TOP: The piece is worked top down. Work first front and back piece separately, back and forth down to armhole, then work in the round. BACK PIECE: Work right shoulder as follows: Cast on 16-17-17-18-20-20 sts on circular needle size 4.5 mm with Belle. Work as follows (1st row = from RS): 3 sts in GARTER ST - see explanation above (= towards the neck), work 10-11-11-12-14-14 sts in stocking st, 3 sts in garter st (= towards armhole). Continue like this until 4 rows in stocking st have been work inside the 3 sts in garter st in each side. On next row inc 1 st inside the 3 sts in garter st towards the neck - READ INCREASE TIP = 17-18-18-19-21-21 sts. Work 1 row from WS and put piece aside. Work left shoulder as follows: Cast on and work as right shoulder but reversed. I.e. inc 1 st before the 3 sts in garter st towards the neck on 5th row in stocking st. Work 1 row from WS. Turn and work as before over all sts. At the end of row cast on 35-35-37-37-39-39 new sts for neck and then work the 17-18-18-19-21-21 sts from right shoulder on to needle = 69-71-73-75-81-81 sts. Work the new sts cast on for neck in garter st. When 2 ridges have been worked over these sts, continue in stocking st inside the 3 sts in garter st in each side. REMEMBER THE KNITTING TENSION When piece measures 13-12-12-10-10-7 cm from cast-on edge, inc 1 st inside the 3 sts in garter st in each side for armhole. Repeat inc on every row from RS 2-4-6-9-11-16 more times = 75-81-87-95-105-115 sts. Work 1 row from WS after last inc and put piece aside. FRONT PIECE: Work left shoulder as follows: Cast on 16-17-17-18-20-20 sts on circular needle size 4.5 mm with Belle. Work as follows (1st row = from RS): 3 sts in garter st (= towards neck), work 10-11-11-12-14-14 sts in stocking st, 3 sts in garter st (= towards the left). READ ALL OF THE FOLLOWING SECTION BEFORE CONTINUING! Continue like this, AT THE SAME TIME when piece measures 7-8-7-8-8-9 cm, inc for neck (- see explanation below) and when piece measures 13-12-12-10-10-7 cm inc for armholes the same way as on back piece. NOTE: In size XXXL beg inc for armholes before inc for neck. INCREASE NECK: Inc 1 st inside the 3 sts in garter st towards the neck. Repeat inc on every row from RS 4-4-5-5-6-6 more times = 5-5-6-6-7-7 sts inc for neck. When all inc are done, work 1 row from WS. Put piece aside. Work right shoulder as follows: Cast on and work as left shoulder but reversed. I.e. inc 1 st before the 3 sts in garter st towards the neck. When all inc for neck are done, work 1 row from WS. Turn and work as before over all sts. At the end of row cast on 27 new sts in all sizes for neck, then work all sts from left shoulder on to needle. Continue back and forth like this (continue inc for armholes) until 2 ridges have been worked over the new sts for neck. Continue in stocking st inside the 3 sts in garter st in each side. When all inc for armholes are done, there are 75-81-87-95-105-115 sts on needle. After last inc work 1 row from WS. Turn and work over all sts on front piece, cast on 3-5-7-9-11-13 new sts for armhole, work 75-81-87-95-105-115 sts from back piece on to same circular needle and cast on 3-5-7-9-11-13 new sts for armhole = 156-172-188-208-232-256 sts on round. Beg of round is after the last 3-5-7-9-11-13 new sts cast on. BODY: Then work in the round on circular needle. NOW MEASURE THE PIECE FROM HERE. Now continue with pattern as follows: Work 3 sts in garter st, continue in stocking st as before over the next 69-75-81-89-99-109 sts, 9-11-13-15-17-19 sts in garter st, stocking st over the next 69-75-81-89-99-109 sts, 6-8-10-12-14-16 sts in garter st. Continue like this until 2 ridges have been worked over the new sts cast on under armhole. Then work in stocking st until 12-13-14-15-16-17 sts remain before beg of round. This is now beg of round. Now work as follows: Insert a marker, work A.1 (= 10 sts on first round), A.2 (= 11 sts on first round), insert a marker, work in stocking st over the next 57-65-73-83-95-107 sts, insert a marker, A.1, A.2, insert a marker, work in stocking st over the remaining 57-65-73-83-95-107 sts. NOTE: Move markers upwards when working to make it easier to tell the section with lace pattern and stocking st apart. The section in stocking st is constant and inc sts in the section with lace pattern in the sides. Continue pattern like this until entire A.1 and A.2 have been worked 1 time vertically. There are now 200-216-232-252-276-300 sts on round and piece measures approx. 19 cm in all sizes. Then repeat A.X vertically AT THE SAME TIME continue inc in diagram as before: I.e. lace pattern in each side inc with 12 sts and there are 2 eyelet rows (1 eyelet row = 1 dec + 1 YO) more in A.1 and A.2 in each side every time A.X is worked 1 time vertically. When piece measures 44-45-46-47-48-49 cm, there are approx. 320-336-352-376-404-432 sts on round. Work 1 round in stocking st. Then work 2 ridges. Cast off. ASSEMBLY: Sew the shoulder seams tog. Make sure that to avoid a tight seam. |
||||||||||||||||
Diagram explanations |
||||||||||||||||
|
||||||||||||||||
 |
||||||||||||||||
 |
||||||||||||||||
Have you finished this pattern?Tag your pictures with #dropspattern #veneziatop or submit them to the #dropsfan gallery. Do you need help with this pattern?You'll find 21 tutorial videos, a Comments/Questions area and more by visiting the pattern on garnstudio.com. © 1982-2026 DROPS Design A/S. We reserve all rights. This document, including all its sub-sections, has copyrights. Read more about what you can do with our patterns at the bottom of each pattern on our site. |
||||||||||||||||


With over 40 years in knitting and crochet design, DROPS Design offers one of the most extensive collections of free patterns on the internet - translated to 17 languages. As of today we count 324 catalogues and 12267 patterns translated into English (UK/cm). 12267
We work hard to bring you the best knitting and crochet have to offer, inspiration and advice as well as great quality yarns at incredible prices! Would you like to use our patterns for other than personal use? You can read what you are allowed to do in the Copyright text at the bottom of all our patterns. Happy crafting!
Post a comment to pattern DROPS 168-33
We would love to hear what you have to say about this pattern!
If you want to leave a question, please make sure you select the correct category in the form below, to speed up the answering process. Required fields are marked *.