
Popular categories
Looking for a yarn?


Comments / Questions (47)
![]() Marie Andree Garnodon wrote:
Marie Andree Garnodon wrote:
Merci beaucoup pour votre réponse rapide et très claire. Bonne journée !
26.10.2016 - 10:40
![]() Marie Andrée Garnodon wrote:
Marie Andrée Garnodon wrote:
Je vous prie de ne pas tenir compte de ma question précédente. J'ai trouvé où se situe le problème: Je n'avais pas compris qu'il fallait faire 4 rangs en point fantaisie1pour 2 rangs de point fantaisie 2. Je dois tout recommencer. !!!!!!
25.10.2016 - 23:25DROPS Design answered:
Bonjour Mme Garnodon, on tricote les 2 points fantaisie en même temps, soit le point fantaisie 2 sur les 21 premières m et le point fantaisie 1 sur les 34 dernières m (en taille L) en commençant le point fantaisie 1 par 1 côte mousse (= 2 rangs endroit). Le point fantaisie 2 se tricote sur 2 rangs (= 1 rang jersey, 1 rang 1 m end/1 m env) et le point fantaisie 1 se tricote sur 4 rangs (= 2 rangs jersey, 2 rangs point mousse), c'est-à-dire que l'on tricote 2x le point fantaisie 2 en hauteur pour 1 fois le point fantaisie 1 en hauteur). Bon tricot!
26.10.2016 - 09:30
![]() Marie Andree Garnodon wrote:
Marie Andree Garnodon wrote:
Pour assembler les 2 parties j'ai un problème: la partie en point fantaisie 2 est très distendue, donc plus longue que la partie en point fantaisie 1 qui doit s'y rattacher. Si je couds sur 50 cm il reste 45cm et non 14cm pour l’encolure. Comment faire pour que les dimensions soient respectées? Merci de votre réponse
25.10.2016 - 22:58DROPS Design answered:
Bonjour Mme Garnodon, pensez à bien conserver la même tension pour les 2 points fantaisie pour que les mesures soient correctes. Bon tricot!
26.10.2016 - 09:27
![]() Stella Moreau wrote:
Stella Moreau wrote:
Bonjour je nai pas daiguille circulaire comment faire pour tricoter avec aiguille normal merci
30.12.2015 - 18:23DROPS Design answered:
Bonjour Mme Moreau, le poncho se tricote entièrement en allers et retours sur aiguille circulaire pour avoir suffisamment de place pour y loger toutes les mailles. Vous pouvez tricoter sur aig. droites mais comme vos mailles seront plus serrées, veillez à bien conserver la bonne tension. Voir aussi ici. Bon tricot!
02.01.2016 - 15:40Tiffany wrote:
It took me ages to figure out this pattern but I got it after 4 goes. In the end I added 8 more stitches and am knitting it on size 5 needles.
01.11.2015 - 20:30
![]() Mieke Van Loon wrote:
Mieke Van Loon wrote:
Ik vind de beschrijving voor de kraag moeilijk. Ik ben op zoek naar een tekening, een telpatroon, maar kan dat niet vinden.
19.10.2015 - 22:23DROPS Design answered:
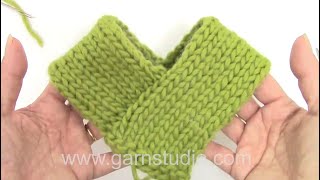
Hoi Mieke. Wij hebben er helaas geen tekening van, maar uit eigen ervaring met dit patroon, dan is het doen precies zoals er staat: Als je de stukken hebt gebreid: Plaats de twee "sjaals" over de schouders en tot middenachter zodat de korte zijkanten elkaar middenachter raken. Naai de korte zijkanten samen met de zijkanten tegen elkaar in de buitenste lusjes van de kant st. Ik zal het ook wel op onze video wenslijst zetten, ik kan helaas niet zeggen hoelang het duurt voordat de video klaar is.
20.10.2015 - 15:59
![]() Stefan wrote:
Stefan wrote:
Hallo, ich habe eine Frage bzw. verstehe etwas nicht: Wenn man die verkürzten Reihen wie beschrieben strickt, wird das Kragenband doch in der Mitte höher und nicht an den Rändern, und weil das Band in der Mitte vorne am Poncho befestigt ist, wird der Kragen nachher vorne am Hals höher sein, und nicht hinten im Nacken. Ist da ein Fehler oder hab ich etwas übersehen / falsch verstanden?
17.10.2015 - 11:49DROPS Design answered:
Es gibt mittlerweile ein Video dazu, das die Kontruktion des Kragens zeigt.
01.03.2016 - 16:55
![]() Helena wrote:
Helena wrote:
Kan de drops brushed alpaca silk van garnstudio ook in de wasmachine?
08.10.2015 - 20:51DROPS Design answered:
Hoi Helena. Nee, het is handwas. Kijk ook onder WASVOORSCHRIFT op de kleurenkaart
09.10.2015 - 14:47
![]() INGER TROELSEN wrote:
INGER TROELSEN wrote:
JEG FORSTÅR IKKE HELT NOGET I OPSKRIFTEN. DER STÅ FØRST DE FØRSTE 2 PINDE STRIKKES MØNSTER 2 OVER DE FØRSTE 17 MASKER SOM JEG LÆSER SOM RET. SÅ SKAL DE RESTERENDE MASKER OGSÅ STRIKKES RET, SOM JEG LÆSER DET, OG DET KAN JO IKKE PASSE. ( JEG ER IKKE SÅ ERFAREN I STRIKNING, MEN DEN SÅ LET UD) HILSEN iNGER
27.05.2015 - 12:24DROPS Design answered:
Hej Inger, Jo det stemmer, hele første pind strikkes ret ifølge opskriften, men 2.pind strikkes i ret over retstriksmaskerne og så ifølge 2.p i M2 over de resterende masker. God fornøjelse!
27.05.2015 - 14:51
![]() Dorthe Hansen wrote:
Dorthe Hansen wrote:
Garnmængden passer ikke til opskriften, der er et nøgle for lidt. Har strikket den i M/L
05.12.2014 - 11:03
|
|
Peru#peruponcho |
|
|
|
|
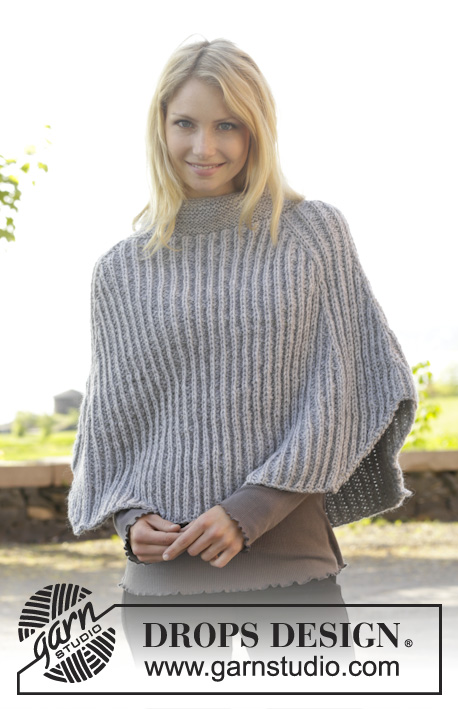
Knitted DROPS poncho in garter st in 2 strands ”Brushed Alpaca Silk”. Size: S - XXXL.
DROPS 156-48 |
|
|
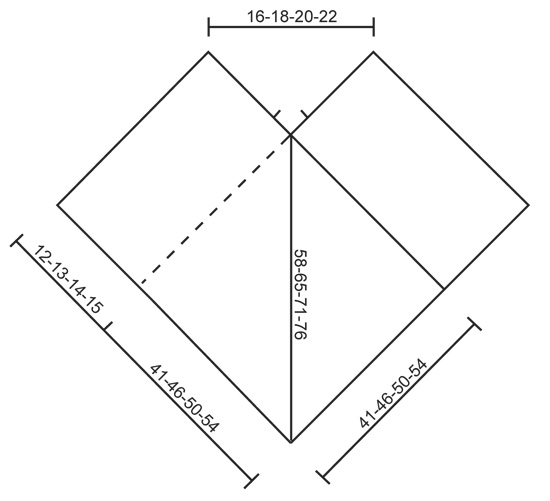
GARTER ST (back and forth on needle): K all rows. 1 ridge = 2 rows K. PATTERN 1: ROW 1: K from RS. ROW 2: P from WS. ROW 3: K from RS. ROW 4: K from WS. PATTERN 2: ROW 1 (= RS): K all sts. ROW 2 (= WS): * K 1, P 1 *, repeat from *-* and finish with K 1. ---------------------------------------------------------- PONCHO: Worked in two parts that are sewn tog when finished. Each part is worked back and forth on circular needle. PART 1: Cast on 45-51-55-59 sts on circular needle size 8 mm with 2 strands Brushed Alpaca Silk. Work the first 2 rows as follows: Work PATTERN 2 over the first 17-19-21-23 sts, 1 ridge in GARTER ST - see explanation – over the remaining 28-32-34-36 sts. Then work as follows from RS: Pattern 2 over the first 17-19-21-23 sts as before, PATTERN 1 over the remaining 28-32-34-36 sts. Continue pattern like this. REMEMBER THE KNITTING TENSION! When piece measures approx. 64-71-77-83 cm - adjust so that next row is worked from RS, work pattern 2 over the first 17-19-21-23 sts as before, work 1 ridge over 28-32-34-36 sts. Cast off. Piece measures approx. 65-72-78-84 cm. PART 2: Cast on and work as 1st part. ASSEMBLY: Place cast-off edge on 1st part towards right long side on 2nd part - at the bottom towards cast-on edge and 41-46-50-54 cm upwards – make sure not to stretch the piece too much. Sew the 2 parts tog with neat little stitches. Then sew cast-off edge on 2nd part to right side on 1st part the same way. NECK WARMER: Work an neck edge with a "scarf" on each side of opening at the front as follows (sew scarfs tog mid back when finished): Insert 2 markers mid front of neck, approx. 5-5-6-7 cm from tip mid front and up, measured along each side of neck. LOOSELY cast on 45-49-54-58 sts around the neck on circular needle size 7 mm with 2 strands Brushed Alpaca Silk, then pick up from RS approx. 37 to 47 sts (beg at one marker at the front and finish at the other marker), then LOOSELY cast on 45-49-54-58 new sts at the end of row = approx. 127-163 sts. Work in garter st back and forth until neck edge measures 7-7-8-9 cm. Now work short rows to make the edge higher at the back of neck as follows: Work 46-50-56-60 sts, slip these sts on 1 stitch holder, work the rest of row, turn and work 46-50-56-60 sts, slip these sts on 1 stitch holder, work the rest of row, * turn and work 4-5-5-6 sts, slip these sts on 1 stitch holder, work the rest of row, turn piece and work 4-5-5-6 sts, slip these sts on 1 stitch holder and work the rest of row *, repeat from *-* 2 more times. Now slip sts from stitch holders back on the needle and continue in garter st back and forth over all sts until neck edge measures approx. 9-9-10-11 cm on the most narrow part (i.e. at the edge in each side). Loosely cast off. Place the two "scarfs" over shoulders and to mid back so that short sides meet mid back. Sew short sides tog edge to edge in outer loops of edge sts. Neck edge now lies around the opening of the poncho. |
|
 |
|
Have you finished this pattern?Tag your pictures with #dropspattern #peruponcho or submit them to the #dropsfan gallery. Do you need help with this pattern?You'll find 16 tutorial videos, a Comments/Questions area and more by visiting the pattern on garnstudio.com. © 1982-2026 DROPS Design A/S. We reserve all rights. This document, including all its sub-sections, has copyrights. Read more about what you can do with our patterns at the bottom of each pattern on our site. |


With over 40 years in knitting and crochet design, DROPS Design offers one of the most extensive collections of free patterns on the internet - translated to 17 languages. As of today we count 324 catalogues and 12267 patterns translated into English (UK/cm). 12267
We work hard to bring you the best knitting and crochet have to offer, inspiration and advice as well as great quality yarns at incredible prices! Would you like to use our patterns for other than personal use? You can read what you are allowed to do in the Copyright text at the bottom of all our patterns. Happy crafting!
Post a comment to pattern DROPS 156-48
We would love to hear what you have to say about this pattern!
If you want to leave a question, please make sure you select the correct category in the form below, to speed up the answering process. Required fields are marked *.