
Popular categories
Looking for a yarn?


Comments / Questions (67)
![]() Patricia Parmentier Endres wrote:
Patricia Parmentier Endres wrote:
Bonjour, je suis complètement perdue pour faire le col de ce gilet! Je n'y comprends rien du tout! Pouvez vous m'aider? Merci !
12.11.2017 - 17:53DROPS Design answered:
Bonjour Mme Parmentier, on va crocheter le col de bas en haut, à partir des 18-22 premières brides des devants. Par ex pour le devant droit, en commençant sur l'endroit, crochetez 1 bride dans chaque maille, tournez. Au rang suivant, crochetez 6 ms, 2-3 dB, 3-4 brides et 7-8-9 doubles brides. Tournez et reprenez au rang 1. Ainsi, le côté extérieur du col sera plus haut et formera un col châle qui pourra joliment se retourner sur l'endroit. Bon crochet!
13.11.2017 - 10:03
![]() Angelika wrote:
Angelika wrote:
Hallo, können Sie mir erklären wie der Schalkragen gemacht wird oder ein Bild schicken? Ich verstehe es nicht🤔 Danke
02.10.2017 - 20:49DROPS Design answered:
Liebe Angelika, der Schalkragen wird über die am Anfang für das Vorderteil angeschlagene Luftmaschen gehäkelt, dh von oben nach unten in den ersten 18-20-22 ersten Lm vom rechten Vorderteil (Hinreihe werden von der vorderen Mitte aus gestrickt): 1 Stb in jeder M. Dann von der Rückseite werden Sie die Rückreihe mit fM, H-Stb, Stb und D-Stb häkeln damit der Kragen höher gegen der Mitte als gegen Schulter sein wird. Viel Spaß beim häkeln!
03.10.2017 - 09:04
![]() Anna wrote:
Anna wrote:
Buonasera, anche io purtroppo ho incontrato delle difficoltà nella realizzazione del collo a scialle. Non ho capito se devo lavorare avanti e indietro sulle prime 18 maglie del collo (per la taglia S) oppure se proseguire fino al centro dietro del collo. Grazie per la risposta!
30.11.2016 - 21:50DROPS Design answered:
Buonasera Anna. Deve lavorare sulle 18 m.a del collo, alternando le seguenti righe: riga 1 (inizia dal centro sul davanti) 1 m.a in ogni m.a. Riga 2 (Inizia dalla spalla): 6 m.b, 2 m.m.a, 3 m.a e 7 m.a.d. Ripete queste righe finché il lavoro non misura ca.16 cm sul lato più corto. Buon lavoro!
30.11.2016 - 22:50
![]() Monia Handtrack wrote:
Monia Handtrack wrote:
Den Ärmel habe ich noch nicht erreicht ich bin gerade unter den Achsel angekommen wo die 8LM gemacht wurden. Es steht dann dort 3cm dann folgen abnahmen und das habe ich auch getan. Ich habe auch die nachfolgenden 2 RD abgenommen wie es da steht und nun steht dort 7cm aber sind da die 3cm dabei oder muss ich da wieder neu Messen? Also ab wo werden denn die 7cm nun gemessen
02.11.2016 - 12:09DROPS Design answered:
Liebe Frau Handtrack, Sie sind jetzt bei dem Rumpfteil oder? dann müssen Sie von hier messen, dh von den 8 Lm für die Ärmel, wie unter "RUMPFTEIL" geschrieben.
02.11.2016 - 13:51
![]() Monia Handtrack wrote:
Monia Handtrack wrote:
Evtl. sollte in der Anleitung erwähnt werden ob die cm angaben immer ab Anfang zählen oder erst ab da wo ein neuer Teil beginnt! Unter den armen Heist es 3cm dann abnehmen dann die nächste cm Angabe aber wirklich wissen tue ich un nicht sind da die 3cm mit drin oder muss man ab dieser stelle messen?
01.11.2016 - 21:55DROPS Design answered:
Liebe Frau Handtrack, die Ärmel wird von der Markierung gemessen, die Sie eingestellt haben, bevor Sie die Ärmel weiter häkeln.
02.11.2016 - 09:48
![]() Camilla wrote:
Camilla wrote:
Non ho ancora capito come si fa il collo a scialle, da dove comincio? grazie e ciao.
30.12.2015 - 11:29DROPS Design answered:
Buongiorno Camilla. Le 20 m.a sono le m.a del davanti, all'altezza del collo, quelle corrispondenti a questa riga delle spiegazioni: Proseguire a lavorare come segue: 1 m.a in ognuna delle prime 20 m.a ... lavorare 1 m.a in ognuna delle ultime 20 m.a. Lavora queste 20 m come indicato nella riga 1 e 2 del paragrafo: collo a scialle. Lavora tutte e 20 le m, ma sulla riga 2 con maglie di altezza diversa. Ci riscriva se non è ancora chiaro. Buon lavoro!
30.12.2015 - 16:43
![]() Camilla wrote:
Camilla wrote:
Ciao a tutti, vorrei che mi spiegate nel collo a scialle cosa significa lavorare a righe accorciate? Delle mie 97 maglie alte iniziali come faccio a ridurre a 40 m.a.(20 m.a.davanti destro+20 m.a.davanti sinistro) ? Grazie per la vostra disponibilità.
27.12.2015 - 19:45DROPS Design answered:
Buonasera Camilla, partendo dalle 97 m iniziali lavora come indicato nel modello; quando arriva alla parte del collo a scialle lavora solo su alcune maglie del davanti, in questo caso 20 da entrambe le parti, come indicato. Ci riscriva se non è chiaro. Buon lavoro!
28.12.2015 - 17:44
![]() Antje Altvater wrote:
Antje Altvater wrote:
Welcher Größe entspricht denn xxl ?
08.11.2015 - 08:38DROPS Design answered:
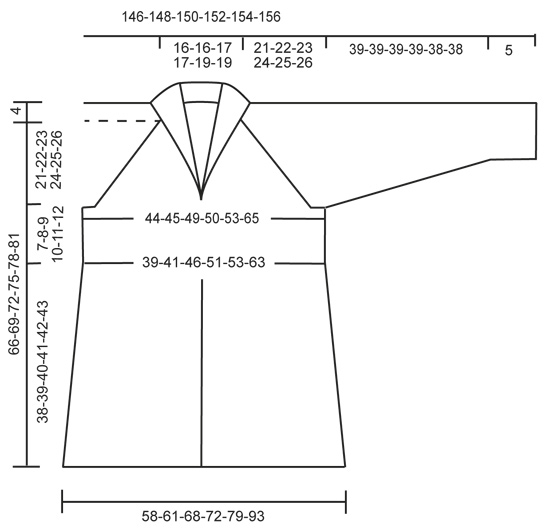
Schauen Sie am besten in die Maßskizze ganz am Ende der Anleitung, dann können Sie sehen, welche Maße für Gr. XXL gelten und ob das für Sie die richtige Größe ist.
12.11.2015 - 23:45
![]() Nele Van Den Broeck wrote:
Nele Van Den Broeck wrote:
Beste, Ik ben zelf aan het twijfelen met de maat. Ik twijfel of ik een M of een L nodig zou hebben. Normaal heb ik een 40-42 ongeveer, maar dit hangt uiteraard ook af van "merk tot merk". Zo heb ik ooit in dezelfde week een S en een XL voor mezelf gekocht. Hebben jullie maattabellen waar we naar kunnen kijken? Of kunnen jullie mij adviseren welke maat ik zou nemen? Met vriendelijke groeten, Nele
19.10.2015 - 00:11DROPS Design answered:
Hoi Nele. Kijk onderaan het patroon. Hier vind je de maattabel voor dit model. Hier staan alle afmetingen in cm per maat. Je kan deze dan vergelijken met je eigen afmetingen en je maat kiezen. Veel plezier.
19.10.2015 - 15:04
![]() Kristin wrote:
Kristin wrote:
Ik loop vast op de kraag. Hoe en waar haak ik die? Met 22 steken geraak je toch niet vanaf voor tot midden achter?
29.12.2014 - 16:33DROPS Design answered:
Hoi Kristin. De 22 st zijn langs middenvoor van het voorpand. Je haakt de verkorte toeren (toer 1) vanaf middenvoor zoals beschreven. (Rechter voorpand) tot de vermelde hoogte. Je naait deze sjaalkraag vast op de halslijn van het achterpand.
13.01.2015 - 14:31
|
|
Lavender Mist#lavendermistjacket |
|
|
|
|
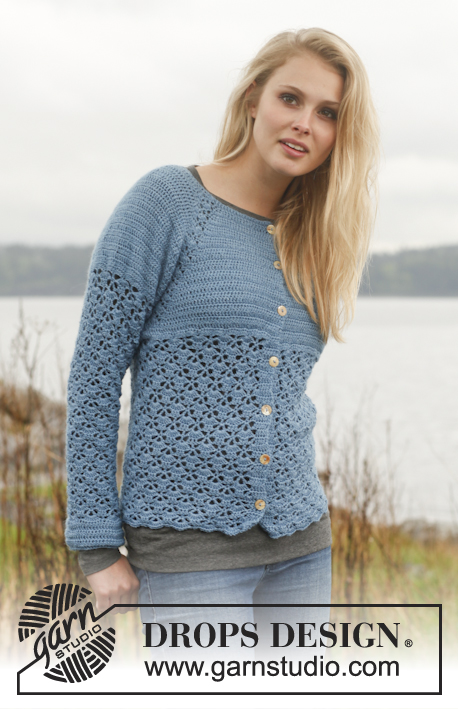
Crochet DROPS jacket with fan pattern, raglan and shawl collar in ”Karisma”. Size: S - XXXL.
DROPS 149-7 |
|
|
CROCHET INFO: Replace first tr on every round/row with 3 ch. Finish every round with 1 sl st in 3rd ch from beg of round. Finish every row with 1 tr in first tr from beg of previous row. DECREASE TIP: Work 1 tr but wait with last pull through (= 2 sts on hook), then work next tr but on last pull through, pull yarn through all sts on hook = 1 st dec. INCREASE TIP: Inc 1 dtr by working 2 dtr in one of the middle dtr from previous row = 4 dtr between every fan on round. CROCHET TIP: After first inc to 4 dtr, continue to inc 1 dtr between every section with fan pattern when piece measures 14-14-15-15-16-16 cm, 21-21-21-22-23-23 cm and 28-28-28-28-28-28 cm = 7 dtr between every fan when all inc are done. ---------------------------------------------------------- JACKET: The piece is worked top down. Work 92-92-100-100-107-108 ch on hook size 4 mm with Karisma. Work 1 tr in 4th ch from hook, then work 1 tr in every ch the entire row = 89-89-97-97-104-105 tr. Continue to work as follows: 1 tr in each of the first 18-18-20-20-22-22 tr, 1 ch (= front piece), work 1 tr in each of the next 14 tr (= sleeve), 1 ch, work 1 tr in each of the next 25-25-29-29-32-33 tr, 1 ch (= back piece), work 1 tr in each of the next 14 tr (= sleeve), 1 ch, work 1 tr in each of the last 18-18-20-20-22-22 tr = 89-89-97-97-104-105 tr on row and 1 ch for each raglan line (= 4 ch) READ ALL OF THE FOLLOWING SECTION BEFORE CONTINUING: Work next row as follows: Work 1 tr in every tr but in every ch work 2 tr + 2 ch + 2 tr = 105-105-113-113-120-121 tr on row and 2 ch in every raglan line (= 8 ch). Continue inc for raglan on every row as follows: Work 1 tr + 2 ch + 1 tr in each ch-space in every raglan line (= 8 tr inc on row) NOTE! In size XXXL inc 1 st extra each side of front and back piece on the first 9 rows, i.e work 2 tr next to 2 ch on the side towards front and back pieces in every ch-space (= 12 inc in total on each of these rows), then continue as explained above with 8 inc per row. Repeat inc for raglan on every row 18-19-20-21-22-23 more times (= 19-20-21-22-23-24 times in total) = 257-265-281-289-304-349 tr. REMEMBER THE CROCHET TENSION! Work next row as follows: Work 1 tr in each of the first 39-40-43-44-47-57 tr (= front piece), skip the next 56-58-60-62-64-66 tr (= sleeve), work 8 ch, work 1 tr in each of the next 67-69-75-77-82-103 tr (= back piece), skip the next 56-58-60-62-64-66 tr (= sleeve), work 8 ch and work 1 tr in each of the last 39-40-43-44-47-57 tr. Then finish body and sleeves separately. BODY: NOW MEASURE PIECE FROM HERE! Work first row as follows: Work 1 tr in each of the 39-40-43-44-47-57 tr on front piece, 1 tr in every ch (= 8 tr), 1 tr in each of the 67-69-75-77-82-103 tr on back piece, 1 tr in every ch (= 8 tr) and 1 tr in each of the 39-40-43-44-47-57 tr on front piece = 161-165-177-181-192-233 tr on row. Insert 1 marker 43-44-47-48-51-61 sts in from each side (= 75-77-83-85-90-111 sts on back piece). Continue back and forth with 1 tr in every tr. When piece measures 3 cm, dec 1-1-1-0-0-1 tr on each side of both markers – READ DECREASE TIP (= 4-4-4-0-0-4 tr dec). Repeat dec on the next 2-2-1-0-0-1 row (= 12-12-8-0-0-8 tr dec in total). When piece measures 6-7-8-9-10-11 cm, inc 0-0-0-4-1-0 tr and dec 4-0-0-0-0-0 tr evenly = 145-153-169-185-193-225 tr on round. When piece measures 7-8-9-10-11-12 cm, work fan pattern back and forth from mid front as follows: ROW 1: 1 tr in each of the first 6 tr (= band), 1 dc in next tr, * 2 ch, skip 1 tr, 1 dc in next tr, 2 ch, skip 1 tr, 1 dc in next tr, 1 tr in each of the next 3 tr, 1 dc in next tr *, repeat from *-* 15-16-18-20-21-25 more times (= 16-17-19-21-22-26 times in total), ch 2, skip 1 tr, 1 dc in next tr, ch 2, skip 1 tr, 1 dc in next tr, and finish with 1 tr in each of the next 6 tr (= band). Turn piece. There are now 34-36-40-44-46-54 ch-spaces with 6 tr in each side for band. ROW 2: 1 dtr in each of the first 6 tr, * 4 tr in ch-space below, 2 ch, 4 tr in next ch-space, 1 dtr in each of the next 3 tr *, repeat from *-* until 2 ch-spaces remain, work 4 tr in ch-space below, 2 ch, 4 tr in next ch-space, finish with 1 dtr in each of the next 6 tr below. Turn piece. ROW 3: 1 dtr in each of the first 6 dtr, * 4 tr + 2 ch + 4 tr in ch-space below, 1 dtr in each of the 3 dtr from previous row *, repeat from *-* until 1 ch-space remains, 4 tr + 2 ch + 4 tr in ch-space, finish with 1 dtr in each of the 6 dtr on band, turn piece. ROW 4: 1 dtr in each of the first 6 dtr, * 4 tr + 2 ch + 4 tr in ch-space below, 1 dtr in each of the three dtr from previous row AT THE SAME TIME inc 1 dtr – Read INCREASE TIP *, repeat from *-* until 1 ch-space remains, 4 tr + 2 ch + 4 tr in this ch-space, finish with 1 dtr in each of the 6 dtr on band, turn piece. Then continue the same way with fan pattern and 6 dtr in each side for band, AT THE SAME TIME inc 1 dtr between every fan 3 more times - Read CROCHET TIP. Continue to work until piece measures 45-47-49-51-53-55 cm. Piece measures approx. 70-73-76-79-82-85 cm from shoulder. Fasten off. SLEEVE: = 56-58-60-62-64-66 sts. Insert 1 marker here – NOW MEASURE PIECE FROM HERE. Sleeve is worked in the round, top down. Beg by working mid under sleeve as follows: Work 1 dc in 5th ch of the 8 ch worked in armhole on body. Ch 3 (= 1 tr) and work 1 tr in each of the next 3 ch. Then work 1 tr in every tr over sleeve, before working 1 tr in each of the remaining 4 ch under sleeve = 64-66-68-70-72-74 tr. Insert 1 marker mid under sleeve. When sleeve measures 3 cm, dec 1 st on each side of marker - READ DECREASE TIP. Repeat dec every 3-2½-2½-3-2½-2 cm 11-12-13-11-12-13 more times (= 12-13-14-12-13-14 dec in total) = 40-40-40-46-46-46 tr remain. Continue until sleeve measures 39-39-39-39-38-38 cm, AT THE SAME TIME on last row dec 0-0-0-1-1-1 tr mid under sleeve = 40-40-40-45-45-45 tr remain. Then work an edge as follows: - Remember CROCHET INFO! ROUND 1: 1 dc in first tr, * 2 ch, skip 1 tr, 1 dc in next tr, 2 ch, skip 1 tr, 1 dc in next tr, 1 tr in each of the next 3-3-3-4-4-4 tr, 1 dc in next tr *, repeat from *-* 3 more times (= 4 times in total), 2 ch, skip 1 tr, 1 dc in next tr, 2 ch, skip 1 tr, 1 dc in next tr, 1 tr in each of the next 3-3-3-4-4-4 tr. ROUND 2: 1 dc in first tr, * 4 tr in ch-space below, 2 ch, 4 tr in next ch-space, 1 dtr in each of the next 3-3-3-4-4-4 tr below *, repeat from *-* the entire way, finish with 1 sl st in first dc and 3 ch. ROUND 3: Work sl sts until the middle of first ch-space, * 4 tr + 2 ch + 4 tr in ch-space below, 1 dtr in each of the 3-3-3-4-4-4 tr from previous row *, repeat from *-* the entire round 4 more times (= 5 times in total). Repeat 3rd ROUND 1 more time but finish with 1 sl st in first tr on round. Fasten off. SHAWL COLLAR: Work shawl collar with short rows over the 18-18-20-20-22-22 tr on right front piece as follows: ROW 1 (= from mid front): 1 tr in every tr = 18-18-20-20-22-22 tr. ROW 2 (= from shoulder): 6-6-6-6-6-6 dc, 2-2-2-2-3-3 htr, 3-3-4-4-4-4 tr and 7-7-8-8-9-9 dtr. Repeat 1st and 2nd row until piece measures approx. 16-16-17-17-18-18 cm on the shortest. Work on left front piece as right front piece but mirrored. NOTE: Make sure that one side is finished with 1st row and the other side is finished with 2nd row. ASSEMBLY: Sew collar tog mid back and sew collar to neckline at the back of neck. Sew buttons on to left band 2-2-2-2-2-2 cm and 7-7-8-8-9-9 cm over fan pattern. Button between tr on band. |
|
 |
|
Have you finished this pattern?Tag your pictures with #dropspattern #lavendermistjacket or submit them to the #dropsfan gallery. Do you need help with this pattern?You'll find 9 tutorial videos, a Comments/Questions area and more by visiting the pattern on garnstudio.com. © 1982-2026 DROPS Design A/S. We reserve all rights. This document, including all its sub-sections, has copyrights. Read more about what you can do with our patterns at the bottom of each pattern on our site. |


With over 40 years in knitting and crochet design, DROPS Design offers one of the most extensive collections of free patterns on the internet - translated to 17 languages. As of today we count 324 catalogues and 12267 patterns translated into English (UK/cm). 12267
We work hard to bring you the best knitting and crochet have to offer, inspiration and advice as well as great quality yarns at incredible prices! Would you like to use our patterns for other than personal use? You can read what you are allowed to do in the Copyright text at the bottom of all our patterns. Happy crafting!
Post a comment to pattern DROPS 149-7
We would love to hear what you have to say about this pattern!
If you want to leave a question, please make sure you select the correct category in the form below, to speed up the answering process. Required fields are marked *.