
Popular categories
Looking for a yarn?


Comments / Questions (67)
![]() Giuseppina wrote:
Giuseppina wrote:
Sto lavorando il collo a scialle. Se ho ben capito si lavorano avanti e indietro solo le 18 maglie del davanti (S). Chiedo se Il lato corto sia quello che andrà cucito allo scollo dietro. Grazie
03.02.2022 - 10:30DROPS Design answered:
Buonasera Giuseppina, deve cucire il collo alla scollatura e poi unire le due estremità sul dietro del collo. Buon lavoro!
05.02.2022 - 20:46
![]() Karin wrote:
Karin wrote:
I have posted on the Facebook page about the collar. Please go there and help me with this question. It is for the small size. Please help dint understand how the vollar works only 18 stiches x two for the 2 sides of the collar. How is that possible ? Linda 25.02.2014 do you have a pictufe of the collar please ?
28.11.2021 - 09:22DROPS Design answered:
Dear Karin, you can see the answer below. We don't have anymore pictures than those displayed in the webpage. Happy crochetting!
28.11.2021 - 19:00
![]() Karin wrote:
Karin wrote:
I have posted on the Facebook page about the collar. Please go there and help me with this question. It is for the small size. Please help dint understand how the vollar works only 18 stiches x two for the 2 sides of the collar. How is that possible ?
28.11.2021 - 09:20DROPS Design answered:
Dear Karin, you can see the answer below.
28.11.2021 - 18:59
![]() Karin wrote:
Karin wrote:
As i understand it there are two pieces to the collar, whuch is crocheted seperst from the cardigan. It is then sewed together at back middel of neck and then sewn onto the cardigan. Is that right ? As the stiches to crochet direct onto the cardigan do not correspond with the cardigan .
28.11.2021 - 08:08DROPS Design answered:
Dear Karin, at the start of the cardigan, you have 18-22 tr for each front. At the end, you work the collar over these stitches, according to the explanation in the section SHAWL COLLAR. Each part is worked separately and then joined in the back middle of neck. Happy crochetting!
28.11.2021 - 18:59
![]() Karin wrote:
Karin wrote:
Morning,if my bust all around is 110 cm (43") And my hip is 117cm (46") What size should i crochet ? Thank you
28.11.2021 - 07:50DROPS Design answered:
Dear Karin, you can check the diagram for the measurements of the garnment below the written instructions. In your case, you would need to choose between XXL and XXXL. We always recomend to work the bigger size. Happy crochetting!
28.11.2021 - 18:53
![]() Dorothea Henzler wrote:
Dorothea Henzler wrote:
Häckle die Jacke zum 3x aber denn Musterzatz etweder komplett in Stäbchen oder Doppelstäbchen dann wellt es sich nicht und fält schön dann brauch man sie auch nicht dämpfen(unter Tüchern bügeln)oder spannen.
25.07.2021 - 13:12
![]() Uta wrote:
Uta wrote:
Hallo. Wenn der Kragen über 22M gehäkelt wir, reicht er doch nicht in der Länge bis zur hinteren Mitte?!
08.10.2020 - 07:50DROPS Design answered:
Liebe Uta, die 22 Maschen sind für die Breite vom Kragen, diese 22 Maschen häkeln Sie bis die Arbeit 18 cm am kürzesten mist - diese Seite von Kragen soll bis zur der Hälfte von Halsausschnitt passen. dann hâkeln Sie der 2. Kragen von anderen Vorderteil gleich (spiegelverkehr), beide Kragen sind dann zusammengenäht und dann am Halsausschnitt vom Rûckenteil angenäht; Viel Spaß beim häkeln!
08.10.2020 - 10:55
![]() Anna Ludlow wrote:
Anna Ludlow wrote:
Just to clarify, with the fan pattern, is it American or British tr and dc? I'm doing American tr and dc, but on row 3 it's not laying flat.
11.11.2019 - 22:07DROPS Design answered:
Dear Mrs Ludlow, make sure you are choosing the right language by clicking on the scroll down menu under picture and choose either English - UK or English US. Happy crocheting!
12.11.2019 - 08:25
![]() Ann-Charlotte Söderberg wrote:
Ann-Charlotte Söderberg wrote:
Hej! Stämmer det att varv 1 och 2 (på kragen) virkas efter varann och sen vänder ? Alltså varv 1, varv 2, vänd, varv 2, varv 1? Och var mäts där det är kortast? Är det över de fm över axeln?
31.08.2019 - 12:23DROPS Design answered:
Hej Ann-Charlotte, du virkar 1.rad från mitt fram, vänd och virka 2.rad från axeln. Upprepa fram och tillbaka. Sidan med fm vill bli kortare än sidan med dst. Lycka till :)
06.09.2019 - 11:40
![]() Angela wrote:
Angela wrote:
Hi, please can you post a diagram of the collar? It would be easier to visualise it, because the pattern seems to say that it is worked bottom up from the front piece only. In this case, where does one find the part of the collar to sew to the back neckline? Is my pattern missing a paragraph? A simple drawing will explain it. Thanks
30.05.2019 - 21:41DROPS Design answered:
Dear Angela, the jacket is worked top down, but the collar will be then sewn bottom up over the 18-20-22 sts on each side of jacket (= the first 18-20-22 sts on each front piece from mid front). Happy crocheting!
31.05.2019 - 09:37
|
|
Lavender Mist#lavendermistjacket |
|
|
|
|
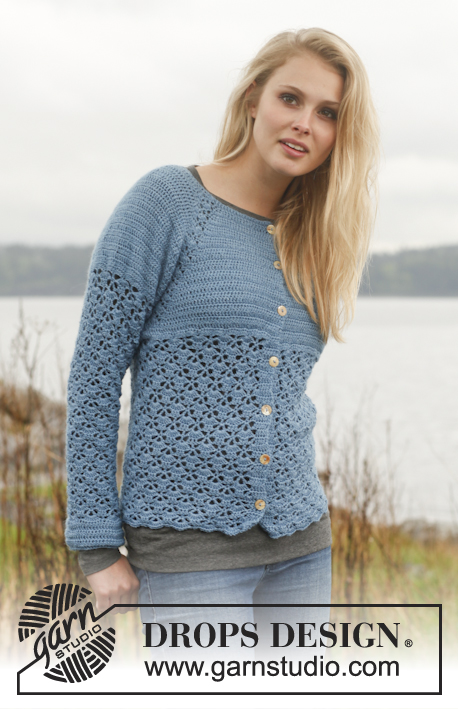
Crochet DROPS jacket with fan pattern, raglan and shawl collar in ”Karisma”. Size: S - XXXL.
DROPS 149-7 |
|
|
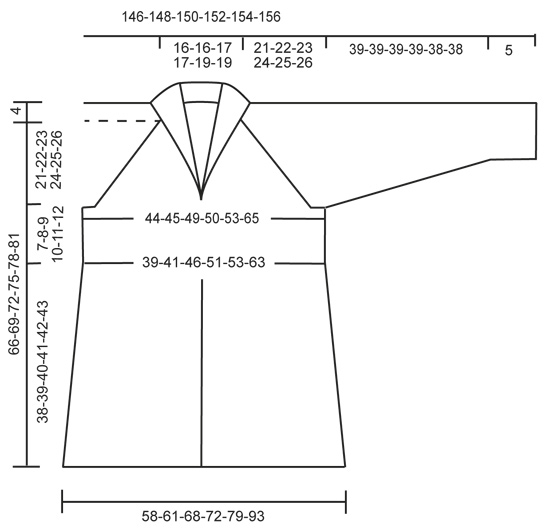
CROCHET INFO: Replace first tr on every round/row with 3 ch. Finish every round with 1 sl st in 3rd ch from beg of round. Finish every row with 1 tr in first tr from beg of previous row. DECREASE TIP: Work 1 tr but wait with last pull through (= 2 sts on hook), then work next tr but on last pull through, pull yarn through all sts on hook = 1 st dec. INCREASE TIP: Inc 1 dtr by working 2 dtr in one of the middle dtr from previous row = 4 dtr between every fan on round. CROCHET TIP: After first inc to 4 dtr, continue to inc 1 dtr between every section with fan pattern when piece measures 14-14-15-15-16-16 cm, 21-21-21-22-23-23 cm and 28-28-28-28-28-28 cm = 7 dtr between every fan when all inc are done. ---------------------------------------------------------- JACKET: The piece is worked top down. Work 92-92-100-100-107-108 ch on hook size 4 mm with Karisma. Work 1 tr in 4th ch from hook, then work 1 tr in every ch the entire row = 89-89-97-97-104-105 tr. Continue to work as follows: 1 tr in each of the first 18-18-20-20-22-22 tr, 1 ch (= front piece), work 1 tr in each of the next 14 tr (= sleeve), 1 ch, work 1 tr in each of the next 25-25-29-29-32-33 tr, 1 ch (= back piece), work 1 tr in each of the next 14 tr (= sleeve), 1 ch, work 1 tr in each of the last 18-18-20-20-22-22 tr = 89-89-97-97-104-105 tr on row and 1 ch for each raglan line (= 4 ch) READ ALL OF THE FOLLOWING SECTION BEFORE CONTINUING: Work next row as follows: Work 1 tr in every tr but in every ch work 2 tr + 2 ch + 2 tr = 105-105-113-113-120-121 tr on row and 2 ch in every raglan line (= 8 ch). Continue inc for raglan on every row as follows: Work 1 tr + 2 ch + 1 tr in each ch-space in every raglan line (= 8 tr inc on row) NOTE! In size XXXL inc 1 st extra each side of front and back piece on the first 9 rows, i.e work 2 tr next to 2 ch on the side towards front and back pieces in every ch-space (= 12 inc in total on each of these rows), then continue as explained above with 8 inc per row. Repeat inc for raglan on every row 18-19-20-21-22-23 more times (= 19-20-21-22-23-24 times in total) = 257-265-281-289-304-349 tr. REMEMBER THE CROCHET TENSION! Work next row as follows: Work 1 tr in each of the first 39-40-43-44-47-57 tr (= front piece), skip the next 56-58-60-62-64-66 tr (= sleeve), work 8 ch, work 1 tr in each of the next 67-69-75-77-82-103 tr (= back piece), skip the next 56-58-60-62-64-66 tr (= sleeve), work 8 ch and work 1 tr in each of the last 39-40-43-44-47-57 tr. Then finish body and sleeves separately. BODY: NOW MEASURE PIECE FROM HERE! Work first row as follows: Work 1 tr in each of the 39-40-43-44-47-57 tr on front piece, 1 tr in every ch (= 8 tr), 1 tr in each of the 67-69-75-77-82-103 tr on back piece, 1 tr in every ch (= 8 tr) and 1 tr in each of the 39-40-43-44-47-57 tr on front piece = 161-165-177-181-192-233 tr on row. Insert 1 marker 43-44-47-48-51-61 sts in from each side (= 75-77-83-85-90-111 sts on back piece). Continue back and forth with 1 tr in every tr. When piece measures 3 cm, dec 1-1-1-0-0-1 tr on each side of both markers – READ DECREASE TIP (= 4-4-4-0-0-4 tr dec). Repeat dec on the next 2-2-1-0-0-1 row (= 12-12-8-0-0-8 tr dec in total). When piece measures 6-7-8-9-10-11 cm, inc 0-0-0-4-1-0 tr and dec 4-0-0-0-0-0 tr evenly = 145-153-169-185-193-225 tr on round. When piece measures 7-8-9-10-11-12 cm, work fan pattern back and forth from mid front as follows: ROW 1: 1 tr in each of the first 6 tr (= band), 1 dc in next tr, * 2 ch, skip 1 tr, 1 dc in next tr, 2 ch, skip 1 tr, 1 dc in next tr, 1 tr in each of the next 3 tr, 1 dc in next tr *, repeat from *-* 15-16-18-20-21-25 more times (= 16-17-19-21-22-26 times in total), ch 2, skip 1 tr, 1 dc in next tr, ch 2, skip 1 tr, 1 dc in next tr, and finish with 1 tr in each of the next 6 tr (= band). Turn piece. There are now 34-36-40-44-46-54 ch-spaces with 6 tr in each side for band. ROW 2: 1 dtr in each of the first 6 tr, * 4 tr in ch-space below, 2 ch, 4 tr in next ch-space, 1 dtr in each of the next 3 tr *, repeat from *-* until 2 ch-spaces remain, work 4 tr in ch-space below, 2 ch, 4 tr in next ch-space, finish with 1 dtr in each of the next 6 tr below. Turn piece. ROW 3: 1 dtr in each of the first 6 dtr, * 4 tr + 2 ch + 4 tr in ch-space below, 1 dtr in each of the 3 dtr from previous row *, repeat from *-* until 1 ch-space remains, 4 tr + 2 ch + 4 tr in ch-space, finish with 1 dtr in each of the 6 dtr on band, turn piece. ROW 4: 1 dtr in each of the first 6 dtr, * 4 tr + 2 ch + 4 tr in ch-space below, 1 dtr in each of the three dtr from previous row AT THE SAME TIME inc 1 dtr – Read INCREASE TIP *, repeat from *-* until 1 ch-space remains, 4 tr + 2 ch + 4 tr in this ch-space, finish with 1 dtr in each of the 6 dtr on band, turn piece. Then continue the same way with fan pattern and 6 dtr in each side for band, AT THE SAME TIME inc 1 dtr between every fan 3 more times - Read CROCHET TIP. Continue to work until piece measures 45-47-49-51-53-55 cm. Piece measures approx. 70-73-76-79-82-85 cm from shoulder. Fasten off. SLEEVE: = 56-58-60-62-64-66 sts. Insert 1 marker here – NOW MEASURE PIECE FROM HERE. Sleeve is worked in the round, top down. Beg by working mid under sleeve as follows: Work 1 dc in 5th ch of the 8 ch worked in armhole on body. Ch 3 (= 1 tr) and work 1 tr in each of the next 3 ch. Then work 1 tr in every tr over sleeve, before working 1 tr in each of the remaining 4 ch under sleeve = 64-66-68-70-72-74 tr. Insert 1 marker mid under sleeve. When sleeve measures 3 cm, dec 1 st on each side of marker - READ DECREASE TIP. Repeat dec every 3-2½-2½-3-2½-2 cm 11-12-13-11-12-13 more times (= 12-13-14-12-13-14 dec in total) = 40-40-40-46-46-46 tr remain. Continue until sleeve measures 39-39-39-39-38-38 cm, AT THE SAME TIME on last row dec 0-0-0-1-1-1 tr mid under sleeve = 40-40-40-45-45-45 tr remain. Then work an edge as follows: - Remember CROCHET INFO! ROUND 1: 1 dc in first tr, * 2 ch, skip 1 tr, 1 dc in next tr, 2 ch, skip 1 tr, 1 dc in next tr, 1 tr in each of the next 3-3-3-4-4-4 tr, 1 dc in next tr *, repeat from *-* 3 more times (= 4 times in total), 2 ch, skip 1 tr, 1 dc in next tr, 2 ch, skip 1 tr, 1 dc in next tr, 1 tr in each of the next 3-3-3-4-4-4 tr. ROUND 2: 1 dc in first tr, * 4 tr in ch-space below, 2 ch, 4 tr in next ch-space, 1 dtr in each of the next 3-3-3-4-4-4 tr below *, repeat from *-* the entire way, finish with 1 sl st in first dc and 3 ch. ROUND 3: Work sl sts until the middle of first ch-space, * 4 tr + 2 ch + 4 tr in ch-space below, 1 dtr in each of the 3-3-3-4-4-4 tr from previous row *, repeat from *-* the entire round 4 more times (= 5 times in total). Repeat 3rd ROUND 1 more time but finish with 1 sl st in first tr on round. Fasten off. SHAWL COLLAR: Work shawl collar with short rows over the 18-18-20-20-22-22 tr on right front piece as follows: ROW 1 (= from mid front): 1 tr in every tr = 18-18-20-20-22-22 tr. ROW 2 (= from shoulder): 6-6-6-6-6-6 dc, 2-2-2-2-3-3 htr, 3-3-4-4-4-4 tr and 7-7-8-8-9-9 dtr. Repeat 1st and 2nd row until piece measures approx. 16-16-17-17-18-18 cm on the shortest. Work on left front piece as right front piece but mirrored. NOTE: Make sure that one side is finished with 1st row and the other side is finished with 2nd row. ASSEMBLY: Sew collar tog mid back and sew collar to neckline at the back of neck. Sew buttons on to left band 2-2-2-2-2-2 cm and 7-7-8-8-9-9 cm over fan pattern. Button between tr on band. |
|
 |
|
Have you finished this pattern?Tag your pictures with #dropspattern #lavendermistjacket or submit them to the #dropsfan gallery. Do you need help with this pattern?You'll find 9 tutorial videos, a Comments/Questions area and more by visiting the pattern on garnstudio.com. © 1982-2026 DROPS Design A/S. We reserve all rights. This document, including all its sub-sections, has copyrights. Read more about what you can do with our patterns at the bottom of each pattern on our site. |


With over 40 years in knitting and crochet design, DROPS Design offers one of the most extensive collections of free patterns on the internet - translated to 17 languages. As of today we count 324 catalogues and 12267 patterns translated into English (UK/cm). 12267
We work hard to bring you the best knitting and crochet have to offer, inspiration and advice as well as great quality yarns at incredible prices! Would you like to use our patterns for other than personal use? You can read what you are allowed to do in the Copyright text at the bottom of all our patterns. Happy crafting!
Post a comment to pattern DROPS 149-7
We would love to hear what you have to say about this pattern!
If you want to leave a question, please make sure you select the correct category in the form below, to speed up the answering process. Required fields are marked *.