
Popular categories
Looking for a yarn?


Comments / Questions (76)
![]() Aukje wrote:
Aukje wrote:
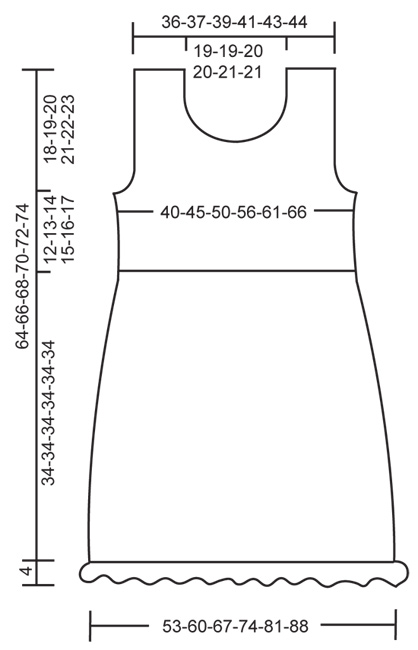
Is there someone that can tell me what size it turns out to be. I've crocheted a pattern before and it was BIG. (Yes correct size needle and yarn size) I would love to make this pattern but since I'm in the plussize I want to know if the XXXL is large enough for me.
28.04.2014 - 18:18DROPS Design answered:
Dear Aukje, you will find at the bottom of the pattern a measurement chart with all measures taken flat from side to side for each size. Compare them to a similar garment you like the shape to find the matching size. Remember to keep the correct tension throughout. Happy crocheting!
29.04.2014 - 09:21
![]() Carmen wrote:
Carmen wrote:
Por favor,¿podrían poner gráficos en todos los patrones?(gráficos claros). Pues con una sola mirada se entiende todo. En este patrón solo ponen el gráfico de una parte. Yo y miles de personas se lo vamos a agradecer. Un saludo, Carmen
07.02.2014 - 15:19DROPS Design answered:
Hola Carmen. se está estudiando esa posibilidad aunque de momento el espacio disponible para cada patrón no lo permite.
08.02.2014 - 09:44
![]() Pili wrote:
Pili wrote:
Tengo dudas con la forma de hacer las disminuciones. En el patrón pone: DISMINUCIÓN: 4 p.a. 1 vez, 3 p.a. 0-0-1-1-2-3 veces, 2 p.a. 0-1-1-3-3-4 veces y 1 p.a. 1-3-4-4-5-4 veces en cada lado = 82-86-90-94-98-102 p.a. restantes en la hilera. Cuando habla de "veces" quiere decir hileras? Por ejemplo, para una talla M, tendría que disminuir 4pa en la primera hilera, 2pa en la siguiente y 1pa en las tres siguientes? Gracias!
29.07.2013 - 11:36DROPS Design answered:
Hola Pili! Efectivamente es como dices. Ya ves que un poco antes te pone."..en cada hilera", si por ej. pusiera cada segunda o tercera hilera, tendrías que dejar entre las disminuciones 1 o 2 hileras sin disminuir.
01.08.2013 - 09:03
![]() Lydia Havenaar wrote:
Lydia Havenaar wrote:
Tilly, Heb jij al een antwoord gekregen op je vraag? Wil dat ook wel graag weten, voordat ik eraan begin ;) Groetjes Lydia
26.04.2013 - 19:46
![]() Marialuisa wrote:
Marialuisa wrote:
Buonasera, grazie per la risposta. Si, ho fatto tutte le diminuzioni, credo di aver lavorato con precisione perchè appena vedo un errore non vado avanti e correggo la mancanza. Appena riesco le mando una foto. Buona serata
11.04.2013 - 16:09
![]() Marialuisa wrote:
Marialuisa wrote:
Buongiorno, volevo sapere se avevate preso in considerazione la mia domanda dell'8 aprile 2013 ore 15.12 Ho il lavoro sospeso. Attendo una vostra risposta. Grazie. Buona giornata
11.04.2013 - 09:06
![]() Marialuisa wrote:
Marialuisa wrote:
Buongiorno, sono di nuovo qua a chiedervi un altro vostro prezioso consiglio. Nonostante ho fatto il campione e tutto coincideva, ora che ho concluso la prima spallina del davanti, mi sono accorta che mi sta grande. Sembra proprio una taglia in piu'. Che cosa devo fare ora disfarlo tutto o diminuire dopo il punto fantasia? Aiutatemi come e cosa devo fare. Grazie mille
08.04.2013 - 15:12DROPS Design answered:
scusi per non aver risposto prima.E' difficile rispondere se non vedo il lavoro. Può mandare una foto a italy@garnstudio.com ? E' sicura di aver fatto tutte le diminuzioni?
11.04.2013 - 15:46
![]() Tilly wrote:
Tilly wrote:
Ben met dit patroon bezig maar het wordt niet zoals beschreven. Het aantal steken en de maten (onderaan en taille) wijken enorm af..... Heeft iemand dit ook ondervonden of kan iemand mij een tip geven. Dat zou ik heel fijn vinden aangezien ik niet verder kan en zo graag aan de slag wil. Groetend, Tilly
29.03.2013 - 18:21DROPS Design answered:
Beste Tilly. Rekenvoorbeeld: Voorpand, maat L. Als je de juiste stekenverhouding van 23 stk per 10 cm hebt en je haakt daar volgens patroon 116 stk, dan is de breedte 50 cm. Dat klopt met de tekening. Als de maat in de taille bij u niet klopt, dan klopt zeer waarschijnlijk uw stekenverhouding niet.
16.05.2013 - 13:29
![]() Marialuisa wrote:
Marialuisa wrote:
Buongiorno, sono di nuovo qua a chiedervi gentilmente un altro aiuto.Ho fatto le ripetizioni sulla riga come richiesto per la mia taglia. Ho finito la riga dal diritto del lavoro. Ora che devo ripetere le 4 righe del diagramma A1 in verticale(quindi sono al rovescio del lavoro) come devo leggere lo schema? Dalla fine della prima riga? Vi ringrazio per l'eventuale risposta. Buona giornata.
19.03.2013 - 12:26DROPS Design answered:
Buonasera. Terminata la prima riga del diagramma A.1, si passa alla seconda riga del diagramma, procedendo da sinistra verso destra (si inizia quindi dalla linea tratteggiata); la terza riga viene letta da destra verso sinistra e la quarta da sinistra verso destra. Si ripetono queste quattro righe finché il lavoro non misura ca.32 cm. Buon lavoro!!
19.03.2013 - 22:14
![]() Marialuisa wrote:
Marialuisa wrote:
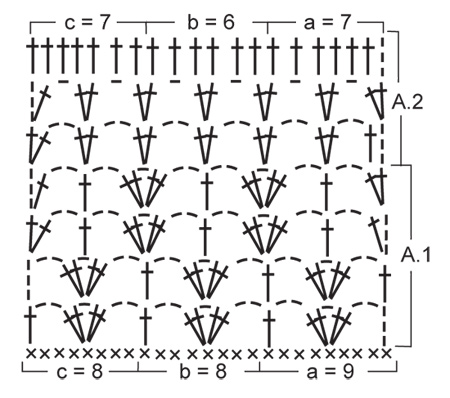
Non so se potete rispondermi io provo a chiedere aiuto sul diagramma di questo modello che non capisco queste divisioni sul diagramma a-b c. ho lavorato sulle prime 9 m.b. il diagramma a, poi non capisco come devo andare avanti con i diagr b e c cosa significa finchè non rimangono 8 m.b.? Premetto che non ho acquistato il filato nei negozi DROPS. Vi sarei grata se potete darmi l'aiuto chiesto. Cordialità Marialuisa
14.03.2013 - 09:53DROPS Design answered:
Buongiorno. Si procede come segue: si lavora il diagramma A1.a sulle prime 9 m; si ripete il diagramma A1.b (formato da 8 m) per 13-15-17-19-21-23 volte a seconda della taglia; a questo punto rimangono 8 m e su queste 8 m si lavora il diagramma A1.c. Buon lavoro!
14.03.2013 - 13:56
|
||||||||||
Yasmin#yasmintunic |
||||||||||
 |
 |
|||||||||
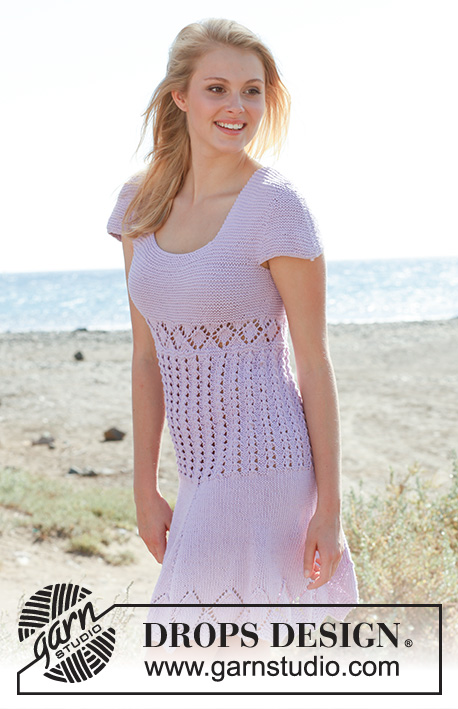
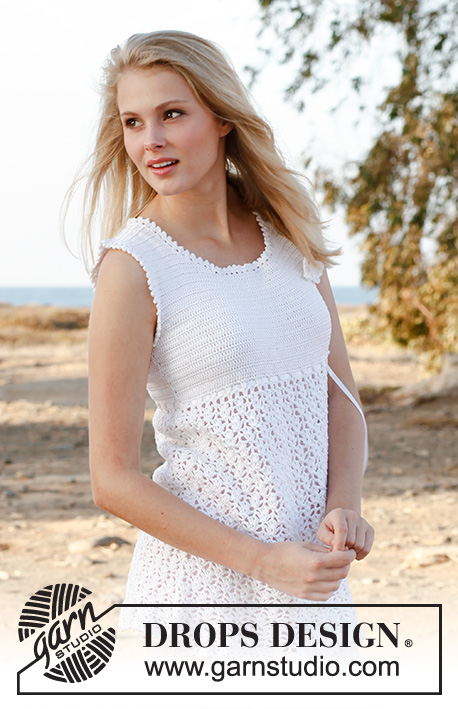
Crochet DROPS tunic with lace pattern, flounce at the bottom and butterfly for decoration in ”Cotton Viscose”.
DROPS 148-9 |
||||||||||
|
CROCHET INFO: Replace first tr on every row with 3 ch. PATTERN: See diagrams A.1 and A.2. DECREASE TIP (applies to neck and armhole): Dec at beg of row as follows: Work sl sts over no of tr to be dec. Dec at end of row as follows: When no of tr to be dec remains, turn. -------------------------------------------------------- TUNIC: Worked back and forth in 2 parts and sewn tog when finished. FRONT PIECE: Work 141-160-178-197-216-234 ch on hook size 3 mm with Cotton Viscose. Continue with 1 dc in 2nd ch from hook, then 1 dc in each of the next 6-4-8-6-4-8 ch, * skip 1 ch, 1 dc in each of the next 6 ch *, repeat from *-* the entire row = 121-137-153-169-185-201 dc. Continue pattern A.1 as follows: Diagram a over the first 9 dc, diagram b until 8 dc remain, then diagram c over these (= 15-17-19-21-23-25 repetitions in total on row). Repeat the 4 rows in diagram A.1 upwards until piece measures approx. 32 cm – finish after 4th row in diagram. REMEMBER THE CROCHET TENSION! Then work diagram A.2 one time vertically. When A.2 has been worked, there are 92-104-116-128-140-152 tr on row. Then work 1 tr in every tr - READ CROCHET INFO. When piece measures 46-47-48-49-50-51 cm, dec for armhole in each side on every row as follows – READ DECREASE TIP: 4 tr 1 time, 3 tr 0-0-1-1-2-3 times, 2 tr 0-1-1-3-3-4 times and 1 tr 1-3-4-4-5-4 times in each side = 82-86-90-94-98-102 tr remain on row. When piece measures 53-54-56-57-59-60 cm, beg neck dec and finish each shoulder separately. FIRST SHOULDER: Work tr back and forth over the first 28-30-31-33-34-36 tr in one side – AT THE SAME TIME dec towards the neck on every row: 3 tr 1 time, 2 tr 2 times and 1 tr 2 times = 19-21-22-24-25-27 tr remain on shoulder. When piece measures 64-66-68-70-72-74 cm, cut the thread. OTHER SHOULDER: Work the same way as the first. BACK PIECE: Work as front piece up to and with armhole dec = 82-86-90-94-98-102 tr on row. Continue to work until piece measures approx. 62-64-66-68-70-72 cm. Now finish each shoulder separately as follows: Work 1 row with tr over the first 21-23-24-26-27-29 tr, turn, dec the first 2 tr and work the rest of row, cut the thread. Repeat on the other shoulder. ASSEMBLY: Sew shoulder seams edge to edge to avoid a chunky seam. Sew side seams edge to edge so that they are less visible. FLOUNCE AT THE BOTTOM: Work in the dc row at the bottom of body as follows (beg in one side): ROUND 1: 1 dc in first dc, * 3 ch, skip 1 dc, 1 dc in next dc *, repeat from *-* the entire round, finish with 1 sl st in first dc. ROUND 2: 2 ch, 1 dc in first ch-loop, * 4 ch, 1 dc in next ch-loop *, repeat from *-* the entire round, finish with 1 sl st in first dc. ROUND 3: 2 ch, 1 dc in first ch-loop, * 4 ch, 1 dc in next ch-loop *, repeat from *-* the entire round, finish with 1 sl st in first dc. ROUND 4: 2 ch, 1 dc in first ch-loop, * 5 ch, 1 dc in next ch-loop *, repeat from *-* the entire round, finish with 1 sl st in first dc. ROUND 5: 2 ch, 1 dc in first ch-loop, * 5 ch, 1 dc in next ch-loop *, repeat from *-* the entire round, finish with 1 sl st in first dc. ROUND 6: Work as follows in every ch-loop: 2 dc + 1 picot (= 3 ch, 1 dc in first ch) + 2 dc. Cut and fasten the thread. EDGE AROUND THE ARMHOLES AND NECK: Beg mid back of neck and mid under armhole. ROUND 1: 1 dc in first st, * 3 ch, skip approx. ½ cm, 1 dc in next st *, repeat from *-* the entire round, finish with 1 sl st in first dc. ROUND 2: Work as follows in every ch-loop: 1 dc + 1 picot (= 3 ch, 1 dc in first ch) + 1 dc. Cut and fasten the thread. SILK RIBBON: Thread a silk ribbon in the row with eyelet holes at the top below the yoke – beg and end in the left side at the front and make a small bow. BUTTERFLY - for decoration: WINGS: Work 15 ch on hook size 3 mm. Work all rows from RS. ROW 1: Work 3 triple tr in 6th ch from hook, 1 ch, 1 tr in next ch, 2 ch (on 2nd row beg working here), 2 triple tr in next ch, 1 triple tr in next ch, 3 ch, 1 sl st in next ch, 3 ch (on 3rd row beg working here), 1 triple tr in next ch, 2 triple tr in next ch, 1 ch, 1 tr in next ch, 2 ch, 3 triple tr in next ch, 5 ch, 1 sl st in last ch. Cut and fasten the thread. ROW 2: Start by working 1 sl st in the second of the 2 ch from previous row (see 1st row), 1 ch, in next triple tr work as follows: 1 htr and 1 tr, in next triple tr work as follows: 1 tr (on 4th row beg working here), 1 ch, 1 dtr and 1 tr, in next triple tr work as follows: 1 tr and 1 htr, 1 ch, 1 sl st in the 1st of the 3 ch from previous row. Cut and fasten the thread. ROW 3: Start by working 1 sl st in the third of the 3 ch from 1st row (see 1st row), 1 ch, in next triple tr work as follows: 1 htr and 1 tr, in next triple tr work as follows: 1 tr (on 5th row beg working here), 1 dtr, 1 ch, 1 tr, in next triple tr work as follows: 1 tr and 1 htr, 1 ch, 1 sl st in 1 ch from 1st row. Cut and fasten the thread. ROW 4: Start by working 1 sl st in tr from 2nd row (see 2nd row), 1 ch, in next dtr work as follows: 1 dc, 1 ch and 1 dc, 1 ch, 1 sl st in next tr. Cut and fasten the thread. ROW 5: Start by working 1 sl st in tr from 3rd row (see 3rd row), 1 ch, in next dtr work as follows: 1 dc, 1 ch and 1 dc, 1 ch, 1 sl st in next tr. Cut and fasten the thread. BODY: Work as follows with double yarn: 6 ch, 2 dc in the 2nd ch from hook (= head). Cut and fasten the thread. Sew the body on to the wings with the head up between the big wings. Finish by working a row of sl sts along the edge of the big wings. Sew the butterfly to the left side of yoke. |
||||||||||
Diagram explanations |
||||||||||
|
||||||||||
 |
||||||||||
 |
||||||||||
Have you finished this pattern?Tag your pictures with #dropspattern #yasmintunic or submit them to the #dropsfan gallery. Do you need help with this pattern?You'll find 9 tutorial videos, a Comments/Questions area and more by visiting the pattern on garnstudio.com. © 1982-2026 DROPS Design A/S. We reserve all rights. This document, including all its sub-sections, has copyrights. Read more about what you can do with our patterns at the bottom of each pattern on our site. |
||||||||||


With over 40 years in knitting and crochet design, DROPS Design offers one of the most extensive collections of free patterns on the internet - translated to 17 languages. As of today we count 324 catalogues and 12267 patterns translated into English (UK/cm). 12267
We work hard to bring you the best knitting and crochet have to offer, inspiration and advice as well as great quality yarns at incredible prices! Would you like to use our patterns for other than personal use? You can read what you are allowed to do in the Copyright text at the bottom of all our patterns. Happy crafting!
Post a comment to pattern DROPS 148-9
We would love to hear what you have to say about this pattern!
If you want to leave a question, please make sure you select the correct category in the form below, to speed up the answering process. Required fields are marked *.