
Popular categories
Looking for a yarn?


Comments / Questions (91)
Zillah wrote:
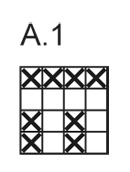
The chart really is confusing! I suggest you rewrite the pattern and only offer the chart for when knitting in the round. I really had to struggle with it and had to unpick it all after several mistakes.
12.08.2014 - 01:09
![]() Beate Wewezow wrote:
Beate Wewezow wrote:
Warum wird der Kragen nicht mit Knopflöchern gestrickt? So muss er doch über den Kopf / Frisur gezogen werden?! Hätte mir ohnehin eine Schemazeichnung für den gesamten Kragen gewünscht.
24.06.2014 - 15:38DROPS Design answered:
Ja, es stimmt, der Kragen wird über den Kopf gezogen, so wie ein "normaler" Rundschal. Sie können ihn aber ganz leicht modifizieren, indem Sie beim oberen Teil, d.h. nach dem seitlichen Schlitz, an der einen Blende gleichmäßig verteilt Knopflöcher einarbeiten. Der obere Teil misst insg. 18 cm. (Der Kragen wird von unten nach oben gestrickt, der seitl. Schlitz, den Sie sehen, ist die Stelle, an der beide Teile auf eine Nadel gelegt werden und rechts und links 6 neue M angeschlagen werden.)
25.06.2014 - 11:55
![]() Lucia wrote:
Lucia wrote:
Gostaria que vocês publicassem o gráfico deste modelo de gola 140-40. este modelo é belíssimo, parabéns.
15.02.2014 - 13:40
![]() Helen Gladgo wrote:
Helen Gladgo wrote:
Confused on A-1 chart first row is the same a Purl row , second row a Knit and third row k,P,k,p,k,p,k,p then Fourth row k,P, k, p k,p,k,p
16.01.2014 - 18:46DROPS Design answered:
Dear Mrs Gladgo, start reading diagram at the bottom corner on the right side towards the left on every RS row / on all rounds - from WS, read from left towards right. Rounds 1 & 2: K1,P1,K1,P1 - Round 3: K - Round 4 P (from RS i.e. in the round or as seen from RS). Happy knitting!
17.01.2014 - 09:56
![]() Shellee wrote:
Shellee wrote:
The only oart if this pattern not confusing is the chart! Love it. Question. Can you explain the neck warmer construction? Are bothe sides of the initial 8cm disconnect? If so the instruction only allows for buttons on one side. What happens with the loose flaps on the other side? Is there a 360 view of the neck warmer????? If not how is it worn on the side not showing in the photo? Is the area connecting the two sides worn under the arm? Or on the shoulder??????
22.12.2013 - 18:56DROPS Design answered:
Dear Shelly, the neck warmer is worked first in 2 identical pieces until 20 cm high, then you put both pieces tog and finish piece. Just follow instructions step by step and you'll see your neck warmer take form. Happy knitting!
27.12.2013 - 13:14
![]() Rausis Laurence wrote:
Rausis Laurence wrote:
Après différentes tentatives, j'ai enfin compris: lorsque l'on tricote droit à l'endroit après les 6 mailles mousses on fait 1 endroit 1 envers ... et au retour (envers) on croise pour qu'il y ait une espèce de mini-côte. Puis 2 rangs tricotés à l'endroit. Quand on tricote en rond, c'est 1 end 1 env et au 2è rang pareil, puis 1 rang tout à l'endroit puis tout à l'envers. Si j'ai fait juste....
20.11.2013 - 20:29
![]() Petra wrote:
Petra wrote:
Ich habe Probleme mit den Abnahmen bei der Mütze. Sollen die Abnahmen immer an den gleichen Stellen (z.B. jede 6. und 7. Masche zusammenstricken, in der nächsten Reihe mit Abnahmen dann jede 5. und 6. Masche) vorgenommen werden und kann dies auch versetzt erfolgen?
20.11.2013 - 11:26DROPS Design answered:
Liebe Petra, ich habe diese Mütze auch gestrickt und die Abnahmen immer an der gleichen Stelle gemacht. Es ist schön geworden, ich würde es also empfehlen.
21.11.2013 - 18:33
![]() Moraima wrote:
Moraima wrote:
I'm confused with the instruction about following the a.1 diagram for the pattern 104 neck warmer. Please help. Can you show on video?
18.10.2013 - 01:44DROPS Design answered:
Dear Mrs Moraima, in the diag. 1square=1st x 1row. Start at the bottom corner on the right side, read it towards the left on RS rows (or every round when worked in the round), and from right towards the left on WS rows. Happy knitting!
18.10.2013 - 10:04
![]() Raisa Jaako wrote:
Raisa Jaako wrote:
Puuttuuko tästä ohjeesta tasona neulottaessa käytettävä mallineulepiirros:tasona neulottaessahan mallikerta on 1oikein,1nurin (neulottaessa oikealta vasemmalle) ja 1nurin,1oikein (neulottaessa vasemmalta oikealle),sitten neulotaan 2 kerrosta OIKEAA:oikealta vasemmalle ja vasemmalta oikealle?
09.09.2013 - 10:36DROPS Design answered:
Ohjeen piirroksen merkkien selitykset käsittelevät silmukat sekä oikealta että nurjalta puolelta.
09.09.2013 - 13:45
![]() Bettina wrote:
Bettina wrote:
Die Mütze gefällt mir sehr gut. Vor allem die angenähten Knöpfe machen etwas her. Ich überlege, sie für diesen Winter zu stricken. Sehr schön.
08.09.2013 - 17:47
|
|||||||
Bliss#blissset |
|||||||
|
|
|||||||
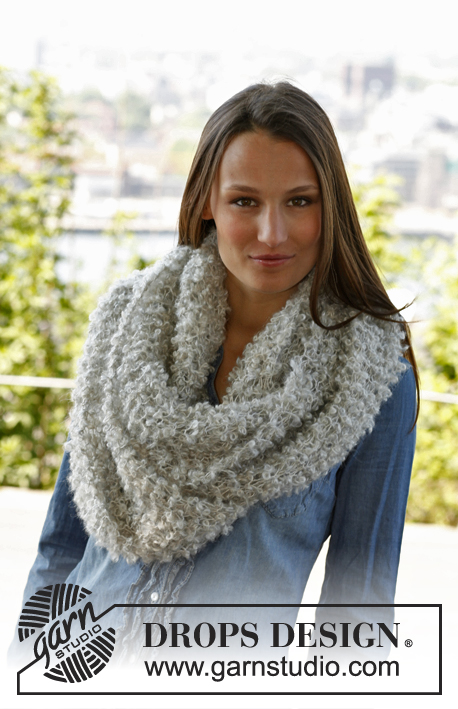
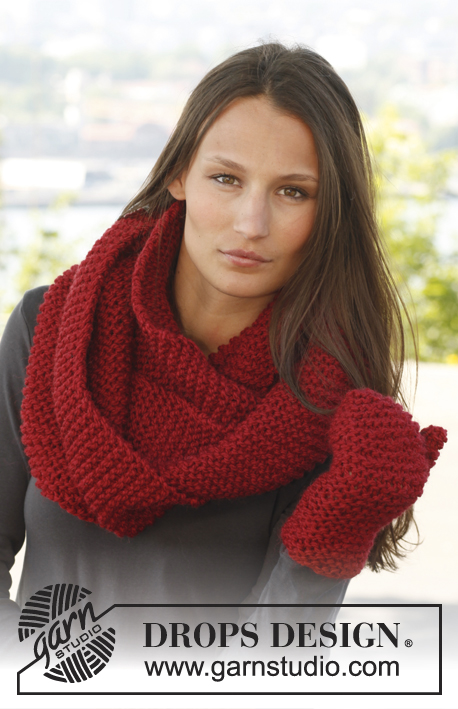
Knitted DROPS neck warmer and hat with pattern in ”Nepal”.
DROPS 140-40 |
|||||||
|
GARTER ST (back and forth on needle): K all rows. 1 ridge = 2 rows K. GARTER ST (in the round on circular needle): 1 ridge = 2 rounds * K 1 round and P 1 round *, repeat from *-*. PATTERN: See diagram A.1. Diagram shows all rows in pattern from RS. ---------------------------------------------------------- HAT: Piece is first worked back and forth on circular needle and then in the round. Cast on 86-94 sts with Nepal on circular needle size 4 mm. K 1 row from WS, then work as follows: 6 sts in GARTER ST - see explanation above, * K 2, P 2 *, repeat from *-*, finish with K 2 and 6 sts in garter st. Continue rib and in garter st in each side until piece measures 4 cm. Switch to circular needle size 5 mm. Now work as follows: 6 sts in garter st, A.1 over the next 74-82 sts and finish with 6 sts in garter st. When piece measures 8 cm, cast off the first 6 sts on needle, then work in the round with A.1 over all sts = 80-88 sts. When piece measures 20-21 cm, work in GARTER ST - see explanation above - until finished measurements. Work in garter st, AT THE SAME TIME dec 12 sts evenly every 3rd round a total of 5 times = 20-28 sts remain on round. Work the remaining sts tog 2 by 2, cut the thread and pull it through the remaining sts. Tighten tog and fasten. The hat measures approx. 25-26 cm vertically. Sew 2 buttons on to flap at the bottom of hat, sew through both layers. ---------------------------------------------------------- NECK WARMER: Worked back and forth on needle. Cast on 62 sts on circular needle size 4 mm with Nepal. K 1 row from WS, then work as follows - from RS: 6 sts in garter st, K 2, * P 2, K 2 *, repeat from *-* and finish with 6 sts in garter st. Continue like this. When piece measures 4 cm, switch to circular needle size 5 mm and continue as follows: 6 sts in garter st, A.1 over the next 50 sts and finish with 6 sts in garter st. When piece measures 20 cm, cast off 6 sts in each side = 50 sts. Cut the thread. Put piece aside. Knit another part the same way. Cast on 6 sts on circular needle size 5 mm, work sts from one part back on needle, work sts from the other part back on needle and cast on 6 sts at end of row = 112 sts. Worked back and forth on needle as follows: 6 sts in garter st (band), A.1 over the next 100 sts, 6 sts in garter st (band). Continue like this until piece measures 34 cm. Switch to circular needle size 4 mm, then work as follows – AT THE SAME TIME on first row inc 2 sts evenly. 6 sts in garter st, K 2, * P 2, K 2 *, repeat from *-* and finish with 6 sts in garter st = 114 sts. Work rib for 4 cm, then cast off with K over K and P over P. Place bands on top of each other and sew on 4 buttons through both layers. |
|||||||
Diagram explanations |
|||||||
|
|||||||
 |
|||||||
Have you finished this pattern?Tag your pictures with #dropspattern #blissset or submit them to the #dropsfan gallery. Do you need help with this pattern?You'll find 7 tutorial videos, a Comments/Questions area and more by visiting the pattern on garnstudio.com. © 1982-2026 DROPS Design A/S. We reserve all rights. This document, including all its sub-sections, has copyrights. Read more about what you can do with our patterns at the bottom of each pattern on our site. |
|||||||


With over 40 years in knitting and crochet design, DROPS Design offers one of the most extensive collections of free patterns on the internet - translated to 17 languages. As of today we count 324 catalogues and 12267 patterns translated into English (UK/cm). 12267
We work hard to bring you the best knitting and crochet have to offer, inspiration and advice as well as great quality yarns at incredible prices! Would you like to use our patterns for other than personal use? You can read what you are allowed to do in the Copyright text at the bottom of all our patterns. Happy crafting!
Post a comment to pattern DROPS 140-40
We would love to hear what you have to say about this pattern!
If you want to leave a question, please make sure you select the correct category in the form below, to speed up the answering process. Required fields are marked *.