
Popular categories
Looking for a yarn?


Comments / Questions (146)
![]() Mari wrote:
Mari wrote:
HOLA, QUERIA SABER POR DONDE TENGO QUE COMENZAR, POR ESPALDA?Y POR ARRIBA O ABAJO. ES QUE ES DIFICIL LEER EL PATRON.
20.09.2014 - 13:43DROPS Design answered:
Hola Mari. El patrón se trabaja de ida y vta: primero se trabaja el cuerpo desde la cintura aproximadamente hacia el hombro y después la parte inferior de la chaqueta a partir de la orilla de montaje (desde donde comenzamos la parte del cuerpo pero ahora hacia abajo).
22.09.2014 - 15:42
![]() Linda wrote:
Linda wrote:
Er staat bij minderen in de mouw, dat je 1 lus moet overslaan en dan de volgende lus moet haken, die overgeslagen lus werd bij mij dus een grote opening zeg maar. Maar heb het zelf opgelost door in de lus die je moet overslaan 1 keer door te halen en dan de volgende lus gewoon haken met 3 (2 plus die ene steek van de overgeslagen lus) steken afhalen. Het is nu heel mooi geworden.
03.09.2014 - 07:31
![]() Linda wrote:
Linda wrote:
Goedemorgen, Ik heb de vraag al eens zien staan, maar wil toch nog graag wat duidelijkheid. Ik hou ook een "gat" over na de minderingen van de mouw, ook als ik het vest in elkaar gezet heb, als ik mijn arm optil dan zie je dat gat wel erg. Hoort dit nou zo, of doe ik iets verkeerd?
14.08.2014 - 09:00DROPS Design answered:
Er hoort geen gat onder de mouw te zitten. Wij kunnen op afstand helaas niet beoordelen waarom dat bij u wel zo is, dus we raden u aan naar een verkooppunt in de buurt te gaan met uw werk zodat zij met u mee kunnen kijken.
01.09.2014 - 16:44
![]() Päivi Pylväläinen wrote:
Päivi Pylväläinen wrote:
Hei, aloitin tekemään kokoa XS/S, mutta koululla 4,5 jakusta tulee valtava. Vaihdoin koukkuun 4, mutta leveys on edelleen hirmuisen suuri. Pienemmällä koululla tätä ei oikein voi virkata, eikä koko siitä edes paljoa pienenisi. Lankana on Muskat musta. Myöskin kun vertaan mallikuvan "ruutujen" kokoa, ne ovat mielestäni pienemmät. Onkohan tämä oikeasti suunniteltu Muskatille?
25.07.2014 - 15:14DROPS Design answered:
Jakku on suunniteltu Muskat-langalle. Olethan tehnyt ensimmäisen kerroksen kavennukset?
25.08.2014 - 14:22
![]() Carolyn wrote:
Carolyn wrote:
I really love so many of your patterns and appreciate that they are free and so beautiful, but they are more difficult than necessary to follow. I have been crocheting for over 30 years and would appreciate an easier to follow pattern. I have done some very difficult, detailed pieces over the years.
17.07.2014 - 03:48DROPS Design answered:
Dear Carolyn, remember you can get help from your DROPS store for any individual help even per mail or telefon if required. Happy crocheting!
17.07.2014 - 09:11Veronica wrote:
I adore this pattern but the size which should fit is much too big. L/XL says start with 262 chain. I am now well into Pattern 1 and I could wrap it around myself once and half again. Is this normal or have I made a mistake somewhere?
07.04.2014 - 05:03DROPS Design answered:
Hi Veronica. Did you make the decreases on first row to 224 sts as explained? If you did and then have worked a pattern repeat in height and it's still that big, then it sounds like your gauge is off. Are you using recommended yarn Muskat? Did you swatch before you started? Maybe you need to use a smaller hook to get given gauge.
09.05.2014 - 18:48
![]() Diane Street wrote:
Diane Street wrote:
Please could you help me with the diagrams in this pattern as i do not understand and would like it explained in words. Kind Regards Diane Street
18.03.2014 - 13:19DROPS Design answered:
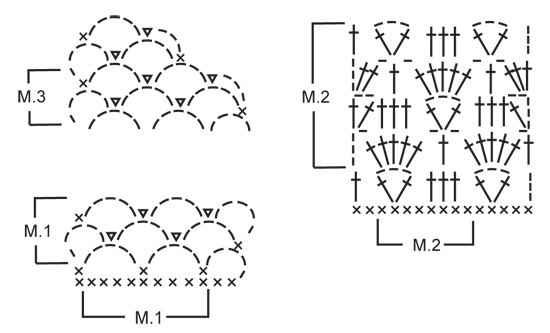
Dear Mrs Street, M.1 and M.2 are explained in words at the beginning of the pattern, so that you can figure out how diagram work and how to do dec in M.3. (1 symbol = 1 st or group of st). Happy crocheting!
18.03.2014 - 13:41
![]() Diane Street wrote:
Diane Street wrote:
Please could you help me with this pattern as i don't understand the shaping for the fronts from the diagram.i have only been crocheting for about a year.Please could you explain the decrease shaping in written instructions for me.i am not sure if i am doing it right,on the front right i have decreased from the third row and each alternate row, i hope this is correct. i love your patterns,kind regards Diane Street
17.03.2014 - 17:47DROPS Design answered:
Dear Mrs Street, dec for front piece are shown in diagram M.3, read diagram from right to left on RS, from left to right on WS: at the end of 2nd row, work ch 3, 1 dc in the middle of ch-loop, ch2, sl in same ch as dc, ch 5, etc... work one more row from WS, and repeat this row at beg from row from RS. Happy crocheting!
17.03.2014 - 18:44
![]() Maria Bichel wrote:
Maria Bichel wrote:
Jag är lite en nybörjare..Jag har börjat virka strl M och när jag nu ska gå till Mönster 1, varv 2 mäter mitt arbete 126 cm, med 42+1 båge. Var kan jag ha gjort så fel? mvh Maria
14.02.2014 - 22:40DROPS Design answered:
Hej Maria. Det eneste jeg kan taenke er at din heklefasthed er forkert og du maaske skal have en mindre naal. Du skal have 5 stora lm-bågar per 10 cm. Med 42 lm-bågar er det da ca 84-85 cm.
19.02.2014 - 15:00
![]() Jet wrote:
Jet wrote:
Mooi vest, heb alleen geen idee waar ik moet beginnen. Ruim 200 lossen haken om te beginnen?
06.01.2014 - 21:47DROPS Design answered:
Hoi Jet. Ja, je kiest de maat die je wilt haken en begint dan (bijvoorbeeld maat XS/S) met een ketting van 187 l, keer dan het werk en haak terug zoals beschreven. Je haakt heen en weer van middenvoor tot middenvoor.
07.01.2014 - 12:05
|
||||||||||||||||
Buttercup#buttercupcardigan |
||||||||||||||||
 |
 |
|||||||||||||||
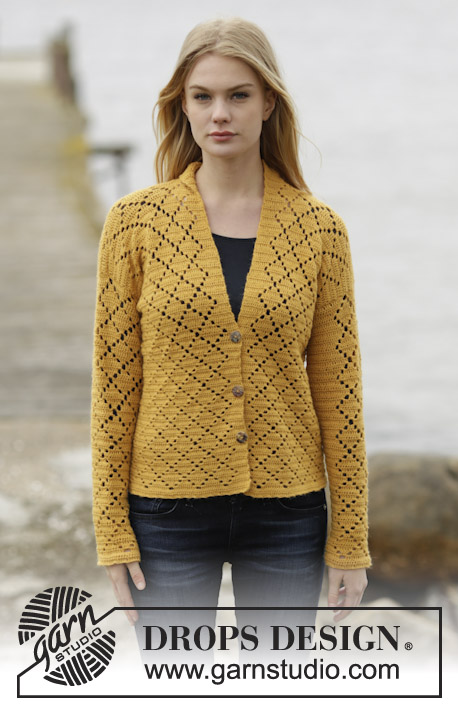
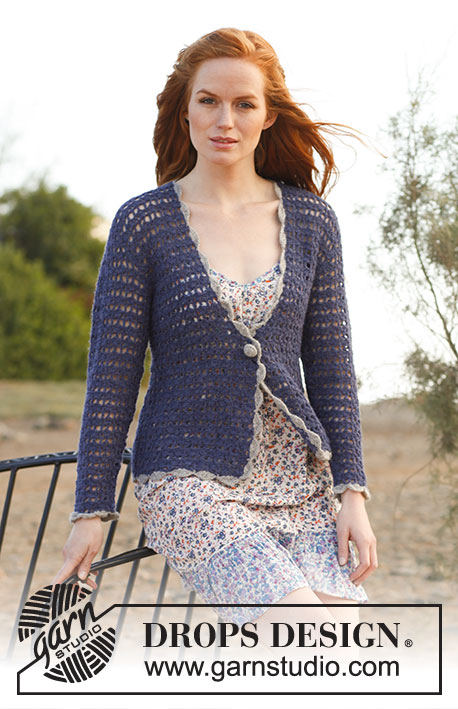
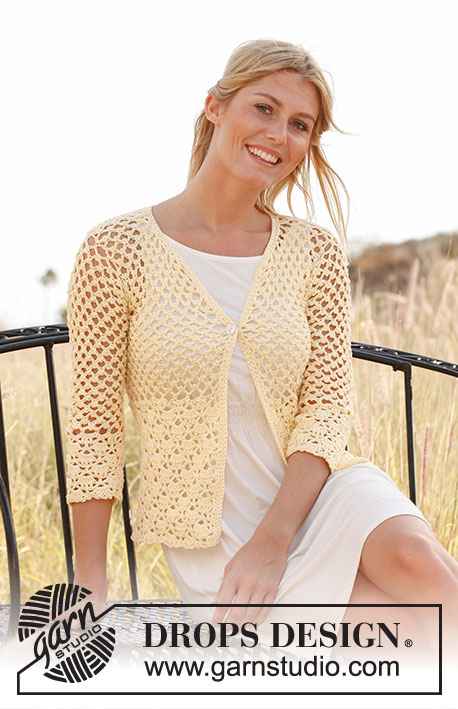
Crochet DROPS jacket in ”Muskat”. Size: XS - XXXL.
DROPS 136-30 |
||||||||||||||||
|
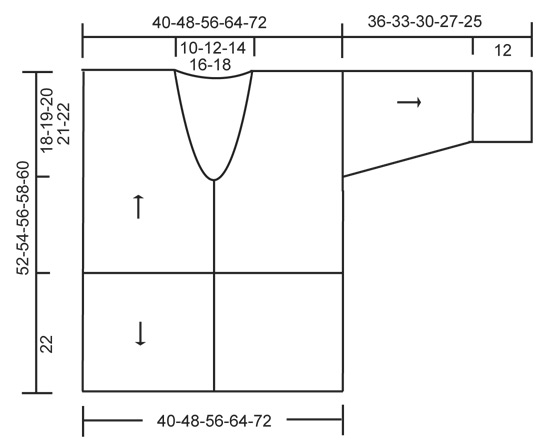
PATTERN 1 (also see diagram M.1): ROW 1: See explanation in pattern. ROW 2: 5 ch, 1 dc in middle ch on first ch-loop, 2 ch, 1 sl st in same ch, * 5 ch, 1 dc in middle ch on next ch-loop, 2 ch, 1 sl st in same ch *, repeat from *-* until 1 ch-loop remains, 5 ch, 1 dc in middle ch on last ch-loop, turn piece. Repeat 2nd row upwards. PATTERN 2 (also see diagram M.2): ROW 1: See explanation in pattern. ROW 2: 4 ch, * 5 tr in ch-loop, 1 ch, skip 2 tr, 1 tr in next tr, 1 ch, skip 2 tr *, repeat from *-* until 1 ch-loop remains, work 5 tr in this ch-loop, 1 ch and 1 tr in 3rd ch from beg of row, turn piece. ROW 3: 5 ch, 1 tr in first tr, * skip 1 tr, 1 tr in each of the next 3 tr, skip 1 tr, in next tr work 1 tr + 3 ch + 1 tr *, repeat from *-* until 5 tr remain, skip 1 tr, 1 tr in each of the next 3 tr, skip 1 tr, 1 tr + 2 ch + 1 tr in 3rd ch from beg of previous row, turn piece. ROW 4: 3 ch, 2 tr in first ch-loop, * 1 ch, skip 2 tr, 1 tr in next tr, 1 ch, skip 2 tr, in next ch-loop work 5 tr *, repeat from *-* until 5 tr remain, 1 ch, skip 2 tr, 1 tr in next tr, 1 ch, skip 2 tr, in last ch-loop work 3 tr, turn piece. ROW 5: 3 ch, skip 2 tr, *in next tr work 1 tr + 3 ch + 1 tr, skip 1 tr, 1 tr in each of the next 3 tr, skip 1 tr *, repeat from *-* until 4 tr remain, in next tr work 1 tr + 3 ch + 1 tr, skip 2 tr, 1 tr in 3rd ch from beg of previous row. Repeat rows 2 to 5. -------------------------------------------------------- JACKET: Worked back and forth from mid front. First work PATTERN 1 up to shoulder, then work PATTERN 2 from cast on edge and down. The sleeves are worked from armholes and down. Work 187-224-262-298-335 ch on hook size 4.5 mm with Muskat. Turn, work 1 dc in 2nd ch from hook, then work 1 dc in each of the next 3-5-1-2-4 ch, * skip 1 ch, work 1 dc in each of the next 6 ch *, repeat from *-* the rest of row = 160-192-224-255-287 dc. Work next row as follows: 5 ch, skip the first 2 dc, 1 dc in next dc, * 5 ch, skip 3 dc, 1 dc in next dc, 5 ch, skip 4 dc, 1 dc in next dc *, repeat from *-* until 4-0-5-0-5 dc remain. Sizes M and XXL are done. SIZE XS/S: 5 ch, skip 3 dc, 1 dc in last dc. SIZE L/XL and XXXL: 5 ch, skip 4 dc, 1 dc in last dc. Turn piece (= 35-42-49-56-63 large ch-loops + loop used when turning at beg of row). Continue PATTERN 1 (beg on 2nd row) – see explanation above! REMEMBER THE CROCHET TENSION! When piece measures approx. 12-13-14-15-16 cm, divide for armholes and finish each part separately. RIGHT FRONT PIECE: Work diagram M.1 back and forth over the first 9-11-12-14-16 large ch-loops - AT THE SAME TIME next time 3rd row in diagram is worked, dec for neck according to diagram M.3. Repeat dec until 6-7-9-10-11 large ch-loops remain on shoulder. Continue to work diagram M.1 until piece measures approx. 29-31-33-35-37 cm – work last row as follows: 5 ch, 1 dc in middle ch on first ch-loop from previous row, * 5 ch, 1 dc in middle ch on next ch-loop *, repeat from *-* the rest of row, cut the thread. LEFT FRONT PIECE: Work as right front piece but reversed. BACK PIECE: Work back and forth over the middle 17-20-25-28-31 large ch-loops. When piece measures approx. 29-31-33-35-37 cm (count so that no of ch-loops vertically on front piece is the same as on back piece), work 1 last row over 6-7-9-10-11 ch-loops in each side as on front piece (the 5-6-7-8-9 middle ch-loops = neck). EDGE AT THE BOTTOM: Work down from cast on edge as follows (beg from WS): 1 sl st in first dc, then 3 ch, skip 2 dc, in next dc work 1 tr + 3 ch + 1 tr, * skip 2 dc, work 1 tr in each of the next 3 dc, skip 2 dc, in next dc work 1 tr + 3 ch + 1 tr *, repeat from *-* until 4-4-4-3-3 dc remain, skip 3-3-3-2-2 dc and work 1 tr in last dc, turn piece. Continue PATTERN 2 (beg on 2nd row) – see explanation above! There will be a total of 20-24-28-32-36 repetitions on row. Work diagram M.2 for approx. 22 cm, finish after 2nd or 4th row in pattern. Work last row as follows: * 3 ch, skip 1 st (either 1 tr or 1 ch), 1 dc in next tr *, repeat from *-* the rest of row, cut the thread. The entire body measures approx. 52-54-56-58-60 cm vertically. ASSEMBLY: Crochet the shoulders tog as follows: * 1 dc in first large ch-loop on front piece, 2 ch, 1 dc in first large ch-loop on back piece, 2 ch *, repeat from *-* on both shoulders. SLEEVE: Worked back and forth from armhole and down. Work 1 dc in first ch-loop at the bottom of armhole, * 5 ch, skip approx. 2 cm, fasten with 1 dc *, repeat from *-* until bottom of other side of armhole, there should be 18-19-20-21-22 ch-loops in total. Turn and continue with 2ND ROW in PATTERN 1 (= 17-18-19-20-21 large ch-loops on row + ch-loop used when turning). When piece measures 2 cm, dec 1 large ch-loop at the end of next row, this is done by working until 2 large ch-loops remain, work 5 ch, skip first ch-loop and work 1 dc in middle ch on last ch-loop. Repeat dec every 4-3-3-2-2 cm (dec alternately in the right and left side) until 11-11-13-13-15 large ch-loops remain + ch-loop used when turning. When sleeve measures 24-21-18-15-13 cm (shorter measurements in the larger sizes because of broader shoulder width), work next row as follows: 5 ch, 1 dc in middle ch on first ch-loop, * 5 ch, 1 dc in middle ch on next ch-loop *, repeat from *-* the rest of row. Work next row as follows: 4 dc in every ch-loop and 3 dc in last ch-loop on row = 47-47-55-55-63 dc. Work next row as follows: 3 ch, skip the first 2 dc, in next dc work 1 tr + 3 ch + 1 tr, * skip 2 dc, work 1 tr in each of the next 3 dc, skip 2 dc, in next dc work 1 tr + 3 ch + 1 tr *, repeat from *-* until 4 dc remain, skip 3 dc and work 1 tr in last dc, turn piece. Continue PATTERN 2 (beg on 2nd row) – see explanation above! There will be a total of 6-6-7-7-8 repetitions on row. When diagram M.2 has been worked for approx. 12 cm (finish after 2nd or 4th row in pattern), work next row as follows: * 3 ch, skip 1 st (either 1 tr or 1 ch), 1 dc in next tr *, repeat from *-* the rest of row, cut the thread. ASSEMBLY: Work sleeve seams tog the same way as on shoulders. BANDS AND NECK EDGE: Work 1 dc row up along right band, around the neck and down along left band - make sure that dc row neither tightens nor widens the edges. There should be approx. 16 dc on 10 cm. Turn and work 1 row with 1 dc in every dc - when finished around the neck and beg down right front piece work as follows: 1 dc in first dc, 2 ch, skip 2 dc (= button hole), continue with dc down along the rest of front piece. Turn and work 1 dc row – work 2 dc in ch-loop. Cut and fasten the thread. Sew on button. |
||||||||||||||||
Diagram explanations |
||||||||||||||||
|
||||||||||||||||
 |
||||||||||||||||
 |
||||||||||||||||
Have you finished this pattern?Tag your pictures with #dropspattern #buttercupcardigan or submit them to the #dropsfan gallery. Do you need help with this pattern?You'll find 3 tutorial videos, a Comments/Questions area and more by visiting the pattern on garnstudio.com. © 1982-2026 DROPS Design A/S. We reserve all rights. This document, including all its sub-sections, has copyrights. Read more about what you can do with our patterns at the bottom of each pattern on our site. |
||||||||||||||||


With over 40 years in knitting and crochet design, DROPS Design offers one of the most extensive collections of free patterns on the internet - translated to 17 languages. As of today we count 324 catalogues and 12267 patterns translated into English (UK/cm). 12267
We work hard to bring you the best knitting and crochet have to offer, inspiration and advice as well as great quality yarns at incredible prices! Would you like to use our patterns for other than personal use? You can read what you are allowed to do in the Copyright text at the bottom of all our patterns. Happy crafting!
Post a comment to pattern DROPS 136-30
We would love to hear what you have to say about this pattern!
If you want to leave a question, please make sure you select the correct category in the form below, to speed up the answering process. Required fields are marked *.