
Popular categories
Looking for a yarn?


Comments / Questions (146)
Nelie Minnaar wrote:
The 2 cm that what I do not understand. Do I measure the 2 cm over the loops. How do do that?
10.01.2017 - 08:20DROPS Design answered:
Dear Mrs Minaar, on 1st row on sleeve, measure the 2 cm in width along armhole (on back/front piece). Happy crocheting!
10.01.2017 - 09:51Nelie wrote:
I do not understand the follow instructions. Work 1 dc in first ch-loop at the bottom of armhole, * 5 ch, skip approx. 2 cm, fasten with 1 dc *, repeat from *-* until bottom of other side of armhole, there should be 18-19-20-21-22 ch-loops in total.
09.01.2017 - 10:05DROPS Design answered:
Dear Nelie, Sleeve is worked top down from around the armhole, beg round with 1 dc in the ch-sloop at the bottom of armhole and work around (5 ch, skip approx. 2 cm and work 1 dc ) repeat from (to) until you have 18-22 ch-loops in total on the row (see size). Happy crocheting!
09.01.2017 - 11:53Sarah wrote:
Bonsoir, j'ai aimé ce patron et je suis entrain de le réaliser an taille xxl. Mais arrivée au niveau de la séparation des devants et dos, j'ai réalisé le devant droit sur les 14 grands arceaux et j'ai coupé le fil. Maintenant pour réaliser le devant gauche et le dos je ne sais pas comment les commencer et comment attacher le fil est ce que je commence par une mail serrée dans le premier arceau?
22.09.2016 - 20:37DROPS Design answered:
Bonjour Sarah, Le dos se crochète sur les 28 grands arceaux laissés non travaillés quand vous avez fait le devant droit, et le devant gauche se crochète sur les 14 grands arceaux restants (vous avez ainsi 14 grands arceaux x 2 devants + 28 grands arceaux pour le dos = 56 comme avant la séparation). Ajustez le début de chaque rang comme dans M.1 en fonction du dernier rang crocheté. Bon crochet!
23.09.2016 - 08:27Debra Crary wrote:
Buttercup R-613 instructs you to do dc and tr on your website. I have the same pattern that instructs you to use sc and dc. Which pattern is correct?
03.09.2016 - 15:06DROPS Design answered:
Dear Debra. The terms dc and tr are the same as the sc and dc, respectively. The first ones are used in British and the others in American English.
04.09.2016 - 22:29
![]() Laura wrote:
Laura wrote:
Buona sera. Una domanda . Nella taglia s quantodeve misurare più o meno l inizio del giacchino? A me al secondo giro di.m1 misura circa 88 di larghezza con 35 archi piu quello da 2 x girare. Grazie laura
30.07.2016 - 19:13DROPS Design answered:
Buonasera Laura. Per la misura S la larghezza complessiva (i due davanti + il dietro) dovrebbe essere di ca. 80 cm. Alla fine delle spiegazioni trova un diagramma con le misure delle taglie espresse in cm. Verifichi anche la correttezza del suo campione con quello indicato nel modello. Buon lavoro!
30.07.2016 - 19:38
![]() Liesbeth wrote:
Liesbeth wrote:
Ik wil graag beginnen met dit vestje maar zit zelf tussen maat m en l in. En l zit gekoppeld aan xl. Hoe valt het patroon?
16.07.2016 - 09:24DROPS Design answered:
Hoi Liesbeth. Op de foto zit hij vrij strak (de model draagt de kleinste maat), maar kijk ook onderaan het patroon op de maattekening. Hier staan alle afmetingen in cm en je kan hier vergelijken. Kijk ook hier hoe je een maat kan kiezen
19.07.2016 - 13:51
![]() Liesbeth wrote:
Liesbeth wrote:
Ik wil graag beginnen met dit vestje maar zit zelf tussen maat m en l in. En l zit gekoppeld aan xl. Hoe valt het patroon?
14.07.2016 - 19:44DROPS Design answered:
Hoi Liesbeth. Kijk onderaan het patroon. Hier is een maatschema met alle afmetingen in cm. Je kan deze vergelijken met je eigen afmetingen. Lees ook hier meer over het kiezen van de juist maat
15.07.2016 - 16:07
![]() Astrid wrote:
Astrid wrote:
Ik heb dit vestje gehaakt met nld nr 4 had 3 bolletjes extra nodig voor maat M. Ik denk dat het voor een onervaren haakster eenvoudiger beschreven kan worden. Vooral de start, hoe het totaal gehaakt wordt. Verder krijg ook ik als ik volgens de beschrijving haak een gat bij de mindering van de mouw. Ik heb dat dus anders opgelost door half vasten te haken tot het midden van de eerste boog. Ziet er net uit en kan ik iedereen aanbevelen. Ben erg tevreden met het resultaat
15.04.2016 - 14:55
![]() Emilia Ashby wrote:
Emilia Ashby wrote:
The instruction in the pattern says, in the Jacket part, "divide for armholes," I haven't been able to figure it out. My only solution is to sew the seems on both sides and count between front(s) and back 18 looped chains around to make the sleeve (as I am making the medium size. Is this the way you intended the instruction to be? Otherwise, would you mind explaining this instruction? Thanks, Emilia
07.04.2016 - 23:35DROPS Design answered:
Dear Mrs Ashby, when it says to divide for armholes, you now continue each piece separately. First work right front piece over the first 9-16 large ch-space seen from RS, when front piece is done to shoulder, work left front piece over the 9-16 large ch-spaces on the other side and work afterwards back piece on the middle 17-31 large ch-spaces on body for back piece. Happy crocheting!
08.04.2016 - 08:58
![]() Judy Fudge wrote:
Judy Fudge wrote:
I am stumped by the second row. "Turn, work 1 sc in 2nd ch from hook, then work 1 sc in each of the next 3-5-1-2-4 ch, * skip ch 1, work 1 sc in each of the next 6 ch *, repeat from *-* the rest of row = 160-192-224-255-287 sc." I don't see where the decrease is and don't see this row in the diagram. What am I missing? Thank you Judy
05.04.2016 - 13:01DROPS Design answered:
Dear Mrs Fudge, you have crocheted 187-224-262-298-335 ch to start with, and will skip 1 ch evenly (when repeating *skip ch 1, work 1 sc in each of the next 6 ch*), this mean you will have then less sc than you had chains, ie 160-192-224-255-287 sc at the end of row. There is no diagram to this row. Happy crocheting!
05.04.2016 - 14:00
|
||||||||||||||||
Buttercup#buttercupcardigan |
||||||||||||||||
 |
 |
|||||||||||||||
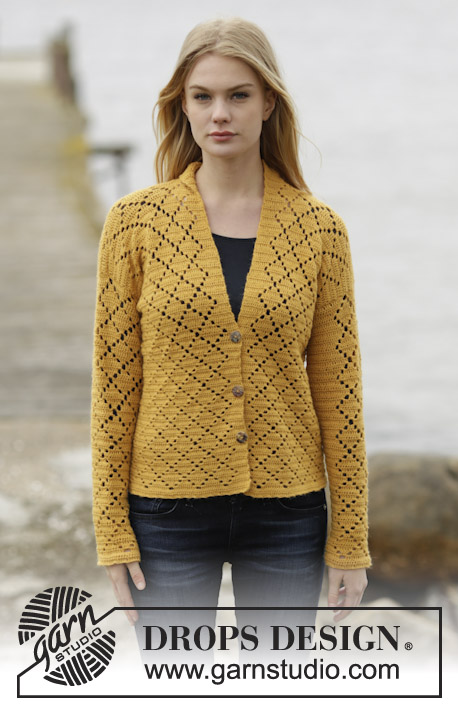
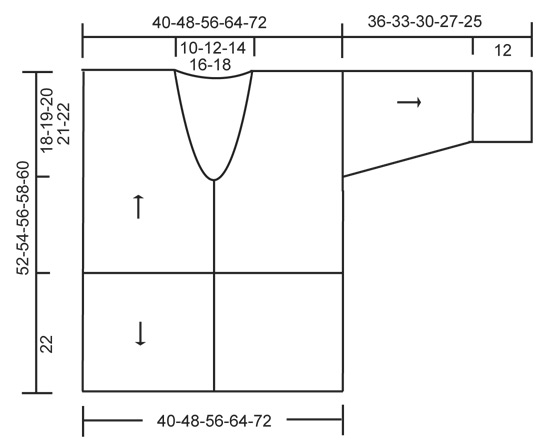
Crochet DROPS jacket in ”Muskat”. Size: XS - XXXL.
DROPS 136-30 |
||||||||||||||||
|
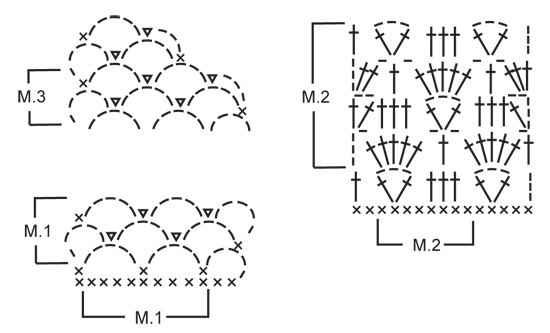
PATTERN 1 (also see diagram M.1): ROW 1: See explanation in pattern. ROW 2: 5 ch, 1 dc in middle ch on first ch-loop, 2 ch, 1 sl st in same ch, * 5 ch, 1 dc in middle ch on next ch-loop, 2 ch, 1 sl st in same ch *, repeat from *-* until 1 ch-loop remains, 5 ch, 1 dc in middle ch on last ch-loop, turn piece. Repeat 2nd row upwards. PATTERN 2 (also see diagram M.2): ROW 1: See explanation in pattern. ROW 2: 4 ch, * 5 tr in ch-loop, 1 ch, skip 2 tr, 1 tr in next tr, 1 ch, skip 2 tr *, repeat from *-* until 1 ch-loop remains, work 5 tr in this ch-loop, 1 ch and 1 tr in 3rd ch from beg of row, turn piece. ROW 3: 5 ch, 1 tr in first tr, * skip 1 tr, 1 tr in each of the next 3 tr, skip 1 tr, in next tr work 1 tr + 3 ch + 1 tr *, repeat from *-* until 5 tr remain, skip 1 tr, 1 tr in each of the next 3 tr, skip 1 tr, 1 tr + 2 ch + 1 tr in 3rd ch from beg of previous row, turn piece. ROW 4: 3 ch, 2 tr in first ch-loop, * 1 ch, skip 2 tr, 1 tr in next tr, 1 ch, skip 2 tr, in next ch-loop work 5 tr *, repeat from *-* until 5 tr remain, 1 ch, skip 2 tr, 1 tr in next tr, 1 ch, skip 2 tr, in last ch-loop work 3 tr, turn piece. ROW 5: 3 ch, skip 2 tr, *in next tr work 1 tr + 3 ch + 1 tr, skip 1 tr, 1 tr in each of the next 3 tr, skip 1 tr *, repeat from *-* until 4 tr remain, in next tr work 1 tr + 3 ch + 1 tr, skip 2 tr, 1 tr in 3rd ch from beg of previous row. Repeat rows 2 to 5. -------------------------------------------------------- JACKET: Worked back and forth from mid front. First work PATTERN 1 up to shoulder, then work PATTERN 2 from cast on edge and down. The sleeves are worked from armholes and down. Work 187-224-262-298-335 ch on hook size 4.5 mm with Muskat. Turn, work 1 dc in 2nd ch from hook, then work 1 dc in each of the next 3-5-1-2-4 ch, * skip 1 ch, work 1 dc in each of the next 6 ch *, repeat from *-* the rest of row = 160-192-224-255-287 dc. Work next row as follows: 5 ch, skip the first 2 dc, 1 dc in next dc, * 5 ch, skip 3 dc, 1 dc in next dc, 5 ch, skip 4 dc, 1 dc in next dc *, repeat from *-* until 4-0-5-0-5 dc remain. Sizes M and XXL are done. SIZE XS/S: 5 ch, skip 3 dc, 1 dc in last dc. SIZE L/XL and XXXL: 5 ch, skip 4 dc, 1 dc in last dc. Turn piece (= 35-42-49-56-63 large ch-loops + loop used when turning at beg of row). Continue PATTERN 1 (beg on 2nd row) – see explanation above! REMEMBER THE CROCHET TENSION! When piece measures approx. 12-13-14-15-16 cm, divide for armholes and finish each part separately. RIGHT FRONT PIECE: Work diagram M.1 back and forth over the first 9-11-12-14-16 large ch-loops - AT THE SAME TIME next time 3rd row in diagram is worked, dec for neck according to diagram M.3. Repeat dec until 6-7-9-10-11 large ch-loops remain on shoulder. Continue to work diagram M.1 until piece measures approx. 29-31-33-35-37 cm – work last row as follows: 5 ch, 1 dc in middle ch on first ch-loop from previous row, * 5 ch, 1 dc in middle ch on next ch-loop *, repeat from *-* the rest of row, cut the thread. LEFT FRONT PIECE: Work as right front piece but reversed. BACK PIECE: Work back and forth over the middle 17-20-25-28-31 large ch-loops. When piece measures approx. 29-31-33-35-37 cm (count so that no of ch-loops vertically on front piece is the same as on back piece), work 1 last row over 6-7-9-10-11 ch-loops in each side as on front piece (the 5-6-7-8-9 middle ch-loops = neck). EDGE AT THE BOTTOM: Work down from cast on edge as follows (beg from WS): 1 sl st in first dc, then 3 ch, skip 2 dc, in next dc work 1 tr + 3 ch + 1 tr, * skip 2 dc, work 1 tr in each of the next 3 dc, skip 2 dc, in next dc work 1 tr + 3 ch + 1 tr *, repeat from *-* until 4-4-4-3-3 dc remain, skip 3-3-3-2-2 dc and work 1 tr in last dc, turn piece. Continue PATTERN 2 (beg on 2nd row) – see explanation above! There will be a total of 20-24-28-32-36 repetitions on row. Work diagram M.2 for approx. 22 cm, finish after 2nd or 4th row in pattern. Work last row as follows: * 3 ch, skip 1 st (either 1 tr or 1 ch), 1 dc in next tr *, repeat from *-* the rest of row, cut the thread. The entire body measures approx. 52-54-56-58-60 cm vertically. ASSEMBLY: Crochet the shoulders tog as follows: * 1 dc in first large ch-loop on front piece, 2 ch, 1 dc in first large ch-loop on back piece, 2 ch *, repeat from *-* on both shoulders. SLEEVE: Worked back and forth from armhole and down. Work 1 dc in first ch-loop at the bottom of armhole, * 5 ch, skip approx. 2 cm, fasten with 1 dc *, repeat from *-* until bottom of other side of armhole, there should be 18-19-20-21-22 ch-loops in total. Turn and continue with 2ND ROW in PATTERN 1 (= 17-18-19-20-21 large ch-loops on row + ch-loop used when turning). When piece measures 2 cm, dec 1 large ch-loop at the end of next row, this is done by working until 2 large ch-loops remain, work 5 ch, skip first ch-loop and work 1 dc in middle ch on last ch-loop. Repeat dec every 4-3-3-2-2 cm (dec alternately in the right and left side) until 11-11-13-13-15 large ch-loops remain + ch-loop used when turning. When sleeve measures 24-21-18-15-13 cm (shorter measurements in the larger sizes because of broader shoulder width), work next row as follows: 5 ch, 1 dc in middle ch on first ch-loop, * 5 ch, 1 dc in middle ch on next ch-loop *, repeat from *-* the rest of row. Work next row as follows: 4 dc in every ch-loop and 3 dc in last ch-loop on row = 47-47-55-55-63 dc. Work next row as follows: 3 ch, skip the first 2 dc, in next dc work 1 tr + 3 ch + 1 tr, * skip 2 dc, work 1 tr in each of the next 3 dc, skip 2 dc, in next dc work 1 tr + 3 ch + 1 tr *, repeat from *-* until 4 dc remain, skip 3 dc and work 1 tr in last dc, turn piece. Continue PATTERN 2 (beg on 2nd row) – see explanation above! There will be a total of 6-6-7-7-8 repetitions on row. When diagram M.2 has been worked for approx. 12 cm (finish after 2nd or 4th row in pattern), work next row as follows: * 3 ch, skip 1 st (either 1 tr or 1 ch), 1 dc in next tr *, repeat from *-* the rest of row, cut the thread. ASSEMBLY: Work sleeve seams tog the same way as on shoulders. BANDS AND NECK EDGE: Work 1 dc row up along right band, around the neck and down along left band - make sure that dc row neither tightens nor widens the edges. There should be approx. 16 dc on 10 cm. Turn and work 1 row with 1 dc in every dc - when finished around the neck and beg down right front piece work as follows: 1 dc in first dc, 2 ch, skip 2 dc (= button hole), continue with dc down along the rest of front piece. Turn and work 1 dc row – work 2 dc in ch-loop. Cut and fasten the thread. Sew on button. |
||||||||||||||||
Diagram explanations |
||||||||||||||||
|
||||||||||||||||
 |
||||||||||||||||
 |
||||||||||||||||
Have you finished this pattern?Tag your pictures with #dropspattern #buttercupcardigan or submit them to the #dropsfan gallery. Do you need help with this pattern?You'll find 3 tutorial videos, a Comments/Questions area and more by visiting the pattern on garnstudio.com. © 1982-2026 DROPS Design A/S. We reserve all rights. This document, including all its sub-sections, has copyrights. Read more about what you can do with our patterns at the bottom of each pattern on our site. |
||||||||||||||||


With over 40 years in knitting and crochet design, DROPS Design offers one of the most extensive collections of free patterns on the internet - translated to 17 languages. As of today we count 324 catalogues and 12267 patterns translated into English (UK/cm). 12267
We work hard to bring you the best knitting and crochet have to offer, inspiration and advice as well as great quality yarns at incredible prices! Would you like to use our patterns for other than personal use? You can read what you are allowed to do in the Copyright text at the bottom of all our patterns. Happy crafting!
Post a comment to pattern DROPS 136-30
We would love to hear what you have to say about this pattern!
If you want to leave a question, please make sure you select the correct category in the form below, to speed up the answering process. Required fields are marked *.