
Popular categories
Looking for a yarn?


Comments / Questions (146)
![]() Carina wrote:
Carina wrote:
Var hittar jag en storleksguide? Hur vet jag storleken?
02.06.2012 - 11:45DROPS Design answered:
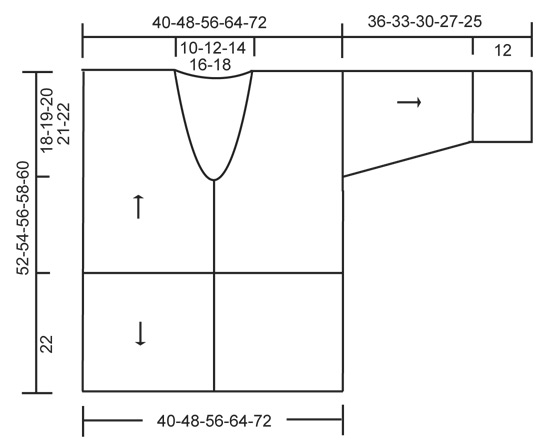
Hej, i måttskissen ser du vilken storlek du skall ha. Lycka till!
12.06.2012 - 10:13
![]() Wendy wrote:
Wendy wrote:
Ik heb een vraag over de minderingen voor de mouw. Als ik de aanwijzingen volg houdt ik een gat over en een soort bobbel dit kan niet de bedoeling zijn. Kunt u mij misschien een meer uitgebreide uitleg geven over de minderingen?
24.05.2012 - 21:31DROPS Design answered:
Hoi. We hebben het patroon en de minderingen bekeken en de instructie klopt. Omdat u de mouw van boven naar beneden haakt zou dit volgens ons de beste manier zijn. Maar u mag het natuurlijk altijd aanpassen als u een andere manier heeft. Bij het samen naaien van de mouw, zou het ook beter passen (met de gaten / minderingen).
06.06.2012 - 10:24
![]() Marie wrote:
Marie wrote:
Har problem med vilken virknål jag ska ha. Perl-Inox 4,5 känns väldigt grov. Vilket märke har ni?
14.05.2012 - 19:22
![]() Lisa wrote:
Lisa wrote:
Verkligen en jättegullig kofta jag vill virka i alla färger. Är dock nybörjare än. Det står det att man ska "dela" arbetet för ärmhål. Vad menas exakt med att dela arbetet? Undrar även vad siffrorna där man ser vilka delar man virkar står för, tex ovanför ärmen står det 36-33... står de siffrorna för maskor, bågar eller cm? Tack annars för en riktigt bra sida!
23.04.2012 - 17:00DROPS Design answered:
När vi skriver delas så menar vi att du inte längre virkar över alla maskorna, utan nu virkar delarna var för sig, så det blir öppnaingar för ärmhålen i var sida, så gå bara vidare till förkl för framst. Siffrorna i diagrammet är centimeter måtten.
23.04.2012 - 20:07
![]() Therese Oggier wrote:
Therese Oggier wrote:
Durch die Abnahme an den Ärmeln entstanden unschöne Löcher. Was habe ich falsch gemacht und welche Vorschläge haben Sie für mich. Herzlichen Dank und lieben Gruss
12.04.2012 - 15:17DROPS Design answered:
Evt. bei der Reihe vor der Abnahme den Lm-Bogen etwas kleiner häkeln?
13.04.2012 - 09:14
![]() Corinda De Vries wrote:
Corinda De Vries wrote:
Kan iemand mij helpen: Ik ben bij het kopje rechter voorpand. Daar moet ik elke 3e tour minderen. De 1e keer dat ik de 3e tour haakte ging dit goed. Dus wilde ik de 2e mindering (6e tour) op het eind van die tour doen, omdat het anders niet aan de halskant zit. Ik kom dan echter op een verkeerd punt uit om verder te gaan. Kan iemand mij verder helpen? Ik hoop dat de vraag duidelijk is. Vriendelijke groet.
05.04.2012 - 20:41DROPS Design answered:
Uw vraag is duidelijk! U houdt voor het minderen telpatroon M.3 aan, dus u mindert de 3e toer en vanaf daar mindert u volgens het telpatroon, dan komt het goed uit. groeten Angelique
11.04.2012 - 17:31
![]() Linda Daly wrote:
Linda Daly wrote:
I am having difficulty following the sequence of this pattern. I began the Jacket with 224 chains for M, and then proceeded up to the point where it says Sizes M and XXL are done. How do I proceed from this point
26.03.2012 - 20:49DROPS Design answered:
You ch 224, then work first row as explained. Then pattern say: Turn piece (= 35-42-49-56-63 large ch-spaces + loop used when turning at beg of row). Continue PATTERN 1 (beg on 2nd row) – see explanation above!
28.03.2012 - 00:11
![]() Erja Viuhkola wrote:
Erja Viuhkola wrote:
Hyvä virkkausmalli, vierastan keltaista, murretumpi sävy olisi parempi.
10.03.2012 - 19:29
![]() Jennifer wrote:
Jennifer wrote:
I really love your designs but your instructions are too complicated, that's why I haven't done more of your patterns. Row by row instructions would be nice. Thanks.
04.02.2012 - 17:23Rosalba wrote:
Por favor podrían traducirlo al Español? me gustaría lucirlo en Baja California éste verano. Saludos a todas la diseñadores.
26.01.2012 - 20:51
|
||||||||||||||||
Buttercup#buttercupcardigan |
||||||||||||||||
 |
 |
|||||||||||||||
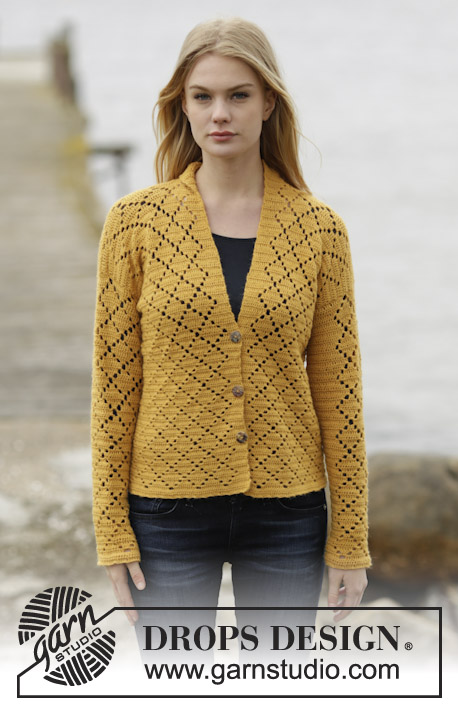
Crochet DROPS jacket in ”Muskat”. Size: XS - XXXL.
DROPS 136-30 |
||||||||||||||||
|
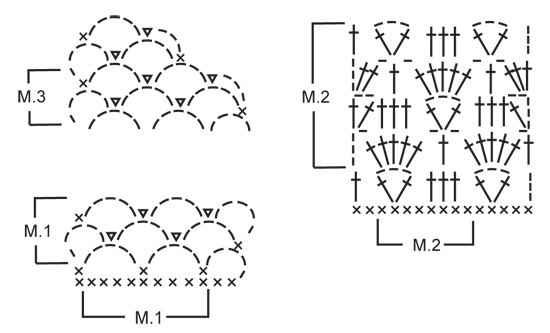
PATTERN 1 (also see diagram M.1): ROW 1: See explanation in pattern. ROW 2: 5 ch, 1 dc in middle ch on first ch-loop, 2 ch, 1 sl st in same ch, * 5 ch, 1 dc in middle ch on next ch-loop, 2 ch, 1 sl st in same ch *, repeat from *-* until 1 ch-loop remains, 5 ch, 1 dc in middle ch on last ch-loop, turn piece. Repeat 2nd row upwards. PATTERN 2 (also see diagram M.2): ROW 1: See explanation in pattern. ROW 2: 4 ch, * 5 tr in ch-loop, 1 ch, skip 2 tr, 1 tr in next tr, 1 ch, skip 2 tr *, repeat from *-* until 1 ch-loop remains, work 5 tr in this ch-loop, 1 ch and 1 tr in 3rd ch from beg of row, turn piece. ROW 3: 5 ch, 1 tr in first tr, * skip 1 tr, 1 tr in each of the next 3 tr, skip 1 tr, in next tr work 1 tr + 3 ch + 1 tr *, repeat from *-* until 5 tr remain, skip 1 tr, 1 tr in each of the next 3 tr, skip 1 tr, 1 tr + 2 ch + 1 tr in 3rd ch from beg of previous row, turn piece. ROW 4: 3 ch, 2 tr in first ch-loop, * 1 ch, skip 2 tr, 1 tr in next tr, 1 ch, skip 2 tr, in next ch-loop work 5 tr *, repeat from *-* until 5 tr remain, 1 ch, skip 2 tr, 1 tr in next tr, 1 ch, skip 2 tr, in last ch-loop work 3 tr, turn piece. ROW 5: 3 ch, skip 2 tr, *in next tr work 1 tr + 3 ch + 1 tr, skip 1 tr, 1 tr in each of the next 3 tr, skip 1 tr *, repeat from *-* until 4 tr remain, in next tr work 1 tr + 3 ch + 1 tr, skip 2 tr, 1 tr in 3rd ch from beg of previous row. Repeat rows 2 to 5. -------------------------------------------------------- JACKET: Worked back and forth from mid front. First work PATTERN 1 up to shoulder, then work PATTERN 2 from cast on edge and down. The sleeves are worked from armholes and down. Work 187-224-262-298-335 ch on hook size 4.5 mm with Muskat. Turn, work 1 dc in 2nd ch from hook, then work 1 dc in each of the next 3-5-1-2-4 ch, * skip 1 ch, work 1 dc in each of the next 6 ch *, repeat from *-* the rest of row = 160-192-224-255-287 dc. Work next row as follows: 5 ch, skip the first 2 dc, 1 dc in next dc, * 5 ch, skip 3 dc, 1 dc in next dc, 5 ch, skip 4 dc, 1 dc in next dc *, repeat from *-* until 4-0-5-0-5 dc remain. Sizes M and XXL are done. SIZE XS/S: 5 ch, skip 3 dc, 1 dc in last dc. SIZE L/XL and XXXL: 5 ch, skip 4 dc, 1 dc in last dc. Turn piece (= 35-42-49-56-63 large ch-loops + loop used when turning at beg of row). Continue PATTERN 1 (beg on 2nd row) – see explanation above! REMEMBER THE CROCHET TENSION! When piece measures approx. 12-13-14-15-16 cm, divide for armholes and finish each part separately. RIGHT FRONT PIECE: Work diagram M.1 back and forth over the first 9-11-12-14-16 large ch-loops - AT THE SAME TIME next time 3rd row in diagram is worked, dec for neck according to diagram M.3. Repeat dec until 6-7-9-10-11 large ch-loops remain on shoulder. Continue to work diagram M.1 until piece measures approx. 29-31-33-35-37 cm – work last row as follows: 5 ch, 1 dc in middle ch on first ch-loop from previous row, * 5 ch, 1 dc in middle ch on next ch-loop *, repeat from *-* the rest of row, cut the thread. LEFT FRONT PIECE: Work as right front piece but reversed. BACK PIECE: Work back and forth over the middle 17-20-25-28-31 large ch-loops. When piece measures approx. 29-31-33-35-37 cm (count so that no of ch-loops vertically on front piece is the same as on back piece), work 1 last row over 6-7-9-10-11 ch-loops in each side as on front piece (the 5-6-7-8-9 middle ch-loops = neck). EDGE AT THE BOTTOM: Work down from cast on edge as follows (beg from WS): 1 sl st in first dc, then 3 ch, skip 2 dc, in next dc work 1 tr + 3 ch + 1 tr, * skip 2 dc, work 1 tr in each of the next 3 dc, skip 2 dc, in next dc work 1 tr + 3 ch + 1 tr *, repeat from *-* until 4-4-4-3-3 dc remain, skip 3-3-3-2-2 dc and work 1 tr in last dc, turn piece. Continue PATTERN 2 (beg on 2nd row) – see explanation above! There will be a total of 20-24-28-32-36 repetitions on row. Work diagram M.2 for approx. 22 cm, finish after 2nd or 4th row in pattern. Work last row as follows: * 3 ch, skip 1 st (either 1 tr or 1 ch), 1 dc in next tr *, repeat from *-* the rest of row, cut the thread. The entire body measures approx. 52-54-56-58-60 cm vertically. ASSEMBLY: Crochet the shoulders tog as follows: * 1 dc in first large ch-loop on front piece, 2 ch, 1 dc in first large ch-loop on back piece, 2 ch *, repeat from *-* on both shoulders. SLEEVE: Worked back and forth from armhole and down. Work 1 dc in first ch-loop at the bottom of armhole, * 5 ch, skip approx. 2 cm, fasten with 1 dc *, repeat from *-* until bottom of other side of armhole, there should be 18-19-20-21-22 ch-loops in total. Turn and continue with 2ND ROW in PATTERN 1 (= 17-18-19-20-21 large ch-loops on row + ch-loop used when turning). When piece measures 2 cm, dec 1 large ch-loop at the end of next row, this is done by working until 2 large ch-loops remain, work 5 ch, skip first ch-loop and work 1 dc in middle ch on last ch-loop. Repeat dec every 4-3-3-2-2 cm (dec alternately in the right and left side) until 11-11-13-13-15 large ch-loops remain + ch-loop used when turning. When sleeve measures 24-21-18-15-13 cm (shorter measurements in the larger sizes because of broader shoulder width), work next row as follows: 5 ch, 1 dc in middle ch on first ch-loop, * 5 ch, 1 dc in middle ch on next ch-loop *, repeat from *-* the rest of row. Work next row as follows: 4 dc in every ch-loop and 3 dc in last ch-loop on row = 47-47-55-55-63 dc. Work next row as follows: 3 ch, skip the first 2 dc, in next dc work 1 tr + 3 ch + 1 tr, * skip 2 dc, work 1 tr in each of the next 3 dc, skip 2 dc, in next dc work 1 tr + 3 ch + 1 tr *, repeat from *-* until 4 dc remain, skip 3 dc and work 1 tr in last dc, turn piece. Continue PATTERN 2 (beg on 2nd row) – see explanation above! There will be a total of 6-6-7-7-8 repetitions on row. When diagram M.2 has been worked for approx. 12 cm (finish after 2nd or 4th row in pattern), work next row as follows: * 3 ch, skip 1 st (either 1 tr or 1 ch), 1 dc in next tr *, repeat from *-* the rest of row, cut the thread. ASSEMBLY: Work sleeve seams tog the same way as on shoulders. BANDS AND NECK EDGE: Work 1 dc row up along right band, around the neck and down along left band - make sure that dc row neither tightens nor widens the edges. There should be approx. 16 dc on 10 cm. Turn and work 1 row with 1 dc in every dc - when finished around the neck and beg down right front piece work as follows: 1 dc in first dc, 2 ch, skip 2 dc (= button hole), continue with dc down along the rest of front piece. Turn and work 1 dc row – work 2 dc in ch-loop. Cut and fasten the thread. Sew on button. |
||||||||||||||||
Diagram explanations |
||||||||||||||||
|
||||||||||||||||
 |
||||||||||||||||
 |
||||||||||||||||
Have you finished this pattern?Tag your pictures with #dropspattern #buttercupcardigan or submit them to the #dropsfan gallery. Do you need help with this pattern?You'll find 3 tutorial videos, a Comments/Questions area and more by visiting the pattern on garnstudio.com. © 1982-2026 DROPS Design A/S. We reserve all rights. This document, including all its sub-sections, has copyrights. Read more about what you can do with our patterns at the bottom of each pattern on our site. |
||||||||||||||||


With over 40 years in knitting and crochet design, DROPS Design offers one of the most extensive collections of free patterns on the internet - translated to 17 languages. As of today we count 324 catalogues and 12267 patterns translated into English (UK/cm). 12267
We work hard to bring you the best knitting and crochet have to offer, inspiration and advice as well as great quality yarns at incredible prices! Would you like to use our patterns for other than personal use? You can read what you are allowed to do in the Copyright text at the bottom of all our patterns. Happy crafting!
Post a comment to pattern DROPS 136-30
We would love to hear what you have to say about this pattern!
If you want to leave a question, please make sure you select the correct category in the form below, to speed up the answering process. Required fields are marked *.