
Popular categories
Looking for a yarn?


Comments / Questions (46)
![]() Marita wrote:
Marita wrote:
Goedemorgen, ik wil met de trui met sjaalkraag beginnen, nr 135-24 maar ik kom niet uit het patroon........De steken komen niet uit, kan iemand mij helpen ?
31.08.2015 - 09:03DROPS Design answered:
Hoi Marita. Zie mijn antwoord hierboven.
01.09.2015 - 16:56
![]() Bea De Boer wrote:
Bea De Boer wrote:
Bij het voorpand moet ik beginnen met 105 steken, bij de 1e naald moet ik dan meteen 15 steken minderen? Waarom is dat? Kan ik niet meteen met 90 steken beginnen? Daarnaast begrijp ik het telpatroon M1 niet, het lijkt of recht en averecht telkens verspringen terwijl het op de foto lijkt alsof het een rib is (1 recht, 1 averecht).
10.12.2014 - 10:45DROPS Design answered:
Hoi Bea. Je zet meer steken op om de opzetnld elastischer te maken. Je leest de teltekening als volgt: 1e rij, goede kant, lees van rechs naar links: 1 r, 1 av, 1 r. 2e rij, verkeerde kant, lees van links naar rechts, 2 r (zie ook beschrijving van de symbolen), 1 r, enzovoort. Op deze manier krijg je een soort rib. Lees ook hier hoe je de teltekeningen moet lezen
10.12.2014 - 12:01
![]() Britt wrote:
Britt wrote:
Jeg får ikke antall masker til å stemme med mønsteret. 90 masker, men 2 går bort i kantmaske. 88 igjen. Som skal gå opp i 3. Men det gjør det jo ikke. Så da blir det bare rot i mønsteret. Kan noen forklare?
23.10.2014 - 17:17DROPS Design answered:
Hej Britt, Jo 1 kantm, (1vr, 2r som stickas 29 ggr = 87m) 2 m kvar som stickas 1 av, 1 kantm. Lycka till!
28.10.2014 - 09:55Julene wrote:
The pattern looks like a double rib but if I look at the M1 diagram it does not make sense. Can you give me the WS row pattern and the RS row pattern in K and P stitches explanation. Thank you.
01.06.2014 - 19:11DROPS Design answered:
Dear Julene, you start M1 from RS with *K1, P1, K1*, repeat from *-* and finish with K1. From WS, work P1, *K2, P1*, repet from *-* (don't forget edge sts). Happy knitting!
03.06.2014 - 09:52
![]() Anna wrote:
Anna wrote:
Hej, ni räknar garnkostnad utifrån att det går åt 3 nystan Kidsilk men i beskrivningen står att det går åt 150g vilket är 6 nystan. Hur mycket behöver jag av kidsilk? 3 nystan eller 6 nystan
26.05.2014 - 22:19DROPS Design answered:
Hej Anna. Du skal bruge 6 nystan (150 gr til str M og L). Jeg har rettet prisen til, den er beregnet paa den mindste störrelse (str S).
27.05.2014 - 15:45Barbara wrote:
What is 3-03-0 dont understans
27.11.2013 - 08:41DROPS Design answered:
Dear Barbara, instructions are given in the order of size, ie you work from *-* until 3 sts remain in size S, L and XXL, until the end in size M, XL and XXXL. Happy knitting!
27.11.2013 - 09:36
![]() Maria wrote:
Maria wrote:
En käsitä tuota M.1-piirrosta; onko tarkoitus siis alimmassa kohdassa tehdä joka toinen oikea silmukka ja joka toinen nurja silmukka ja sitten seuraavalla rivillä oikeasilmukka, kaksi nurjaa, oikea, kaksi nurjaa jne?
31.03.2013 - 13:10DROPS Design answered:
Hei! Piirros näyttää mallineuletta oikealta puolelta katsottuna, eli 1. rivillä tehdään 1 o, 1 n, 1 o jne. 2. rivillä (nurjalta puolelta) sitten 2 o, 1 n, 2 o, 1 n jne.
02.04.2013 - 13:48
![]() Inge Hambuch wrote:
Inge Hambuch wrote:
Bei der Anleitung zu Margot fehlt das Diagram des Musters M1. Kann man das irgendwo bekommen?
20.11.2012 - 07:32DROPS Design answered:
Liebe Inge, das Diagramm finden Sie unterhalb des Ärmels im Schnittschema.
20.11.2012 - 08:23
![]() Anneli wrote:
Anneli wrote:
Det står att första v på både framstycket och ärmen stickas från rätsidan. När jag har lagt upp så kommer första v på avigsidan. Hur kommer det sig?
13.10.2012 - 16:32DROPS Design answered:
Det är den sidan vi har valt som rätsida. Men om du vill ha den andra sidan som rätsida, så sticka 1 varv rät innan du börjar på mönstret!
16.11.2012 - 10:55
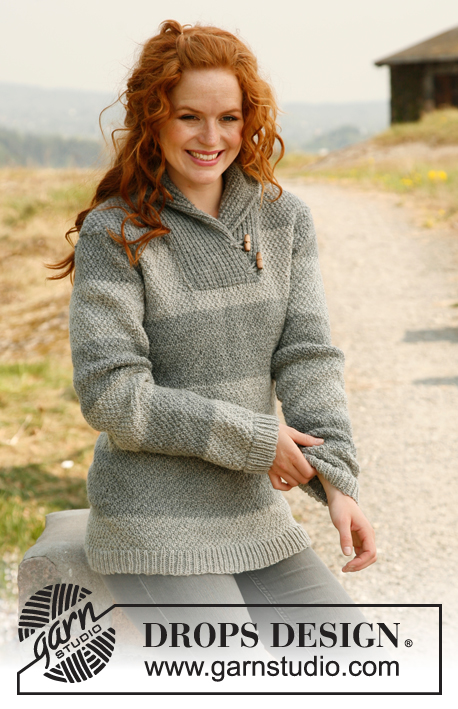
![]() Amalie wrote:
Amalie wrote:
Til svale sommerkvelder og lune høstdager:)
04.07.2011 - 08:54
|
|||||||
Margot#margotsweater |
|||||||
|
|
|||||||
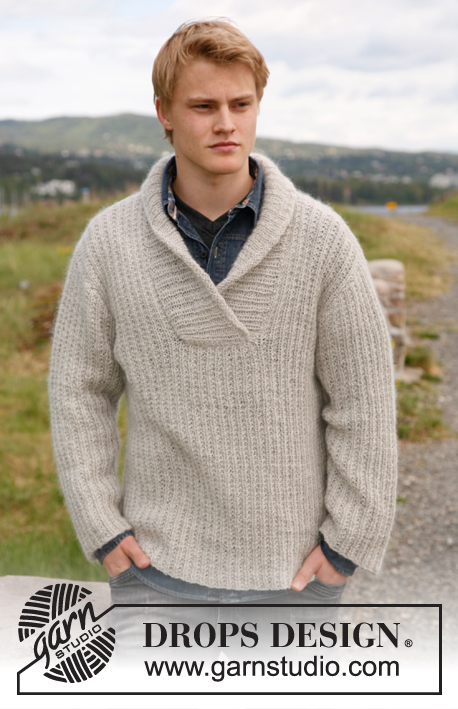
Knitted jumper with shawl collar in DROPS Alpaca and DROPS Kid-Silk. Sizes S to XXXL.
DROPS 135-24 |
|||||||
|
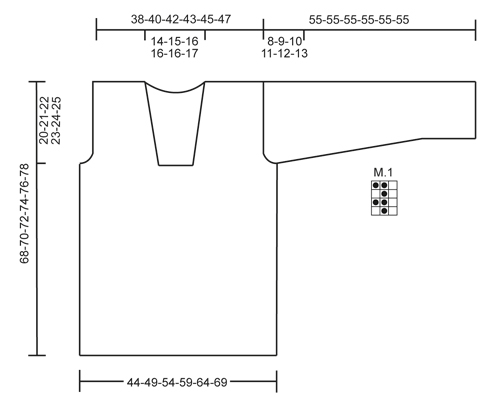
PATTERN: See diagram M.1 – diagram shows pattern from RS. ---------------------------------------------------------- FRONT PIECE: Worked back and forth on needle. Cast on 94-105-115-126-136-147 sts (incl 1 edge st in each side) on needle size 5.5 mm with 1 thread Alpaca + 1 thread Kid-Silk. Work as follows (from RS): * K 3, K 2 tog, K 2 *, repeat from *-* until 3-0-3-0-3-0 sts remain, K these sts = 81-90-99-108-117-126 sts. Work next row from WS as follows: K 1 edge st * P 1, K 2 *, repeat from *-* until 2 sts remain, P 1 and K 1 edge st. Then work diagram M.1 over all sts, with 1 edge st in each side worked K on all rows (diagram M.1 starts and ends with 1 K st, seen from RS, before edge st in each side). When piece measures approx. 48-49-50-51-52-53 cm, work next row as follows from RS: Cast off 4 sts for armhole, work 26-30-34-38-42-46 sts in diagram M.1 as before (= left front piece), cast off 21-22-23-24-25-26 sts for neck, and work the rest of row in diagram M.1 as before (= 30-34-38-42-46-50 sts). Turn and cast off 4 sts for armhole, work the rest of row, = 26-30-34-38-42-46 sts remain on right front piece. Slip sts in the left side on a stitch holder. RIGHT SIDE: Continue to work diagram M.1 over sts on needle, while at the same time casting off for armhole at the beg of every row from the side: 3 sts 0-0-1-1-2-2 times, 2 sts 0-1-1-2-2-3 times and 1 st 2-3-3-4-4-5 times. AT THE SAME TIME when piece measures 54-55-56-57-58-59 cm, dec 1 st towards the neck, repeat dec when piece measures 60-61-62-63-64-65 cm. After all cast offs and dec are done, 22-23-24-25-26-27 sts remain on needle. Cast off when piece measures 68-70-72-74-76-78 cm. LEFT SIDE: Slip the stitches on the stitch holder back on needle and work as right side but reversed. BACK PIECE: Cast on and work as on front piece until piece measures 48-49-50-51-52-53 cm. Now cast off for armholes at beg of every row in each side: 4 sts 1 time, 3 sts 0-0-1-1-2-2 times, 2 sts 0-1-1-2-2-3 times and 1 st 2-3-3-4-4-5 times = 69-72-75-78-81-84 sts. When piece measures 66-68-70-72-74-76 cm, cast off the middle 25-26-27-28-29-30 sts for neck. Work each shoulder (= 22-23-24-25-26-27 sts) separately until piece measures 68-70-72-74-76-78 cm, cast off. SLEEVE: Worked back and forth on needle. Cast on 57-57-60-60-63-66 sts (incl 1 edge st each side) on needle size 5.5 mm with 1 thread Alpaca + 1 thread Kid-Silk. K 1 row from RS while at the same time dec 6 sts evenly = 51-51-54-54-57-60 sts. Work next row from WS as follows: K 1 edge st * P 1, K 2 *, repeat from *-* until 2 sts remain, finish with P 1 and K 1 edge st. Then work diagram M.1 over all sts, with 1 edge st in each side worked K on all rows. (Diagram M.1 starts and ends with K 1, seen from RS, before edge st in each side.) When piece measures 11-11-11-13-13-13 cm, inc 1 st in each side inside edge st. Repeat inc every 4-4-4-2½-2½-2½ cm a total of 9-9-9-12-12-12 times = 69-69-72-78-81-84 sts – work the inc sts gradually in diagram M.1. When piece measures 47-46-45-44-43-42 cm (shorter measurements in the larger sizes because of longer sleeve cap and broader shoulder width) cast off at beg of every row in each side: 4 sts 1 time, 2 sts 3 times and 1 st 2-4-5-6-8-9 times. Then cast off 2 sts in each side until piece measures 54 cm, then cast off 3 sts 1 time in each side. Cast off, the piece measures approx. 55 cm in all sizes. ASSEMBLY: Sew the shoulder seams. SHAWL COLLAR: Beg mid front on left side of sts cast off for neck. Knit up on circular needle size 5.5 mm with 1 thread Alpaca and 1 thread Kid-Silk: 38 to 45 sts up to shoulder, then knit up 26 to 32 sts in the back of neck, and finally 38 to 45 sts down along left side of neck dec = 102 to 122 sts (do not knit up where sts were dec in front of neck). K 1 row from WS while AT THE SAME TIME inc no of sts to 128-134-140-146-152-158. Then work rib as follows (from RS): 2 sts worked K on all rows, * K 1, P 2 *, repeat from *-* and finish with K 1 and 2 sts worked K on all rows. Continue like this until collar measures approx. 5 cm. Now inc 1 st on each side of the middle 12 P-sections, seen from RS (= back of neck) = 140-146-152-158-164-170 sts. Continue with K over K and P over P until collar measures approx. 11-11-12-12-13-13 cm - adjust so that next row is from RS. Work 4 rows in stocking st over all sts, then cast off all sts with K from RS. The outermost edge is supposed to roll. Place the collar double (right side over left side) at the bottom of neck opening and sew it to the neck line through both layers. MORE ASSEMBLY: Sew in sleeves and sew under arm and side seams in one inside 1 edge st. |
|||||||
Diagram explanations |
|||||||
|
|||||||
 |
|||||||
Have you finished this pattern?Tag your pictures with #dropspattern #margotsweater or submit them to the #dropsfan gallery. Do you need help with this pattern?You'll find 10 tutorial videos, a Comments/Questions area and more by visiting the pattern on garnstudio.com. © 1982-2026 DROPS Design A/S. We reserve all rights. This document, including all its sub-sections, has copyrights. Read more about what you can do with our patterns at the bottom of each pattern on our site. |
|||||||


With over 40 years in knitting and crochet design, DROPS Design offers one of the most extensive collections of free patterns on the internet - translated to 17 languages. As of today we count 324 catalogues and 12260 patterns translated into English (UK/cm). 12260
We work hard to bring you the best knitting and crochet have to offer, inspiration and advice as well as great quality yarns at incredible prices! Would you like to use our patterns for other than personal use? You can read what you are allowed to do in the Copyright text at the bottom of all our patterns. Happy crafting!
Post a comment to pattern DROPS 135-24
We would love to hear what you have to say about this pattern!
If you want to leave a question, please make sure you select the correct category in the form below, to speed up the answering process. Required fields are marked *.