
Popular categories
Looking for a yarn?


Comments / Questions (102)
![]() Søs Lindberg wrote:
Søs Lindberg wrote:
Mangler forklaring til diagram M1 start på pind 3, trekant pegende opad over 4 masker
28.10.2012 - 18:03
![]() Monica Nielsen wrote:
Monica Nielsen wrote:
Hej i detta mönster står det på mössan "stickas fram och tillbaka på st. vad menas stickor nr 7 eller vad???
04.10.2012 - 17:00
![]() Ghis wrote:
Ghis wrote:
J'ai tricoté les moufles avec les restes du pull ESKIMO, c'est magnifique
12.02.2012 - 11:13
![]() DROPS Design NL wrote:
DROPS Design NL wrote:
Hoi Tjitske. Het patroon zou moeten kloppen. Je breit van voorhoofd naar de nek. Let goed op de stekenverhouding. Zie ook mijn mail naar je toe. Succes.
02.01.2012 - 15:46
![]() Tjitske Reurslag wrote:
Tjitske Reurslag wrote:
Met 150 gram ga ik het zker niet redden. Is het middenpatroon niet te lang..... 8 x
27.12.2011 - 17:01
![]() DROPS Design wrote:
DROPS Design wrote:
Hej, Stickfastheten är jätteviktig! Med angiven stickfasthet skall arbetet mäta ca 40cm fra pannan upp över huvudet och ned bak i nacken, när du stickat M.1 8 ggr. Om arb är för litet bör du gå upp ett sticknummer. Lycka till!
04.10.2011 - 08:49
![]() Linda wrote:
Linda wrote:
Då jag ej är en van stickare undrar jag lite över storlek på denna. Har stickat allt men ej virkat än, den ser liten ut, räcker inte ner till nacken. Hjälp vad gör jag för fel?
04.10.2011 - 08:45
![]() Drops Design wrote:
Drops Design wrote:
Hvis du overholder strikkefastheden måler arb ca 40cm fra panden op over hovedet og ned bag i nakken, når du har strikket M.1 8 gange. Hvis arb er for lang skal du gå et pindenummer ned. God fornøjelse!
21.09.2011 - 14:08
![]() Eva wrote:
Eva wrote:
I følge opskriften skal m1 strikkes 3 gange,så skal der en mærketråd, derefter en mærketråd efter 5 gang, allerede der er midterstykket meget langt, og mit hoved er ikke specielt lille, strikker jeg videre som der står er det 8 gange mønster.
21.09.2011 - 14:06
![]() Drops Design France wrote:
Drops Design France wrote:
Bonjour Céline, le "triangle complet" de M.1 se compose du dernier symbole + l'avant dernier symbole de la légende des diagrammes (= glisser 1 m devant, 1 m env ... + glisser 1 m derrière, 1 m end ...).
14.09.2011 - 08:30
|
|||||||||||||||||||
Rocky Mountain#rockymountainset |
|||||||||||||||||||
 |
 |
||||||||||||||||||
Set consists of: Knitted DROPS hat and mittens in ”Snow” or “Andes” with fur edge in “Puddel”.
DROPS 134-10 |
|||||||||||||||||||
|
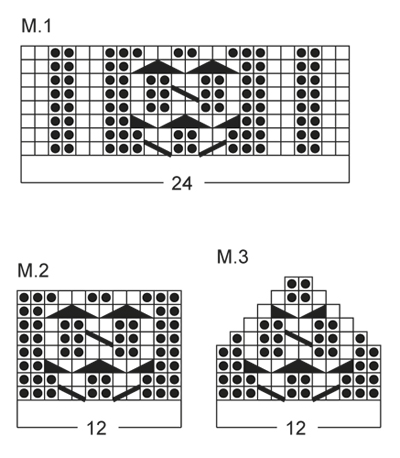
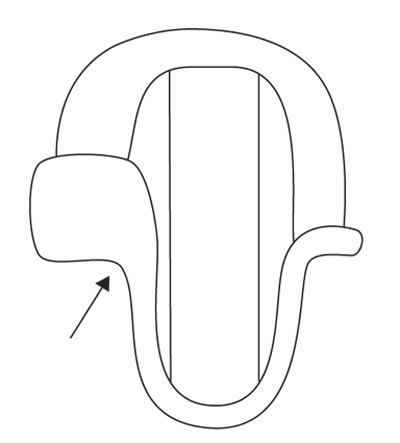
HAT: GARTER ST (back and forth on needle): K all rows. PATTERN: See diagram M.1. The diagram shows the pattern from RS. -------------------------------------------------------- HAT: Worked back and forth on needle. Beg with middle part of the head and finish with the ear flaps in each side. Cast on 26 sts with Snow on needle size 7 mm (incl 2 edge sts in garter st). Work 1st row (= RS) as follows: 1 st in garter st - See explanation above, work diagram M.1, finish with 1 st in garter st. When diagram M.1 has been worked 3 times vertically, insert a marker at the beg and end of next row (= 1st row in diagram M.1). When diagram M.1 has been worked 5 times vertically, insert another marker at the beg and end of next row (= 1st row in diagram M.1). Continue until diagram M.1 has been worked a total of 8 times vertically, piece should now measure 40 cm, loosely cast off all sts. EAR FLAP: Worked with Snow on needle size 5 mm (to get a nicer row at the beg) as follows: Knit up 14 sts evenly from RS along the edge between the 2 markers in one side of piece. Work next row (= WS) as follows: 1 st in garter st, K 3, P 2, K 2, P 2, K 3, 1 st in garter st. On next row, switch to needle size 7 mm and work: 1 st in garter st, work diagram M.2, finish with 1 st in garter st. Continue to work diagram M.2 (with 1 st in garter st in each side). When diagram M.2 has been worked 3 times vertically, inc 1 st in each side on next row from RS (1st row in diagram M.2) as follows: 1 st in garter st, make a YO, work diagram M.2, make a YO, finish with 1 st in garter st. On next row from WS, P the YOs twisted (i.e. in back loop of st instead of front to avoid holes). K the new sts from RS and P the new sts from WS in each side. Continue until diagram M.2 has been worked 4 times vertically. Then work 1st and 2nd row in diagram M.2, then cast off 1 st at beg of next row from RS (3rd row in diagram M.2) as follows: * work 2 sts, pass the first st over, work the rest of row *. Repeat from *-* 5 more rows, diagram M.2 has now been worked a total of 5 times. Then cast off all sts while AT THE SAME TIME working 1st row in diagram M.2. Work another ear flap the same way in the other side of piece. ASSEMBLY: Sew tog ear flaps and middle part in each side inside 1 edge st. FUR EDGE: Crochet along the bottom edge in front loop of st from RS. NOTE: Do not crochet too tight. Crochet with 2 threads Puddel on crochet hook size 8 mm as follows: ROW 1 (= RS): Beg in the corner where left ear flap beg (marked with arrow in diagram), work dc around left ear flap, around the back part and around the entire right ear flap, turn piece. ROW 2 (= WS): Work 1 ch, then work 1 dc in every dc back to the beg. Then work 16 dc over the bottom edge mid front, finish row with 1 sl st in 1st dc on 2nd row (at right ear flap), turn piece. ROW 3-5: Work 1 ch, dc in every dc mid front = 16 dc on row, turn piece. ROW 6: Work 1 ch, skip 1st dc, 1 dc in next dc, 1 dc in every dc until 2 dc remain on row, skip next dc, 1 dc in last dc = 14 dc, turn piece. ROW 7: Work 1 ch, skip 1st dc, 1 dc in next dc, 1 dc in every dc until 2 dc remain on row, skip next dc, 1 dc in last dc = 12 dc, turn piece. ROW 8: Work 1 ch, skip 1st dc, 1 dc in next dc, 1 dc in every dc until 2 dc remain on row, skip next dc, 1 dc in last dc = 10 dc, finish with 1 sl st in the last dc. Cut and fasten the thread. Fold the fur edge upwards over the hat and sew it tightly. Make 1 pompom of approx. 7 cm in diameter with Puddel. With Snow join at the bottom of the ear flap, make 1 tie by working ch for approx. 20 cm. Place the end of the tie inside the pompom before cutting and tying around the pompom. Make another pompom and tie the same way in the other side. -------------------------------------------------------- MITTENS: INCREASE TIP: Inc 1 st by getting the thread between 2 sts from previous round - K this st twisted, i.e. work in back loop of st instead of front to avoid holes. DECREASE TIP: Dec 1 st on each side of marker as follows: Work until 1 st remains before marker, slip next st on a cable needle behind the piece, slip next st (with marker), slip st from cable needle back on left needle, K 2 sts tog, psso = 2 sts dec. PATTERN: See diagram M.2 and M.3. The diagram shows the pattern from RS. -------------------------------------------------------- LEFT MITTEN: Worked in the round on double pointed needles. Cast on 24 sts on double pointed needles size 7 mm with Snow. Work 1st round (= RS) as follows: K 12, work diagram M.2 (= 12 K sts and 12 sts from diagram M.2). REMEMBER THE KNITTING TENSION! Continue like this until piece measures 6 cm, then insert a marker in the 9th st. On next round, inc 1 st on each side of st with marker for thumb gusset - Read increase tip above. Repeat inc on each side of the inc sts on next round = 5 sts in thumb gusset. Work 2 round without inc. On next round slip the 5 thumb sts on a stitch holder - At the same time cast on 1 new st behind sts on stitch holder = 24 sts on round (12 K sts and 12 sts from diagram M.2). Insert 2 markers in the piece as follows (round beg with 1 K st): 1 marker in the 1st K st and 1 marker in the 12th K st. When diagram M.2 has been worked 3 times vertically, work next round as follows: K 12, work diagram M.3. After 4 rounds, dec 2 sts in each side of mitten - Read decrease tip above = 4 sts dec on round. Repeat dec on every round a total of 5 times = 4 sts remain. Cut the thread and pull it through the remaining sts and tighten tog. THUMB: Slip the 5 thumb sts back on double pointed needles. Knit up 5 sts behind the thumb = 10 sts. Work in stocking st in the round until thumb measures 5 cm. Insert 2 markers in the thumb; one in the 1st st and one in the 6th st (= in each side). On next round, dec 2 sts in each side of thumb - Read decrease tip above = 4 sts dec on round. Repeat dec on next round = 2 sts remain. Cut the thread and pull it through the remaining sts and tighten tog. RIGHT MITTEN: Cast on and work as left mitten but reversed. Insert marker in the 4th st for inc for thumb gusset. FUR EDGE: Crochet with 2 threads Puddel on crochet hook size 8 mm. Work 1 sl st in cast on edge of mitten, work 1 ch, then work 18 dc around the edge, finish with 1 sl st in first dc. Then work 1 dc in every dc in the round until fur edge measures approx. 6 cm, cut and fasten the thread. Work the same way on the other mitten. |
|||||||||||||||||||
Diagram explanations |
|||||||||||||||||||
|
|||||||||||||||||||
 |
|||||||||||||||||||
 |
|||||||||||||||||||
Have you finished this pattern?Tag your pictures with #dropspattern #rockymountainset or submit them to the #dropsfan gallery. Do you need help with this pattern?You'll find 16 tutorial videos, a Comments/Questions area and more by visiting the pattern on garnstudio.com. © 1982-2026 DROPS Design A/S. We reserve all rights. This document, including all its sub-sections, has copyrights. Read more about what you can do with our patterns at the bottom of each pattern on our site. |
|||||||||||||||||||


With over 40 years in knitting and crochet design, DROPS Design offers one of the most extensive collections of free patterns on the internet - translated to 17 languages. As of today we count 325 catalogues and 12298 patterns translated into English (UK/cm). 12298
We work hard to bring you the best knitting and crochet have to offer, inspiration and advice as well as great quality yarns at incredible prices! Would you like to use our patterns for other than personal use? You can read what you are allowed to do in the Copyright text at the bottom of all our patterns. Happy crafting!
Post a comment to pattern DROPS 134-10
We would love to hear what you have to say about this pattern!
If you want to leave a question, please make sure you select the correct category in the form below, to speed up the answering process. Required fields are marked *.