
Popular categories
Looking for a yarn?


Comments / Questions (102)
![]() Paulina wrote:
Paulina wrote:
Mam pytanie o nauszniki. Na końcu instrukcji "Zamknąć wszystkie o. W TYM SAMYM CZASIE, przer. 1-szy rz. schematu M.2.". Czy mogę prosić o wyjaśnienie o co chodzi? Jak można jednocześnie zamykać oczka i je przerabiać? Czy jest dostępny jakiś film instruktażowy wyjaśniający temat?
26.11.2021 - 00:05DROPS Design answered:
Witaj Paulino, zakańczasz robótkę NASTĘPUJĄCO, ale zamiast przerabiać oczka prawe jak na filmie, będziesz przerabiać 1-szy rząd schematu M2. Pozdrawiamy!
26.11.2021 - 08:57
![]() Kerry Kalupar wrote:
Kerry Kalupar wrote:
Hi there, can you please tell me what the inner circumference of the hat is. Thank you!
01.11.2020 - 16:42DROPS Design answered:
Dear Mrs Kalupar, sorry we do not have these measurements and don't have the hat anymore to check out the measurements. Happy knitting!
02.11.2020 - 08:37
![]() Allinson wrote:
Allinson wrote:
I need to know what alternative yarn to use for the fur trim knitted in Puddel. The yarn suggester says to ask for help. Thanks
28.12.2018 - 02:14DROPS Design answered:
Dear Allinson, replace Puddel with 2 strands of Alpaca Bouclé. Happy knitting!
28.12.2018 - 10:57
![]() MARIA wrote:
MARIA wrote:
Questo berretto potrebbe andare bene anche per un uomo e risulta piccolo o non adatto?
14.12.2018 - 13:47
![]() Kasia wrote:
Kasia wrote:
Zamykanie oczek w nausznikach od trzeciego rzędu schematu M2 Czy zaczynamy zamykać oczka w schemacie M2, czy od oczka dodanego wcześniej, czy od oczka brzegowego
08.12.2018 - 12:49DROPS Design answered:
Witaj Kasiu! Należy przerobić 2 o., a następne zamknąć 1 o. w następujący sposób: przełożyć 1-sze o. nad 2-gim. Dalej przerabiać rząd do końca. Pozdrawiamy!
09.12.2018 - 23:12Suzanne wrote:
Are there written instructions fir the cable pattern section please, rather than the chart?
20.11.2016 - 20:51DROPS Design answered:
Dear Suzanne, there are only charts to this pattern - read more about diagrams here. Happy knitting!
21.11.2016 - 10:03
![]() Irmgard wrote:
Irmgard wrote:
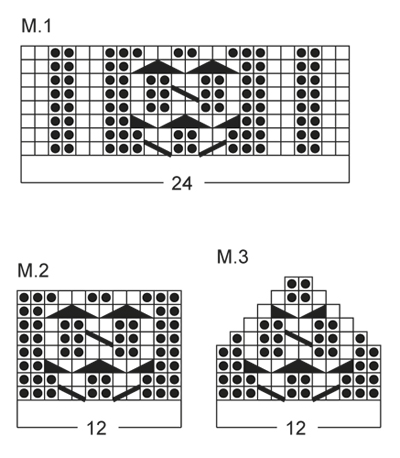
Bei den Fäustlingen ist die Einteilung des Musters unklar. 12 M re., M2(=12 re. und 12 M. von M2). Meint man damit 12 Maschen re stricken, 12 rechte Maschen für Zopfmuster M2, damit wären die 24 Maschen gestrickt (?) oder stimmt die Angabe mit dem Anschlag von 24 Maschen nicht, müsste es vielleicht 36 M. heißen? Werden die Fäustlinge in Runden gestrickt?
24.11.2015 - 23:09DROPS Design answered:
Es ist richtig, dass Sie 24 M anschlagen. Sie stricken 12 M re und die restlichen 12 M im Muster M.2. Die Fäustlinge werden in Runden gestrickt.
29.11.2015 - 21:58
![]() Lene Jensen wrote:
Lene Jensen wrote:
Har strikket hue på bestilling, men ak, fik hue retur, DROPS PUDDEL garn fnuller og taber tråde, ak ak, må finde andet garn som pelskant, syntes bare det er 82 kr ud af vinduet, surt.
12.01.2015 - 15:18
![]() Grethe Gaare Lonie wrote:
Grethe Gaare Lonie wrote:
Er det korrekt, at der kun tages ind i den ene side af øreklappen- altså kun fra retsiden- og skal der tages ind indenfor kantemaske? Hvis dette er korrekt, skal den anden jo tages ind modsat?
11.01.2015 - 22:43DROPS Design answered:
Nej der bliver 3 indtagninger i hver side hvis du følger beskrivningen. God fornøjelse!
02.02.2015 - 15:55
![]() Smokyduck wrote:
Smokyduck wrote:
How much yarn do I need for both the hat and mitten? Thanks,
23.12.2014 - 16:01DROPS Design answered:
Dear Mrs Smokyduck, you will find total weight of yarn required for hat and mittens at the right side of the picture, eg 150 g Eskimo/50 g a ball Eskimo = 3 balls Eskimo + 2 balls Puddel (100/50) for the hat, and 2 balls Eskimo + 2 balls Puddel for the mittens. Please click here to get our yarns from USA. Happy knitting!
23.12.2014 - 19:10
|
|||||||||||||||||||
Rocky Mountain#rockymountainset |
|||||||||||||||||||
 |
 |
||||||||||||||||||
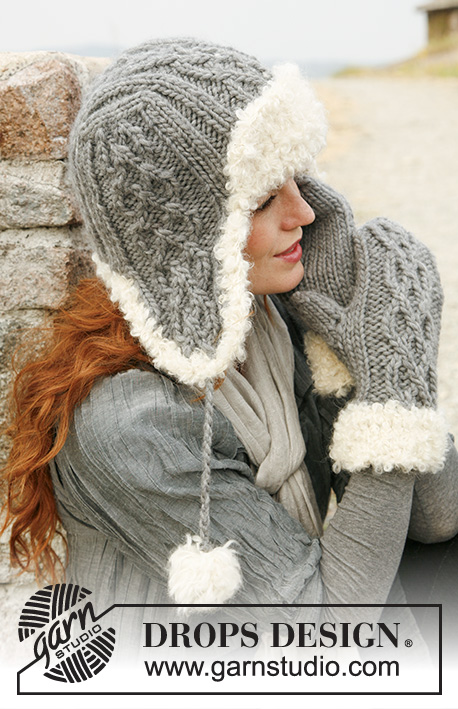
Set consists of: Knitted DROPS hat and mittens in ”Snow” or “Andes” with fur edge in “Puddel”.
DROPS 134-10 |
|||||||||||||||||||
|
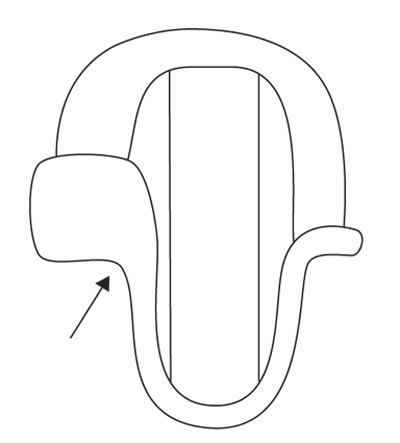
HAT: GARTER ST (back and forth on needle): K all rows. PATTERN: See diagram M.1. The diagram shows the pattern from RS. -------------------------------------------------------- HAT: Worked back and forth on needle. Beg with middle part of the head and finish with the ear flaps in each side. Cast on 26 sts with Snow on needle size 7 mm (incl 2 edge sts in garter st). Work 1st row (= RS) as follows: 1 st in garter st - See explanation above, work diagram M.1, finish with 1 st in garter st. When diagram M.1 has been worked 3 times vertically, insert a marker at the beg and end of next row (= 1st row in diagram M.1). When diagram M.1 has been worked 5 times vertically, insert another marker at the beg and end of next row (= 1st row in diagram M.1). Continue until diagram M.1 has been worked a total of 8 times vertically, piece should now measure 40 cm, loosely cast off all sts. EAR FLAP: Worked with Snow on needle size 5 mm (to get a nicer row at the beg) as follows: Knit up 14 sts evenly from RS along the edge between the 2 markers in one side of piece. Work next row (= WS) as follows: 1 st in garter st, K 3, P 2, K 2, P 2, K 3, 1 st in garter st. On next row, switch to needle size 7 mm and work: 1 st in garter st, work diagram M.2, finish with 1 st in garter st. Continue to work diagram M.2 (with 1 st in garter st in each side). When diagram M.2 has been worked 3 times vertically, inc 1 st in each side on next row from RS (1st row in diagram M.2) as follows: 1 st in garter st, make a YO, work diagram M.2, make a YO, finish with 1 st in garter st. On next row from WS, P the YOs twisted (i.e. in back loop of st instead of front to avoid holes). K the new sts from RS and P the new sts from WS in each side. Continue until diagram M.2 has been worked 4 times vertically. Then work 1st and 2nd row in diagram M.2, then cast off 1 st at beg of next row from RS (3rd row in diagram M.2) as follows: * work 2 sts, pass the first st over, work the rest of row *. Repeat from *-* 5 more rows, diagram M.2 has now been worked a total of 5 times. Then cast off all sts while AT THE SAME TIME working 1st row in diagram M.2. Work another ear flap the same way in the other side of piece. ASSEMBLY: Sew tog ear flaps and middle part in each side inside 1 edge st. FUR EDGE: Crochet along the bottom edge in front loop of st from RS. NOTE: Do not crochet too tight. Crochet with 2 threads Puddel on crochet hook size 8 mm as follows: ROW 1 (= RS): Beg in the corner where left ear flap beg (marked with arrow in diagram), work dc around left ear flap, around the back part and around the entire right ear flap, turn piece. ROW 2 (= WS): Work 1 ch, then work 1 dc in every dc back to the beg. Then work 16 dc over the bottom edge mid front, finish row with 1 sl st in 1st dc on 2nd row (at right ear flap), turn piece. ROW 3-5: Work 1 ch, dc in every dc mid front = 16 dc on row, turn piece. ROW 6: Work 1 ch, skip 1st dc, 1 dc in next dc, 1 dc in every dc until 2 dc remain on row, skip next dc, 1 dc in last dc = 14 dc, turn piece. ROW 7: Work 1 ch, skip 1st dc, 1 dc in next dc, 1 dc in every dc until 2 dc remain on row, skip next dc, 1 dc in last dc = 12 dc, turn piece. ROW 8: Work 1 ch, skip 1st dc, 1 dc in next dc, 1 dc in every dc until 2 dc remain on row, skip next dc, 1 dc in last dc = 10 dc, finish with 1 sl st in the last dc. Cut and fasten the thread. Fold the fur edge upwards over the hat and sew it tightly. Make 1 pompom of approx. 7 cm in diameter with Puddel. With Snow join at the bottom of the ear flap, make 1 tie by working ch for approx. 20 cm. Place the end of the tie inside the pompom before cutting and tying around the pompom. Make another pompom and tie the same way in the other side. -------------------------------------------------------- MITTENS: INCREASE TIP: Inc 1 st by getting the thread between 2 sts from previous round - K this st twisted, i.e. work in back loop of st instead of front to avoid holes. DECREASE TIP: Dec 1 st on each side of marker as follows: Work until 1 st remains before marker, slip next st on a cable needle behind the piece, slip next st (with marker), slip st from cable needle back on left needle, K 2 sts tog, psso = 2 sts dec. PATTERN: See diagram M.2 and M.3. The diagram shows the pattern from RS. -------------------------------------------------------- LEFT MITTEN: Worked in the round on double pointed needles. Cast on 24 sts on double pointed needles size 7 mm with Snow. Work 1st round (= RS) as follows: K 12, work diagram M.2 (= 12 K sts and 12 sts from diagram M.2). REMEMBER THE KNITTING TENSION! Continue like this until piece measures 6 cm, then insert a marker in the 9th st. On next round, inc 1 st on each side of st with marker for thumb gusset - Read increase tip above. Repeat inc on each side of the inc sts on next round = 5 sts in thumb gusset. Work 2 round without inc. On next round slip the 5 thumb sts on a stitch holder - At the same time cast on 1 new st behind sts on stitch holder = 24 sts on round (12 K sts and 12 sts from diagram M.2). Insert 2 markers in the piece as follows (round beg with 1 K st): 1 marker in the 1st K st and 1 marker in the 12th K st. When diagram M.2 has been worked 3 times vertically, work next round as follows: K 12, work diagram M.3. After 4 rounds, dec 2 sts in each side of mitten - Read decrease tip above = 4 sts dec on round. Repeat dec on every round a total of 5 times = 4 sts remain. Cut the thread and pull it through the remaining sts and tighten tog. THUMB: Slip the 5 thumb sts back on double pointed needles. Knit up 5 sts behind the thumb = 10 sts. Work in stocking st in the round until thumb measures 5 cm. Insert 2 markers in the thumb; one in the 1st st and one in the 6th st (= in each side). On next round, dec 2 sts in each side of thumb - Read decrease tip above = 4 sts dec on round. Repeat dec on next round = 2 sts remain. Cut the thread and pull it through the remaining sts and tighten tog. RIGHT MITTEN: Cast on and work as left mitten but reversed. Insert marker in the 4th st for inc for thumb gusset. FUR EDGE: Crochet with 2 threads Puddel on crochet hook size 8 mm. Work 1 sl st in cast on edge of mitten, work 1 ch, then work 18 dc around the edge, finish with 1 sl st in first dc. Then work 1 dc in every dc in the round until fur edge measures approx. 6 cm, cut and fasten the thread. Work the same way on the other mitten. |
|||||||||||||||||||
Diagram explanations |
|||||||||||||||||||
|
|||||||||||||||||||
 |
|||||||||||||||||||
 |
|||||||||||||||||||
Have you finished this pattern?Tag your pictures with #dropspattern #rockymountainset or submit them to the #dropsfan gallery. Do you need help with this pattern?You'll find 16 tutorial videos, a Comments/Questions area and more by visiting the pattern on garnstudio.com. © 1982-2026 DROPS Design A/S. We reserve all rights. This document, including all its sub-sections, has copyrights. Read more about what you can do with our patterns at the bottom of each pattern on our site. |
|||||||||||||||||||


With over 40 years in knitting and crochet design, DROPS Design offers one of the most extensive collections of free patterns on the internet - translated to 17 languages. As of today we count 324 catalogues and 12260 patterns translated into English (UK/cm). 12260
We work hard to bring you the best knitting and crochet have to offer, inspiration and advice as well as great quality yarns at incredible prices! Would you like to use our patterns for other than personal use? You can read what you are allowed to do in the Copyright text at the bottom of all our patterns. Happy crafting!
Post a comment to pattern DROPS 134-10
We would love to hear what you have to say about this pattern!
If you want to leave a question, please make sure you select the correct category in the form below, to speed up the answering process. Required fields are marked *.