
Popular categories
Looking for a yarn?


Comments / Questions (58)
![]() Patricia Stiff wrote:
Patricia Stiff wrote:
I am knitting the sleeve and would like to clarify that casting off 2 sts at the beginning of every row on each side is done continually until piece measures 57 cms. Or is it done only once at the beginning of each row on each side. Thank you and kind regards
28.10.2020 - 16:08DROPS Design answered:
Dear Mrs Stiff, you should cast off 2 stitches at the beginning of the rows both from RS and from WS until sleeve measures 57 cm from the cast on edge - just make sure to have cast off the same number of times on each side. Happy knitting!
28.10.2020 - 16:18
![]() Patricia Stiff wrote:
Patricia Stiff wrote:
I am knitting the Pearl in Provence in moss st , pattern no. NE-022 and I am confused on how to knit the sleeves. The pattern mentions doubled pointed needles and I am assuming it is based on spreading the stitches on 4 double pointed needles. Can you please clarify. Thanks and regards
22.09.2020 - 16:37DROPS Design answered:
Dear Mrs Stiff, that's right, sleeves are worked in the round on double pointed needles - this video shows how to cast on and knit stitches on double pointed needles. Happy knitting!
22.09.2020 - 16:46
![]() Trotzier wrote:
Trotzier wrote:
Bonjour, Comment réaliser vos modèles sur des aiguilles droites, je n utilise pas d aiguilles circulaires, beaucoup de vos modèles me plaisent mais je ne peux pas les faire à cause de ce problème ? Merci de votre réponse
16.06.2020 - 05:47DROPS Design answered:
Bonjour Mme Trotzier, vous trouverez ici comment adapter un modèle sur aiguilles droites. Bon tricot!
16.06.2020 - 09:11
![]() Foraison Christiane wrote:
Foraison Christiane wrote:
Comment assembler les épaules pour une jolie couture qui suit le point de blé merci cordialement
30.12.2019 - 09:56DROPS Design answered:
Bonjour Mme Foraison, vous pouvez simplement assembler en suivant cette vidéo ou bien alterner avec cette technique si vous voulez assembler au point de blé. Bon tricot!
02.01.2020 - 13:30
![]() Diana wrote:
Diana wrote:
Beim Ärmel steht: nach 8cm auf beiden Seiten der M. In Krausrippe ausnehmen.... Die neuen Maschen werden ins Muster eingetrichtert. Welches Muster? Krausrippe oder Perl?
04.01.2018 - 07:22DROPS Design answered:
Liebe Diana, die neuen Maschen werden im Perlmuster gestrickt. Viel Spaß beim stricken!
04.01.2018 - 13:36
![]() Joan wrote:
Joan wrote:
Kan man mon ikke ,forlænge ,det nederste stykke så det bliver,frakke str. .? Mvh.
10.11.2016 - 20:07DROPS Design answered:
Hej Joan. Det tror jeg sagtens du kan.
11.11.2016 - 15:14
![]() Marjan Heinsbroek wrote:
Marjan Heinsbroek wrote:
Verdwijnen bij het minderen in de strook van 11 ribbelsteken deze ribbelsteken? Of vul je steeds weer aan tot de 11? En wat wordt bedoeld met de laatste zin van de 2e alinea: Ga verder over de laatste ribbelst aan iedere kant in ribbelst?
06.10.2016 - 20:37DROPS Design answered:
Hoi Marjan. De ribbelst worden steeds eerst minder en vanaf een hoogte 20 cm meerder je weer in de ribbelst
07.10.2016 - 13:03
![]() Tine wrote:
Tine wrote:
Når jeg strikker frem og tilbage vrider det sig og bliver meget skævt, jeg har prøvet at starte forfra og strikket løsere, men det hjælper ikke. Hvad gør jeg forkert?
26.09.2016 - 19:33DROPS Design answered:
Hej Tine. Det ved jeg desvaerre ikke. Forskyder du mon mönstret? Det er lidt svaert for mig at se naar jeg ikke kan se dit arbejde :/
27.09.2016 - 15:43Inge-Lise wrote:
The pattern has a gauge reported as 18 sts x 23 rows in stockinette st =10 x 10 cm. However, the jacket is knitted in seed stitch. I believe a seed stitch does not have the same gauge as a stockinette. I get less rows although the same sts per 10 x 10 cm in a seed stitch. If I do my sample in a stockinette as the pattern indicates, my gauge is right. Is the gauge noted actually in a stockinette stitch, in which case my gauge would be correct? Thanks for any help you can provide.
05.11.2014 - 15:05DROPS Design answered:
Dear Inge-Lise, if your tension in stocking st is correct, your work should be correct too. The indications in height are given in cm so that you can adapt easily in any case. Happy knitting!
05.11.2014 - 15:10
![]() Katrine Røjel wrote:
Katrine Røjel wrote:
Jeg har ikke strikket efter jeres opskrifter før. Findes der et størrelses-skema, så jeg kan måle mig frem til, om jeg skal strikke denne cardigan i M eller L? Tak, venlig hilsen Katrine Røjel
06.04.2014 - 10:39DROPS Design answered:
Hej Katrine. Nederst paa vores mönstre finder du et maaleskema hvor alle maal er opgivet i cm per störrelse. Du kan bruge den til at vaelge din störrelse. God fornöjelse.
07.04.2014 - 11:50
|
|
Pearls in Provence#pearlsinprovencecardigan |
|
|
|
|
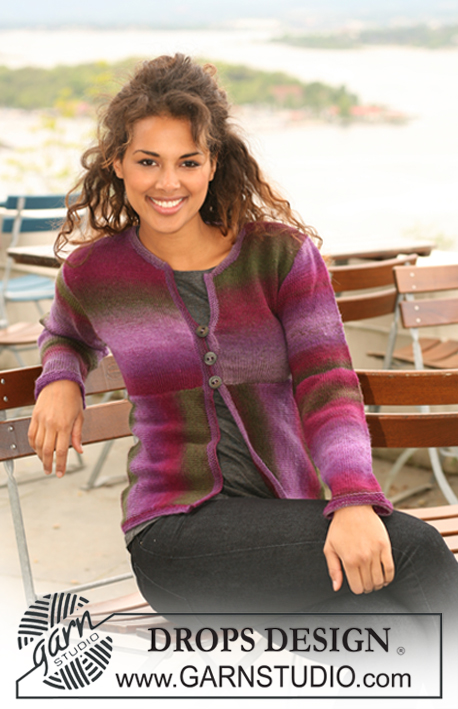
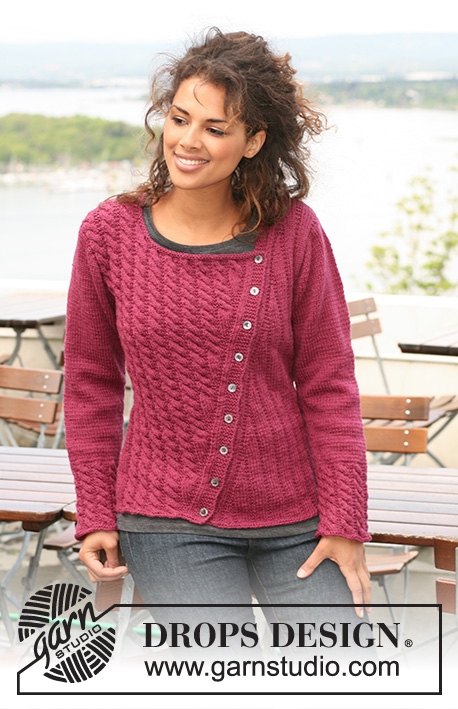
DROPS jacket in Moss st in ”Nepal”. Size S-XXXL.
DROPS 126-9 |
|
|
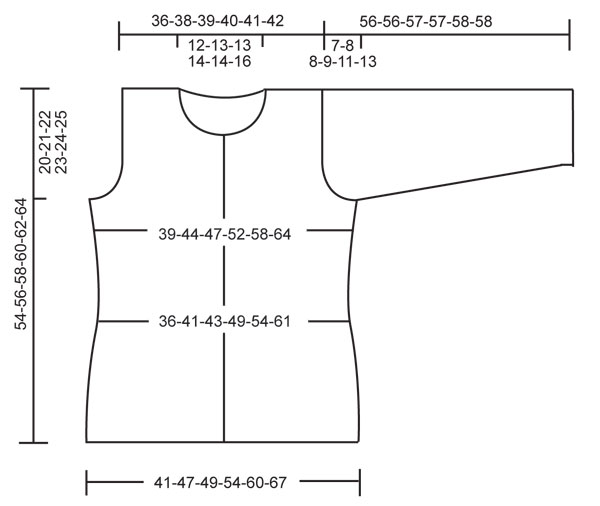
GARTER ST (back and forth on needle): K all rows. GARTER ST (in the round): K 1 round, P 1 round. MOSS ST (double): Row 1: * K1, P1 *, repeat from *-*. Row 2: K over K and P over P. Row 3: P over K and K over P. Repeat row 2 and 3. BUTTONHOLES: Make buttonholes on right front band. 1 buttonhole = cast off 3rd front band st and cast on 1 new st on next row. Make buttonholes when piece measures: Size S: 5, 13, 21, 29, 37 and 45 cm. Size M: 5, 12, 19, 26, 33, 40 and 47 cm. Size L: 5, 12, 19, 26, 33, 40 and 47 cm. Size XL: 5, 11, 18, 24, 30, 36, 43 and 49 cm. Size XXL: 5, 11, 18, 24, 30, 36, 43 and 49 cm. Size XXXL: 5, 12, 18, 25, 31, 38, 44 and 51 cm. -------------------------------------------------------- BODY PIECE: Worked back and forth on needle from mid front on circular needle. Cast on 162-180-190-208-230-252 sts on circular needle size 4.5 mm with Nepal. Insert 2 markers in piece 44-48-51-55-61-66 sts in from each side (back piece = 74-84-88-98-108-120 sts). Continue as follows: 6 GARTER STS (= front band) - see above - MOSS ST - see above - on the next 32-36-39-43-49-54 sts, 11 garter sts (marker sits in the middle of these 11 sts), moss st on the next 64-74-78-88-98-110 sts, 11 garter sts (marker sits in the middle of these 11 sts), moss st on the next 32-36-39-43-49-54 sts and 6 garter sts (= front band). REMEMBER THE KNITTING TENSION! Continue in pattern like this. NOTE! Remember BUTTONHOLES - see above. AT THE SAME TIME when piece measures 5 cm dec in the garter st-section each side by K2 tog before and after sts with marker (= 4 dec), repeat the dec on every 2.5 cm a total of 5 times = 142-160-170-188-210-232 sts (NOTE! when doing the 5th dec dec as follows: slip 1 st as if to K, K2 tog, psso). Continue the last garter st each side in garter st. When piece measures 20 cm inc 1 st each side of garter st each side (= 4 inc), and repeat on every 6-6-6-7-7-7 cm a total of 3 times = 154-172-182-200-222-244 sts. Work inc sts in garter st. Continue until piece measures 34-35-36-37-38-39 cm. Now cast off 7 sts each side (= 3 sts each side of marker + st with marker). Now complete each piece separately. BACK PIECE: = 64-74-78-88-98-110 sts. Work moss st as before. AT THE SAME TIME continue to cast off for armhole at the beg of every row each side as follows: 2 sts 0-1-2-4-6-8 times and 1 st 0-1-0-0-0-1 time = 64-68-70-72-74-76 sts. When piece measures 52-54-56-58-60-62 cm cast off the middle 20-22-22-24-24-26 sts for neck, and complete each shoulder separately. On next row cast off 1 st on neckline = 21-22-23-23-24-24 sts left on shoulder. Cast off when piece measures 54-56-58-60-62-64 cm. LEFT FRONT PIECE: = 38-42-45-49-55-60 sts. Work moss st as before. AT THE SAME TIME cast off for armhole at the side as described for back piece = 38-39-41-41-43-43 sts. Continue until piece measures 46-48-48-50-50-52 cm. Now slip 10 sts towards front edge on a stitch holder for neck. Cast off to shape the neckline at the beg of every row from mid front (= WS): 2 sts 3-3-2-2-2-2 times and 1 st 1-1-4-4-5-5 times = 21-22-23-23-24-24 sts left on shoulder. Cast off when piece measures 54-56-58-60-62-64 cm. RIGHT FRONT PIECE: Like left front piece but mirrored. NOTE! Remember buttonholes! SLEEVE: Worked in the round. Cast on 43-43-47-47-47-49 sts on double pointed needles size 4.5 mm with Nepal. Insert a marker in the first st on round = mid under sleeve. Continue as follows: 1 GARTER ST – see above - and 42-42-46-46-46-48 moss sts. Continue like this until piece measures approx 8-8-8-8-8-10 cm. Now inc 1 st each side of the garter st under sleeve. Repeat the inc on every 4-3-3-2.5-2-1.5 cm a total of 10-12-13-16-18-19 times = 63-67-73-79-83-87 sts. Incorporate inc sts in moss st as you go along. When piece measures 49-48-49-48-47-45 cm (less for the larger sizes because of longer sleeve cap and wider shoulder) cast off 7 sts mid under sleeve and complete piece back and forth on needle. Cast off 2 sts for sleeve cap at the beg of every row each side until piece measures 55-55-56-56-57-57 cm. Now cast off 4 sts 1 time each side and cast off remaining sts. Piece measures approx 56-56-57-57-58-58 cm. ASSEMBLY: Sew shoulder seams. Set in sleeves. Sew on buttons. NECK: Pick up 70 to 100 sts (includes sts on stitch holders) from RS round neck. K 1 row from WS, K 1 row from RS and K 1 row from WS. Cast off with K sts from RS. |
|
 |
|
Have you finished this pattern?Tag your pictures with #dropspattern #pearlsinprovencecardigan or submit them to the #dropsfan gallery. Do you need help with this pattern?You'll find 23 tutorial videos, a Comments/Questions area and more by visiting the pattern on garnstudio.com. © 1982-2026 DROPS Design A/S. We reserve all rights. This document, including all its sub-sections, has copyrights. Read more about what you can do with our patterns at the bottom of each pattern on our site. |


With over 40 years in knitting and crochet design, DROPS Design offers one of the most extensive collections of free patterns on the internet - translated to 17 languages. As of today we count 324 catalogues and 12260 patterns translated into English (UK/cm). 12260
We work hard to bring you the best knitting and crochet have to offer, inspiration and advice as well as great quality yarns at incredible prices! Would you like to use our patterns for other than personal use? You can read what you are allowed to do in the Copyright text at the bottom of all our patterns. Happy crafting!
Post a comment to pattern DROPS 126-9
We would love to hear what you have to say about this pattern!
If you want to leave a question, please make sure you select the correct category in the form below, to speed up the answering process. Required fields are marked *.