
Popular categories
Looking for a yarn?


Comments / Questions (151)
Carmen wrote:
Drops Baby 16-2, okay thank you - the final question, the remaining stitches DO NOT HAVE TO BE THE SAME AS BEGINNING 21 STITCHES, just what remains, which will be 17 stitches? Yes, No? Thank you, I am just totally confused and need help, or just lost in translation.
10.02.2016 - 18:31DROPS Design answered:
Dear Carmen, when working 1st row on body, you work 21 sts in stocking st, P2, Kfb, Kfb, P2, Kfb, Kfb, P2, 73 sts in stocking st=108 sts. On next round, you work: 21 sts in stocking st, P2, M1 (= 4sts), P2, M2 (=4sts), P2, 73 sts in stocking st = 108 sts. Happy knitting!
11.02.2016 - 10:01Carmen wrote:
Drops Design thank you for your reply, If I do knit in the front and back of the next 2 stitches the count will be off. For the 6/9 months, I am suppose to end with 108 sts (54 and 54) with K2FB in 2 stitches will give me 56 stitches on each side which total 112. Is the count wrong or the pattern?
10.02.2016 - 03:51DROPS Design answered:
Dear Carmen, you work in size 6/9 months as follows over the 104 sts: 21 sts in stocking st, then work P2, then inc by working K2 in each of the next 2 sts (= you have inc 2 sts and there are now K4), then P2, then inc 2 sts by working K2 in each of the next 2 sts (= you have inc 2 sts and there are now K4), work then P2 and work remaining sts in stocking st = you have inc a total of 4 sts, 104+4= 108 sts. Happy knitting!
10.02.2016 - 10:22Connie wrote:
On your pattern Baby Drops 16-2 right leg: Are you saying that after you cast on the # of stitches necessary you start with a wrong side and you purl that side before you start the ribbing? Please advise. Thank you.
30.01.2016 - 05:02DROPS Design answered:
Dear Connie, after casting on sts you first work a P row from WS, then work on next row from RS in rib with 4 sts in garter st on each side. Happy knitting!
01.02.2016 - 09:21
![]() Steffi wrote:
Steffi wrote:
Hallo, In der Mützen-Anleitung steht, dass nach 6 1/2-7-... cm mit den Abnahmen begonnen werden soll. Ist diese Angabe inkl. 2cm Bündchen oder messe ich erst nach dem Bündchen?
02.01.2015 - 00:07DROPS Design answered:
Liebe Steffi, das bezieht sich auf die Gesamthöhe, also einschließlich Bündchen. Generell bedeutet "nach" + cm-Angabe bei uns immer Gesamthöhe, sofern nicht anders angegeben.
02.01.2015 - 22:13
![]() Daniela Domingues wrote:
Daniela Domingues wrote:
Bonjour. Je tricote le béret 6/9 mois. En ayant fait tous les augmentations, après le dernier marqueur, il me reste que les 16 mailles, pas assez pour faire les 19 diminutions. Comment faire?
08.11.2014 - 22:06DROPS Design answered:
Bonjour Mme Domingues, en taille 6/9 mois, vous avez 85 m, vous augmentez 7 fois 1 m à chacun des 5 marqueurs (7x5=35 augm) = 120 m, puis vous diminuez 19 fois 1 m à chacun des 5 marqueurs (19x5=95 dim), il vous reste 120-95= 25 m. Tricotez alors les mailles ens 2 par 2 tout le rang. Bon tricot!
10.11.2014 - 09:23
![]() Anne Olsen wrote:
Anne Olsen wrote:
Når det gjelder øking, "økes det 1 m på venstre side av alle merkene ". Vil det si at det først må strikkes en maske på venstre side av merket, og så et kast? Hvis ikke får jeg kastet på høyre side.
17.07.2014 - 14:35DROPS Design answered:
Hej Anne. Du har sat merkene imellem en maske, så du laver kastet lige efter merket. Dvs, du strikker fra begyndelsen af pinden: 1 r, merket, 1 kast, 17-18-19 m (afhængig af str), merke, kast osv. Sørg for at du ikke får flyttet merkene.
18.07.2014 - 13:14
![]() Anne Rosset wrote:
Anne Rosset wrote:
Bonjour, Je ne peux pas imprimer les explications. Ceci arrive très fréquemment sur presque tous les modèles. Je vous remercie pour votre réponse Anne Rosset
20.04.2014 - 19:06DROPS Design answered:
Bonjour Mme Rosset, Assurez-vous que votre navigateur accepte les fenêtres pop'up, puis cliquez sur "Imprimer:Explications", une fenêtre s'ouvre, dans cette fenêtre, cliquez sur "Imprimer les explications" pour lancer l'impression. Bon tricot!
22.04.2014 - 10:07
![]() Juliane wrote:
Juliane wrote:
Ich hätte da noch eine Frage: Wird die Hose in Runden oder in Reihen gestrickt?
30.12.2013 - 14:06DROPS Design answered:
Liebe Juliane, der obere Teil der Hose wird in Runden gestrickt.
01.01.2014 - 17:13
![]() Juliane Morasch wrote:
Juliane Morasch wrote:
Ich strick Größe 12/18 Monate. ich hätte da paar Fragen zum Strampler. Da, wo man mit dem Vorderteil anfangen muss. Muss man da nur die mittleren Maschen, die sich zwischen den Makierungsfäden befinden, weiterstricken und muss man die Ärmel an diesen Teil von beiden Seiten stricken?? Oder muss man die Ärmel an den beiden äußeren Seiten stricken ?? Wird das dann nicht auch alles parallel gestrickt und nicht jede Seite einzeln?
30.12.2013 - 11:39DROPS Design answered:
Liebe Juliane, die Ärmelmaschen müssen an beiden Seiten angeschlagen werden - und zwar am Vorderteil und am Rückenteil.
01.01.2014 - 17:16
![]() Kerstin wrote:
Kerstin wrote:
Vielen Dank, für die superschnelle Antwort. Und: Noch ein ganz großes Lob für die WebSeite. Das hier ist klasse.
19.11.2013 - 10:24
|
||||||||||
Little Lamb#littlelambset |
||||||||||
|
|
||||||||||
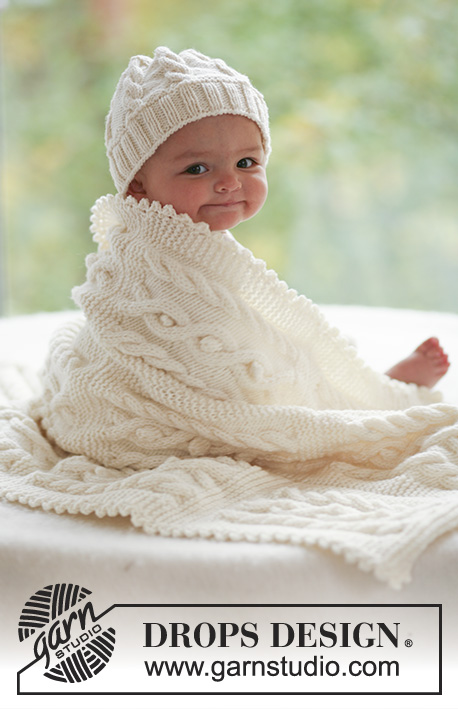
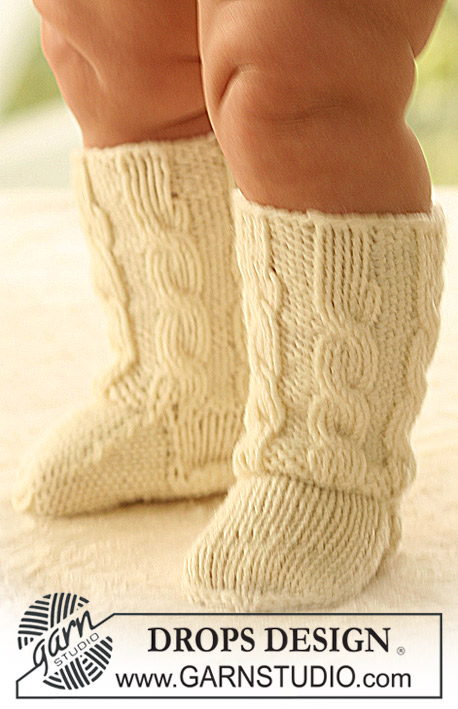
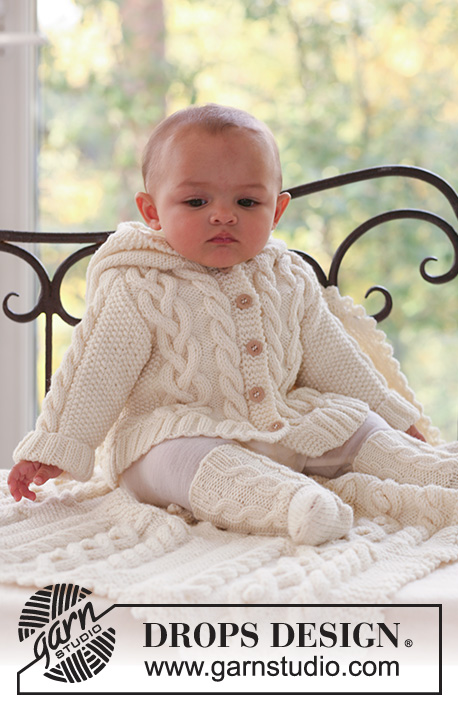
Set of beret hat and onesie with cables for baby in DROPS Merino Extra Fine
DROPS Baby 16-2 |
||||||||||
|
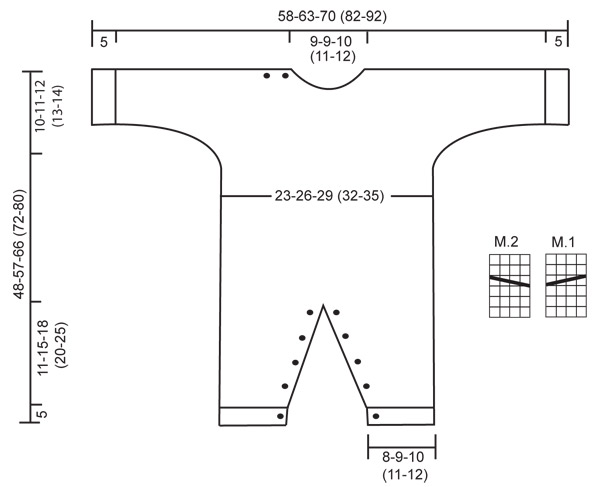
JUMPSUIT: GARTER ST (back and forth on needle): K all rows. PATTERN: See diagram M.1 and M.2. The diagrams show the pattern from the RS. BUTTONHOLES: Make buttonholes on buttonhole edge on front of leg. On right leg make buttonholes from RS and on left leg make buttonholes from WS. 1 buttonhole = K tog 2nd and 3rd st from edge and make 1 YO. Make buttonholes when leg measures: SIZE 1/3 months: 2, 5, 8, 11 and 14 cm. SIZE 6/9 months: 2, 6, 10, 14 and 18 cm. SIZE 12/18 months: 2, 6, 11, 16 and 21 cm. SIZE 2 years: 2, 6, 10, 14, 18 and 23 cm. SIZE 3/4 years: 2, 7, 12, 17, 22 and 28 cm. ---------------------------------------------------------- RIGHT LEG: Worked back and forth on circular needle. Cast on 47-53-53 (59-65) sts on circular needle size 3.5 mm with Merino Extra Fine. P 1 row from WS and continue as follows from RS: 4 garter sts (buttonhole edge) rib K3/P3, on the next 36-42-42 (48-54) sts and finish row with K3 and 4 garter sts (= buttonhole edge). Continue in rib with 4 garter sts each side, AT THE SAME TIME when piece measures 2 cm make buttonhole – SEE ABOVE. When piece measures 5 cm K 2 rows on all sts, AT THE SAME TIME dec 11-13-9 (11-13) sts evenly on first row = 36-40-44 (48-52) sts. Change to needle size 4.5 mm and continue in stocking st with 4 garter sts each side. AT THE SAME TIME when piece measures 6 cm inc 1 st each side inside the 4 garter sts on every 3-3-4 (4-4) row a total of 9-10-11 (12-13) times = 54-60-66 (72-78) sts. REMEMBER THE KNITTING TENSION! When piece measures 16-20-23 (25-30) cm cast off 4 sts each side = 46-52-58 (64-70) sts. Put piece aside and knit the other leg. LEFT LEG: Like right leg, but make buttonholes on the opposite side. BODY PIECE: Slip both legs on the same circular needle = 92-104-116 (128-140) sts. Insert 1 marker each side = 46-52-58 (64-70) sts between markers. Work next round as follows – beg on the left side of piece: 18-21-24 (27-30) stocking sts, P2, K2 in each of the next 2 sts (= K4), P2, K2 in each of the next 2 sts (= K4), P2 and work remaining sts in stocking st = 96-108-120 (132-144) sts. Work next round as follows: 18-21-24 (27-30) stocking sts, P2, M.1, P2, M.2, P2 and work remaining sts in stocking st. Continue like this until piece measures 38-46-54 (59-66) cm. Now divide the piece by markers at sides and complete front and back pieces separately – NOTE: Make sure to divide piece so that the cable row in M.1 and M.2 sits on the RS. FRONT PIECE: = 50-56-62 (68-74) sts. Continue in stocking st with cables as before, AT THE SAME TIME cast on new sts each side for sleeves. Cast on at the end of every row at the sides: 4 sts 2-1-1 (1-1) times, 6 sts 0-1-1 (2-1) times, 8 sts 1-1-1 (1-2) times and 9-9-13 (16-21) sts 1 time = 100-110-124 (148-168) sts – work inc sts in stocking st. When piece measures 44-53-61 (67-75) cm K2 tog on the 2 cables = 96-106-120 (144-164) sts. On next row slip the middle 10-10-12 (14-16) sts on a stitch holder for neck and complete each side separately. RIGHT SHOULDER/SLEEVE: Continue as before, AT THE SAME TIME cast off to shape the neckline at the beg of every row from mid front: 2 sts 1 time and 1 st 2 times = 39-44-50 (61-70) sts left on shoulder/sleeve. AT THE SAME TIME when piece measures 46-55-64 (70-78) cm work garter st on the first 12-13-14 (15-16) sts from mid front (work remaining sts as before). After 4 rows garter st make 2 buttonholes as follows from RS: K2 tog, 1 YO, work 5-6-7 (8-9) sts, K2 tog, 1 YO, work remaining sts on row. Continue in stocking st with garter st on the first 12-13-14 (15-16) sts from mid front until piece measures 48-57-66 (72-80) cm, cast off. LEFT SHOULDER/SLEEVE: Like right shoulder/sleeve, but mirrored = 39-44-50 (61-70) sts on shoulder/sleeve. Continue in stocking st until piece measures 48-57-66 (72-80) cm, cast off. BACK PIECE = 46-52-58 (64-70) sts. Cast on new sts each side for sleeves as described for front piece = 96-106-120 (144-164) sts. When piece measures 46-55-64 (70-78) cm cast off the middle 16-16-18 (20-22) sts for neck and complete each side separately. RIGHT SHOULDER/SLEEVE: = 40-45-51 (62-71) sts. Cast off 1 st on neckline on next row = 39-44-50 (61-70) sts. When piece measures 48-57-66 (72-80) cm cast off the first 27-31-36 (46-54) sts from sleeve edge towards shoulder. Work another 1.5 cm stocking st with 1 garter st each side on the remaining 12-13-14 (15-16) sts (= buttonhole edge). K 1 row from WS and cast off all sts from RS LEFT SHOULDER/SLEEVE: Continue and cast off as described for right shoulder/sleeve, but mirrored = 39-44-50 (61-70) sts left on shoulder/sleeve. Continue in stocking st until piece measures 48-57-66 (72-80) cm, cast off. ASSEMBLY: Sew upper arm seams, edge to edge to avoid a chunky seam – on right shoulder only sew seam up to buttonhole edge. CUFF: Pick up 38-44-50 (50-56) sts on needle size 3.5 mm along sleeve edge. K 2 rows and continue in rib, K3/P3, with 1 edge st each side. Cast off when rib measures 5 cm. Repeat along the other sleeve edge. Sew seams under arms inside 1 edge st. NECK: Pick up approx 48 to 64 sts round neckline (incl sts on stitch holders) on needle size 4.5 mm. K 3 rows and cast off. Sew tog buttonhole edges at the top of the front of legs and sew tog the buttonhole edges at the top of the back of legs. Sew on buttons to fit buttonholes on legs and shoulder. ---------------------------------------------------------- BASQUE HAT: Head circumference: 40/42 - 44/46 - 46/48 (48/50 - 50/52) cm INCREASING TIP: Inc 1 st by making 1 YO. Work YO into back of loop on return row to avoid a hole. ---------------------------------------------------------- HAT: Worked back and forth on pointed needles. Cast on 90-92-94 (96-98) sts on needle size 4 mm with Merino Extra Fine. Work 2 cm rib, K1/P1. Continue in garter st – SEE ABOVE – AT THE SAME TIME dec 5-7-4 (6-3) sts evenly on first row = 85-85-90 (90-95) sts. Insert 5 markers in piece as follows from RS: First marker after 1 st, and the remaining 4 markers with 17-17-18 (18-19) sts between each = 16-16-17 (17-18) sts left after the last marker. On next row from RS inc 1 st to the left of all markers – SEE INCREASING TIP – and repeat the inc on every other row a total of 6-7-8 (9-10) times = 115-120-130 (135-145) sts. REMEMBER THE KNITTING TENSION! When piece measures 6.5-7-7.5 (8-8.5) cm dec 1 st to the left of all markers by K2 tog, and repeat the dec on every other row a total of 18-19-20 (21-22) times = 25-25-30 (30-35) sts. Now K2 tog across the row. Cut the thread, pull through remaining sts and fasten. Sew hat tog mid back in outer loops of sts. Hat measures approx 15-16-17 (18-19) cm. |
||||||||||
Diagram explanations |
||||||||||
|
||||||||||
 |
||||||||||
Have you finished this pattern?Tag your pictures with #dropspattern #littlelambset or submit them to the #dropsfan gallery. Do you need help with this pattern?You'll find 16 tutorial videos, a Comments/Questions area and more by visiting the pattern on garnstudio.com. © 1982-2026 DROPS Design A/S. We reserve all rights. This document, including all its sub-sections, has copyrights. Read more about what you can do with our patterns at the bottom of each pattern on our site. |
||||||||||


With over 40 years in knitting and crochet design, DROPS Design offers one of the most extensive collections of free patterns on the internet - translated to 17 languages. As of today we count 324 catalogues and 12245 patterns translated into English (UK/cm). 12245
We work hard to bring you the best knitting and crochet have to offer, inspiration and advice as well as great quality yarns at incredible prices! Would you like to use our patterns for other than personal use? You can read what you are allowed to do in the Copyright text at the bottom of all our patterns. Happy crafting!
Post a comment to pattern DROPS Baby 16-2
We would love to hear what you have to say about this pattern!
If you want to leave a question, please make sure you select the correct category in the form below, to speed up the answering process. Required fields are marked *.