
Popular categories
Looking for a yarn?


Comments / Questions (100)
![]() Nerurol wrote:
Nerurol wrote:
Hola, estoy haciendo este modelo y como veo que me van a sobrar ovillos, he pensado en añadirle mangas ¿me podéis dar algún tip para hacerlas? No sé si habrá algún modelo/patrón del que pueda copiar las mangas y coserlas a este modelo. Muchas gracias!
23.07.2016 - 21:12DROPS Design answered:
Hola Nerurol. Es dificil recomendar pero puedes ver por ej. el modelo 65/18. No olvides que si quieres hacer las mangas tienes que hacer la sisa más profunda (según el patrón con las mangas) y no se trabajan los bordes en la parte de la sisa.
27.07.2016 - 19:00
![]() Anna Pedersen wrote:
Anna Pedersen wrote:
Jeg har lukket af til ærmegab og skal til at strikke fortykket . Men i opskriften står der, som jeg forstår det , at når arbejdet måler 42 cm sættes de midterste m på en tråd til halsen. Efter det begynder halsen jo stort set samtidig med ærmegabet? Hvad er det jeg misforstår. Venlig hilsen Anna
22.01.2016 - 15:02DROPS Design answered:
Hej. Ja, du sätter de mittersta m till hals när arbetet mäter 42 cm, men tänk på att du senare också stickar en halskant (M.5). Lycka till!
25.01.2016 - 15:27
![]() Zuzana Gulašová wrote:
Zuzana Gulašová wrote:
Ďakujem vám pekne.Vyskúšam to upliesť ešte raz,pretože som to asi 5x nahodila a následne spárala lebo mi to nesedelo.Mám upletených viacero modelov podľa návodov ale s týmto som sa zatiaľ natrápila najviac.Ešte raz ďakujem a pekný deň prajem Zuzana
20.07.2015 - 20:58
![]() Zuzana Gulašová wrote:
Zuzana Gulašová wrote:
Dobrý deň,pletiem tielko podľa návodu ale nesedí mi to podľa vzoru,ktorý udávate pod č. M1.Ako keby tam neboli znázornené nahodené očká.Je to dobre vyznačené?Ďakujem s pozdravom Zuzana
19.07.2015 - 16:28DROPS Design answered:
Dobrý den, nahozená oka jsou znázorněna kolečkem. Nenechte se zmást prázdnými místy ve schématu - tam, kde není žádný čtvereček, není ani žádné oko. Vzor M.1 začínáme nad 16 oky, 1. řada tedy vypadá takto: 1 oko hladce, 1x nahodíme, 2 oka hladce, 2 obrace, 2 hladce, 3 obrace, 2 hladce, 2 obrace, 2 hladce, 1x nahodíme. Hodně zdaru! Hana
20.07.2015 - 01:04
![]() Carole Sisman wrote:
Carole Sisman wrote:
Drops pattern 107-8 I do not understand how to bind off neck. 3sts one time, 2 sts 4 times, 1 st 7 times Thanks Carole
05.07.2015 - 05:23DROPS Design answered:
Dear Mrs Sisman, you work each side separately and bind off at the beg of every row starting from neckline towards side (= every other row): 3 sts 1 time (= bind off the first 3 sts towards neckline, work to the end of row, turn and work back), 2 sts 4 times (bind off 2 sts at beg of next row towards neck, work to the end of row, turn and work back, repeat these 2 rows a total of 4 times) and 1 st 7 times (bind off 1 st at beg of row towards neck, work to the end of row, work row back and repeat these 2 rows a total of 7 times). Happy knitting!
06.07.2015 - 10:08
![]() Carole Sisman wrote:
Carole Sisman wrote:
Drops 107-8 pattern How do i shape neckline on every other row 3sts 1 time, 2sts 4 times 1st 7 times thanks carole
05.07.2015 - 05:04
![]() Alessia wrote:
Alessia wrote:
Dopo aver lavorato la prima parte del davanti e dietro come pezzo unico in tondo, quando si deve iniziare a lavorare separatamente le due parti devo passare ai ferri dritti? O devo comunque usare i circolari? Se devo usare i circolari come lavoro? In tondo? O come... ?
15.04.2015 - 18:54DROPS Design answered:
Buonasera Alessia, quando separa il davanti e il dietro può lavorare con i ferri circolari lavorando avanti e indietro esattamente come farebbe con i ferri dritti. Buon lavoro!!
15.04.2015 - 21:57
![]() Birgit Kunkel wrote:
Birgit Kunkel wrote:
Hallo Ich verstehe die Strickanleitung nicht. Wird das Top rund gestrickt oder falls nicht, wird das Stück in der Mitte zusammengelegt (Markierungsfaden)und habe ich doch dann eine Seitennaht? Aber beim Zusammennähen wird da nichts erwähnt. Ich habe es versucht rund zu stricken, aber dann stimmt in der 2 Reihe das Muster nicht überein.Können Sie mir das bitte genauer beschreiben?
24.08.2014 - 14:27DROPS Design answered:
Das Top wird bis zu den Armausschnitten in Runden gestrickt, diese Info wurde gerade ergänzt. Das Muster sollte dann passen - M1 hat am Anfang 16 M, das geht für die angeschlagene M-Zahl auf. In der 1. Rd nehmen Sie pro Rapport 2 M durch 2 Umschläge zu, dann haben Sie in der nächsten Rd (= 2. Rd im Diagramm) 18 M pro M1-Rapport. In der 3. Rd machen Sie wieder 2 Umschläge pro Rapport und haben dann in der 4. Rd 20 M pro Rapport usw.
24.08.2014 - 15:03
![]() Dorthe Hansen wrote:
Dorthe Hansen wrote:
Den er sjov at strikke. Og rigtig flot Fordel at mærkere hver mønstre report. i M 1.
23.02.2014 - 17:55
![]() Nicole wrote:
Nicole wrote:
Hallo ich möchte gerne das Oberteil stricken. aber ich habe schon Probleme den Chart M1 zu verstehen. die erste runde ist doch von unten. was bedeutet die zahl 16 und was ist mit den maschen die nicht gezeichnet sind. ich denke mal es soll 16 maschen bedeuten. aber ich zähle mehr.
21.06.2013 - 14:04DROPS Design answered:
Liebe Nicole, es sind 16 Maschen, die leeren Kästchen sind keine Maschen und dienen nur der Darstellung, die Kreise sind Umschläge, die erst in der nächsten R zu einer Masche werden.
24.06.2013 - 10:46
|
|||||||||||||||||||||||||
DROPS 107-8 |
|||||||||||||||||||||||||
|
|
|||||||||||||||||||||||||
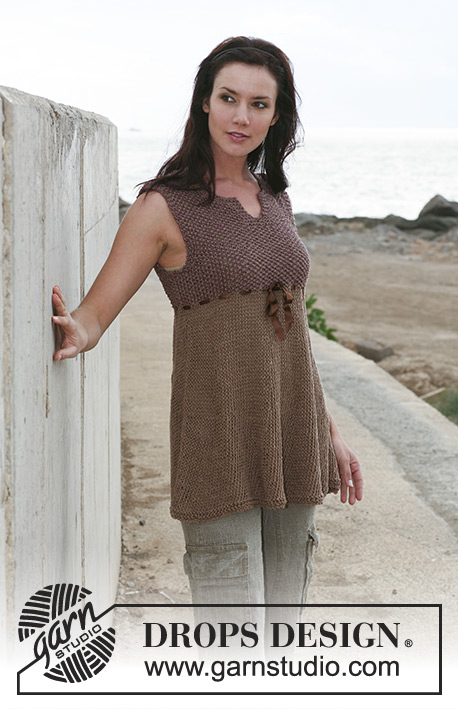
DROPS top with lace pattern in ”Cotton Viscose”. Sizes: S - XXXL
DROPS 107-8 |
|||||||||||||||||||||||||
|
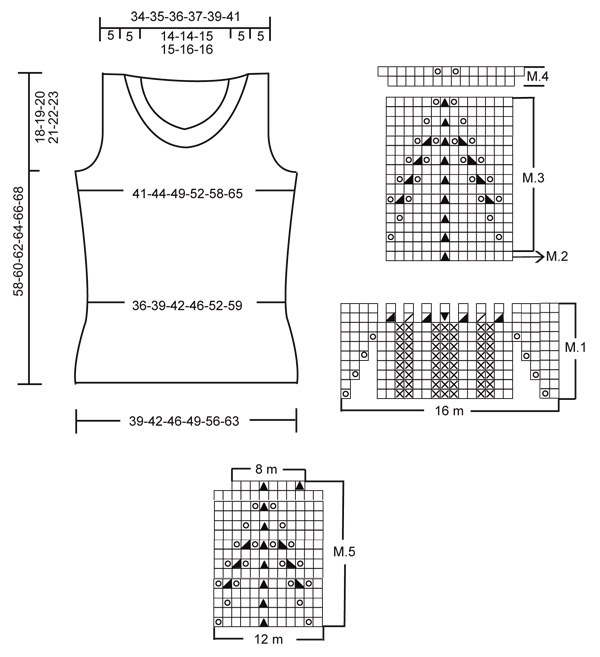
Garter st , back and forth on needle: K all rows. Garter st, in the round: K 1 round, P 1 round. Pattern: See diagrams M.1 to M.5. Note! M.1 varies from 16 to 24 sts. Decreasing tip (for armhole): Dec inside 3 garter sts. Make all dec from RS! Dec as follows after 3 sts: Slip 1 st as if to K, K1, psso. Dec as follows before 3 sts: K2 tog. Front and back piece: Worked in the round on circular needle. Loosely cast on 176-192-208-224-256-288 sts on circular needles size 3.5 mm. Work 3 vertical repeats of M.1 and then 1 vertical repeat of M.2 (= 1 round) = 154-168-182-196-224-252 sts. Continue in M.3 until piece measures approx 30 cm – adjust to 1 whole pattern repeat, then work 1 vertical repeat of M.4 (= 2 rounds) = 176-192-208-224-256-288 sts. Insert a marking thread or stitch marker each side (= 88-96-104-112-128-144 sts on front and back piece). Continue in stocking sts. Remember knitting tension! At the same time when piece measures 32-32-33-33-35-35 cm inc 1 st on each side of both marking threads or stitch markers on every 6 round a total of 3-3-4-4-3-3 times = 188-204-224-240-268-300 sts. When piece measures 39-40-41-42-43-44 cm work 4 rows garter st on 12-14-16-18-20-22 sts each side (i.e. 6-7-8-9-10-11 sts on either side of marking thread), work remaining sts in stocking st as before. Now cast off 6-8-10-12-14-16 sts each side for armhole and complete front and back pieces separately. Front piece: = 88-94-102-108-120-134 sts. Continue in stocking st with 3 garter sts each side. At the same time dec to shape the armhole each side on every other row – read Decreasing tips: 1 st 5-7-10-11-15-20 times. Continue with 3 garter sts each side towards armhole. At the same time when piece measures 41-42-43-44-45-46 cm slip the middle 20-20-22-22-24-24 sts on a thread or stitch holder for neck. Cast off to shape the neckline on every other row: 3 sts 1 time, 2 sts 4 times and 1 st 7 times = 11-12-12-14-15-17 sts left on shoulder. Cast off when piece measures 58-60-62-64-66-68 cm. Back piece: = 88-94-102-108-120-134 sts. Dec for armhole as described for front piece = 78-80-82-86-90-94 sts. Continue with 3 garter sts each side until piece measures 53-55-57-59-61-63 cm. Now cast off the middle 42-42-44-44-46-46 sts for neck and cast off to shape the neckline on every other row: 2 sts 1 time and 1 st 5 times = 11-12-12-14-15-17 sts left on shoulder. Cast off when piece measures 58-60-62-64-66-68 cm. Assembly: Sew shoulder seams. Neckline: Pick up 168-168-168-180-180-180 sts round neckline (includes sts on thread or stitch holder at front) on circular needle size 3.5 mm. P 1 round, then work M.5. After M.5 there are 112-112-112-120-120-120 sts on round. P 1 round and cast off. |
|||||||||||||||||||||||||
Diagram explanations |
|||||||||||||||||||||||||
|
|||||||||||||||||||||||||
 |
|||||||||||||||||||||||||
Have you finished this pattern?Tag your pictures with #dropspattern or submit them to the #dropsfan gallery. Do you need help with this pattern?You'll find 22 tutorial videos, a Comments/Questions area and more by visiting the pattern on garnstudio.com. © 1982-2026 DROPS Design A/S. We reserve all rights. This document, including all its sub-sections, has copyrights. Read more about what you can do with our patterns at the bottom of each pattern on our site. |
|||||||||||||||||||||||||


With over 40 years in knitting and crochet design, DROPS Design offers one of the most extensive collections of free patterns on the internet - translated to 17 languages. As of today we count 324 catalogues and 12258 patterns translated into English (UK/cm). 12258
We work hard to bring you the best knitting and crochet have to offer, inspiration and advice as well as great quality yarns at incredible prices! Would you like to use our patterns for other than personal use? You can read what you are allowed to do in the Copyright text at the bottom of all our patterns. Happy crafting!
Post a comment to pattern DROPS 107-8
We would love to hear what you have to say about this pattern!
If you want to leave a question, please make sure you select the correct category in the form below, to speed up the answering process. Required fields are marked *.