
Popular categories
Looking for a yarn?


Comments / Questions (2)
![]() Bohuslava Kašparová wrote:
Bohuslava Kašparová wrote:
Nerozumím výrazu 1po ,
05.06.2026 - 18:20DROPS Design answered:
Dobrý den, Bohuslavo, zkratka 1 po = 1 pevné oko. Hodně zdaru!
06.06.2026 - 07:24
![]() Elisabeth wrote:
Elisabeth wrote:
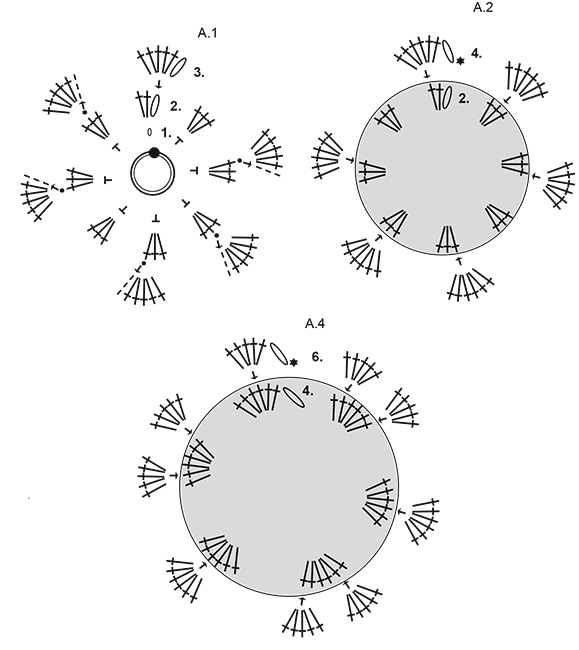
Er de 3 loddrette strekene i diagram A1 rad 3 luftmasker? Første gruppe med staver starter med ring= 3 luftmasker og deretter 5 staver. Det er derfor logisk for meg at de 3 loddrette strekene er luftmasker, slik at gruppene gjennom raden blir til sammen 6 staver, dvs. 3 luftmasker og 5 staver
19.04.2026 - 14:20DROPS Design answered:
Hei Elisabeth. Ja, en liten strek = 1 luftmaske. 3 streker = 3 luftmasker. Takk for at du gjorde oss oppmerksom på dette, vi skal få lagt til forklaringen under Diagram. mvh DROPS Design
20.04.2026 - 12:05
|
||||||||||||||||||||||||||||
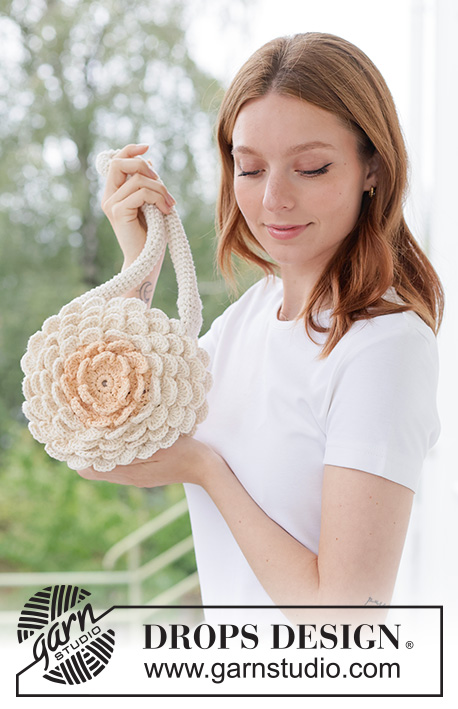
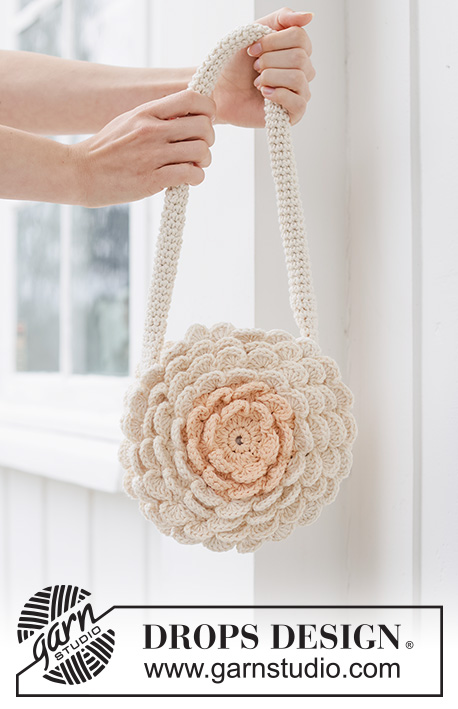
English Rose Bag#englishrosebag |
||||||||||||||||||||||||||||
 |
 |
|||||||||||||||||||||||||||
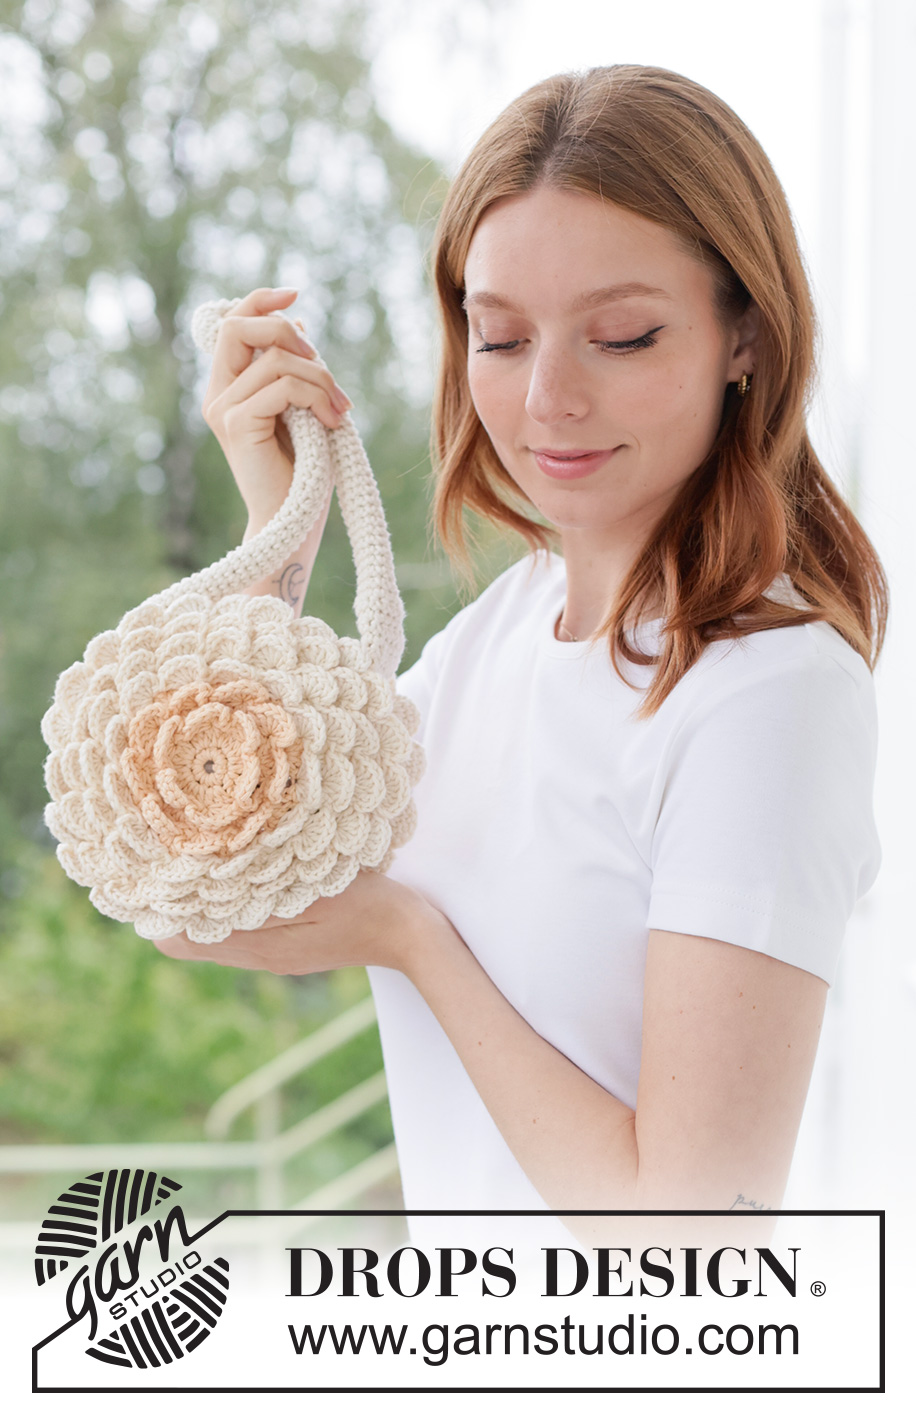
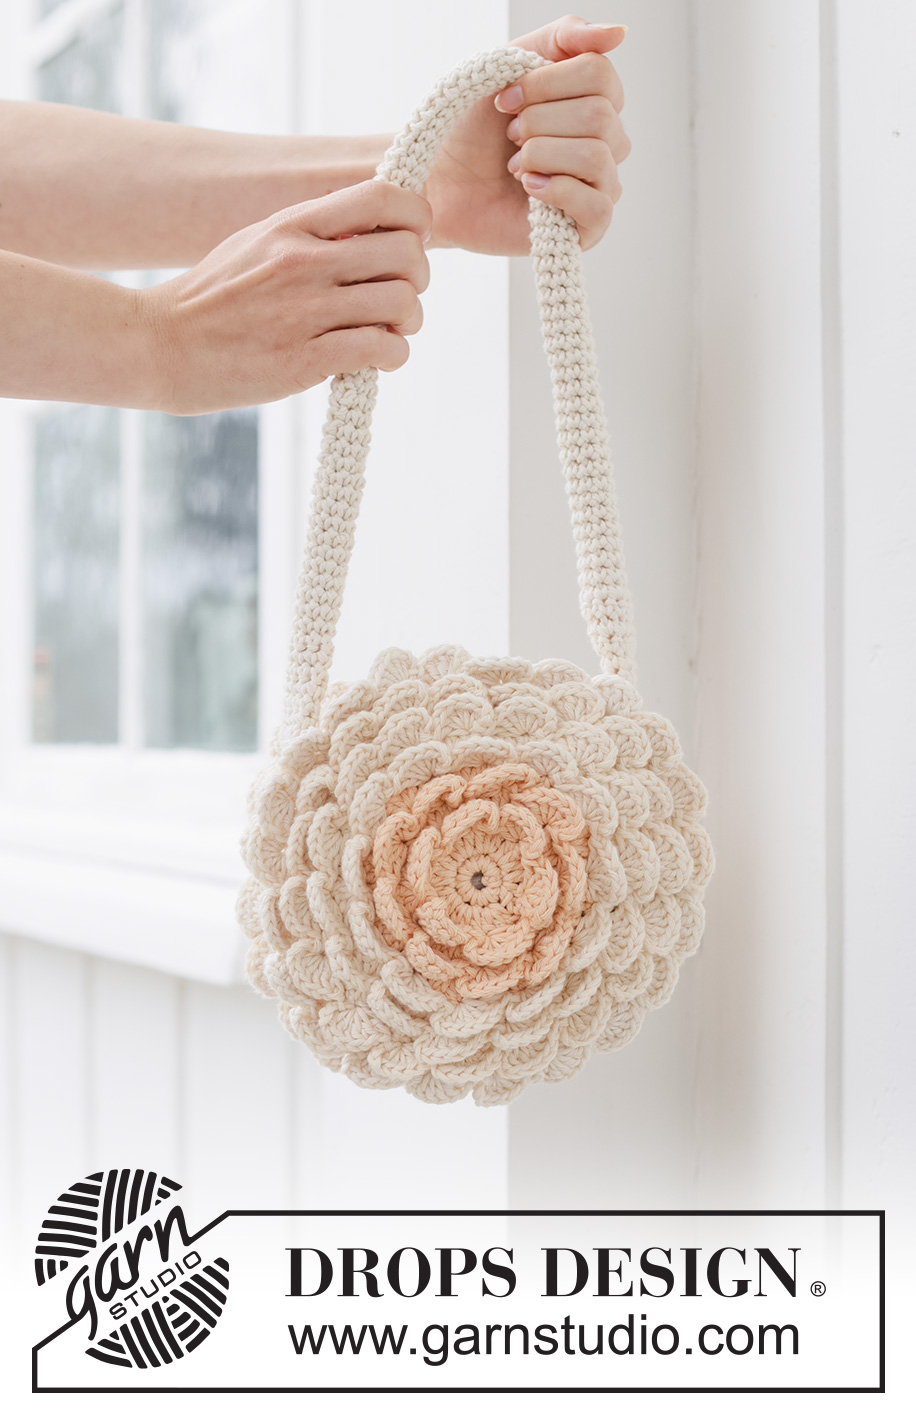
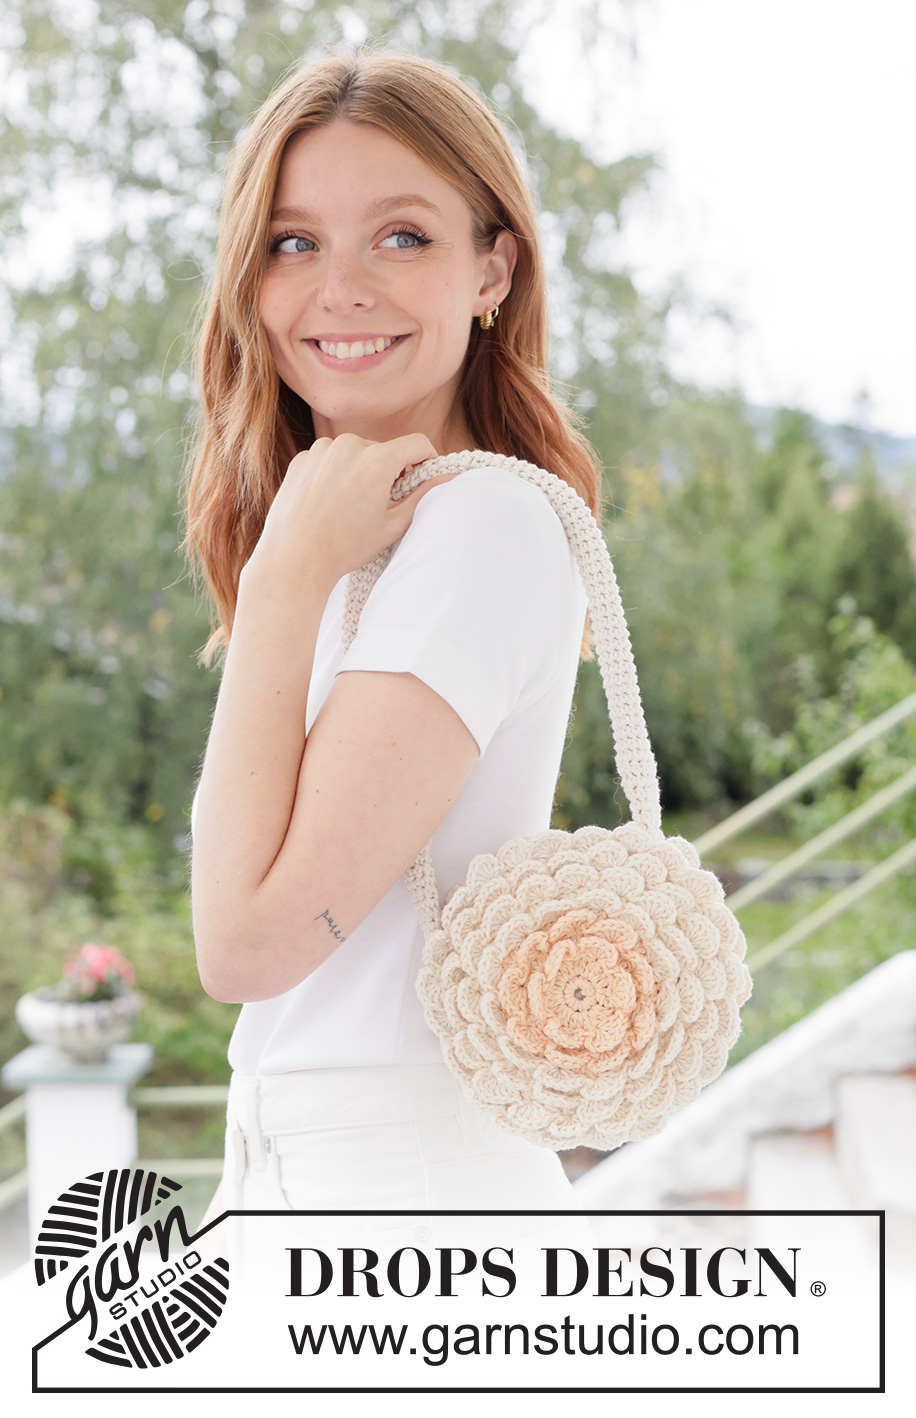
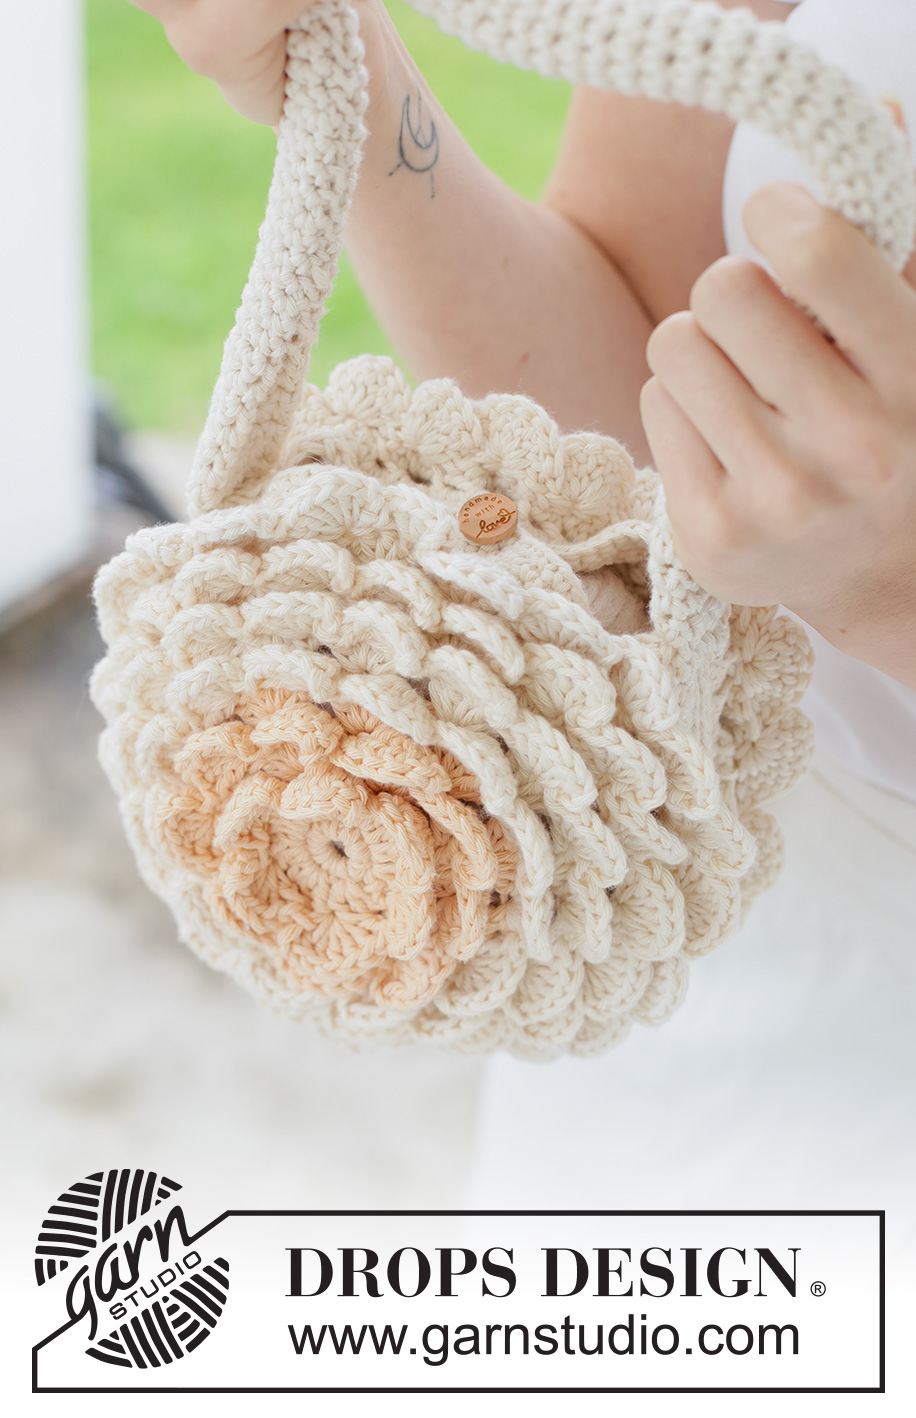
Crocheted bag in DROPS Paris. The piece is worked in the round with flowers.
DROPS 265-10 |
||||||||||||||||||||||||||||
|
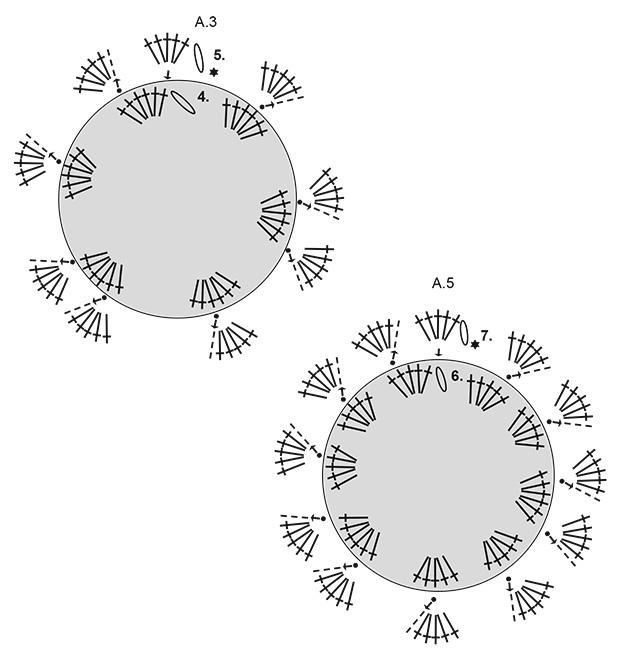
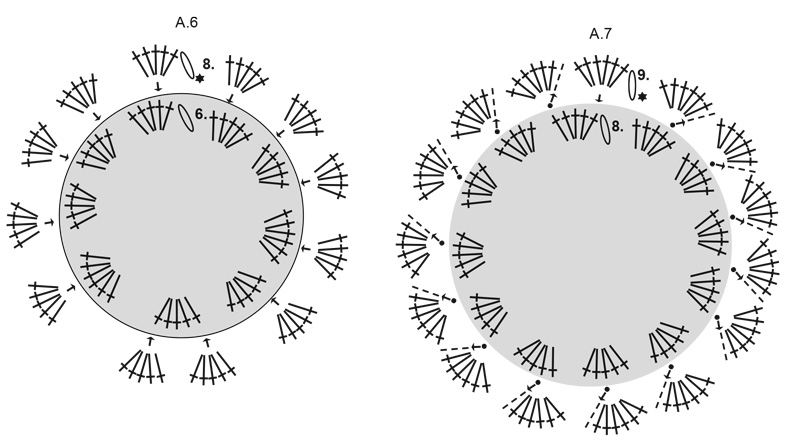
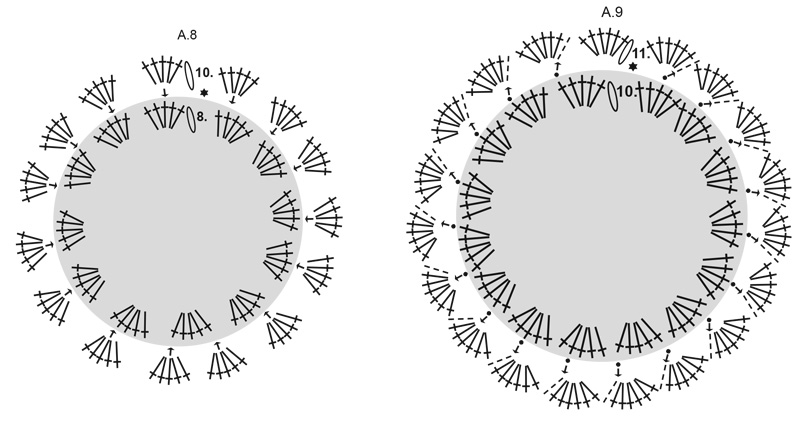
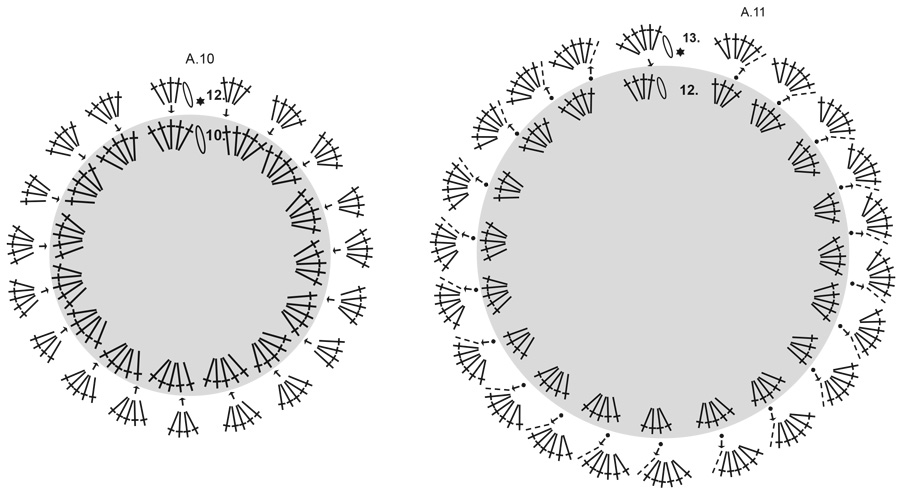
------------------------------------------------------- EXPLANATIONS FOR THE PATTERN: ------------------------------------------------------- CHAIN STITCH: If you work outermost on the hook the chain stitch will often be too tight; 1 chain stitch should be as long as 1 double/treble crochet is wide. PATTERN: See diagrams A.1 to A.11. The grey sections in A.2 to A.11 are already worked. They show which stitches the next round is worked in. ------------------------------------------------------- START THE PIECE HERE: ------------------------------------------------------- BAG – SHORT OVERVIEW OF THE PIECE: The piece is worked in 2 similar pieces (the front and back of the bag). The pieces are circles with flowers and have an edge which will become the sides. The pieces are joined and an opening is worked along the top of the bag. A strap is worked, then sewn onto the bag. The opening is fastened with a button. FRONT: Use crochet hook size 4 mm and colour Apricot Cream DROPS Paris. Read CHAIN STITCH and PATTERN in the explanations above. Work diagram A.1 (rounds 1-3). After the last round there are 6 petals on the round. Work diagram A.2 (round 4), fold round 3 of A.1 forwards and work in round 2 of A.1. When A.2 is finished there are still 6 petals on the round. Work diagram A.3 (round 5) in round 4. When A.3 is finished there are 9 petals on the round. Remember to maintain the crochet tension. Change to colour Off White and work diagram A.4 (round 6), fold round 5 forwards and work in round 4. When A.4 is finished there are still 9 petals on the round. Work diagram A.5 (round 7) in round 6. When A.5 is finished there are 12 petals on the round. Work diagram A.6 (round 8), fold round 7 forwards and work in round 6. When A.6 is finished there are still 12 petals on the round. Work diagram A.7 (round 9) in round 8. When A.7 is finished there are 15 petals on the round. Work diagram A.8 (round 10), fold round 9 forwards and work in round 8. When A.8 is finished there are still 15 petals on the round. Work diagram A.9 (round 11) in round 10. When A.9 is finished there are 19 petals on the round. Work diagram A.10 (round 12), fold round 11 forwards and work in round 10. When A.10 is finished there are still 19 petals on the round. Work diagram A.11 (round 13) in round 12. When A.11 is finished there are 22 petals on the round. EDGE: Fold round 13 forwards and work in round 12: ROUND 1: Work 1 slip stitch around the first treble crochet on the first petal, work 3 chain stitches, then 1 slip stitch around the last treble crochet on the first petal, * work 2 chain stitches, 1 slip stitch around the first treble crochet on the next petal, 3 chain stitches and 1 slip stitch around the last treble crochet on the same petal *, work from *-* to end of round, finishing with 3 chain stitches and 1 slip stitch in the first slip stitch. There are 38 chain-spaces on the round. ROUND 2: Work 1 chain stitch, * 3 double crochets around the first/next chain-space, 2 double crochets around the next chain-space *, work from *-* to end of round, finishing with 1 slip stitch in the first chain stitch. There are 95 double crochets on the round. ROUND 3: Work 1 chain stitch, then 1 double crochet in each double crochet on the round, finishing with 1 slip stitch in the first chain stitch. ROUND 4: Work 1 chain stitch, then 1 double crochet in each double crochet on the round, finishing with 1 slip stitch in the first chain stitch. BACK: Work in the same way as the front but when working ROUND 4 of the EDGE work 1 buttonhole as follows: Work double crochets as before until there are 13 double crochets left on the round, work 1 chain stitch, skip 1 double crochet, work 1 double crochet in each of the last 12 double crochets and finish with 1 slip stitch in the first chain stitch. Cut and fasten the strand. CROCHET TOGETHER: The front and back pieces are now joined. Insert 1 marker on each side of 25 double crochets on each piece, positioning the markers so the buttonhole is in the middle of the 25 double crochets. These 25 stitches are the opening of the bag. Use crochet hook size 4 mm and colour Off White. Start by the marker after the 25 stitches and work as follows: Insert the hook from the right side and through the back loop of the next stitch on one piece, then insert the hook from the right side and through the back loop of the next stitch on the second piece, pick up the strand and pull it through both loops on the hook *, work from *-* through each double crochet until the pieces are joined as far as the second marker. Cut and fasten the strand. STRAP: Use crochet hook size 4 mm and colour Off White. Work 12 chain stitches and form them into a ring with 1 slip stitch in the first chain stitch. Continue in the round, without finishing after each round and working 1 double crochet in each stitch until the strap measures 60 cm. Cut and fasten the strand. The strap is a tube. Flatten each end and using colour Of White, sew the ends to each side of the opening (of the 25 double crochets not crocheted together). Flatten the tuben lengthwise. Use colour Off White and sew the tube together with small stitches, starting and finishing 5 cm from each end. Cut and fasten the strand. ASSEMBLY: Sew the button onto the front of the bag so it matches the buttonhole on the back. |
||||||||||||||||||||||||||||
Diagram explanations |
||||||||||||||||||||||||||||
|
||||||||||||||||||||||||||||
 |
||||||||||||||||||||||||||||
 |
||||||||||||||||||||||||||||
 |
||||||||||||||||||||||||||||
 |
||||||||||||||||||||||||||||
 |
||||||||||||||||||||||||||||
Have you finished this pattern?Tag your pictures with #dropspattern #englishrosebag or submit them to the #dropsfan gallery. Do you need help with this pattern?You'll find 9 tutorial videos, a Comments/Questions area and more by visiting the pattern on garnstudio.com. © 1982-2026 DROPS Design A/S. We reserve all rights. This document, including all its sub-sections, has copyrights. Read more about what you can do with our patterns at the bottom of each pattern on our site. |
||||||||||||||||||||||||||||


With over 40 years in knitting and crochet design, DROPS Design offers one of the most extensive collections of free patterns on the internet - translated to 17 languages. As of today we count 325 catalogues and 12298 patterns translated into English (UK/cm). 12298
We work hard to bring you the best knitting and crochet have to offer, inspiration and advice as well as great quality yarns at incredible prices! Would you like to use our patterns for other than personal use? You can read what you are allowed to do in the Copyright text at the bottom of all our patterns. Happy crafting!
Post a comment to pattern DROPS 265-10
We would love to hear what you have to say about this pattern!
If you want to leave a question, please make sure you select the correct category in the form below, to speed up the answering process. Required fields are marked *.