
Popular categories
Looking for a yarn?


Comments / Questions (13)
![]() Malin wrote:
Malin wrote:
Hej! Hur ökar man på axlarna- med bild. Försöker förstå hur man ökar . Minskar kan jag. Försöker göra en båtringat linne(nybörjare)
23.01.2026 - 06:44DROPS Design answered:
Hei Malin. Vi har dessverre ingen bilder på økninger, men har du tatt en titt på hjelpevideoen til oppskriften? Klikk på Videor til høyre / eller under bildet. mvh DROPS Design
30.01.2026 - 10:18
![]() Kim wrote:
Kim wrote:
I'm knitting Size S. I'm about to cast off for neck, and I currently have 60 stitches. 14 (worked as before) + 30 (cast off) + 14 (worked as before) = 58 What do I do with the remaining 2 stitches?
12.09.2025 - 15:33DROPS Design answered:
Hi Kim, it should be corrected, thank you for the notification. I suggest waiting for the correction. If you want to finnish your garment quickly, do it like this: 14 (worked as before) + 32 (cast off) + 14 (worked as before) = 60 sts. Happy knitting!
26.09.2025 - 11:21
![]() Joanna wrote:
Joanna wrote:
Co oznacza: ‚Dalej przerabiać dżersejem z 1 oczkiem brzegowym ŚCIEGIEM FRANCUSKIM’ - czy z jednej strony początkowe oczko brzegowe ma być zdejmowane a na końcu przerabiane na prawo, a w kolejnym rzędzie pierwsze ma być przerabiane na prawo a ostatnie zdejmowane lub odwrotnie?
17.08.2025 - 11:49DROPS Design answered:
Witaj Joanno, to oznacza, że 1-sze i ostatnie oczko w rzędzie jest przerabiane na prawo, zarówno na prawej jak i na lewej stronie robótki. Pozdrawiamy!
17.08.2025 - 13:10
![]() Ania wrote:
Ania wrote:
Dzień dobry - co oznacza fragment "Zamknąć 3-4-5-6-7-8 oczek na początku 2 kolejnych rzędów na podkroje rękawów = 78-82-88-94-104-112 oczek."? Zamykam 4 (dla M) oczka z każdej strony? czy po 2 oczka z każdej strony w 2 rzędach? Czyli przerabiam: rząd z zamykaniem (na prawej stronie), rząd na lewej bez zamykania i potem 2gi rząd na prawo z zamykaniem? dzięki
24.07.2025 - 23:23DROPS Design answered:
Witaj Aniu, zamykasz 4 oczka na początku rzędu na prawej stronie robótki, a następnie zamykasz 4 oczka na początku rzędu na lewej stronie robótki. Pozdrawiamy!
25.07.2025 - 17:18
![]() Maria wrote:
Maria wrote:
Wegens defect aan vinger kan ik geen rondbreinld. gebruiken. Hebben jullie een tip om de patronen aan te passen voor gewone naalden. Hoor graag. Mvg, Maria
07.07.2025 - 00:09DROPS Design answered:
Dag Maria,
Om een patroon aan te passen om op rechte naalden te breien hebben we een instructie gemaakt. Deze vind je hier.
07.07.2025 - 18:53
![]() Nadège wrote:
Nadège wrote:
Bonjour, je ne comprends pas à quoi servent les explications diminutions encolure ?
25.05.2025 - 08:26DROPS Design answered:
Bonjour Nadège, elles vont vous servir lorsque vous tricoterez l'épaule gauche (puis l'épaule droite), lorsqu'il est indiqué de diminuer 2 mailles puis 1 maille inclinées à gauche (à droite). Bon tricot!
26.05.2025 - 10:36
![]() Mariela wrote:
Mariela wrote:
Empecé a tejer el patrón, pero la parte de abajo se enrolla mucho, ¿algún tip para que esto no suceda? El patrón, según entiendo, dice que hay que tejer jersey desde el principio empezando con revés, ¿es así? ¿o habrá que tejer dos vueltas de revés para que no se enrolle? Gracias
19.05.2025 - 03:34DROPS Design answered:
Hola Mariela, en la primera fila trabajas de revés por el lado revés y en la segunda de derecho por el lado derecho (es decir, en punto jersey). El borde se enrolla un poco, como puedes ver en la foto en el cuello o en la parte inferior. Si se enrolla mucho se puede planchar el borde con cuidado, con vapor y un trapo entre la plancha y la prenda, o hormar la labor al final; debería desenrollar el borde un poco.
25.05.2025 - 15:41
![]() Alice wrote:
Alice wrote:
When making the left shoulder , the decreases do not look smooth at all whereas the right shoulder makes a nice shape. Why are they so different ? The slipping over of the stitches to reduce makes it stick out and look bulky. Is there not a different way to do this so the shoulders look the same ?
13.05.2025 - 10:09
![]() Raquel wrote:
Raquel wrote:
En las notas de I CORD final de la hilera pone Tejer hasta que resten 21 puntos en la aguja, deslizar 1 punto como de revés con el hilo al frente de la pieza, tejer 1 punto derecho. Quiere decir hasta que queden 2 ptos.?
06.05.2025 - 06:21DROPS Design answered:
Hola Raquel, sí, se trata de una errata, es hasta que queden 2 pts. La corregiremos lo antes posible.
10.05.2025 - 23:24
![]() Sally McCallum wrote:
Sally McCallum wrote:
I’m having difficulties with the I-cord explanation as I am increasing the number of stitches by two on every row. Can you please give me an explanation that does not increase the number of stitches?
23.04.2025 - 09:08DROPS Design answered:
Dear Mrs McCallum, sure in this video you will see how to work the 2 edge stitches at the beginning and at the end of the row - in the video we work some garter stitches after/before these 2 stitches, here y ou will just have to work as explained, ie with stocking stitch (increasing when necessary). Happy knitting!
23.04.2025 - 15:39
|
|
Silver Reflection#silverreflection |
|
 |
 |
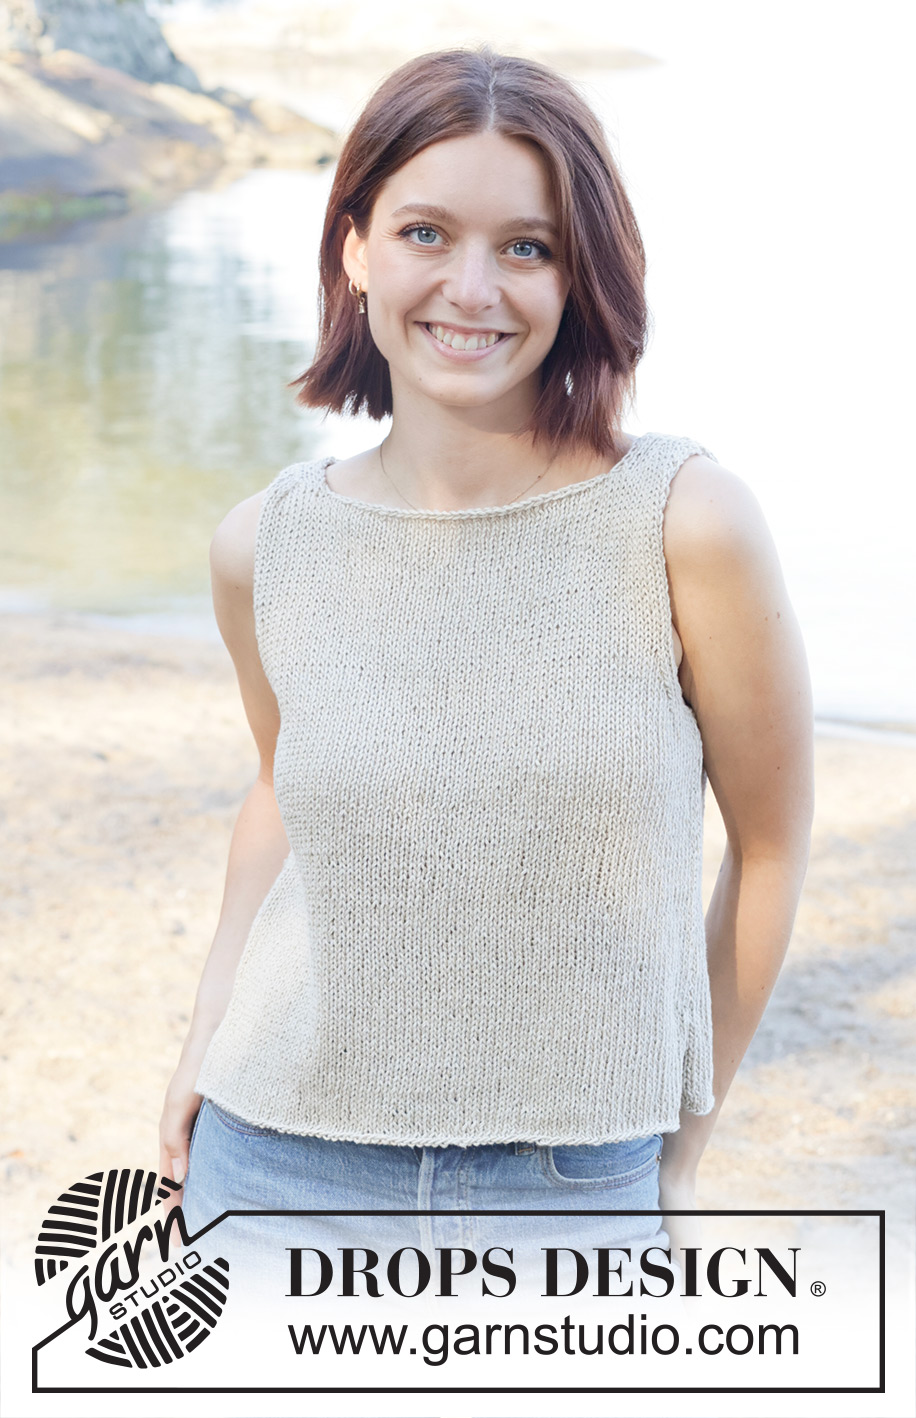
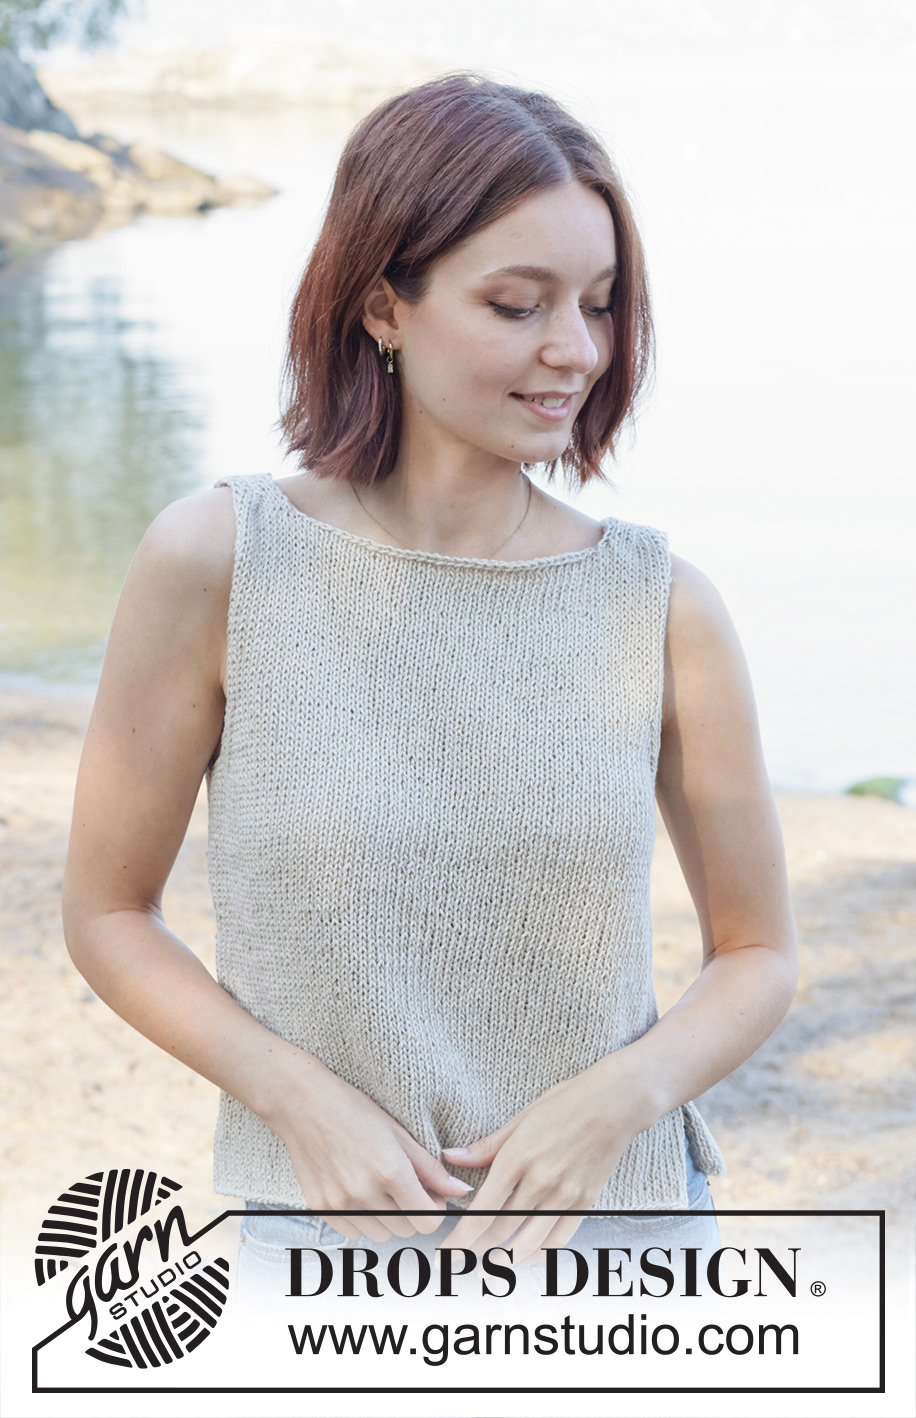
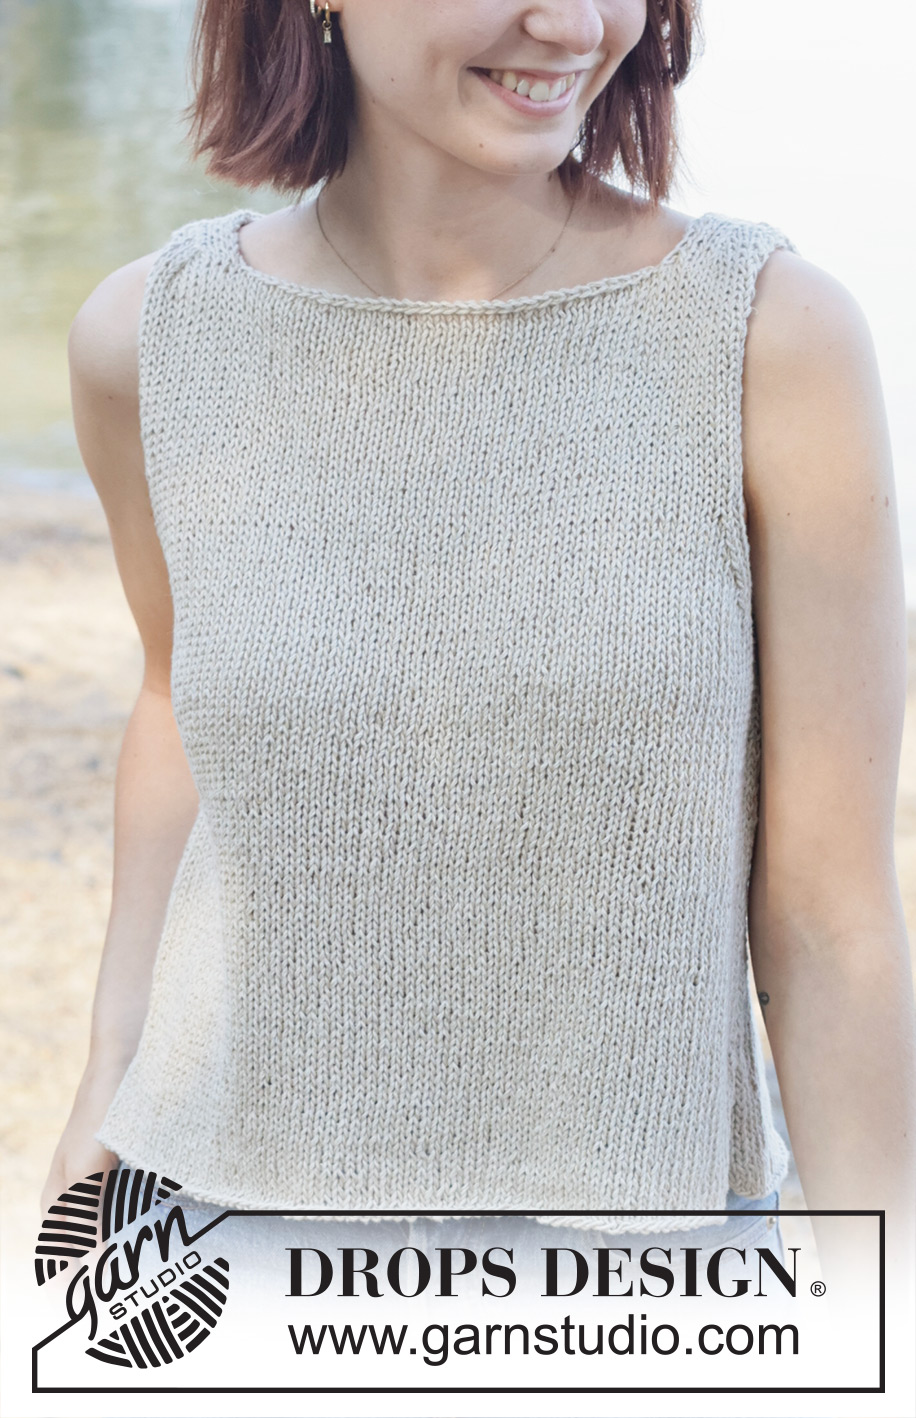
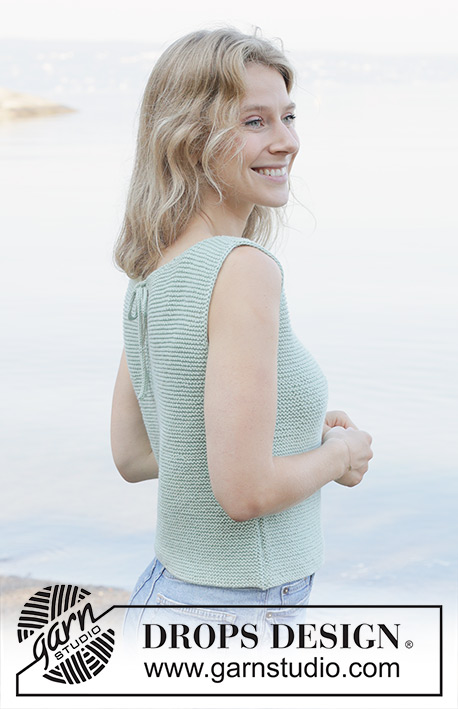
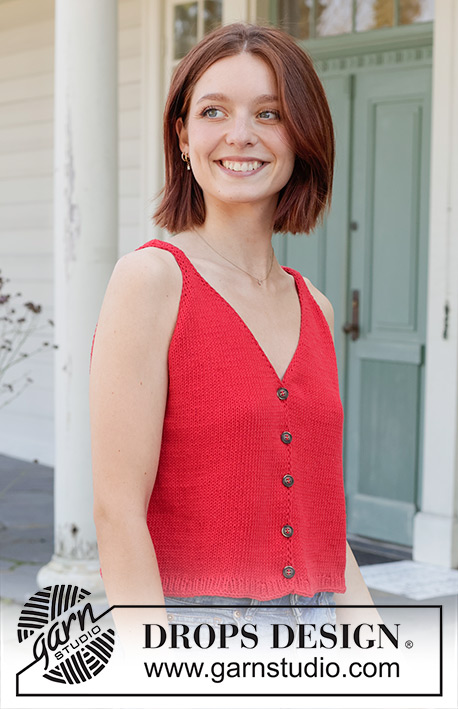
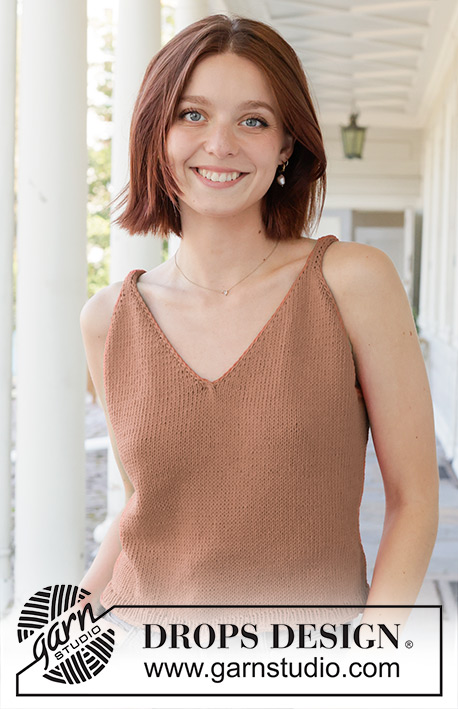
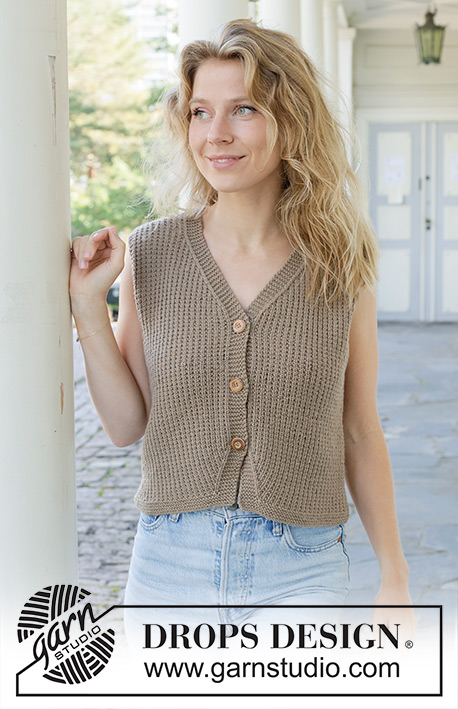
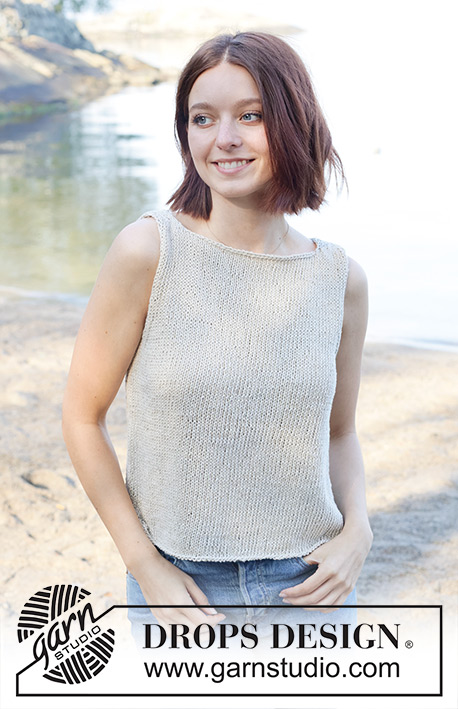
Knitted top in DROPS Bomull-Lin. Piece is knitted bottom up in stocking stitch with I-cord and boat neck. Size: S - XXXL.
DROPS 257-18 |
|
|
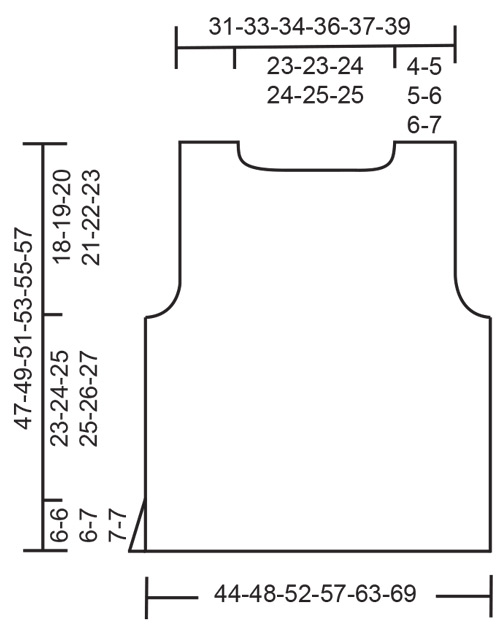
---------------------------------------------------------- EXPLANATION FOR THE PATTERN: ---------------------------------------------------------- I-CORD: BEGINNING OF ROW: Slip 1 stitch purlwise with strand in front of piece, knit 1. END OF ROW: Work until 2 stitches remain on needle, slip 1 stitch purlwise with strand in front of piece, knit 1. Work the same way both from right side and wrong side. GARTER STITCH (when working back and forth): Knit on all rows, i.e. knit from right side and knit from wrong side. 1 ridge vertically = knit 2 rows. DECREASE TIP-1 (applies to armholes): All decreases are done from the right side! DECREASE 1 STITCH IN EACH SIDE AS FOLLOWS: Work I-cord as before, work 2 stitches in stocking stitch, slip 1 stitch knitwise, knit 1 and pass slipped stitch over stitch worked (= 1 stitch decreased). Work until 6 stitches remain, knit 2 together, work 2 stitches in stocking stitch and work I-cord as before (= 1 stitch decreased). DECREASE 2 STITCHES IN EACH SIDE AS FOLLOWS: Work I-cord as before, work 2 stitches in stocking stitch, slip 1 stitch knitwise, knit 2 together and pass slipped stitch over stitch worked (= 2 stitches decreased). Work until 7 stitches remain, knit 3 together, work 2 stitches in stocking stitch and work I-cord as before (= 2 stitches decreased). DECREASE TIP-2 (applies to neck): All decreases are done from the right side! DECREASE 1 STITCH AS FOLLOWS: TOWARDS THE LEFT: Work I-cord as before, work 2 stitches in stocking stitch, slip 1 stitch knitwise, knit 1 and pass slipped stitch over stitch worked (= 1 stitch decreased). TOWARDS THE RIGHT: Work until 6 stitches remain, knit 2 together, work 2 stitches in stocking stitch and work I-cord as before (= 1 stitch decreased). DECREASE 2 STITCHES AS FOLLOWS: TOWARDS THE LEFT: Work I-cord as before, work 2 stitches in stocking stitch, slip 1 stitch knitwise, knit 2 together and pass slipped stitch over stitch worked (= 2 stitches decreased). TOWARDS THE RIGHT: Work until 7 stitches remain, knit 3 together, work 2 stitches in stocking stitch and work I-cord as before (= 2 stitches decreased). ---------------------------------------------------------- START THE PIECE HERE: ---------------------------------------------------------- TOP - SHORT OVERVIEW OF THE PIECE: Worked back and forth on circular needle, bottom up in parts, and sewn together when finished. BACK PIECE: Cast on 82-88-96-104-116-126 stitches on circular needle size 4.5 mm with DROPS Bomull-Lin. ROW 1 (= wrong side): I-CORD - read explanation above, purl until 2 stitches remain and work I-CORD. ROW 2 (= right side): Work I-cord, knit until 2 stitches remain and 2 in I-cord stitches. Continue back and forth as 1st and 2nd row until piece measures 6-6-6-7-7-7 cm. On next row work as follows: Work 2 stitches in first stitch, work in stocking stitch until 1 stitch remain, work 2 stitches in last stitch = 84-90-98-106-118-128 stitches. Then work in stocking stitch with 1 edge stitch in each side which is worked in GARTER STITCH - read explanation above. Remember to follow the knitting tension! Work until piece measures 29-30-31-32-33-34 cm. At the beginning of the next 2 rows cast off 3-4-5-6-7-8 stitches in each side for armholes = 78-82-88-94-104-112 stitches. Now continue with I-cord in each side as before and stocking stitch, at the same time decrease for armholes on the inside of 4 stitches in each side on every other row - read DECREASE TIP-1 in explanation above and work as follows: Decrease 2 stitches 0-0-0-2-5-7 times in each side, then decrease 1 stitch 9-10-12-10-8-7 times in each side = 60-62-64-66-68-72 stitches. Work until piece measures 43-45-46-47-48-49 cm. On next row from right side cast off for neck as follows: Work over the first 14-15-15-17-17-19 stitches as before and slip them on a thread, cast off the next 32-32-34-32-34-34 stitches for neck, work over the last 14-15-15-17-17-19 stitches as before. Then work each shoulder separately. LEFT SHOULDER: = 14-15-15-17-17-19 stitches. Begin from wrong side and work as follows: ROW 1 (= wrong side): Work I-cord as before, purl until 2 stitches remain and work I-cord. ROW 2 (= right side): Work i-cord, knit 2, decrease 2 stitches towards the left - remember DECREASE TIP-2, knit until 2 stitches remain and work i-cord = 12-13-13-15-15-17 stitches. ROW 3 (= wrong side): Work I-cord, purl until 2 stitches remain and work I-cord. ROW 4 (= right side): Work i-cord, knit 2, decrease 1 stitch towards the left - read DECREASE TIP-2, knit until 2 stitches remain and work i-cord = 11-12-12-14-14-16 stitches. Repeat 3rd and 4th row 1 more time = 10-11-11-13-13-15 stitches. Work in stocking stitch with I-cord until piece measures 47-49-51-53-55-57 cm. Slip stitches on a thread, stitch stitches together later. RIGHT SHOULDER: = 14-15-15-17-17-19 stitches. Begin from wrong side and work as follows: ROW 1 (= wrong side): Work I-cord as before, purl until 2 stitches remain and work I-cord. ROW 2 (= right side): Work i-cord, knit until 7 stitches remain, decrease 2 stitches towards the right - remember DECREASE TIP-2, knit 2 and work i-cord = 12-13-13-15-15-17 stitches. ROW 3 (= wrong side): Work I-cord, purl until 2 stitches remain and work I-cord. ROW 4 (= right side): Work i-cord, knit until 6 stitches remain, decrease 1 stitch towards the right - remember DECREASE TIP-2, knit 2 and work i-cord = 11-12-12-14-14-16 stitches. Repeat 3rd and 4th row 1 more time = 10-11-11-13-13-15 stitches. Work in stocking stitch with I-cord until piece measures 47-49-51-53-55-57 cm. Slip stitches on a thread, stitch stitches together later. FRONT PIECE: Cast on the same number of stitches, and work the same way as back piece. ASSEMBLY: Use grafting/kitchener stitches and sew shoulders together. Sew side seams in outer loops of edge ridge to form a vent of 6-6-6-7-7-7 cm at the bottom in each side. |
|
 |
|
Have you finished this pattern?Tag your pictures with #dropspattern #silverreflection or submit them to the #dropsfan gallery. Do you need help with this pattern?You'll find 20 tutorial videos, a Comments/Questions area and more by visiting the pattern on garnstudio.com. © 1982-2026 DROPS Design A/S. We reserve all rights. This document, including all its sub-sections, has copyrights. Read more about what you can do with our patterns at the bottom of each pattern on our site. |
|


With over 40 years in knitting and crochet design, DROPS Design offers one of the most extensive collections of free patterns on the internet - translated to 17 languages. As of today we count 324 catalogues and 12154 patterns translated into English (UK/cm). 12154
We work hard to bring you the best knitting and crochet have to offer, inspiration and advice as well as great quality yarns at incredible prices! Would you like to use our patterns for other than personal use? You can read what you are allowed to do in the Copyright text at the bottom of all our patterns. Happy crafting!
Post a comment to pattern DROPS 257-18
We would love to hear what you have to say about this pattern!
If you want to leave a question, please make sure you select the correct category in the form below, to speed up the answering process. Required fields are marked *.