
Popular categories
Looking for a yarn?


Comments / Questions (1)
![]() Anna R wrote:
Anna R wrote:
Min fråga gäller Moonlit Tide Neck Warmer och det gäller inledningen på bakstycket där det står följande; EFTER VARV 3: Sticka 2 och VARV 3 totalt 6 gånger (= 12 varv stickad), efter sista ökningen är det = 50-52 maskor på pinnen Vad menas med sticka 2? Ska man sticka varv 2 och varv 3 6 gånger så stämmer inte maskantalet? behöver en förklaring och ett förtydligande.
20.11.2024 - 11:52DROPS Design answered:
Hej Anna. Ja du ska sticka varv 2 och varv 3 totalt 6 gånger (= 12 varv stickade). Du ökar 2 maskor på varje varv vilket innebär att när du stickat dessa 12 varv så har du ökat 24 maskor. I den minsta storleken blir det då 50 maskor efter ökningarna (26+24=50). Mvh DROPS Design
20.11.2024 - 13:43
|
|
Moonlit Tide Neck Warmer#moonlittideneckwarmer |
|
 |
 |
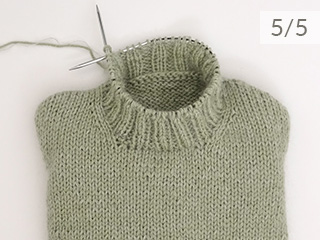
Knitted neck-warmer in 1 strand DROPS Melody or 2 strands DROPS Brushed Alpaca Silk. The piece is worked top down with European/diagonal shoulders, stocking stitch and rolled neck-edge.
DROPS 253-27 |
|
|
------------------------------------------------------- EXPLANATIONS FOR THE PATTERN: ------------------------------------------------------- INCREASE TIP-1: INCREASE 1 STITCH TOWARDS LEFT – from right side (and from wrong side when increasing in garter stitch): Use the left needle to pick up the strand between 2 stitches from the previous row, pick up the strand from the front and knit the back loop. INCREASE 1 STITCH TOWARDS RIGHT – from right side (and from wrong side when increasing in garter stitch): Use the left needle to pick up the strand between 2 stitches from the previous row, pick up the strand from the back knit the front loop. INCREASE TIP-2: INCREASE 1 STITCH TOWARDS LEFT – from wrong side: Use the left needle to pick up the strand between 2 stitches from the previous row, pick up the strand from the back and purl the front loop. INCREASE 1 STITCH TOWARDS RIGHT – from wrong side: Use the left needle to pick up the strand between 2 stitches from the previous row, pick up the strand from the front and purl the back loop. I-CORD: FIRST 2 STITCHES: Worked on all rows: Slip 1 stitch purl-wise with strand in front, knit 1. LAST 2 STITCHES: Worked on all rows: Work until there are 2 stitches left on row, slip 1 stitch purl-wise with strand in front, knit 1. Work like this from both the right and wrong side. GARTER STITCH: Knitted on all rows, from both the right and wrong side. 1 ridge in height = knit 2 rows. ------------------------------------------------------- START THE PIECE HERE: ------------------------------------------------------- NECK-WARMER - SHORT OVERVIEW OF THE PIECE: The piece is started by casting on stitches at the back of the neck, working back and forth and top down. Stitches are increased for the diagonal shoulders and the back piece completed. The front piece is started in 2 sections, knitting up stitches along each back shoulder and working top down. Stitches are increased for the neck. The 2 sections are joined when the neck is finished and the front piece is completed. Stitches are knitted up around the neckline and the neck is worked to finish. BACK PIECE: The piece is worked back and forth on circular needle. Cast on 26-28 stitches with circular needle size 5.5 mm and 1 strand DROPS Melody or 2 strands DROPS Brushed Alpaca Silk. ROW 1 (wrong side): Purl. ROW 2 (right side): Read INCREASE TIP-1, knit 2, increase 1 stitch towards the left, knit until there are 2 stitches left, increase 1 stitch towards the right, knit 2. ROW 3 (wrong side): Read INCREASE TIP-2, purl 2, increase 1 stitch towards the left, purl until there are 2 stitches left, increase 1 stitch towards the right, purl 2. Work ROWS 2 and 3 a total of 6 times (12 worked rows) = 50-52 stitches. The final 4 increases on each side are worked in GARTER STITCH – read description above, i.e., use only INCREASE TIP-1 from both the right and wrong side. ROW 14 (right side): Remember INCREASE TIP-1, knit 2, increase 1 stitch towards the left, knit until there are 2 stitches left, increase 1 stitch towards the right, knit 2. ROW 15 (wrong side): Remember INCREASE TIP-1, purl 2, increase 1 stitch towards the left, knit 1, purl until there are 3 stitches left, knit 1, increase 1 stitch towards the right, purl 2. ROW 16 (right side): Knit 2, increase 1 stitch towards the left, knit until there are 2 stitches left, increase 1 stitch towards the right, knit 2. ROW 17 (wrong side): Purl 2, increase 1 stitch towards the left, knit 3, purl until there are 5 stitches left, knit 3, increase 1 stitch towards the right, purl 2. After the last increase, there are 58-60 stitches. Insert 1 marker outermost on one side; the piece is now measured from here! Continue as follows: Work 2 stitches in I-CORD – read description above, 4 garter stitches, stocking stitch until there are 6 stitches left, 4 garter stitches and 2 stitches in I-cord. Remember the knitting tension. Continue back and forth with stocking stitch, garter stitch and I-cord on each side until the piece measures 5-6 cm from the side-marker. Now decrease inside the 6 stitches on each side as follows. From the right side: Work 2 stitches in I-cord, 4 garter stitches, slip the next stitch knit-wise, knit 1, pass the slipped stitch over the knitted stitch, work stocking stitch until there are 8 stitches left, knit 2 together, 4 garter stitches and 2 stitches in I-cord. Decrease like this every 5 cm a total of 3 times in both sizes = 52-54 stitches. Continue working until the piece measures 17-18 cm from the side marker. Work as follows from the right side: 2 stitches in I-cord, work rib (purl 1, knit 1) over the next 48-50 stitches, AT THE SAME TIME decrease 1 stitch over these stitches, work 2 stitches in I-cord = 51-53 stitches. Work 3 rows of stocking stitch with I-cord on each side. Cast off with knit from the right side, making 1 yarn over after each 4th stitch (which is cast off as a normal stitch) to avoid the cast-off edge being tight. LEFT FRONT PIECE: Find the left back shoulder as follows: Lay the back piece flat, right side up, with the cast-off edge towards you; left side of piece = left shoulder. Start from the right side and knit up 1 stitch in each knitted row (inside the outermost stitch) along the left back shoulder, from the neck outwards = 16-16 stitches. All measurements on the front piece are taken from this knitted-up row. Work as follows from the wrong side: 2 stitches in I-cord, 4 garter stitches, purl to end of row. Work as follows from the right side: Work stocking stitch until there are 6 stitches left, 4 garter stitches and 2 stitches in I-cord. When the piece measures 8-8 cm from the knitted-up row, increase for the neck as follows: ROW 1 (right side): Remember INCREASE TIP-1, knit 3, increase 1 stitch towards the left, work stocking stitch, garter stitch and I-cord as before to end of row. ROW 2 (wrong side): Work I-cord, garter stitch and stocking stitch as before. Work ROWS 1 and 2 a total of 4-4 times (8 rows worked) = 20-20 stitches (last row was from the wrong side). Cut the strand, place the stitches on a stitch holder and work the right front piece. RIGHT FRONT PIECE: Start from the right side and knit up 1 stitch in each knitted row (inside the outermost stitch) along the right back shoulder, from the shoulder inwards = 16-16 stitches. All measurements on the front piece are taken from this knitted-up row. Work the first row from the wrong side as follows: Work stocking stitch until there are 6 stitches left, finish with 4 garter stitches and 2 stitches in I-cord From the right side work as follows: 2 stitches in I-cord, 4 garter stitches, knit to end of row. When the piece measures 8-8 cm from the knitted-up row, increase for the neck as follows: ROW 1 (right side): Work as before until there are 3 stitches left, increase 1 stitch towards the right, knit 3 - remember INCREASE TIP-1. ROW 2 (wrong side): Work as before. Work ROWS 1 and 2 a total of 4-4 times (8 rows worked) = 20-20 stitches (last row was from the wrong side). Now join the 2 front pieces. FRONT PIECE: Work from the right side as follows: Work the 20-20 stitches from the right front piece as before, cast on 18-20 stitches, work the 20-20 stitches from the left front piece as before = 58-60 stitches. Continue back and forth with stocking stitch, garter stitch and I-cord on each side until the piece measures 17-18 cm from the knitted-up row. Now decrease inside the 6 stitches on each side as follows. From the right side: Work 2 stitches in I-cord, 4 garter stitches, slip the next stitch knit-wise, knit 1, pass the slipped stitch over the knitted stitch, work stocking stitch until there are 8 stitches left, knit 2 together, 4 garter stitches and 2 stitch in I-cord. Decrease like this every 5 cm a total of 3 times in both sizes = 52-54 stitches. Continue working until the piece measures 29-30 cm from the stitches knitted up. Work as follows from the right side: 2 stitches in I-cord, work rib (purl 1, knit 1) over the next 48-50 stitches, AT THE SAME TIME decrease 1 stitch over these stitches, work 2 stitches in I-cord = 51-53 stitches. Work 3 rows of stocking stitch with I-cord on each side. Cast off with knit from the right side, making 1 yarn over after each 4th stitch (which is cast off as a normal stitch) to avoid the cast-off edge being tight. NECK: Use circular needle size 5 mm. Start from the right side on one shoulder-line and knit up approx. 74-80 stitches inside 1 stitch around the neckline – the stitch count must be divisible by 2. Work stocking stitch in the round for 6-6 cm. Work 2 rounds of rib (knit 1, purl 1), then 4 rounds of stocking stitch (= rolled edge). Cast off with knit from the right side, making 1 yarn over after each 4th stitch (which is cast off as a normal stitch) to avoid the cast-off edge being tight. |
|
Have you finished this pattern?Tag your pictures with #dropspattern #moonlittideneckwarmer or submit them to the #dropsfan gallery. Do you need help with this pattern?You'll find 26 tutorial videos, a Comments/Questions area and more by visiting the pattern on garnstudio.com. © 1982-2025 DROPS Design A/S. We reserve all rights. This document, including all its sub-sections, has copyrights. Read more about what you can do with our patterns at the bottom of each pattern on our site. |
|


With over 40 years in knitting and crochet design, DROPS Design offers one of the most extensive collections of free patterns on the internet - translated to 17 languages. As of today we count 314 catalogues and 11822 patterns translated into English (UK/cm). 11822
We work hard to bring you the best knitting and crochet have to offer, inspiration and advice as well as great quality yarns at incredible prices! Would you like to use our patterns for other than personal use? You can read what you are allowed to do in the Copyright text at the bottom of all our patterns. Happy crafting!
Post a comment to pattern DROPS 253-27
We would love to hear what you have to say about this pattern!
If you want to leave a question, please make sure you select the correct category in the form below, to speed up the answering process. Required fields are marked *.