
Popular categories
Looking for a yarn?


Comments / Questions (20)
![]() Iain wrote:
Iain wrote:
Hi Drops Team, Can you please share some clarification on how to knit the diagonal shoulders, not understanding the instructions, which stitches are to be placed on a thread? Thanks
31.03.2024 - 11:27DROPS Design answered:
Dear Iain, HERE you can find some videos that can help you understand, how to knit diagonal shoulders. I hope this helps. Happy Knitting!
31.03.2024 - 19:43
![]() Martine Van Herck wrote:
Martine Van Herck wrote:
Ik begrijp de uitleg voor de diagonale schouders niet. Ik heb al de drie filmpje i.v.m. diagonale schouders bezien, maar die helpen mij niet echt voort.
05.02.2024 - 10:54DROPS Design answered:
Dag Martine,
Je plaatst steeds een aantal steken op de hulpdraad en dan brei je de naald verder uit. Op de volgende naald plaats je weer een aantal (afhankelijk van je maat) steken op de hulpdraad en je doet dit in totaal 4 keer. Tot slot zet je de laatste steken bij de hals ook op de hulpdraad. Door steeds een aantal steken op de hulpdraad te zetten en de rest van de naald te breien, krijg je een schuine schouder.
07.02.2024 - 19:35
![]() Christof wrote:
Christof wrote:
Für welche Nadelstärke gelten die Angaben zur Maschenprobe Nr. 3,5 oder Nr. 5?
13.01.2024 - 18:49DROPS Design answered:
Lieber Christof, Maschenprobe wird mit Nadeln Nr 5 gestrickt. Viel Spaß beim stricken!
15.01.2024 - 09:18
![]() Alison Kent wrote:
Alison Kent wrote:
Hi, this is a beautiful pattern and I think I mostly understand it. What I'm not sure about is why there are so many more stitches in the hem than in the body, and the massive increases/decreases in the chest? The schematic shows this all as a straight line -- are there some patterns that really pull in/flare out that much? (I'm doing a very large swatch with all the patterns and so far (bottom of A5) I'm not finding a lot of variation...)
13.01.2024 - 04:44DROPS Design answered:
Dear Alison, the difference between the hem and the body is because you work a rib with a smaller needle. So you will have more stitches in the same amount of cm and allow the hem to be elastic but straight. Then, you change to a larger needle, so the gauge changes and you will need quite less stitches to have keep the correct width of the piece. That is why you decrease so many stitches at the beginning. Which massive increases/ decreases in the chest do you mean? You only increase a maximum of 8 stitches at a time, which may be to adjust for the pattern. Happy knitting!
14.01.2024 - 19:26
![]() Loredana wrote:
Loredana wrote:
Buongiorno. Sto lavorando il modello Lines in the Sand, ma al punto delle spalle non capisco cosa significa mettere in sospeso per 4 volte 4 maglie (dal margine esterno del lavoro? Consecutivamente? Ovvero 16 maglie in sospeso tutte insieme?) e poi lavoro fino al punto vicino al collo (ma qual è? ) Devo contare tutte le 24 maglie, sottrarne 9 che metto in sospeso e poi continuare lavorando fino in fondo, ma come? Non ho capito… grazie mille
12.01.2024 - 19:00DROPS Design answered:
Buonasera Loredana, deve mettere in sospeso 4 maglie dal lato per 4 volte, quindi su ferri diversi, non tutte e 16 insieme, e poi le 9 maglie vicine al collo: lavorerà poi sulle maglie rimaste. Buon lavoro!
17.03.2024 - 17:53
![]() Irena wrote:
Irena wrote:
Zamykanie oczek na rękawy: „przerabiać aż zostaje 2 oczka przed nitką markerem, przerobić 2 oczka razem na prawo lub 2 oczka razem na lewo, w zależności od miejsca w ściegu fantazyjnym, przerobić 1 oczko prawe, nitka marker”. Jeżeli zostają 2 oczka przed markerem i te oczka przerabiam razem, to nie mam już oczka przed markerem, które mam według opisu przerobić na prawo. Gdzie jest mój błąd w myśleniu?
03.01.2024 - 18:16DROPS Design answered:
Witaj Ireno, wydaje mi się, że jest zbędne to 1 oczko prawe, zakładając, że nitka marker na środku pod spodem rękawa znajduje się między 2 oczkami (a nie w oczku jak to ma miejsce w przypadku markera na górze rękawa). Zadałam pytanie i czekam na odpowiedź. Jeśli błąd się potwierdzi, we wzorze zostanie dodana korekta. Pozdrawiamy!
04.01.2024 - 08:46
![]() Anke wrote:
Anke wrote:
Guten Tag, ist es richtig, dass die Schulterschrägung im Rückenteil einen Zentimeter früher beginnt als im Vorderteil? Für Größe L wird beim Rückenteil Start bei 62 cm genannt, beim Vorderteil bei 63 cm. Trotzdem soll aber aus beiden Seiten des Armausschnittes die gleiche Anzahl Maschen für den Ärmel aufgenommen werden?
12.12.2023 - 17:26DROPS Design answered:
Liebe Anke, danke für den Hinweis, unser Designteam wird das sicher bald korrigieren; um die richtige Länge für den Armausschnitt zu haben, stricken Sie die Schulterschrägung beim Vorderteil wie beim Rückenteil. Viel Spaß beim stricken!
13.12.2023 - 07:41
![]() Kathryn Baine wrote:
Kathryn Baine wrote:
I have been following a pattern that has now left your site. How do I find it again?
24.10.2023 - 22:07DROPS Design answered:
Dear Mrs Baine, you might use its number / name / our search engine / tags to find it back. Happy knitting!
25.10.2023 - 07:43
![]() Susi wrote:
Susi wrote:
Warum gibt es diesen tollen Herrenpullover nicht auch als Topdown Modell?
24.10.2023 - 11:46
![]() Susanne Isaksen wrote:
Susanne Isaksen wrote:
Diagrammet er forsvundet. Kommer det igen??
19.10.2023 - 14:58DROPS Design answered:
Hej Susanne, jo diagrammet er nederst i opskriften :)
20.10.2023 - 10:52
|
|||||||||||||
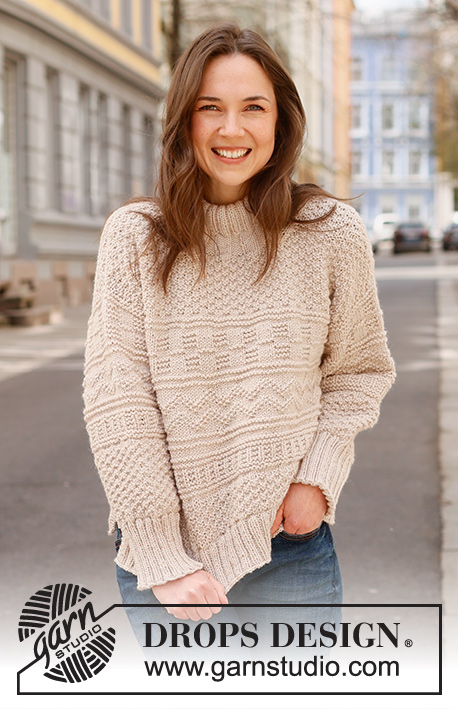
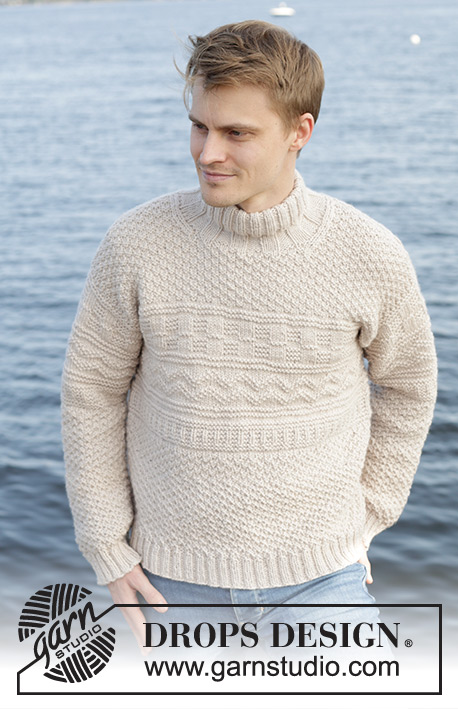
Lines in the Sand#linesinthesandsweater |
|||||||||||||
 |
 |
||||||||||||
Knitted jumper for men in DROPS Alaska or DROPS Big Merino. The piece is worked bottom up with relief-pattern and double neck. Sizes S - XXXL.
DROPS 246-12 |
|||||||||||||
|
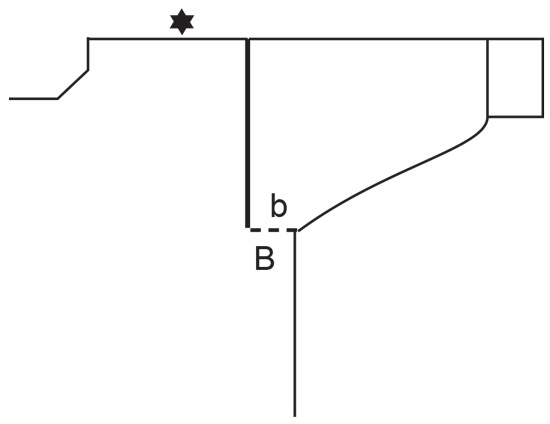
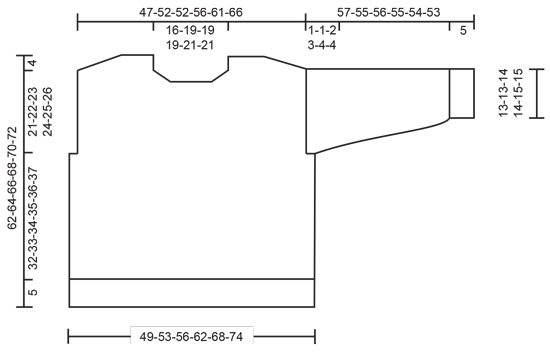
------------------------------------------------------- EXPLANATIONS FOR THE PATTERN: ------------------------------------------------------- GARTER STITCH (worked back and forth): Knit all rows. 1 ridge = knit 2 rows. PATTERN: See diagrams A.1 to A.5. The diagrams show all rows in the pattern from the right side. DECREASE TIP-1 (for neckline): All decreases are worked from the right side! AT BEGINNING OF ROW FROM RIGHT SIDE: Knit 2, slip 1 stitch knit-wise, knit 1, pass the slipped stitch over the knitted stitch (1 stitch decreased). AT END OF ROW FROM RIGHT SIDE: Work until there are 4 stitches left, knit 2 together, knit 2 (1 stitch decreased). DECREASE TIP-2 (for sleeves): Decrease 1 stitch on either side of the marker as follows: Work until there are 2 stitches left before the marker-thread, knit/purl 2 together depending on the pattern, knit 1, marker, knit 2 twisted together /purl 2 stitches twisted together, depending on the pattern (2 stitches decreased). ------------------------------------------------------- START THE PIECE HERE: ------------------------------------------------------- JUMPER – SHORT OVERVIEW OF THE PIECE: The body is worked in the round with the circular needle, bottom up as far as the armholes. Then the front and back pieces are finished separately back and forth with the circular needle. Stiches are knitted up around the armholes, the sleeve cap is worked back and forth with the circular needle before joining the sleeve and finishing in the round with the circular needle/the double pointed needles. The neck is worked to finish. BODY: Cast on 196-212-224-248-272-296 stitches with circular needle size 3.5 mm and DROPS Alaska or DROPS Big Merino. Knit 1 round. Work rib (knit 2, purl 2) for 5 cm. Knit 1 round and decrease 28-32-32-36-40-44 stitches evenly spaced = 168-180-192-212-232-252 stitches. Change to circular needle size 5 mm. Knit 1 round, then work A.1 over all stitches. REMEMBER THE KNITTING TENSION! When the piece measures 22-23-24-25-26-27 cm, work A.2 over all stitches – AT THE SAME TIME on the first round, adjust the stitch count to 168-180-192-213-231-252 stitches. On the last round in A.2 increase 0-4-0-3-1-4 stitches evenly spaced = 168-184-192-216-232-256 stitches. When A.2 is finished, the piece measures approx. 31-32-33-34-35-36 cm from the cast-on edge. If the piece is shorter than this, continue with stocking stitch to the correct length. Work A.3 over all stitches and two times in height. When A.3 is finished the piece measures approx. 36-37-38-39-40-41 cm from the cast-on edge. If the piece is shorter than this, continue with stocking stitch to the correct length. Knit 1 round and decrease 0-4-0-4-0-4 stitches evenly spaced = 168-180-192-212-232-252 stitches. Now insert a marker-thread mid-front and mid-back as well as a marker in each side as follows: Insert 1 marker at the beginning of the round, count 42-45-48-53-58-63 stitches, insert a marker-thread in the next stitch (mid-front), count 42-45-48-53-58-63 stitches, insert a marker before the next stitch, count 42-45-48-53-58-63 stitches, insert a marker-thread in the next stitch (mid-back). There are 42-45-48-53-58-63 stitches left after the last marker-thread. Work A.4 as follows: Count outwards from the symbol marking the middle of the diagram and the marker-thread mid-front to determine where to start the pattern in the side, work A.4 as far as it will go towards the other side (marker-stitch mid-front should match the symbol for the middle of A.4), then begin A.4 again in the same way on the back piece, working as far as the pattern will go towards the marker at the beginning of the round (marker-stitch mid-back should match the symbol for the middle of A.4). Continue this pattern and cast off for the armholes as described below. ARMHOLES: When the piece measures 37-38-39-40-41-42 cm, cast off as follows: Start 3-2-5-6-7-8 stitches before the marker at the beginning of the round, cast off 6-4-10-12-14-16 stitches, work until there are 3-2-5-6-7-8 stitches left before the marker in the other side, cast off 6-4-10-12-14-16 stitches, work to end of round. The front and back pieces are finished separately. BACK PIECE: = 78-86-86-94-102-110 stitches. Start from the wrong side and continue A.4 with 1 GARTER STITCH on each side – read description above. On the last row from the right side, increase 2 stitches evenly spaced = 80-88-88-96-104-112 stitches. When A.4 is finished, work A.1 with 1 garter stitch on each side. Repeat A.1 in height to finished length. Now work the diagonal shoulders and neckline. This is done simultaneously. Read both sections before continuing. DIAGONAL SHOULDERS: When the piece measures 58-60-62-64-66-68 cm, place stitches from the side on a thread for the diagonal shoulders, working them first to avoid cutting the strand as follows: Place 4-4-4-5-5-6 stitches 4 times, then the last 9-11-11-11-13-13 stitches by the neck. Place all stitches back on circular needle 5 mm. Work 1 row of stocking stitch (to avoid holes in the transitions between stitches, pick up the strand between 2 stitches and work it twisted together with the next stitch on the left needle). Cast off. NECKLINE: At the same time when the piece measures 59-61-63-65-67-69 cm, cast off the middle 24-28-28-28-32-32 stitches for the neckline and finish each shoulder separately. Continue A.1, placing stitches on the thread for the shoulder and working the outermost 3 stitches by the neck in stocking stitch. AT THE SAME TIME on the next row from the right side, decrease 1 stitch by the neck – read DECREASE TIP-1. Decrease like this 1 more time on the next row from the right side. When all the stitches are cast off the piece measures 62-64-66-68-70-72 cm from the top of the shoulder. Work the other shoulder in the same way. FRONT PIECE: = 78-86-86-94-102-110 stitches. Start from the wrong side and work pattern in the same way as on the back piece. In addition, work the neckline and diagonal shoulders as described below. NECKLINE: When the piece measures 56-57-59-60-62-63 cm, place the middle 20-24-24-24-26-26 stitches on a thread for the neckline and finish each shoulder separately. Continue A.1, with the 3 outermost stitches by the neck worked in stocking stitch. AT THE SAME TIME on the next row from the right side, decrease 1 stitch for the neckline – read DECREASE TIP-1. Decrease like this on each row from the right side a total of 4-4-4-4-5-5 times. DIAGONAL SHOULDERS: At the same time, when the piece measures 58-60-62-64-66-68 cm, place stitches on a thread for the diagonal shoulder in the same way as on the back, i.e., 4-4-4-5-5-6 stitches 4 times, then the last 9-11-11-11-13-13 stitches. When all the stitches are placed on the thread work 1 row of stocking stitch in the same way as on the back piece. Cast off. Work the other shoulder in the same way. ASSEMBLY: Sew the shoulder seams. SLEEVES: Use circular needle size 5 mm and DROPS Alaska or DROPS Big Merino. Knit up from the right side 36-37-39-41-43-44 stitches from the bottom of the armhole up to the shoulder and 36-37-39-41-43-44 stitches from the shoulder down to the bottom of the armhole on the other side = 72-74-78-82-86-88 stitches. Insert 1 marker in the middle of the row – the sleeve is measured from here and the marker is also used when positioning the pattern. Start from the wrong side and work A.5 as follows: Count outwards from the symbol marking the middle of the diagram and the marker on the sleeve to determine where to start the pattern and work A.5 back and forth with 1 garter stitch on each side. When the sleeve measures 1-1-2-3-4-4 cm from the marker, join the sleeve and finish working in the round, with short circular needle/double pointed needles size 5 mm. Insert 1 marker-thread at the beginning of the round (mid-under sleeve). Allow the thread to follow your work onwards. Start at the marker-thread and continue A.5 in the round (the symbol in the diagram and the marker on the sleeve should still match each other – the pattern will not fit under the sleeve). When the sleeve measures 5-3-4-5-6-8 cm from the marker, decrease 2 stitches under the sleeve – read DECREASE TIP-2. Decrease like this every 3-3-3-2½-2½-2½ cm a total of 14-15-15-17-17-18 times = 44-44-48-48-52-52 stitches. When A.5 is finished in height, work A.1 over all stitches. Work until the sleeve measures 52-50-51-50-49-48 cm from the marker (5 cm left, try the jumper on and work to desired length). Knit 1 round and increase 8 stitches evenly spaced = 52-52-56-56-60-60 stitches. Change to double pointed needles size 3.5 mm. Work rib (knit 2, purl 2) for 5 cm. Cast off a little loosely. The sleeve measures approx. 57-55-56-55-54-53 cm from the marker. Work the other sleeve in the same way. Sew together the openings under each sleeve – see sketch. DOUBLE NECK: Start on one shoulder, with short circular needle size 3.5 mm, and knit up 80-96-96-104-112-112 stitches around the neckline inside 1 edge stitch (including the stitches on the thread). Work rib in the round (knit 4, purl 4 – adjusting so you get purl 4 or knit 4 mid-front). Insert a marker when the neck measures 4 cm; this is used to measure from. Continue with knit 2, purl 2 for a further 9 cm. Change to 5 mm short circular needle. Cast off with knit over knit and purl over purl. Fold the second rib (knit 2, purl 2) to the inside and sew down. To avoid the neck being tight and rolling outwards, it is important that the seam is elastic. |
|||||||||||||
Diagram explanations |
|||||||||||||
|
|||||||||||||

|
|||||||||||||
|
|||||||||||||
|
|||||||||||||
Have you finished this pattern?Tag your pictures with #dropspattern #linesinthesandsweater or submit them to the #dropsfan gallery. Do you need help with this pattern?You'll find 29 tutorial videos, a Comments/Questions area and more by visiting the pattern on garnstudio.com. © 1982-2025 DROPS Design A/S. We reserve all rights. This document, including all its sub-sections, has copyrights. Read more about what you can do with our patterns at the bottom of each pattern on our site. |
|||||||||||||


With over 40 years in knitting and crochet design, DROPS Design offers one of the most extensive collections of free patterns on the internet - translated to 17 languages. As of today we count 314 catalogues and 11820 patterns translated into English (UK/cm). 11820
We work hard to bring you the best knitting and crochet have to offer, inspiration and advice as well as great quality yarns at incredible prices! Would you like to use our patterns for other than personal use? You can read what you are allowed to do in the Copyright text at the bottom of all our patterns. Happy crafting!
Post a comment to pattern DROPS 246-12
We would love to hear what you have to say about this pattern!
If you want to leave a question, please make sure you select the correct category in the form below, to speed up the answering process. Required fields are marked *.