
Popular categories
Looking for a yarn?


Comments / Questions (41)
![]() Sabine Beugel wrote:
Sabine Beugel wrote:
Liebes Drops-Team, habe gerade das selbe Problem wie Ulli vom 18.12.2021. Könnten Sie bitte die Anleitung beim Abschnitt "Knopflöcher" vervollständigen. Dort fehlt ein Textteil. "Das erste Knopfloch einarbeiten, wenn in der ersten Reihe nach das Rippenmuster der Halsblende eine Länge von. " Könnten Sie bitte die Zentimeterzahl angeben Lieben Dank
09.02.2022 - 19:36DROPS Design answered:
Liebe Frau Beugel, danke für den Hinweis, wir werden Anleitung sofort wie möglich korrigieren; wie früher beantwortet soll das 1. Knopfloch eingearbeitet werden, sofort nach dem Rippenmuster der Halsblende, dh nach den 16 cm Rippenmuster (bei der Hinreihe zusammen mit den Zunahmmen). Viel Spaß beim stricken!
10.02.2022 - 09:04
![]() Dawn Eckensviller wrote:
Dawn Eckensviller wrote:
This sweater does not appear to be done in Super Bulky yarn. I am wondering if this is catagorized by European terms and it may be different in Canada?? I am moving and unable to order wool right now but have not been able to find a suitable replacement in available wool here. Do you have any suggestions?
19.01.2022 - 17:58DROPS Design answered:
Dear Mrs Eckensviller, read more about this yarn here and find the list of DROPS Stores in Canada contacting Nordic Yarn here; so that they will be able to help you. Happy knitting!
20.01.2022 - 09:03
![]() Babette Lopez wrote:
Babette Lopez wrote:
Can I buy the pattern? My eyes are bad and I enlarge the pattern for my use. Thank you
16.01.2022 - 18:37DROPS Design answered:
Dear Babette, all of our patterns are free. For more comfortable use, you can download it by clicking on the print button and then, on the printer options, selecting Save as PDF; or you can print the pattern. Happy knitting!
16.01.2022 - 20:39
![]() Jenny wrote:
Jenny wrote:
After putting stitches on a thread (for sleeves) where do the cast on stitches (=in side under sleeve)go? Are they purled right away or knit in next row? Also, I don't understand this about starting the sleeves, "knit up one stitch in each of the ( ) stitches cast on under the sleeve". Thank you
13.01.2022 - 17:05DROPS Design answered:
Hi Jenny, The cast-on stitches under the sleeves are to cover the gap left by the sleeve stitches you placed on threads. So you cast on the right number of stitches under the first sleeve, continue working on the back piece, cast on stitches under the second sleeve and continue over the front piece. The cast-on stitches are now the bottom of the armhole and when you come to working the sleeves in the round, you knit up stitches in these cast-on stitches to cover the gap between the sleeve stitches at the bottom of the armhole. Hope this helps and happy knitting!
14.01.2022 - 06:59
![]() Katharina wrote:
Katharina wrote:
Hallo, wenn ich für die Maschenprobe eine größere Nadel nehmen muss, sollte ich dann die zweite Nadel auch größer wählen? Also statt 8 und 6 besser 9 und 7 nehmen? Viele Grüße, Katharina
02.01.2022 - 21:53DROPS Design answered:
Liebe Katharina, ja genau, sollten Sie Nadeln Nr 9 für die Maschenprobe brauchen, dann nehmen Sie Nadeln Nr 7 für das Rippenmuster/Bündchen. Viel Spaß beim stricken!
03.01.2022 - 12:38
![]() Ulli wrote:
Ulli wrote:
Könnten Sie bitte die Anleitung beim Abschnitt "Knopflöcher" vervollständigen. Dort fehlt ein Textteil. "Das erste Knopfloch einarbeiten, wenn in der ersten Reihe nach das Rippenmuster der Halsblende eine Länge von. " Und dann vielleicht gleich mit korrigieren, dass die Jacke von oben nach unten gestrickt wird. Im Einleitungstext steht "von unten nach oben". Ganz herzlichen Dank dafür.
18.12.2021 - 09:28DROPS Design answered:
Liebe Ulli, danke für den Hinweis, Anleitung wird korrigiert, das erste Knopfloch wird sofort nach dem Rippenmuster der Halsblende gestrickt. Viel Spaß beim stricken!
20.12.2021 - 07:21
![]() Elisabet wrote:
Elisabet wrote:
Hej, koftan ser väldigt snygg ut, men som ofta är det inte helt lätt att få en uppfattning om det, med hjälp av fotografierna. Det skulle vara bra att se den från lite olika håll, osv.
13.12.2021 - 10:15
![]() Christiane Verbeeren wrote:
Christiane Verbeeren wrote:
Waar vind ik een maattabel? Ik heb zelf echt wel een grote maat dus vraag mij af of een xxl wel past.
06.12.2021 - 00:47DROPS Design answered:
Dag Christiane,
Bij elk patroon staat een maattekening onderaan de beschrijving. Het beste kun je deze maten vergelijken met een bestaand kledingstuk, dat goed past. Op kledingmaat.nl kun je ook veel informatie vinden.
07.12.2021 - 17:11
![]() Nat wrote:
Nat wrote:
Tolle Anleitung! Leider ein kleiner Ausrutscher im Untertitel: muss heissen "von oben nach unten". Bei dieser Gelegenheit vielen Dank für die wunderbaren Modelle, klaren Anleitungen und Videotutorials, mit denen ich so viel gelernt habe. Best site ever!
06.11.2021 - 21:02
![]() Emma B wrote:
Emma B wrote:
The tention for this jacket states: KNITTING TENSION: 11 stitches in width and 15 rows in height with stocking stitch = 10 x 10 cm. With which needle size? Two different needle sizes are stated. It appears 6mm is for the rib section and 8mm for the main section. As with other patterns I presume the knitting tension count applies to the main section (8mm needles)? Thanks
06.11.2021 - 18:27DROPS Design answered:
Hi Emma, you're right, the knitting tension applies to the main section of this jacket. For your gauge you should use 8mm needles. Needle size given in the pattern is only a guide. If you get too many stitches on 10 cm, change to a larger needle size. If you get too few stitches on 10 cm, change to a smaller needle size. Happy knitting!
06.11.2021 - 19:24
|
|||||||
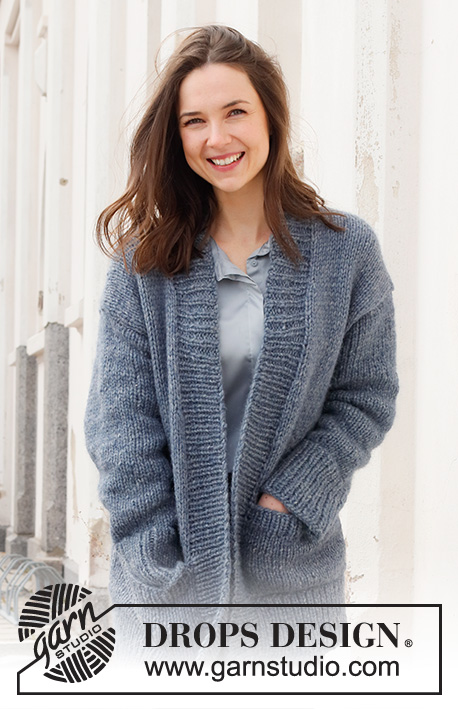
Sailor Blues Jacket#sailorbluesjacket |
|||||||
 |
 |
||||||
Knitted jacket in 1 strand DROPS Wish or 2 strands DROPS Air. The piece is worked top down with round yoke and high neck. Sizes XS - XXL.
DROPS 228-33 |
|||||||
|
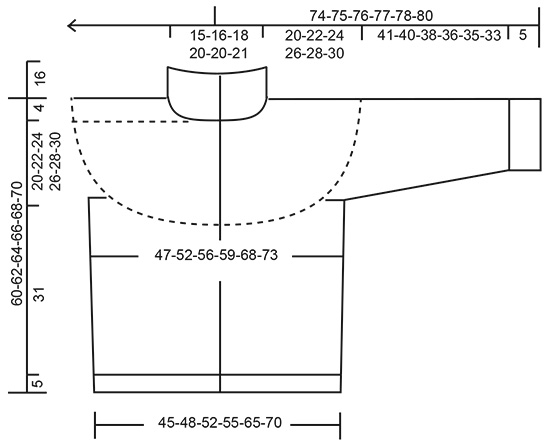
------------------------------------------------------- EXPLANATIONS FOR THE PATTERN: ------------------------------------------------------- RIDGE/GARTER STITCH (worked back and forth): Knit all rows. 1 ridge = knit 2 rows. PATTERN: See diagrams A.1 to A.3. Choose diagram for your size (applies to A.3 in sizes M, L, XL and XXL). The diagrams show all rows in the pattern from the right side. INCREASE TIP (evenly spaced): To work out how to increase evenly, count the total number of stitches on the needle (e.g. 64 stitches) minus the bands (e.g. 10 stitches) and divide the remaining stitches by the number of increases to be made (e.g. 13) = 4.1. In this example, increase by making 1 yarn over after approx. each 4th stitch. Do not increase over the bands. On the next row work the yarn overs twisted to avoid holes. DECREASE TIP (for body and sleeves): Decrease 1 stitch on either side of the marker thread as follows: Work until there are 3 stitches left before the marker thread, knit 2 together, knit 2 (marker thread sits between these 2 stitches), slip 1 stitch as if to knit, knit 1 and pass the slipped stitch over the knitted stitch. BUTTONHOLES: Work buttonholes on the right band (when the garment is worn). Work from the right side when there are 3 stitches left on the row as follows: Make 1 yarn over, knit 2 together and knit 1. On the next row (wrong side), knit the yarn over to leave a hole. The first buttonhole is worked after the neck. The other 6-6-6-7-7-7 buttonholes are worked with approx. 8½-8½-9-8-8½-8½ cm between each one. CASTING-OFF TIP: To avoid the cast-off edge being tight you can cast off with a larger size needle. If the edge is still tight, make 1 yarn over after approx. each 6th stitch at the same time as casting off; the yarn overs are cast off as normal stitches. ------------------------------------------------------- START THE PIECE HERE: ------------------------------------------------------- JACKET – SHORT OVERVIEW OF THE PIECE. The neck and yoke are worked back and forth with circular needle, from mid front and top down. The yoke is divided for body and sleeves and the body continued back and forth with circular needle. The sleeves are worked in the round with double pointed needles/short circular needle, top down. HIGH NECK: Cast on 64-68-72-76-76-80 stitches (including 5 band stitches on each side towards mid-front) with circular needle size 6 mm and 1 strand DROPS Wish or 2 strands DROPS Air. Purl 1 row (= wrong side). The next row is worked as follows from the right side: 5 band stitches in GARTER STITCH – read description above, * knit 2, purl 2 *, work from *-* until there are 7 stitches left, knit 2 and 5 band stitches in garter stitch. Work this rib for 16 cm. Knit 1 row from the right side where you increase 15-16-17-18-28-29 stitches evenly spaced – read INCREASE TIP = 79-84-89-94-104-109 stitches. Remember the BUTTONHOLES on the right band – read description above. Purl 1 row from the wrong side (yarn overs purled twisted and bands knitted). Insert 1 marker after the band at the beginning of the row; the yoke is measured from this marker! YOKE: Change to circular needle size 8 mm. Work stocking stitch with 5 band stitches in garter stitch on each side. REMEMBER THE KNITTING TENSION! When the yoke measures 4 cm from the marker increase as follows: INCREASE 1: 5 band stitches in garter stitch, 2 stitches in stocking stitch, A.1 until there are 7 stitches left (= 13-14-15-16-18-19 repeats of 5 stitches), 2 stitches in stocking stitch, 5 band stitches in garter stitch. When A.1 has been completed you have increased 26-28-30-32-36-38 stitches = 105-112-119-126-140-147 stitches. Continue with stocking stitch and 5 band stitches on each side until the yoke measures 9-10-10-11-12-13 cm from the marker. INCREASE 2: 5 band stitches in garter stitch, 3-3-4-4-5-3 stitches in stocking stitch, A.2 until there are 6-7-7-8-10-6 stitches left (= 15-16-17-18-20-22 repeats of 6 stitches), 2-3-3-4-5-2 stitches in stocking stitch, 5 band stitches in garter stitch. When A.2 has been completed you have increased 30-32-34-36-40-44 stitches = 135-144-153-162-180-191 stitches. Continue with stocking stitch and 5 band stitches on each side until the yoke measures 14-16-17-19-20-22 cm from the marker. Now continue the different sizes as follows: XS and S: 5 band stitches in garter stitch, 3-4 stitches in stocking stitch, A.2 until there are 7-9 stitches left (= 20-21 repeats of 6 stitches), 2-4 stitches in stocking stitch, 5 band stitches in garter stitch. When A.2 has been completed you have increased 40-42 stitches = 175-186 stitches. M and L: 5 band stitches in garter stitch, 2-3 stitches in stocking stitch, A.3 – choose diagram for your size, until there are 6-7 stitches left (= 20-21 repeats of 7 stitches), 1-2 stitches in stocking stitch, 5 band stitches in garter stitch. When A.3 has been completed you have increased 40-42 stitches = 193-204 stitches. XL and XXL: 5 band stitches in garter stitch, 5-3 stitches in stocking stitch, A.3 – choose diagram for your size, until there are 10-7 stitches left (= 20-22 repeats of 8 stitches), 5-2 stitches in stocking stitch, 5 band stitches in garter stitch. When A.3 has been completed you have increased 40-44 stitches = 220-235 stitches ALL SIZES: = 175-186-193-204-220-235 stitches. Continue with stocking stitch and 5 band stitches on each side until the piece measures 20-22-24-26-28-30 cm from the marker and the next row is from the wrong side. Now divide for the body and sleeves as follows: Work the first 29-30-32-33-37-40 stitches (= right front piece), place the next 35-37-38-40-40-42 stitches on 1 thread for the sleeve, cast on 4-6-8-8-10-10 stitches (= in side under sleeve), work 47-52-53-58-66-71 stitches (= back piece), place the next 35-37-38-40-40-42 stitches on 1 thread for the sleeve, cast on 4-6-8-8-10-10 stitches (= in side under sleeve), work the remaining 29-30-32-33-37-40 stitches (= left front piece). The body and sleeves are finished separately. THE PIECE IS MEASURED FROM HERE! BODY: = 113-124-133-140-160-171 stitches. Insert a marker thread in the middle of the 4-6-8-8-10-10 stitches cast on under each sleeve (= 2-3-4-4-5-5 new stitches on each side). Allow the threads to follow your work onwards; they will be used when decreasing. Work in stocking stitch with 5 band stitches in garter stitch on each side. When the piece measures 4 cm, decrease 1 stitch on each side of both marker threads – read DECREASE TIP. The decreases in XS are finished. Repeat the decrease in S, M, L, XL and XXL when the piece measures 15 cm from the division = 109-116-125-132-152-163 stitches. Continue with stocking stitch and 5 band stitches in garter stitch on each side until the piece measures 31 cm from the division. Try the jacket on and work to desired length; there is 5 cm left to finished length. To avoid the following rib being tight, increase 23-24-27-28-32-33 stitches evenly spaced = 132-140-152-160-184-196 stitches. Change to circular needle size 6 mm and work rib as follows: 5 band stitches in garter stitch, * knit 2, purl 2 *, work from *-* until there are 7 stitches left, knit 2 and 5 band stitches in garter stitch. Continue this rib for 5 cm. Cast off with knit over knit and purl over purl – read CASTING-OFF TIP. The jacket measures approx. 60-62-64-66-68-70 cm from the shoulder down. SLEEVES: Place the 35-37-38-40-40-42 stitches from the thread on the one side of the piece on double pointed needles/short circular needle size 8 mm and knit up 1 stitch in each of the 4-6-8-8-10-10 stitches cast on under the sleeve = 39-43-46-48-50-52 stitches. Insert a marker thread in the middle of the new stitches under the sleeve. Allow the thread to follow your work onwards; it will be used when decreasing. Start at the marker thread and work stocking stitch in the round for 4 cm. Now decrease 2 stitches under the sleeve – read DECREASE TIP. Decrease like this every 6-5-4-3-3-3 cm a total of 6-7-8-9-9-10 times = 27-29-30-30-32-32 stitches. Work until the sleeve measures 41-40-38-36-35-33 cm (shorter measurements in larger sizes due to wider neck and longer yoke). Try the jacket on and work to desired length; there is 5 cm left to finished length. Increase 5-7-6-10-8-8 stitches evenly spaced = 32-36-36-40-40-40 stitches. Change to double pointed needles size 6 mm. Work rib (knit 2, purl 2) for 5 cm. Cast off with knit over knit and purl over purl – remember CASTING-OFF TIP. The sleeve measures approx. 46-45-43-41-40-38 cm from the division. Work the other sleeve in the same way. ASSEMBLY: Sew the buttons onto the left band. |
|||||||
Diagram explanations |
|||||||
|
|||||||

|
|||||||
|
|||||||
Have you finished this pattern?Tag your pictures with #dropspattern #sailorbluesjacket or submit them to the #dropsfan gallery. Do you need help with this pattern?You'll find 25 tutorial videos, a Comments/Questions area and more by visiting the pattern on garnstudio.com. © 1982-2025 DROPS Design A/S. We reserve all rights. This document, including all its sub-sections, has copyrights. Read more about what you can do with our patterns at the bottom of each pattern on our site. |
|||||||


With over 40 years in knitting and crochet design, DROPS Design offers one of the most extensive collections of free patterns on the internet - translated to 17 languages. As of today we count 314 catalogues and 11820 patterns translated into English (UK/cm). 11820
We work hard to bring you the best knitting and crochet have to offer, inspiration and advice as well as great quality yarns at incredible prices! Would you like to use our patterns for other than personal use? You can read what you are allowed to do in the Copyright text at the bottom of all our patterns. Happy crafting!
Post a comment to pattern DROPS 228-33
We would love to hear what you have to say about this pattern!
If you want to leave a question, please make sure you select the correct category in the form below, to speed up the answering process. Required fields are marked *.