
Popular categories
Looking for a yarn?


Comments / Questions (19)
![]() Maria Teresa wrote:
Maria Teresa wrote:
È possibile eseguite il modello con tecnica top/down? Se si come? Grazie
25.04.2022 - 19:39DROPS Design answered:
Buonasera Maria Teresa, questo modello è stato progettato per essere lavorato dal basso verso l'alto; sul nostro sito può trovare tanti altri modelli studiati per essere lavorati dall'alto in basso. Buon lavoro!
25.04.2022 - 19:56
![]() Theo wrote:
Theo wrote:
Is er ook iemand die dit model wil breien voor mij tegen vergoeding?
12.08.2017 - 17:26
![]() Valery wrote:
Valery wrote:
Encore moi. Jai presque termine. Jen suis en 47 cm pour les manches. Je sais que cest similaire a lemmanchure pour le devant, mais jai besoin dune confirmation pour pouvoir bien le faire. Merci
28.10.2015 - 11:26DROPS Design answered:
Bonjour Valéry, à 47 cm, en taille S, vous rabattez au début de chaque rang de chaque côté (= sur l'endroit et sur l'envers): 1 fois 2 m, 2 fois 1 m, puis vous rabattez 2 m toujours au début de chaque rang de chaque côté (= sur l'endroit et sur l'envers) jusqu'à ce que la manche mesure 55 cm de hauteur totale, et rabattez les mailles restantes au rang suivant sur l'endroit (le nombre de rangs/m restantes dépendra de votre nbe de rangs en hauteur pour avoir la hauteur indiquée). Bon tricot!
28.10.2015 - 11:53
![]() Valery wrote:
Valery wrote:
Bonjour, merci pour l'aide que vous m'avez apporté Je suscite à nouveau de l'aide. Jai maintenant 62cm de fait. Je ne saisis pas le reste de ce quil faut faire. Pouvez-vous m'aider?
21.10.2015 - 02:16DROPS Design answered:
Bonjour Valery, à 62 cm, on forme les emmanchures ainsi: sur l'endroit, rabattez les 2 premières m du rang, tricotez tout le rang, tournez et au début du rang suivant sur l'envers, rabattez 2 m (= 1 fois 2 m rabattues de chaque côté). IL reste 28 m, continuez jusqu'à 74 cm de hauteur totale et rabattez les 8 m centrales pour l'encolure, et terminez chaque côté séparément en rabattant côté encolure 2 fois 1 m tous les 2 rangs. Rabattez toutes les mailles à 82 cm. Bon tricot!
21.10.2015 - 09:28
![]() Valery wrote:
Valery wrote:
Bonjour, je suis en train dessayer de faire ce patron et il y a une ligne que je ne comprend pas. Pour le devant, je viens de completer 25 cm. Je sais qua partir de la, je dois continuer au point mousse, mais jr ne comprends pas ou je dois faire les diminutions et quand est-ce que je dois les faire. Pouvez-vous maider? P.S. je ne peux aller dans un magasin car il ny en a pas au canada. Merci
17.10.2015 - 03:10DROPS Design answered:
Bonjour Valery, vous continuez effectivement au point mousse à partir de 25 cm de hauteur totale, puis à 26 cm, vous diminuez 3-2 m (cf taille), et diminuez de nouveau 2-3 m à 36-40 cm. Voir ici comment répartir des diminutions è et Cliquez ici pour la liste des revendeurs DROPS au Canada. Bon tricot!
19.10.2015 - 08:22
![]() Linda wrote:
Linda wrote:
Deze jurk wordt toch wel met dubbele draad gebreid met die wol??
11.12.2012 - 11:26DROPS Design answered:
Nee, 1 draad. Het model moet heel los gebreid worden.
11.12.2012 - 12:33
![]() Lindae wrote:
Lindae wrote:
7 m giver ikke 10 cm, men derimod 8 cm i bredden uanset hvad man gør, har været forbi flere strikkeforretninger med det og alle steder er beskeden at der er noget galt. Der bliver alt for store "huller" i forhold til billedet. Er det fordi kjolen bliver tættere efter vask at den ser tættere ud i det på billedet???
25.11.2012 - 16:11DROPS Design answered:
Modellen på billedet er altså strikket med en strikkefasthed på 7 m og 10 cm i retstrik. Sørg for at du strikker løst det er let at strikke for stramt på p 15
04.12.2012 - 11:57
![]() Lindae wrote:
Lindae wrote:
Er der ikke fejl i denne opskrift? Da jeg strikkede den som der står bliver den ALT ALT for åben, med store "huller" I strikkeforretningen var meldingen klar : "du skal strikke med dobbelt garn" Den bliver faktisk rigtig fin når man strikker den i dobbeltgarn som jeg så har gjort, men så passer garnmængden man skal købe ikke, der går så noget mere til.
25.11.2012 - 13:32DROPS Design answered:
Den bliver kun strikket med 1 traad, men modellen skal vaere ret löst strikket (p 15). Er strikkefastheden til mönstret overholdt (7 m x 14 p = 10 x 10 cm) saa er modellen som den skal vaere.
25.11.2012 - 15:45Vale wrote:
Which means Front: Cast on 36-39-42-45-47 sts and knit rib as follows???
29.06.2009 - 06:11
|
|
DROPS 83-3 |
|
|
|
|
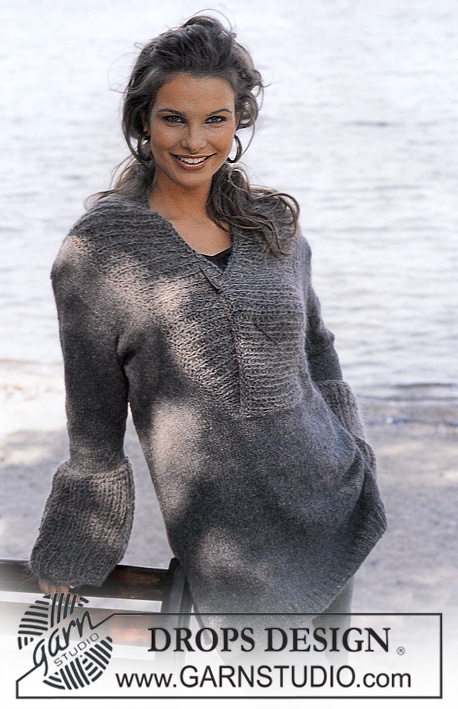
DROPS Dress in Snow
DROPS 83-3 |
|
|
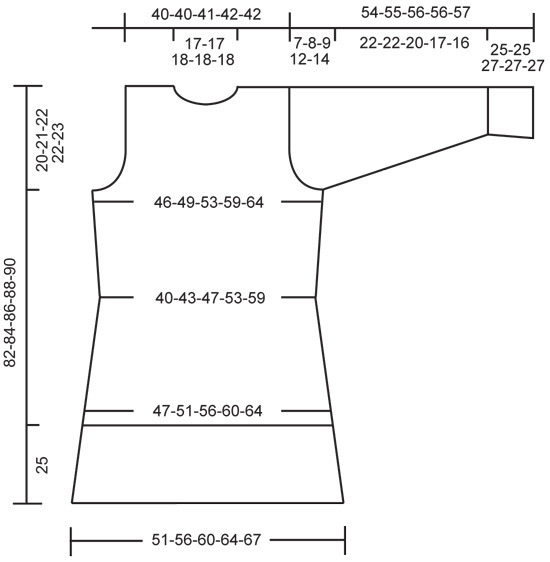
Tension: 7 sts x 14 rows in garter st = 10 x 10 cm. Rib: * K 3, P 3 *, repeat from * - *. Measuring-tips: Measure the piece when lying flat – the piece will be approx. 10-15 cm longer than the measurements on the diagram when the garment is worn. Front: Cast on 36-39-42-45-47 sts and knit rib as follows: Size S: *K 3, P 4, K 3, P 3* repeat * - *, finish with K 3, P 4, and K 3. Size M: *K 3, P 3, K 3, P 4*, repeat * - * Size L: *K 3, P 3, K 3, P 4*, repeat * - *, finish with K 3. Size XL: *K 3, P 3, K 3, P 4*, repeat * - *, finish with K 3, P 3. Size XXL: *K 3, P 3, K 3, P 3, K 3, P 4*, repeat * *, finish with K 3, P 3, K 3. When the piece measures 10 cm dec all P 4 to P 3 = 33-36-39-42-45 sts. When the piece measures 25 cm – adjust so that the next row is a right side row – then knit garter st to finished measurements. When the piece measures 26 cm dec 3-3-3-3-2 sts evenly distributed. Then dec 2-3-3-2-2 sts evenly distributed when the piece measures 36-37-38-39-40 cm = 28-30-33-37-41 sts. When the piece measures 46-47-48-49-50 cm inc 1 st at each side. Repeat inc when the piece measures 55-56-57-58-59 cm = 32-34-37-41-45 sts. When the piece measures 62-63-64-66-67 cm – see Measuring-tips above – bind off for armhole at each side every other row: 2 sts 1-1-1-2-2 times and 1 st 0-1-2-2-4 times = 28-28-29-29-29 sts. When the piece measures 74-76-78-80-82 cm bind off the center 8-8-9-9-9 sts for the neck. Dec 1 st at each neck edge every other row: 2 times = 8 sts remain on each shoulder. Bind off when the piece measures 82-84-86-88-90 cm. Back: Cast on the same as the front, and knit rib as follows: Size S: P 3, *K 3, P 4, K 3, P 3* repeat * - *, finish with K 3 and P 4. Size M: *K 3, P 3, K 3, P 4*, repeat * - * Size L: *P 3, K 3, P 4, K 3*, repeat * - *, finish with P 3. Size XL: *K 3, P 3, K 3, P 4*, repeat * - *, finish with K 3, P 3. Size XXL: * P 3, K 3, P 3, K 3, P 4, K 3 *, repeat * *, finish with P 3, K 3, P 3. When the piece measures 10 cm dec all P 4 to P 3 = 33-36-39-42-45 sts, and then continue as on front. Bind off for armhole as on front. When the piece measures 80-82-84-86-88 bind off the center 10-10-11-11-11 sts for the neck. On the next row dec 1 st at each neck edge = 8 sts remain on each shoulder. Bind off when the piece measures 82-84-86-88-90 cm. Sleeve: Cast on 26-26-28-28-28 sts and knit rib as follows: Sizes S + M: * K 3, P 4, K 3, P 3 *, repeat * - *. Sizes L + XL + XXL: *K 3, P 4*, repeat * - * When the piece measures 7 cm dec all P 4 to P 3 = 24 sts. When the piece measures 25-25-27-27-27 cm – adjust so that the next row is a right side row – change to garter st to finished measurements. On the 1st row of garter st adjust evenly distributed to 22-22-24-24-26 sts. When the piece measures 33 and 42 cm inc 1 st at each side = 26-26-28-28-30 sts. When sleeve measures 47-47-47-44-43 cm bind off for sleeve cap at each side every other row: 2 sts 1 time, 1 st 2-3-4-6-8 times, then 2 sts at each side until piece measures approx. 55-55-56-56-57 cm. Bind off the remaining sts. Assembly: Sew right shoulder. Collar: Pick up 29-32 sts around the neck and K 1 row from wrong side and K 1 row from right side. On the 2nd row adjust to 30-30-30-35-35 sts (divisible by 5). Knit the next row (wrong side) as follows: * K 3, P 2 *, repeat * - * (from the right side the rib will be K 2/ P 3). Continue with rib over all sts. When the collar measures 10 cm inc every other K 2 to K 3 = 33-33-39-39-39 sts. When the piece measures 20 cm inc the remaining K 2 to K 3 = 36-36-42-42-42 sts (the rib = K 3/ P 3). When the piece measures 30 cm inc every other K 3 to K 4 = 39-39-46-46-46 sts. When the piece measures 35 cm inc the remaining K 3 to K 4 = 42-42-49-49-49 sts (the rib = K 4/ P 3 seen from the right side). When the piece measures 40 cm bind off all sts in rib, increasing 3 sts evenly distributed on the row so that the bound-off edge will not be too tight. Sew left shoulder and up along the collar. Sew in sleeves. Sew sleeve and side seams in one. |
|
 |
|
Have you finished this pattern?Tag your pictures with #dropspattern or submit them to the #dropsfan gallery. Do you need help with this pattern?You'll find 16 tutorial videos, a Comments/Questions area and more by visiting the pattern on garnstudio.com. © 1982-2026 DROPS Design A/S. We reserve all rights. This document, including all its sub-sections, has copyrights. Read more about what you can do with our patterns at the bottom of each pattern on our site. |


With over 40 years in knitting and crochet design, DROPS Design offers one of the most extensive collections of free patterns on the internet - translated to 17 languages. As of today we count 324 catalogues and 12245 patterns translated into English (UK/cm). 12245
We work hard to bring you the best knitting and crochet have to offer, inspiration and advice as well as great quality yarns at incredible prices! Would you like to use our patterns for other than personal use? You can read what you are allowed to do in the Copyright text at the bottom of all our patterns. Happy crafting!
Post a comment to pattern DROPS 83-3
We would love to hear what you have to say about this pattern!
If you want to leave a question, please make sure you select the correct category in the form below, to speed up the answering process. Required fields are marked *.