
Popular categories
Looking for a yarn?


Comments / Questions (15)
![]() Manon Roy wrote:
Manon Roy wrote:
Hi!, I just started to knit the Arctic Tide pull and I was wondering... for the beginning of the yoke... the pattern indicate to work 2 stitches in stockinette stitch and insert a marker between those 2 stitches then work pattern over 14 stitches... the pattern is over 4 stitches so my guess is that the first 2 stitches are to be take in consideration in the pattern. 14 divided by 4 is not good.. Could you please specify in details how to knit the Yoke to incorporate the chart,
27.03.2021 - 11:15DROPS Design answered:
Dear Manon, Stitches that would not fit into a pattern repeat (because of increasing or decreasing) are knitted in stockinett stitch, and reincorporated as the number of stotches allows. Happy Knitting!
28.03.2021 - 11:56
![]() Maya wrote:
Maya wrote:
Bonjour, lorsqu'on tricote en rond le dos et le devant, doit-on tricoter également les mailles montées pour sous les manches (avec le motif, puis en jersey)?
08.03.2021 - 18:03DROPS Design answered:
Bonjour Maya, tu as raison. Bon tricot!
09.03.2021 - 06:30
![]() Carole wrote:
Carole wrote:
Kunnen er ook haakpatronen voor truien en vesten van heren komen? Er zijn zo weinig haakpatronen te vinden voor heren!
22.01.2021 - 19:14
![]() Nelleke wrote:
Nelleke wrote:
Patroon raglan komt niet uit wilt u meedenken? Vr gr Nelleke
15.01.2021 - 13:31DROPS Design answered:
Dag Nelleke,
Kan je aangeven waar je precies tegenaan loopt en welke maat je breit? Dan kunnen we je wellicht beter helpen.
17.01.2021 - 11:26
![]() Astrid wrote:
Astrid wrote:
Ist es richtig, dass der kragennach aussen geklappt wird? Das sieht auf den Fotos anders aus.
27.11.2020 - 11:55DROPS Design answered:
Liebe Astrid, Kragen können Sie nach innen oder nach aussen umschlagen, wie Sie es am besten haben. Viel Spaß beim stricken!
30.11.2020 - 07:34
|
|||||||
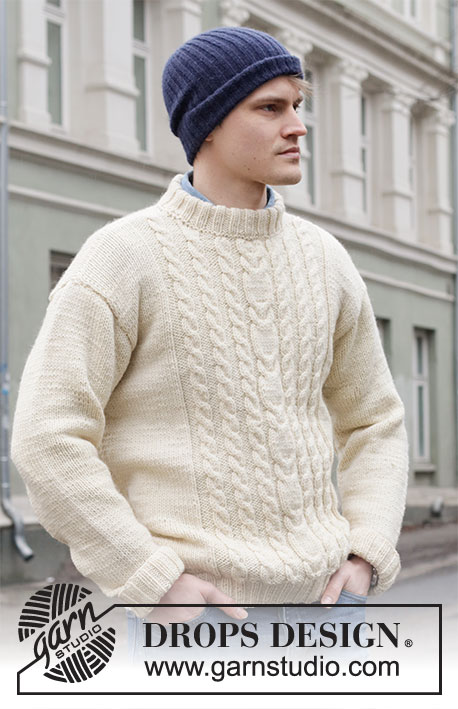
Arctic Tide#arctictidesweater |
|||||||
 |
 |
||||||
Knitted jumper with raglan for men in DROPS Air. Piece is knitted top down with textured pattern and stocking stitch. Size: S - XXXL
DROPS 219-5 |
|||||||
|
---------------------------------------------------------- EXPLANATION FOR THE PATTERN: ---------------------------------------------------------- PATTERN: See diagram A.1 and A.2. Diagrams show all rows in pattern seen from the right side. INCREASE TIP (evenly): To calculate how to increase use the total number of stitches on row (e.g. 72 stitches) divide stitches by number of increases to be done (e.g. 12) = 6. In this example increase by making 1 yarn over after every 6th stitch. On next round work yarn overs twisted to avoid holes. RAGLAN: Increase for raglan every other round, increase 1 stitch on each side of 2 stitches in stocking stitch in every transition between body and sleeves (= 8 stitches increased on round). Increase 1 stitch by making 1 yarn over. On next round knit yarn overs twisted to avoid holes. Then work the new stitches in pattern. DECREASE TIP: Decrease 1 stitch on each side of marker as follows: Work until 3 stitches remain before marker, knit 2 together, knit 2 (marker is between these stitches), slip 1 stitch knitwise, knit 1, pass slipped stitch over stitch worked. CAST-OFF TIP: To avoid a tight cast-off edge you may use a larger needle. If this also is too tight, make 1 yarn over after approx. every 4th stitch and cast off these as regular stitches. ---------------------------------------------------------- START THE PIECE HERE: ---------------------------------------------------------- JUMPER - SHORT OVERVIEW OF THE PIECE: Work neck edge and yoke in the round top down, then divide the piece into body and sleeves. Work body in the round on circular needle. Work sleeves in the round on double pointed needles/a short circular needle. NECK EDGE: Cast on 68-72-80-88-88-104 stitches on circular needle size 4.5 mm with Air. Knit 1 round, then work rib knit 2 and purl 2 until piece measures approx. 9 cm. Knit 1 round and increase 12 stitches evenly - read INCREASE TIP in explanation above = 80-84-92-100-100-116 stitches. YOKE: Switch to circular size 5 mm and insert a marker thread on this round, this is used for measurement later. Now insert 4 markers in the piece while AT THE SAME TIME working as follows (beginning of round is between back piece and sleeve): Work 2 stitches in stocking stitch and insert a marker between these 2 stitches, work pattern A.1 over 10-10-14-14-14-18 stitches (= sleeve), work 2 stitches in stocking stitch and insert a marker between these 2 stitches, work pattern A.1 over 26-28-28-32-32-36 stitches (= front piece), work 2 stitches in stocking stitch and insert a marker between these 2 stitches, work pattern A.1 over 10-10-14-14-14-18 stitches, work 2 stitches in stocking stitch and insert a marker between these 2 stitches, and work pattern A.1 over 26-28-28-32-32-36 stitches (= back piece). READ ALL OF THE FOLLOWING SECTION BEFORE CONTINUING! On next round begin increase for RAGLAN - read explanation above, continue with pattern A.1. REMEMBER THE KNITTING TENSION! When piece measures 9-10-11-12-13-14 cm from marker thread work pattern A.2 over all stitches - continue increase for raglan but now work the 2 stitches in raglan line as stitches in pattern A.2 (work also the increased stitches into pattern A.2). When diagram A.2 has been worked 1 time vertically, continue with pattern A.1, work raglan stitches in stocking stitch and work the increased stitches into pattern A.1. Continue pattern like this increasing 21-24-26-28-31-33 times in total for raglan = 248-276-300-324-348-380 stitches on row. Continue with pattern as before without increase until piece measures 21-23-24-26-28-30 cm from marker thread. Beginning of round is before the 2 stitches in raglan line between back piece and sleeve, and when dividing piece into sleeves and body, work according to diagram A.2 as follows from beginning of round: Work the first 4-3-4-4-6-6 stitches (= back piece), slip the next 48-56-62-66-68-72 stitches on a stitch holder (= sleeve), cast on 6-6-8-8-8-8 new stitches on needle (= in the side under sleeve), work 76-82-88-96-106-118 stitches (= front piece), slip the next 48-56-62-66-68-72 stitches on a stitch holder (= sleeve), cast on 6-6-8-8-8-8 new stitches on needle (= in the side under sleeve), work the last 72-79-84-92-100-112 stitches (= the rest of back piece, 76-82-88-96-106-118 stitches in total on back piece). BODY: = 164-176-192-208-228-252 stitches. Then work in the round according to diagram A.2. When diagram has been worked vertically, continue in stocking stitch. Insert a new marker in middle of the new stitches cast on in each side. When piece measures approx. 4 cm from division, decrease 1 stitch on each side of marker in each side - read DECREASE TIP in explanation above. Repeat decrease approx. every 6-8-8-8-8-6 cm 4-3-4-4-4-5 times in total = 148-164-176-192-212-232 stitches. Work until piece measures 31-31-32-32-32-32 cm from division. Switch to circular needle size 4.5 mm and work rib with knit 2/purl 2 for 5 cm. Loosely cast off stitches with knit over knit and purl over purl. Piece measures approx. 62-64-66-68-70-72 cm from shoulder. SLEEVE: Slip the 48-56-62-66-68-72 stitches from one stitch holder on a short circular needle or double pointed needles size 5 mm and pick in addition up 6-6-8-8-8-8 stitches in each of the new stitches cast on in the side on body = 54-62-70-74-76-80 stitches. Insert a marker in the middle of the 6-6-8-8-8-8 new stitches picked up under sleeve = beginning of round. Then work in the round according to diagram A.2, when diagram has been worked vertically, continue in stocking stitch. When piece measures approx. 4 cm from division, decrease 1 stitch on each side of marker, repeat decrease approx. every 2-3-2-2-2-2 cm 7-11-15-15-16-18 times in total = 40-40-40-44-44-44 stitches on needle. Work until piece measures approx. 44-42-42-41-40-40 cm from division (or work to desired length, approx. 5 cm remain until finished measurements). Switch to double pointed needles size 4.5 mm and work rib with knit 2/purl 2 for 5 cm. Loosely cast off with knit over knit and purl over purl on next round. Work the other sleeve the same way. ASSEMBLY: Fold the neck outwards towards right side. Fasten cast-on edge - sew with neat little stitches from the wrong side of the jumper (make sure to make the seam invisible from the right side and to avoid a tight seam). |
|||||||
Diagram explanations |
|||||||
|
|||||||

|
|||||||
Have you finished this pattern?Tag your pictures with #dropspattern #arctictidesweater or submit them to the #dropsfan gallery. Do you need help with this pattern?You'll find 28 tutorial videos, a Comments/Questions area and more by visiting the pattern on garnstudio.com. © 1982-2025 DROPS Design A/S. We reserve all rights. This document, including all its sub-sections, has copyrights. Read more about what you can do with our patterns at the bottom of each pattern on our site. |
|||||||


With over 40 years in knitting and crochet design, DROPS Design offers one of the most extensive collections of free patterns on the internet - translated to 17 languages. As of today we count 314 catalogues and 11820 patterns translated into English (UK/cm). 11820
We work hard to bring you the best knitting and crochet have to offer, inspiration and advice as well as great quality yarns at incredible prices! Would you like to use our patterns for other than personal use? You can read what you are allowed to do in the Copyright text at the bottom of all our patterns. Happy crafting!
Post a comment to pattern DROPS 219-5
We would love to hear what you have to say about this pattern!
If you want to leave a question, please make sure you select the correct category in the form below, to speed up the answering process. Required fields are marked *.