
Popularne kategorie
Szukasz włóczki?


Komentarze / Pytania (30)
![]() Louise napisała::
Louise napisała::
Ik begrijp niet goed hoe ik moet meerderen bij de mouwen. Dit omdat wanneer ik meerder, het telpatroon niet meer klopt. Hoe kan ik meerderen en het telpatroon behouden?
11.12.2022 - 22:23Odpowiedź DROPS Design :
Dag Louise,
Het telpatroon wordt inderdaad verbroken door het meerderen onder de mouwen, hier is niets aan te doen. Probeer het telpatroon zo ver mogelijk door te laten lopen, indien mogelijk.
12.12.2022 - 20:31
![]() Francoise Lucienne napisała::
Francoise Lucienne napisała::
Bonsoir encore merci a bientot
07.02.2022 - 17:56
![]() Francoise Lucienne napisała::
Francoise Lucienne napisała::
Bonsoir pourquoi on a au début 232 mailles et après 112 merci bonne soirée
06.02.2022 - 19:57Odpowiedź DROPS Design :
Bonjour Mme Lucienne, vous tricotez d'abord le bas du pull en rond, sur 232 mailles, puis vous rabattez les mailles des emmanchures (4 de chaque côté) et terminez chaque partie séparément soit: 4 mailles rabattues de chaque côté + 112 m pour le devant + 112 m rabattues pour le dos = 4+112+4+112= 232 m. Bon tricot!
07.02.2022 - 11:10
![]() Leen Sels napisała::
Leen Sels napisała::
Welke naalddikte gebruik ik best? Safran geeft volgens het label in tricot op nld3 een verhouding van 24st op 10cm. Ik brei vrij vast en heb nld4 nodig om in tricot deze verhouding te krijgen. Volgens het patroon heb je nld3,5 nodig om met teltekening een verhouding van 23st op 10cm te krijgen. Met nld4 heb ik 30st op 10cm. Met nld5 heb ik 25st op 10cm, maar dit is al vrij los gebreid (doorschijnend en losser dan op de foto) en ik zou nog omhoog moeten gaan naar nld 5,5 of 6. Klopt dit wel?
16.05.2021 - 21:08Odpowiedź DROPS Design :
Dag Leen Sels,
Ja, de stekenverhouding zoals aangegeven in het patroon klopt. Je hebt 23 steken op 10 cm in de breedte. Met name de breedte is van belang in dit geval bij de stekenverhouding. In deze link vind je meer informatie over de stekenverhouding.
20.05.2021 - 16:52
![]() Petra napisała::
Petra napisała::
Wat betekend sm ik dacht 2 samen breien. Daarna een omslag, ik krijg dan gaatjes klopt dit. Gr Petra
03.04.2021 - 14:32
![]() Myrna Laupland napisała::
Myrna Laupland napisała::
Ribbed Fantasy Should I do the neck ribbing and sew in the sleeves before or after blocking? Thank you
08.11.2020 - 05:31Odpowiedź DROPS Design :
Dear Mrs Laupland, some knitters always block, some other never - so this look to be just a personnal question. Contact your DROPS store for any further individual assistance. Happy knitting!
09.11.2020 - 10:42
![]() Fata Viden napisała::
Fata Viden napisała::
Kan jag få beskrivning på svenska tack på förhand Mvh //Fata
20.10.2020 - 17:40Odpowiedź DROPS Design :
Hej. Under bilden kan du ändra språk så att du får mönstret på svenska. Mvh DROPS Design
21.10.2020 - 09:48Carol napisała::
I've finally gotten the courage to pick it up again, but (sorry) I still don't understand how I'm meant to work the front & back separately with new yarn whilst on circular needles. Do I need to work back & forth, front & back separately, on straight needles, keeping half of the work on a stitch holder? I'm getting discouraged. Thanks.
04.12.2017 - 08:39Odpowiedź DROPS Design :
Dear Carol, that's right, just slip the sts on back piece onto a stitch holder/a thread and work the sts for front piece back and forth on straight (or circular) needle. Happy knitting!
04.12.2017 - 10:38Carol napisała::
Thanks for your reply. When you say: "Cut the yarn and continue front piece separately with 1st st on needle for front piece... " you don't take into account that the first stitch on the needle is actually two bound-off stitches away from the front, so there's a hole. If I can figure out a way to overcome that, do I then have to work it back & forth, not in a circle? Do I need extra needles? Thanks for your speedy reply.
27.11.2017 - 20:52Odpowiedź DROPS Design :
Dear Carol, you should bind off the last 2 sts on round so that there are 4 sts bound off on each side for armholes (= no st should remain on the side). Then work each piece separately with new yarn. Happy knitting!
28.11.2017 - 08:58Carol napisała::
I'm just at the point where I'm meant to bind off 2 or 4 stitches to begin the armhole, but I end up left with one stitch in the middle of a bound-off section. I have no idea how to proceed with this, and I've never worked in the round before. Can you explain how I proceed? It says I should work the front and back separately, so does that mean I add another ball of yarn and continue in the round? I'm completely confused! Thanks! Carol
26.11.2017 - 11:18Odpowiedź DROPS Design :
Dear Carol, you bind off for the armholes 2 sts at beg of round (half 1st armhole), 4 sts for 2nd armhole and the last 2 sts on round for 1st armhole (= 2nd half). Cut the yarn and continue front piece separately with 1st st on needle for front piece. Happy knitting!
27.11.2017 - 10:14
|
|||||||
Ribbed Fantasy |
|||||||
 |
 |
||||||
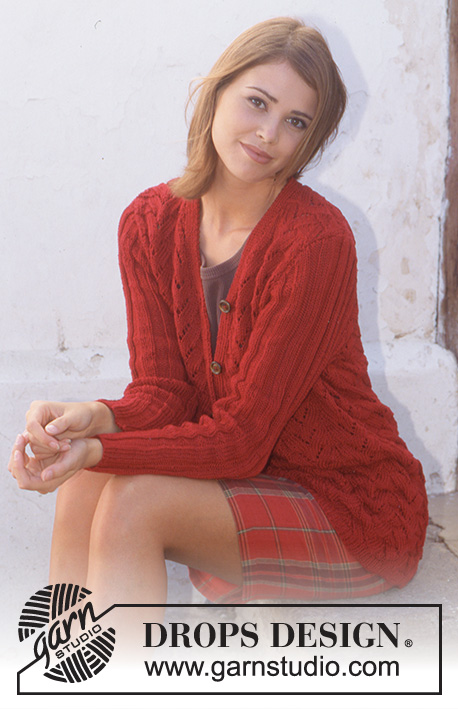
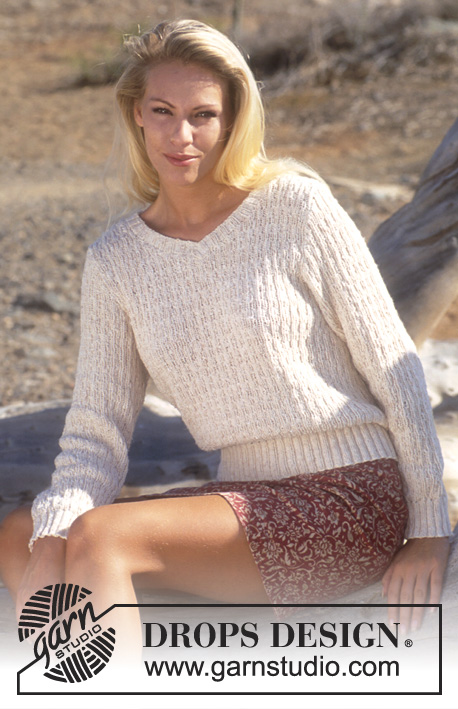
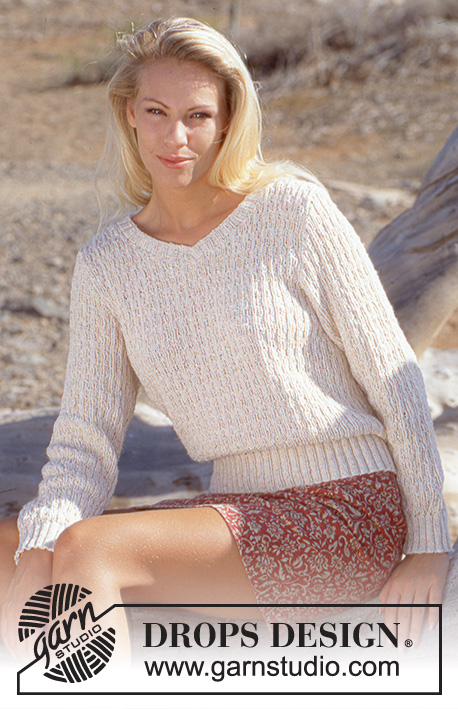
Sweter na drutach z włóczki DROPS Safran
DROPS 56-8 |
|||||||
|
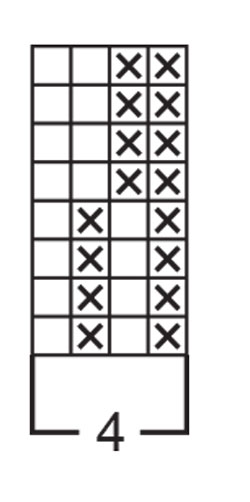
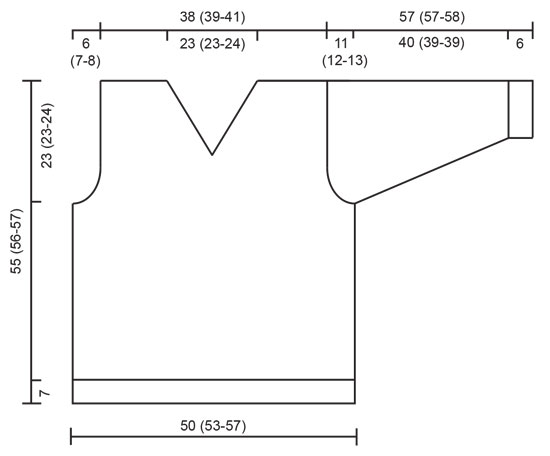
Próbka: 23 oczka x 30 rzędów ściegiem fantazyjnym na drutach nr 3,5 = 10 x 10 cm Ściągacz: *2 oczka prawe, 2 oczka lewe *, powtarzać od * do *. ŚCIEG FANTAZYJNY: patrz schemat poniżej. Schemat przedstawia motyw na prawej stronie robótki. Tył & przód: Na drutach z żyłką nr 2,5 nabrać 232-244-260 oczek. Połączyć na okrągło i umieścić 1 marker na początku okrążenia. Przerabiać 7 cm ściągaczem. Dalej przerabiać na drutach z żyłką nr 3,5 i przerobić kolejne okrążenie: *2 oczka razem na prawo, 1 narzut *, powtarzać od * do * przez całe okrążenie. Dalej przerabiać ściegiem fantazyjnym. Na wys. 32-33-33 cm przerabiać następny rząd: zamknąć 2 oczka na podkrój rękawa, 112-118-126 oczek na przód, zamknąć 4 oczka na podkrój rękawa, 112-118-126 oczek na tył, zamknąć 2 oczka na podkrój rękawa. Kończyć każdą część oddzielnie. Przód: = 112-118-126 oczek. Zamykać z każdej strony co 2 rzędy na podkroje rękawów: 2 razy 3 oczka, 2-3-3 razy 2 oczka i 2-2-4 razy 1 oczko = 88-90-94 oczka. Na wys. 43-44-45 cm podzielić robótkę na środku przodu i zamykać oczka na dekolt V co 2 rzędy: 1 raz 3 oczka, 10 razy 2 oczka i 2-3-4 razy 1 oczko; dalej co 4 rzędy: 1 raz 1 oczko. Na wys. 55-56-57 cm zamknąć wszystkie oczka. Tył: = 112-118-126 oczek. Formować podkroje rękawów jak na przodzie = 88-90-94 oczka. Na wys. 53-54-55 cm zamknąć na dekolt 46-48-50 oczek środkowych, dalej zamykać od strony dekoltu co 2 rzędy: 1 raz 2 oczka i 1 raz 1 oczko. Zamknąć wszystkie oczka na wys. 55-56-57 cm. Rękawy: Na drutach pończoszniczych nr 2,5 nabrać 60-64-64 oczka. Połączyć na okrągło i umieścić 1 marker na początku okrążenia. Przerabiać 6 cm ściągaczem, dalej przerabiać na drutach pończoszniczych nr 3,5 i przerabiać następne okrążenie: *2 oczka razem na prawo, 1 narzut *, powtarzać od * do * przez całe okrążenie. Dalej przerabiać ściegiem fantazyjnym, a w tym samym czasie dodać 1 oczko z każdej strony markera; powtarzać dodawanie oczek 21-20-21 razy: Rozmiar S i L: co 5 rzędów; Rozmiar M: na przemian co 5 i 6 rzędów = 102-104-106 oczek. Na wys. 46-45-45 cm zamknąć 2 oczka z każdej strony markera i dalej przerabiać w tę i z powrotem zamykając z każdej strony co 2 rzędy: 4-3-3 razy 3 oczka, 8-11-13 razy 2 oczka i 4-3-3 razy 3 oczka, zamknąć wszystkie oczka w następnym rzędzie. Wykończenie: Zszyć ramiona. Na drutach nr 2,5 nabrać ok. 142 – 162 oczek (liczba oczek podzielna przez 4 + 2 ) wokół dekoltu. Przerabiać ściągaczem w tę i z powrotem od środka przodu przez 2,5 cm. Zakończyć. Prawą stronę wykończenia dekoltu ułożyć na lewej i zszyć. Wszyć rękawy. |
|||||||
Objaśnienia do schematu |
|||||||
|
|||||||
 |
|||||||
 |
|||||||
Skończyłaś ten wzór?Otaguj swoje zdjęcia #dropspattern lub prześlij je do #dropsfan gallery. Potrzebujesz pomocy w związku z tym wzorem?Zobacz 18 instrukcje video, sekcję Komentarze/Pytania i jeszcze więcej, wchodząc na stronę wzoru na garnstudio.com © 1982-2026 DROPS Design A/S. Wszelkie prawa zastrzeżone. Ten dokument, w całości, jest chroniony prawem. Zobacz co możesz robić z naszymi wzorami na dole każdego wzoru na naszej stronie. |
|||||||


Posiadając 40 lat doświadczenia w projektowaniu wzorów na druty i szydełko, DROPS Design oferuje jedną z największych kolekcji bezpłatnych wzorów w internecie – przetłumaczonych na 17 języków. Obecnie jest dostępnych 324 katalogów i 12290 wzorów w języku polskim.
Dokładamy wszelkich starań, aby oferować Wam druty i szydełka, inspiracje, fachowe porady oraz doskonałej jakości włóczki w najlepszych cenach! Zamierzasz wykorzystać nasze wzory inaczej niż tylko do osobistego użytku? Przeczytaj jakie masz prawa w Copyright, który znajdziesz na końcu każdego wzoru. Miłej pracy!
Dodaj komentarz do modelu DROPS 56-8
Chcielibyśmy się dowiedzieć co masz do powiedzenia o tym wzorze!
Jeśli chcesz zadać pytanie i szybko uzyskać odpowiedź, upewnij się, że została wybrana właściwa kategoria w formularzu poniżej. Pola obowiązkowe są oznaczone *.