
Popularne kategorie
Szukasz włóczki?


Komentarze / Pytania (109)
![]() CHATILLON napisała::
CHATILLON napisała::
Bonjour, nous aimerions avoir le diagramme complet pour realiser ce pull. Merci par avance Cordialement Me CHATILLON
18.11.2018 - 17:00Odpowiedź DROPS Design :
Bonjour Mme Chatillon, nous n'avons pas de diagramme complet pour chaque taille, suivez bien attentivement en même temps les diagrammes et les explications pour votre taille. Bon crochet!
19.11.2018 - 09:08
![]() Dina napisała::
Dina napisała::
I am sorry to say that my yoke size is small to start the diagram so May I add more rows to increase its length and to be under bust as shown in the photo ...or I had to repeat work by adding more rows in the WS ie working row 1RS then 3more rows then row 2RS then 3more rows and so on????!please advice
06.08.2018 - 17:02Odpowiedź DROPS Design :
Dear Dina, make sure to check and keep your tension, you should have 18 dc x 9 rows = 10 x 10 cm - if your tension is still too tight in height you can adjust the yoke length working some more rows evenly between the rows with increases. Hapy crocheting!
07.08.2018 - 09:44
![]() Dina napisała::
Dina napisała::
I am sorry to say that my yoke size is small to start the diagram so May I add more rows to increase its length and to be under bust as shown in the photo ...or I had to repeat work by adding more rows in the WS ie working row 1RS then 3more rows then row 2RS then 3more rows and so on????!please advice
06.08.2018 - 16:59
![]() Carrie napisała::
Carrie napisała::
On next row from RS, inc as follows: Inc 1 dc on each side of every marker (= 24 dc inc), repeat inc on every row from RS 3-3-4-6-7-9 times in total, then inc before every marker (= 12 dc inc), repeat inc on every row from RS 4-4-4-2-2-0 times in total I'm having trouble with this part. I did the 1st row but don't understand how many more rows I am supposed yo do or how exactly to increase... Can you please help?
31.07.2018 - 03:25Odpowiedź DROPS Design :
Dear Carrie, you will now increase for the round yoke 1 dc on each side of each marker (= 24 sts increased). Depending on your size you will work these increases on every row 3-3 times in total in size S and M, 4 times in total in size L, 6 times in total in size XL, 7 times in total in size XXL, 9 times in total in size XXXL. Then repeat these increase every other row 4 times in total in size S, M and L and 2 times in total in total in size XL and XXL (no increase every other row in the largest size). Happy crocheting!
31.07.2018 - 10:01
![]() Ellen napisała::
Ellen napisała::
Your explanation on the chains at beginning of pattern A1 is very confusing!! Looking through peoples questions you haven't answered simply you just say follow A1,A2,A3 then join. BUT the chain shows especially on bobble row. Does the starting point after the joins veer to left each time and not run vertically down the back of jumper? The start of the row of bobbles is particually confusing. To recap PLEASE explain starting chains IN VERY EASY DIALOGUE.
29.06.2018 - 18:03Odpowiedź DROPS Design :
Dear Ellen, you start either A.1 depending on the row with either 1, 3 or4 chains and finish each round with 1 sl st in the 1st, 3rd or 4th chain from beg of round. On the row with bobbles you start with 4 ch (then work 4 ch = 1st sch-space and 1 boblle, 3 ch = A.1) and finish with 1 sl st in the 4th ch from beg of round. Happy crocheting!
02.07.2018 - 08:49
![]() Sarah napisała::
Sarah napisała::
When doing the row before bobble it starts 3 chains then 2 chains 4 trebles 2 chains etc. At end of row 2 chains and sl st into previous 3 chains. I am left with a single line of chains where I have joined!!! Which doesn't look right! To recap- 4 trebles,2 Ch joined into 3 Ch at start which looks as if I have one line treble in the pattern. Please explain step by step where I am going wrong with the starting chains
28.06.2018 - 14:54Odpowiedź DROPS Design :
Dear Sarah, when working A.z you start round with A.1 and finish the round with A.3 = 2 chains at the end of last repeat before the sl st joining the beg of round. Happy crocheting!
28.06.2018 - 18:00
![]() Paula M napisała::
Paula M napisała::
Es muy enredada la explicación, mucha palabras, especialmente para el canesu, debieran colocar un video de cómo aumentar los puntos y especificar bien dónde comienzan los marcadores,los puntos se aumentan antes o después. Prefiero los patrones y no tanta letra sin sentido, dice repetir de *-* y ves cuentos de asteriscos(✴), al final no sabes de donde a dónde se repite!
27.06.2018 - 20:23
![]() Sarah napisała::
Sarah napisała::
WHEN STARTING THE PATTERN ARE THE 3 CHAINS AT BEGINNING TO BE USED AS THE FIRST TREBLE STITCH? IF NOT I AM CONFUSED ON WHAT TO DO WITH THEM AT THE JOINS????
26.06.2018 - 17:42Odpowiedź DROPS Design :
Dear Sarah, the 3 ch replace the first st at beg of row only when working piece back and forth, finish then each row with a sl st in the 3rd ch from beg of row, turn piece, work 3 ch at the beg of row and finish with 1 sl st in the 3rd ch from beg of round. When working diagrams, the first st in A.1 shows how to start and finish the round. Happy crocheting!
27.06.2018 - 08:19
![]() Yvonne napisała::
Yvonne napisała::
On lacey days jumper continuing with my previous question i cannot get neck size correct, far to wide and it is shoulder high not neck height?? i am determined to get it right but struggling how to do it!! i have unpicked it endlesss times! tension, chains and hook all correct!!!!
19.06.2018 - 15:14Odpowiedź DROPS Design :
Deaer Yvonne, see previous answer and check the number of chains and number of sts in your size. Hapy crocheting!
19.06.2018 - 15:54
![]() Yvonne napisała::
Yvonne napisała::
On lacey days jumper i am not getting on too good,!!!! I have correct amount of chains at the start,correct tension, i have just finished yoke, but the neck opening is far too big and it is too far down my back??? there is no way when i do neck edge it will be as high as the picture. what have i done wrong.?
19.06.2018 - 14:25Odpowiedź DROPS Design :
Dear Yvonne, at the very first round on yoke, you will skip chains evenly so that you should have 124-124-132-136-140-148 tr at the end of this first round over the 153-153-163-168-173-183 ch (this is to avoid that the foundation chain is too tight and prevent a tight neck edge). Happy crocheting!
19.06.2018 - 15:53
|
||||||||||||||||||||||||||||||||||
Lacey Days Jumper#laceydaysjumper |
||||||||||||||||||||||||||||||||||
 |
 |
|||||||||||||||||||||||||||||||||
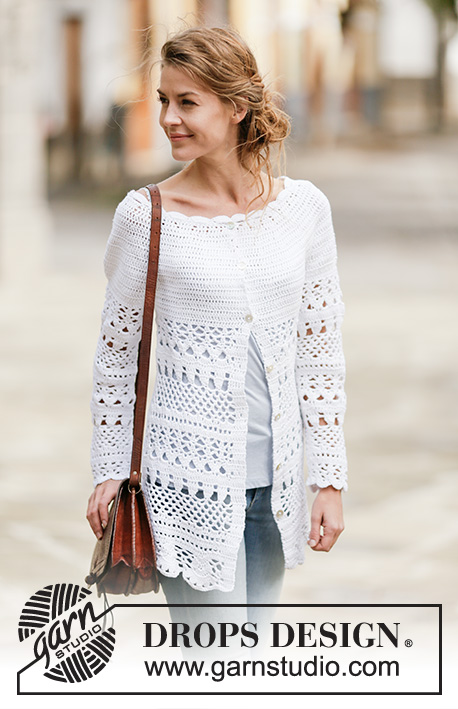
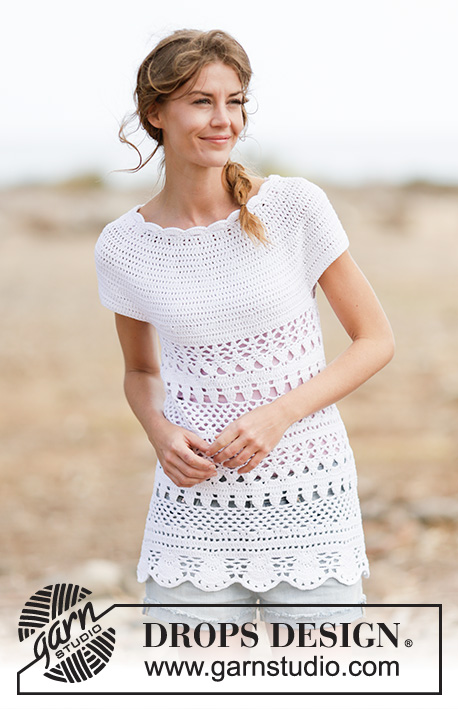
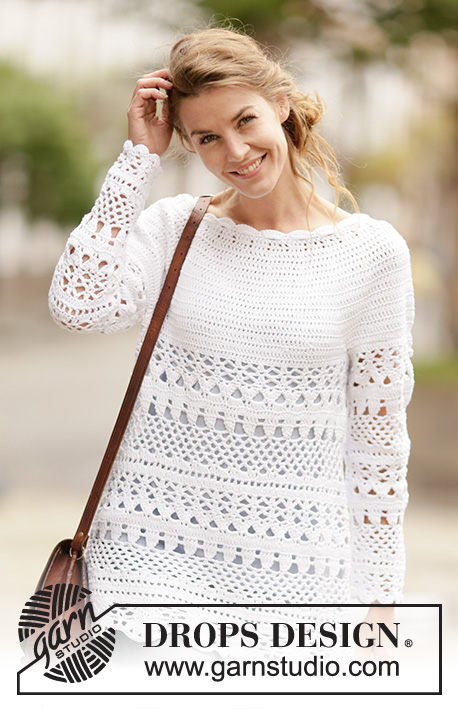
Sweter ażurowy DROPS na szydełku z zaokrąglonym karczkiem, przerabiany z góry na dół (top down), z włóczki DROPS Cotton Light. Od S do XXXL.
DROPS 162-27 |
||||||||||||||||||||||||||||||||||
|
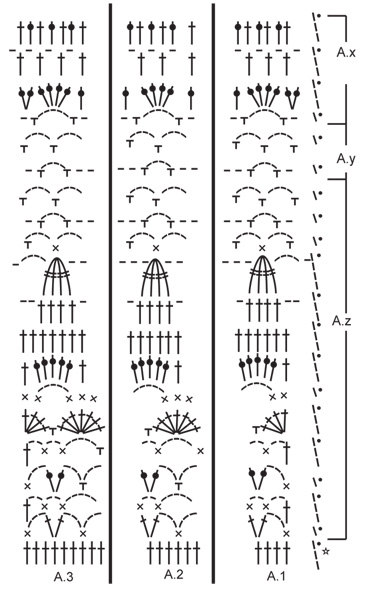
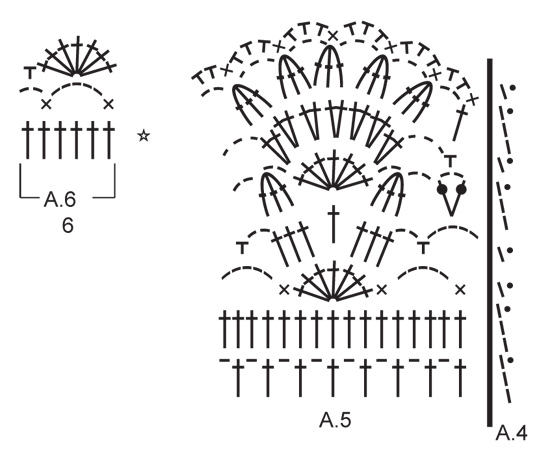
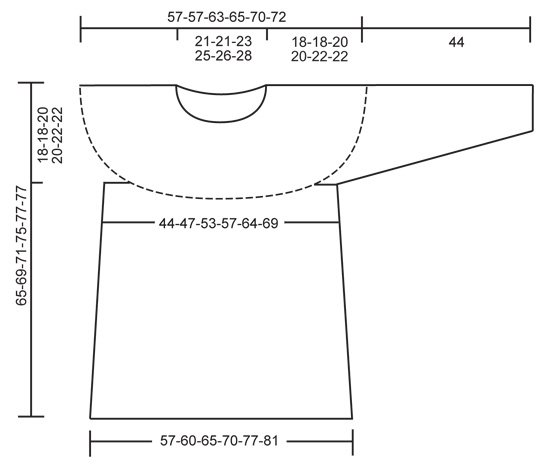
WSKAZÓWKA: Tylko podczas przerabiania w tę i z powrotem. Zastąpić 1-szy sł w każdym rzędzie sł przez 3 oł, zakończyć rząd przerabiając 1 oz w 3-cie oł. DODAWANIE OCZEK: Aby dodać 1 sł należy przer. 2 sł w 1 sł. ZAMYKANIE OCZEK: Przer. 1 sł ale nie wykonywać ost. narzutu (= 2 pętelki na szydełku), dalej przer. nast. sł, a po ost. narzucie przeciągnąć nitkę przez wszystkie pętelki na szydełku = 1 zamknięty sł. ŚCIEG FANTAZYJNY: Patrz schematy od A.1 do A.6 – schemat A.4 pokazuje jak zacząć i zakończyć motyw, gdy przerabiamy na okrągło. ---------------------------------------------------------- KARCZEK: Przerabiany z góry na dół, zaczynając od środka tyłu. Na szydełku nr 4 wykonać 153-153-163-168-173-183 oł włóczką Cotton Light i zamknąć na okrągło przerabiając 1 oz w 1-sze oł. Przer. kolejne okrążenie następująco: 3 oł (= 1 sł), 1 sł w 1-sze oł, 1 sł w każde z 2 nast. oł, *ominąć 1 oł, 1 sł w każde z 4 nast. oł*, powt. od *-* = 124-124-132-136-140-148 sł. Dalej przer. w tę i z powrotem. Zakończyć każdy rząd przerabiając 1 oz w 3-cie oł na pocz. rzędu. Obrócić. PATRZ WSKAZÓWKA! Umieścić 12 markerów następująco: przer. 15-15-17-18-19-21 sł, W TYM SAMYM CZASIE równomiernie dodać 1-5-3-3-4-2 sł – PATRZ DODAWANIE OCZEK, umieścić 1-szy marker, *przer. 4 sł, umieścić nast. marker*, powt. od *-* jeszcze 1 raz, przer. 16 sł, umieścić nast. marker, *przer. 4 sł, umieścić nast. marker*, powt. od *-* jeszcze 1 raz, przer. 30-30-34-36-38-42 sł, W TYM SAMYM CZASIE równomiernie dodać 2-10-6-6-8-4 sł, umieścić nast. marker, *przer. 4 sł, umieścić nast. marker*, powt. od *-* jeszcze 1 raz, przer. 16 sł, umieścić nast. marker, *przer. 4 sł, umieścić nast. marker*, powt. od *-* jeszcze 1 raz, przer. 15-15-17-18-19-21 sł, W TYM SAMYM CZASIE równomiernie dodać 1-5-3-3-4-2 sł = 128-144-144-148-156-156 sł. ZACHOWAĆ TAKIE SAME NAPRĘŻENIE NICI JAK W PRZYPADKU PRÓBKI! Obrócić. W nast. rzędzie na prawej stronie robótki dodawać o. następująco: dodać 1 sł z każdej strony każdego markera (= 24 dodanych sł), powt. dodawanie o. w każdym rzędzie na prawej stronie robótki w sumie 3-3-4-6-7-9 razy. Dalej dodać o. przed każdym markerem (= 12 dodanych sł), powt. dodawanie o. w każdym rzędzie na prawej stronie robótki w sumie 4-4-4-2-2-0 razy = 248-264-288-316-348-372 sł. Dł. robótki wynosi ok. 17-17-19-19-21-21 cm. W nast. okrążeniu przer. następująco: 35-38-42-47-53-57 sł (połowa tyłu), 8 oł (podkrój rękawa), ominąć 54-56-60-64-68-72 sł poprzedniego rzędu (następnie użyte na rękaw), 70-76-84-94-106-114 sł, W TYM SAMYM CZASIE równomiernie dodać 1-1-3-1-1-3 sł (przód), 8 oł (podkrój rękawa), ominąć 54-56-60-64-68-72 sł poprzedniego rzędu (następnie użyte na rękaw) i 35-38-42-47-53-57 sł (połowa tyłu) = 157-169-187-205-229-247 sł/oł. Przer. teraz na okrągło, bez obracania robótki. Dalej przer. następująco: A.1, w sumie 24-26-29-32-36-39 razy schemat A.2 na szerokość i zakończyć przerabiając schemat A.3. Przer. 7 pierwszych okr. schematu A.z. W 8-mym okr. schematu A.z (= 1 okr. sł) równomiernie dodać 6 sł – PATRZ DODAWANIE OCZEK = 163-175-193-211-235-253 sł. Dalej przer. schemat A.z jak wcześniej ale przer. teraz 25-27-30-33-37-40 razy schemat A.2 na szerokość. Gdy schemat A.z zostanie przerobiony 1 raz na wysokość, przer. w sumie 1-2-2-3-3-3 razy na wysokość schemat A.y ponad schematem A.z. Dalej przer. A.x ponad schematem A.y. W 2-gim okr. schematu A.x równomiernie dodać 12 sł = 175-187-205-223-247-265 sł. Dalej przer. schemat A.x jak wcześniej, ale przer. teraz 27-29-32-35-39-42 razy schemat A.2 na szerokość. W ost. okrążeniu schematu A.x równomiernie dodać 6 sł = 181-193-211-229-253-271 sł. Dalej przer. schemat A.z ponad schematem A.x (przer. teraz 28-30-33-36-40-43 razy schemat A.2 na szerokość). W 8-mym okr. schematu A.z równomiernie dodać 12 sł = 193-205-223-241-265-283 sł. Dalej przer. schemat A.z jak wcześniej, ale przer. teraz 30-32-35-38-42-45 razy schemat A.2 na szerokość. Gdy schemat A.z zostanie przerobiony 1 raz na wysokość, przer. w sumie 1-2-2-3-3-3 razy na wysokość schemat A.y ponad schematem A.z. Dalej przer. schemat A.x ponad schematem A.y. W 2-gim okr. schematu A.x równomiernie dodać 6 sł = 199-211-229-247-271-289 sł. Dalej przer. schemat A.x jak wcześniej, ale przer. teraz 31-33-36-39-43-46 razy schemat A.2 na szerokość. W ost. okrążeniu schematu A.x równomiernie dodać 9-13-11-9-17-15 sł = 208-224-240-256-288-304 sł. Dalej przer. następująco: w sumie 13-14-15-16-18-19 razy schemat A.5 (A.4 pokazuje jak zacząć i zakończyć każde okrążenie). Zakończyć gdy schemat A.5 zostanie przerobiony 1 raz na wysokość. Dł. robótki wynosi ok. 65-69-71-75-77-77 cm. RĘKAWY: Rękawy są przerabiane na okrągło, z góry na dół. Zacząć na środku pod rękawem następująco: 1 psł w 5-te z 8 oł przerobionych na podkrój rękawa, 3 oł (= 1 sł), dalej 1 sł w każde z 3 nast. oł, 1 sł w każdy sł ponad rękawem, W TYM SAMYM CZASIE równomiernie zamknąć 1-3-1-5-3-1 sł – PATRZ ZAMYKANIE OCZEK, i 1 sł w każde z 4 pozostałych oł pod rękawem = 61-61-67-67-73-79 sł. Dalej przer. następująco: A.1, 8-8-9-9-10-11 razy schemat A.2 na szerokość, zakończyć przerabiając schemat A.3. W 8-mym okr. schematu A.z (= 1 okr. sł) równomiernie zamknąć 6 sł = 55-55-61-61-67-73 sł. Dalej przer. schemat A.z jak wcześniej, ale przer. teraz 7-7-8-8-9-10 razy schemat A.2 na szerokość. Gdy schemat A.z zostanie przerobiony 1 raz na wysokość, przer. A.y ponad schematem A.z. Gdy schemat A.y zostanie przerobiony 1 raz na wysokość, przer. A.x ponad schematem A.y. W ost. okrążeniu schematu A.x równomiernie zamknąć 6 sł = 49-49-55-55-61-67 sł. Dalej przer. schemat A.z ponad schematem A.x. Schemat A.2 jest teraz przerabiany 6-6-7-7-8-9 razy na szerokość. W 8-mym okr. równomiernie zamknąć 6 sł = 43-43-49-49-55-61 sł. Gdy schemat A.z zostanie przerobiony 1 raz na wysokość, przer. A.y ponad schematem A.z. Dalej przer. A.x ponad schematem A.y. W ost. okrążeniu schematu A.x równomiernie zamknąć 0-0-0-0-6-6 sł = 43-43-49-49-49-55 sł. Dalej przer. 5 pierwszych okr. schematu A.z. Schemat A.2 jest teraz przerobiony 5-5-6-6-6-7 razy na szerokość. Zakończyć. Dł. rękawa wynosi ok. 44 cm dla każdego rozmiaru. Drugi rękaw wykonać w taki sam sposób. WYKOŃCZENIE DEKOLTU: Przerabiane na okrągło. Wykonać 1 brzeg wokół dekoltu, przerabiając w łańcuszek początkowy na szydełku nr 4 włóczką Cotton Light, zaczynając na środku tyłu, na prawej stronie robótki następująco: 114-114-120-120-126-126 sł w łańcuszek, dalej przer. 19-19-20-20-21-21 razy schemat A.6 na szerokość. Zakończyć. |
||||||||||||||||||||||||||||||||||
Objaśnienia do schematu |
||||||||||||||||||||||||||||||||||
|
||||||||||||||||||||||||||||||||||
 |
||||||||||||||||||||||||||||||||||
 |
||||||||||||||||||||||||||||||||||
 |
||||||||||||||||||||||||||||||||||
Skończyłaś ten wzór?Otaguj swoje zdjęcia #dropspattern #laceydaysjumper lub prześlij je do #dropsfan gallery. Potrzebujesz pomocy w związku z tym wzorem?Zobacz 14 instrukcje video, sekcję Komentarze/Pytania i jeszcze więcej, wchodząc na stronę wzoru na garnstudio.com © 1982-2026 DROPS Design A/S. Wszelkie prawa zastrzeżone. Ten dokument, w całości, jest chroniony prawem. Zobacz co możesz robić z naszymi wzorami na dole każdego wzoru na naszej stronie. |
||||||||||||||||||||||||||||||||||


Posiadając 40 lat doświadczenia w projektowaniu wzorów na druty i szydełko, DROPS Design oferuje jedną z największych kolekcji bezpłatnych wzorów w internecie – przetłumaczonych na 17 języków. Obecnie jest dostępnych 324 katalogów i 12290 wzorów w języku polskim.
Dokładamy wszelkich starań, aby oferować Wam druty i szydełka, inspiracje, fachowe porady oraz doskonałej jakości włóczki w najlepszych cenach! Zamierzasz wykorzystać nasze wzory inaczej niż tylko do osobistego użytku? Przeczytaj jakie masz prawa w Copyright, który znajdziesz na końcu każdego wzoru. Miłej pracy!
Dodaj komentarz do modelu DROPS 162-27
Chcielibyśmy się dowiedzieć co masz do powiedzenia o tym wzorze!
Jeśli chcesz zadać pytanie i szybko uzyskać odpowiedź, upewnij się, że została wybrana właściwa kategoria w formularzu poniżej. Pola obowiązkowe są oznaczone *.